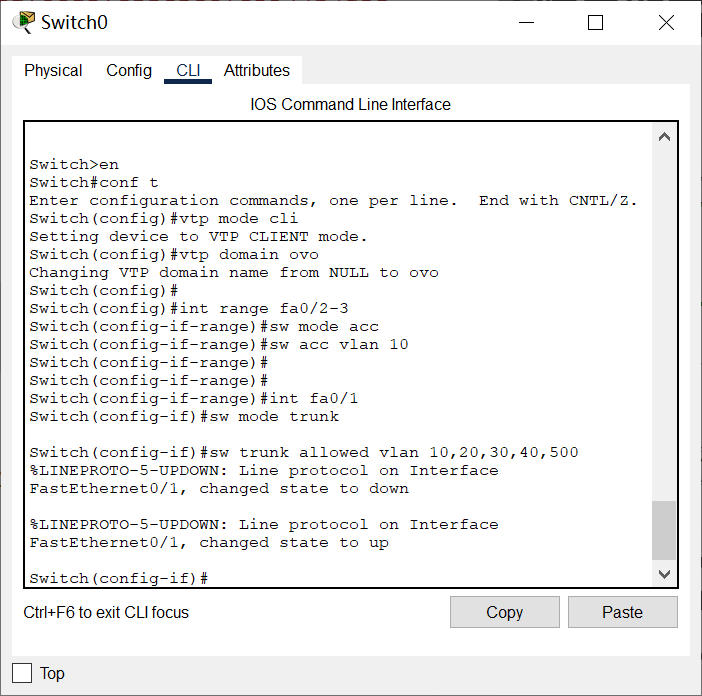
Switch>en Switch#conf t Enter configuration commands, one per line. End with CNTL/Z. Switch(config)#vtp mode client Setting device to VTP CLIENT mode. Switch(config)#vtp domain crazy-friday Changing VTP domain name from NULL to crazy-friday Switch(config)#vtp password crazy Setting device VLAN database password to crazy
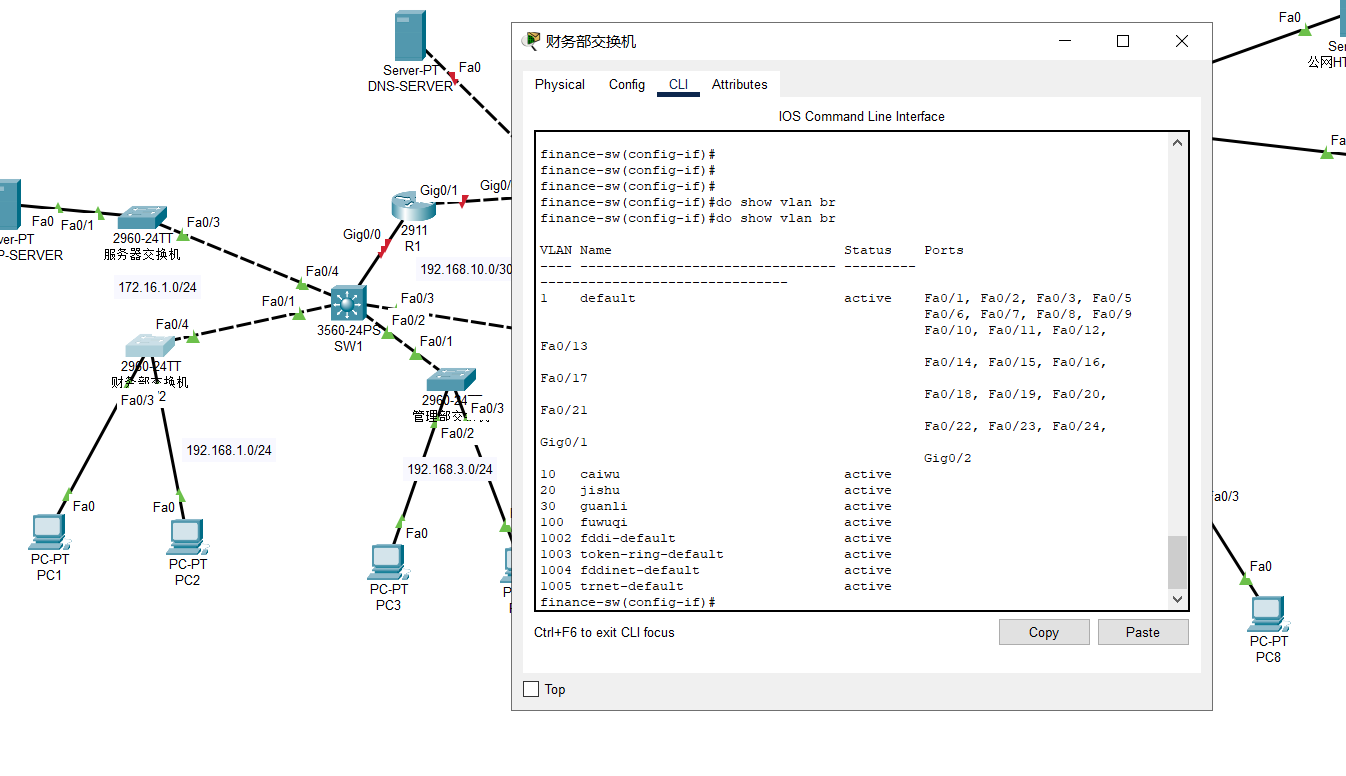
finance-sw(config-if)#int range fa0/1,fa0/2,fa0/3,fa0/5-24 finance-sw(config-if-range)#sw mode access finance-sw(config-if-range)#sw ac vlan 10 finance-sw(config-if-range)#do show vlan br
VLAN Name Status Ports ---- -------------------------------- --------- ------------------------------- 1 default active Gig0/1, Gig0/2 10 caiwu active Fa0/1, Fa0/2, Fa0/3, Fa0/5 Fa0/6, Fa0/7, Fa0/8, Fa0/9 Fa0/10, Fa0/11, Fa0/12, Fa0/13 Fa0/14, Fa0/15, Fa0/16, Fa0/17 Fa0/18, Fa0/19, Fa0/20, Fa0/21 Fa0/22, Fa0/23, Fa0/24 20 jishu active 30 guanli active 100 fuwuqi active 1002 fddi-default active 1003 token-ring-default active 1004 fddinet-default active 1005 trnet-default active finance-sw(config-if-range)#
Switch>en Switch#conf t Enter configuration commands, one per line. End with CNTL/Z. Switch(config)#hostname manage-sw manage-sw(config)#int fa 0/1 manage-sw(config-if)#sw mode trunk %LINEPROTO-5-UPDOWN: Line protocol on Interface FastEthernet0/1, changed state to down %LINEPROTO-5-UPDOWN: Line protocol on Interface FastEthernet0/1, changed state to up manage-sw(config-if)#do show vlan br
VLAN Name Status Ports ---- -------------------------------- --------- ------------------------------- 1 default active Fa0/2, Fa0/3, Fa0/4, Fa0/5 Fa0/6, Fa0/7, Fa0/8, Fa0/9 Fa0/10, Fa0/11, Fa0/12, Fa0/13 Fa0/14, Fa0/15, Fa0/16, Fa0/17 Fa0/18, Fa0/19, Fa0/20, Fa0/21 Fa0/22, Fa0/23, Fa0/24, Gig0/1 Gig0/2 1002 fddi-default active 1003 token-ring-default active 1004 fddinet-default active 1005 trnet-default active manage-sw(config-if)# manage-sw(config-if)#vtp mode client Setting device to VTP CLIENT mode. manage-sw(config)#vtp domain crazy-friday Domain name already set to crazy-friday. manage-sw(config)#vtp password crazy Setting device VLAN database password to crazy
manage-sw(config)#do show vlan br
VLAN Name Status Ports ---- -------------------------------- --------- ------------------------------- 1 default active Fa0/2, Fa0/3, Fa0/4, Fa0/5 Fa0/6, Fa0/7, Fa0/8, Fa0/9 Fa0/10, Fa0/11, Fa0/12, Fa0/13 Fa0/14, Fa0/15, Fa0/16, Fa0/17 Fa0/18, Fa0/19, Fa0/20, Fa0/21 Fa0/22, Fa0/23, Fa0/24, Gig0/1 Gig0/2 10 caiwu active 20 jishu active 30 guanli active 100 fuwuqi active 1002 fddi-default active 1003 token-ring-default active 1004 fddinet-default active 1005 trnet-default active manage-sw(config)#
manage-sw(config)#int range fa0/2-fa0/24 manage-sw(config-if-range)#sw mode access manage-sw(config-if-range)#sw ac vlan 30 manage-sw(config-if-range)#do show vlan br
VLAN Name Status Ports ---- -------------------------------- --------- ------------------------------- 1 default active Gig0/1, Gig0/2 10 caiwu active 20 jishu active 30 guanli active Fa0/2, Fa0/3, Fa0/4, Fa0/5 Fa0/6, Fa0/7, Fa0/8, Fa0/9 Fa0/10, Fa0/11, Fa0/12, Fa0/13 Fa0/14, Fa0/15, Fa0/16, Fa0/17 Fa0/18, Fa0/19, Fa0/20, Fa0/21 Fa0/22, Fa0/23, Fa0/24 100 fuwuqi active 1002 fddi-default active 1003 token-ring-default active 1004 fddinet-default active 1005 trnet-default active manage-sw(config-if-range)#
Switch>en Switch#conf t Enter configuration commands, one per line. End with CNTL/Z. Switch(config)#hostname tech-sw tech-sw(config)#vtp mode client Setting device to VTP CLIENT mode. tech-sw(config)#vtp domain crazy-friday Changing VTP domain name from NULL to crazy-friday tech-sw(config)#vtp password crazy Setting device VLAN database password to crazy tech-sw(config)#do show vlan br
VLAN Name Status Ports ---- -------------------------------- --------- ------------------------------- 1 default active Fa0/1, Fa0/2, Fa0/3, Fa0/4 Fa0/5, Fa0/6, Fa0/7, Fa0/8 Fa0/9, Fa0/10, Fa0/11, Fa0/12 Fa0/13, Fa0/14, Fa0/15, Fa0/16 Fa0/17, Fa0/18, Fa0/19, Fa0/20 Fa0/21, Fa0/22, Fa0/23, Fa0/24 Gig0/1, Gig0/2 1002 fddi-default active 1003 token-ring-default active 1004 fddinet-default active 1005 trnet-default active
tech-sw(config)#int g0/1 tech-sw(config-if)#sw mode tr tech-sw(config-if)#sw mode trunk %LINEPROTO-5-UPDOWN: Line protocol on Interface GigabitEthernet0/1, changed state to down %LINEPROTO-5-UPDOWN: Line protocol on Interface GigabitEthernet0/1, changed state to up tech-sw(config-if)#dis vlan br tech-sw(config-if)#do show vlan br
VLAN Name Status Ports ---- -------------------------------- --------- ------------------------------- 1 default active Fa0/1, Fa0/2, Fa0/3, Fa0/4 Fa0/5, Fa0/6, Fa0/7, Fa0/8 Fa0/9, Fa0/10, Fa0/11, Fa0/12 Fa0/13, Fa0/14, Fa0/15, Fa0/16 Fa0/17, Fa0/18, Fa0/19, Fa0/20 Fa0/21, Fa0/22, Fa0/23, Fa0/24 Gig0/2 1002 fddi-default active 1003 token-ring-default active 1004 fddinet-default active 1005 trnet-default active tech-sw(config-if)#int range fa0/1-24 tech-sw(config-if-range)#sw mode access tech-sw(config-if-range)#sw ac vlan 30 tech-sw(config-if-range)#sw ac vlan 20 tech-sw(config-if-range)#do show vlan br
VLAN Name Status Ports ---- -------------------------------- --------- ------------------------------- 1 default active Gig0/2 10 caiwu active 20 jishu active Fa0/1, Fa0/2, Fa0/3, Fa0/4 Fa0/5, Fa0/6, Fa0/7, Fa0/8 Fa0/9, Fa0/10, Fa0/11, Fa0/12 Fa0/13, Fa0/14, Fa0/15, Fa0/16 Fa0/17, Fa0/18, Fa0/19, Fa0/20 Fa0/21, Fa0/22, Fa0/23, Fa0/24 30 guanli active 100 fuwuqi active 1002 fddi-default active 1003 token-ring-default active 1004 fddinet-default active 1005 trnet-default active tech-sw(config-if-range)#
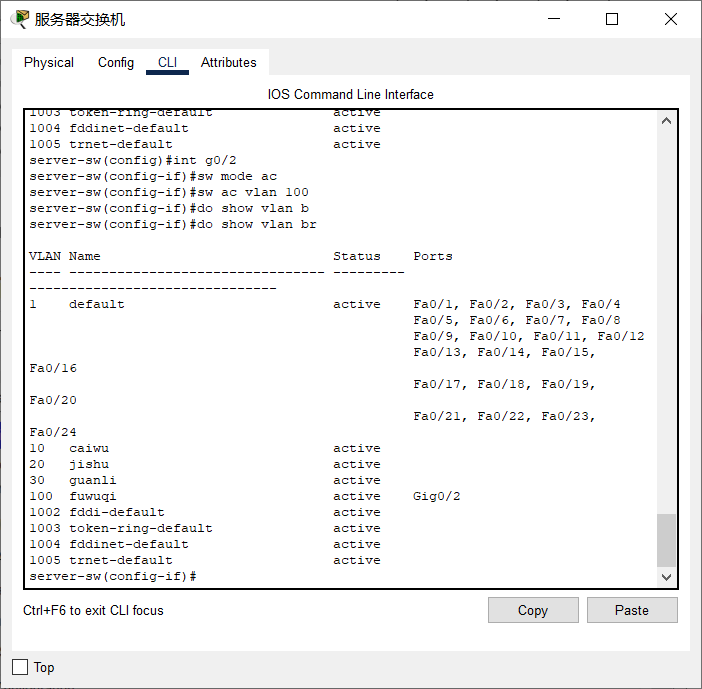
Switch#en Switch#conf t Enter configuration commands, one per line. End with CNTL/Z. Switch(config)#hostname server-sw server-sw(config)#int g0/1 server-sw(config-if)#sw mode tr server-sw(config-if)#sw mode trunk %LINEPROTO-5-UPDOWN: Line protocol on Interface GigabitEthernet0/1, changed state to down %LINEPROTO-5-UPDOWN: Line protocol on Interface GigabitEthernet0/1, changed state to up server-sw(config-if)#vtp mode client Setting device to VTP CLIENT mode. server-sw(config)#vtp domain crazy-friday Domain name already set to crazy-friday. server-sw(config)#vtp password crazy Setting device VLAN database password to crazy server-sw(config)#do show vlan br
VLAN Name Status Ports ---- -------------------------------- --------- ------------------------------- 1 default active Fa0/1, Fa0/2, Fa0/3, Fa0/4 Fa0/5, Fa0/6, Fa0/7, Fa0/8 Fa0/9, Fa0/10, Fa0/11, Fa0/12 Fa0/13, Fa0/14, Fa0/15, Fa0/16 Fa0/17, Fa0/18, Fa0/19, Fa0/20 Fa0/21, Fa0/22, Fa0/23, Fa0/24 Gig0/2 10 caiwu active 20 jishu active 30 guanli active 100 fuwuqi active 1002 fddi-default active 1003 token-ring-default active 1004 fddinet-default active 1005 trnet-default active server-sw(config)#int g0/2 server-sw(config-if)#sw mode ac server-sw(config-if)#sw ac vlan 100 server-sw(config-if)#do show vlan br
VLAN Name Status Ports ---- -------------------------------- --------- ------------------------------- 1 default active Fa0/1, Fa0/2, Fa0/3, Fa0/4 Fa0/5, Fa0/6, Fa0/7, Fa0/8 Fa0/9, Fa0/10, Fa0/11, Fa0/12 Fa0/13, Fa0/14, Fa0/15, Fa0/16 Fa0/17, Fa0/18, Fa0/19, Fa0/20 Fa0/21, Fa0/22, Fa0/23, Fa0/24 10 caiwu active 20 jishu active 30 guanli active 100 fuwuqi active Gig0/2 1002 fddi-default active 1003 token-ring-default active 1004 fddinet-default active 1005 trnet-default active server-sw(config-if)#
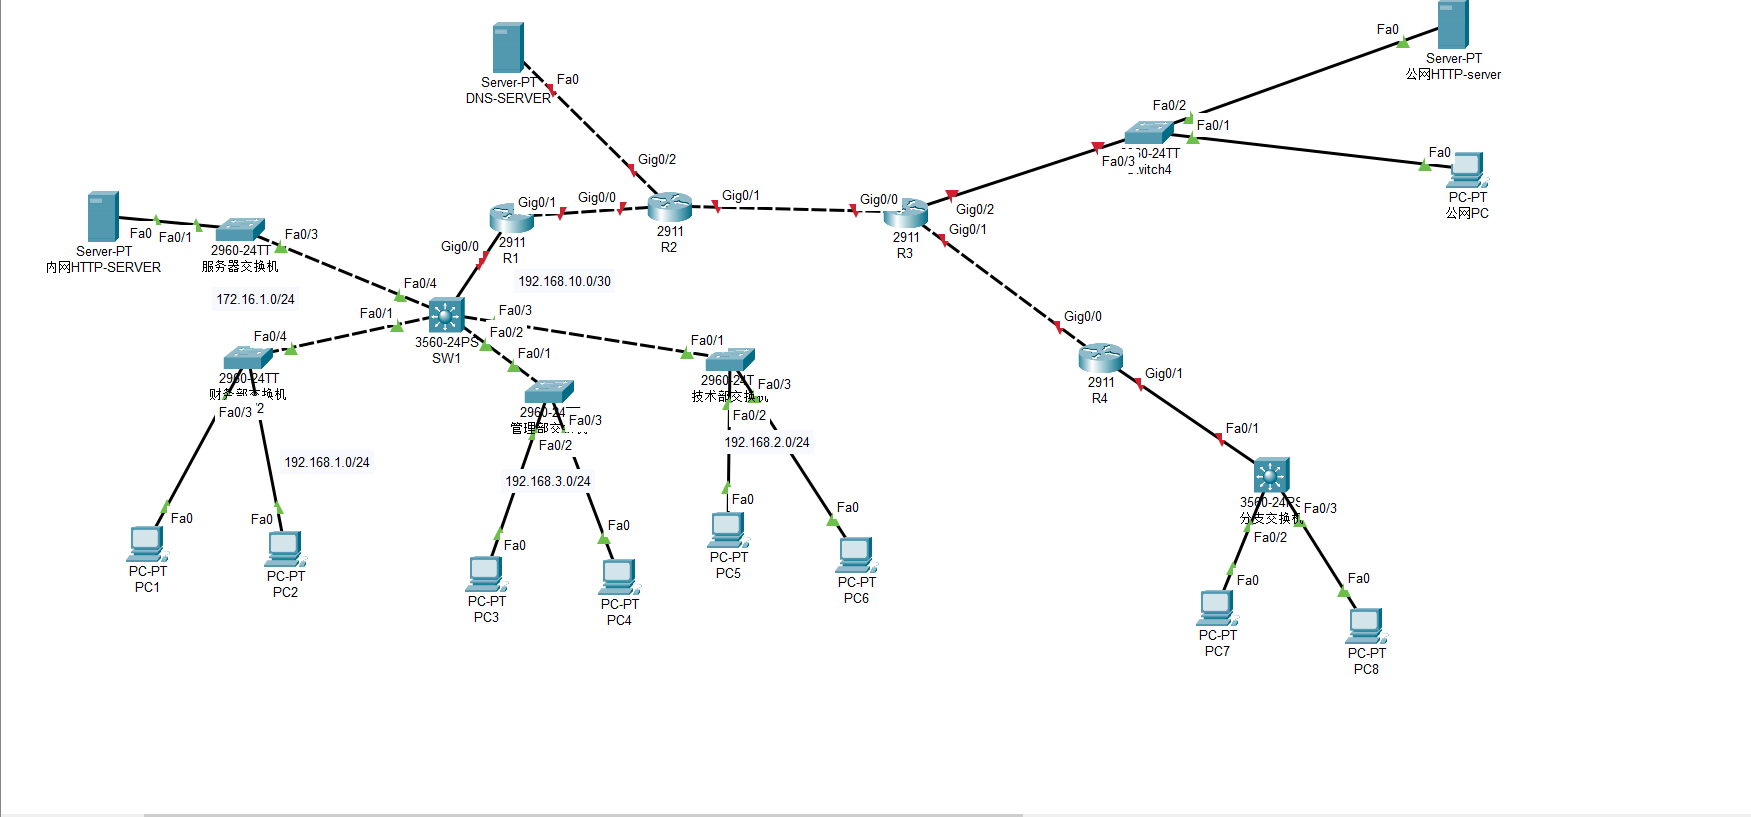
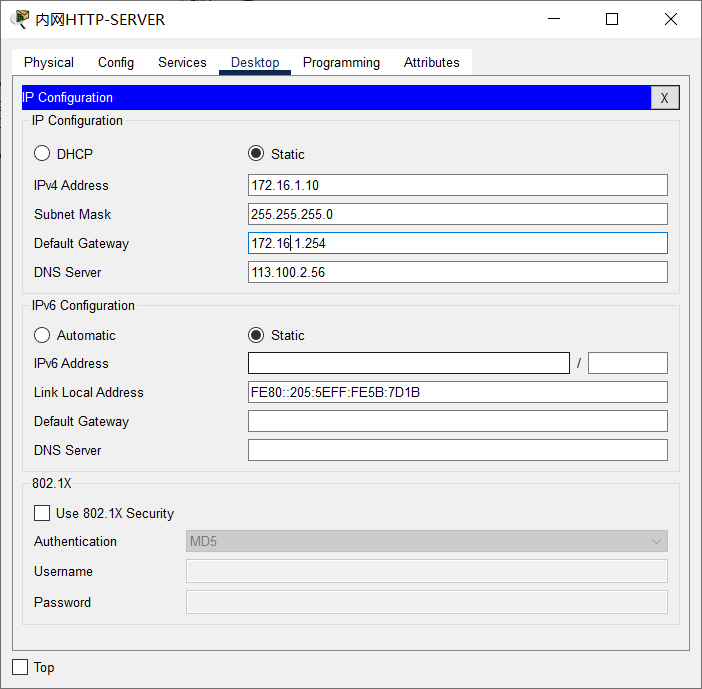
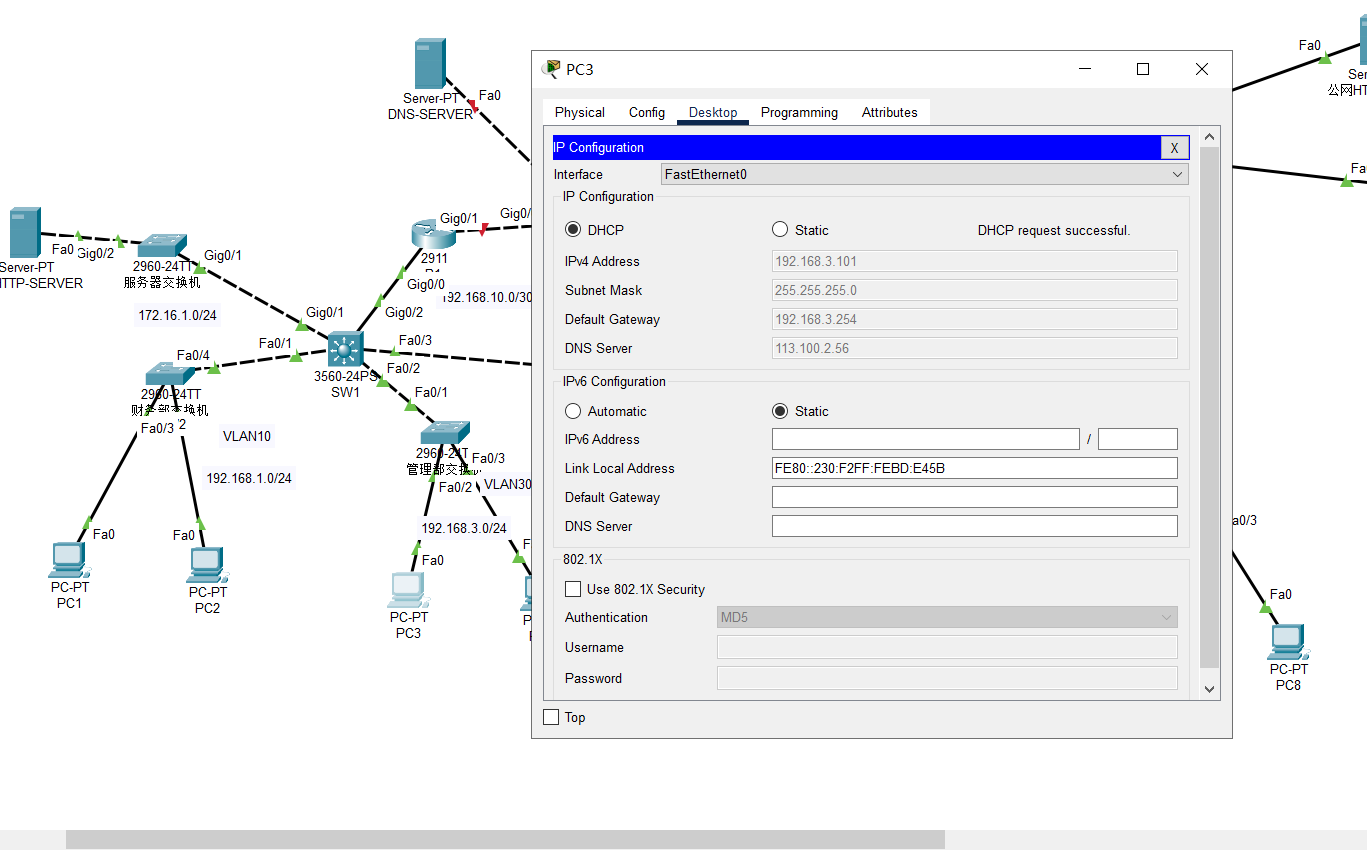
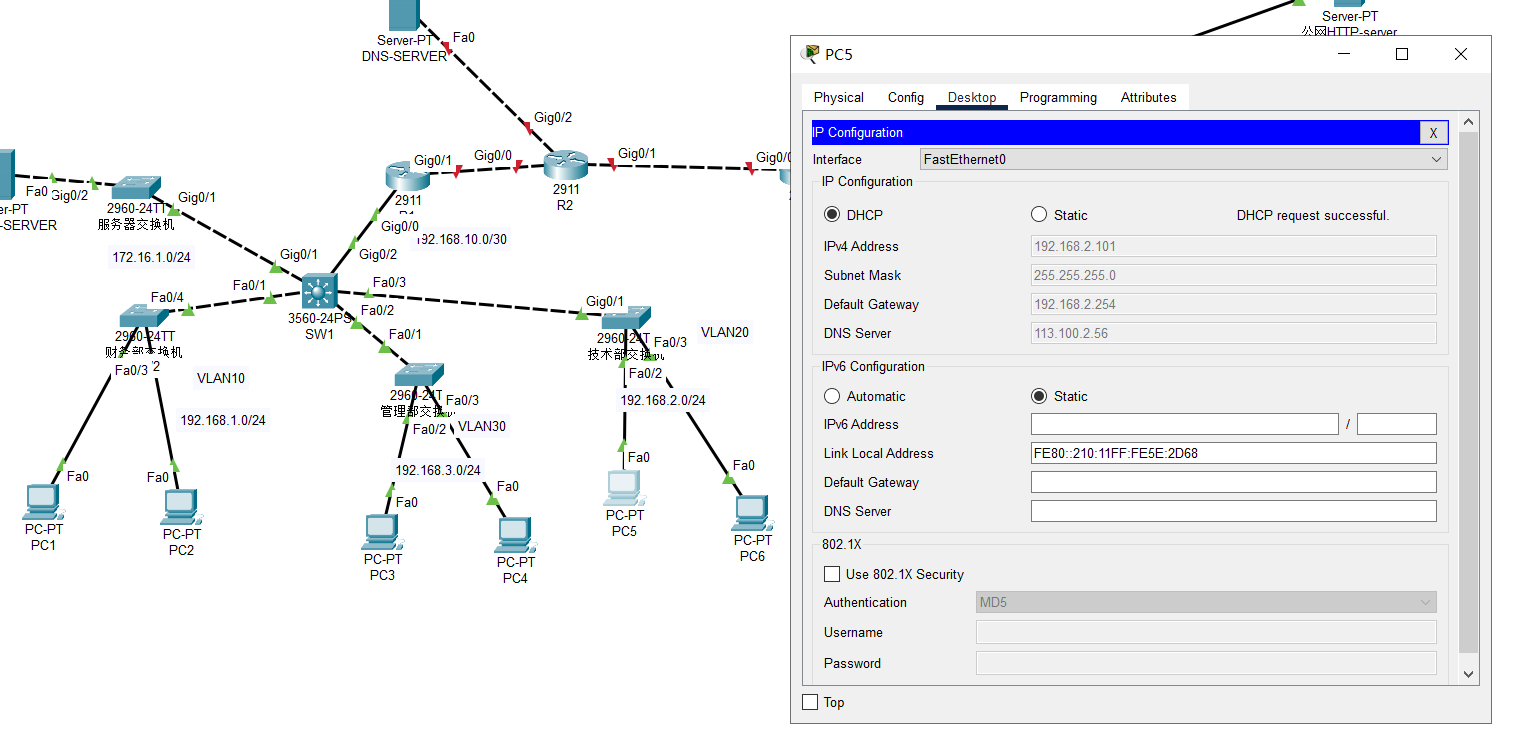
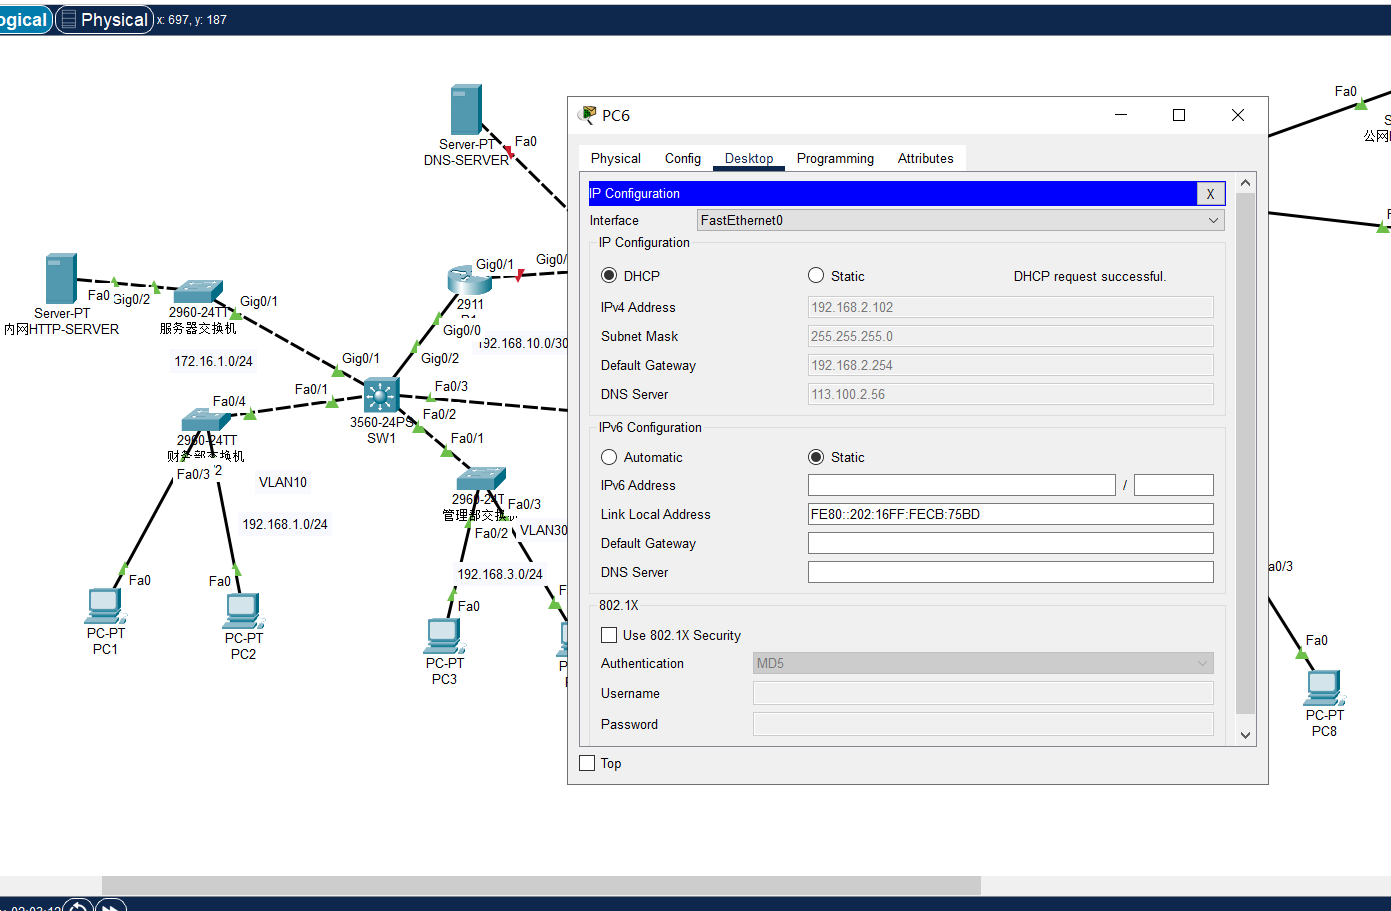
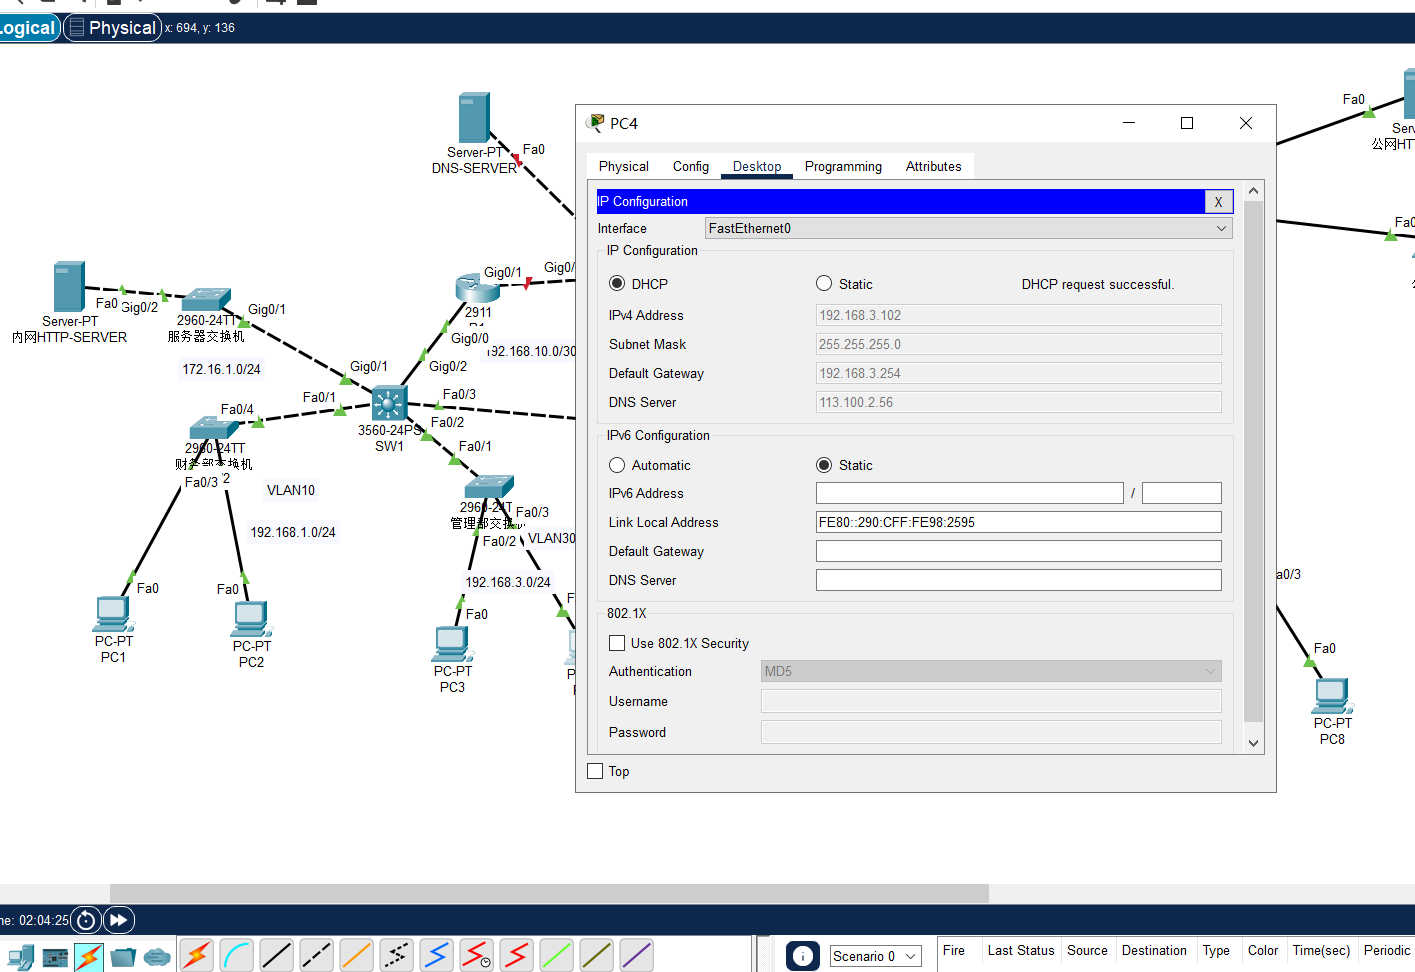
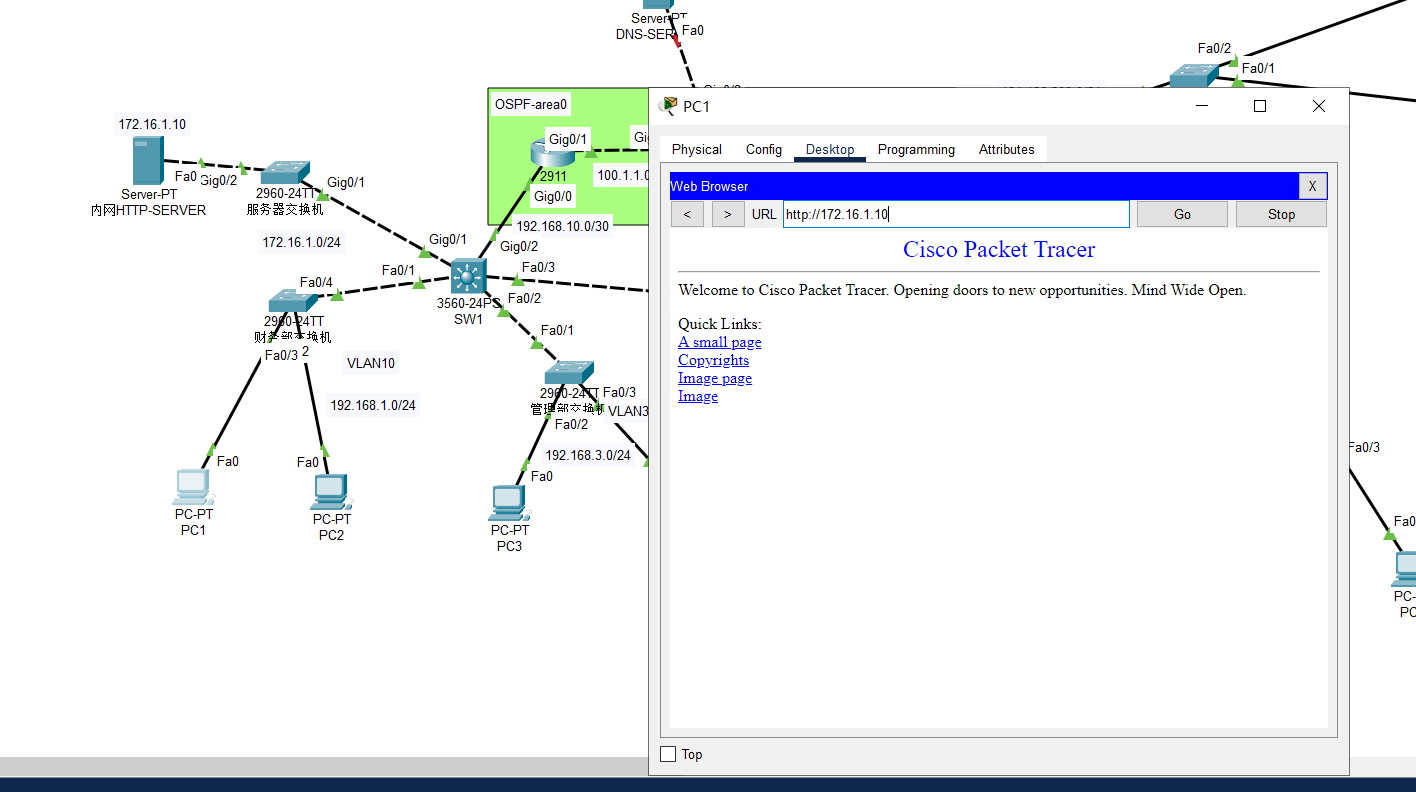
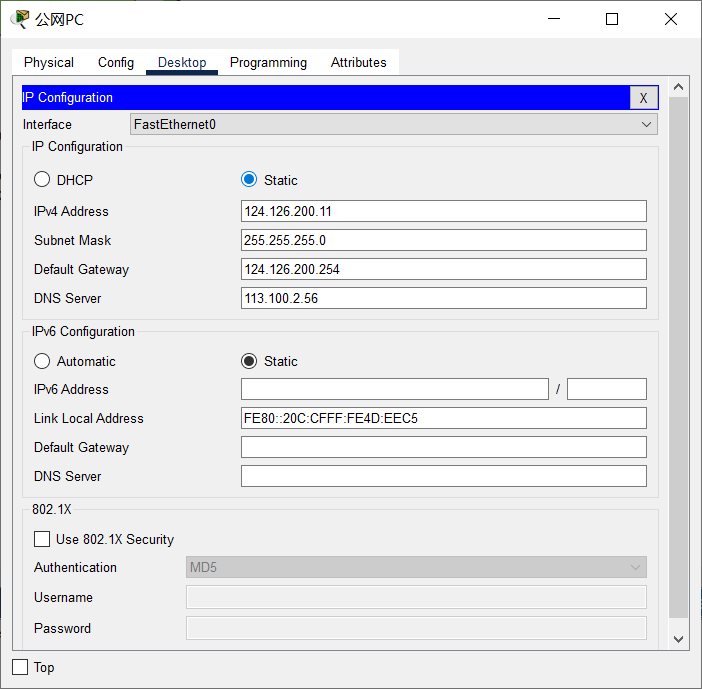
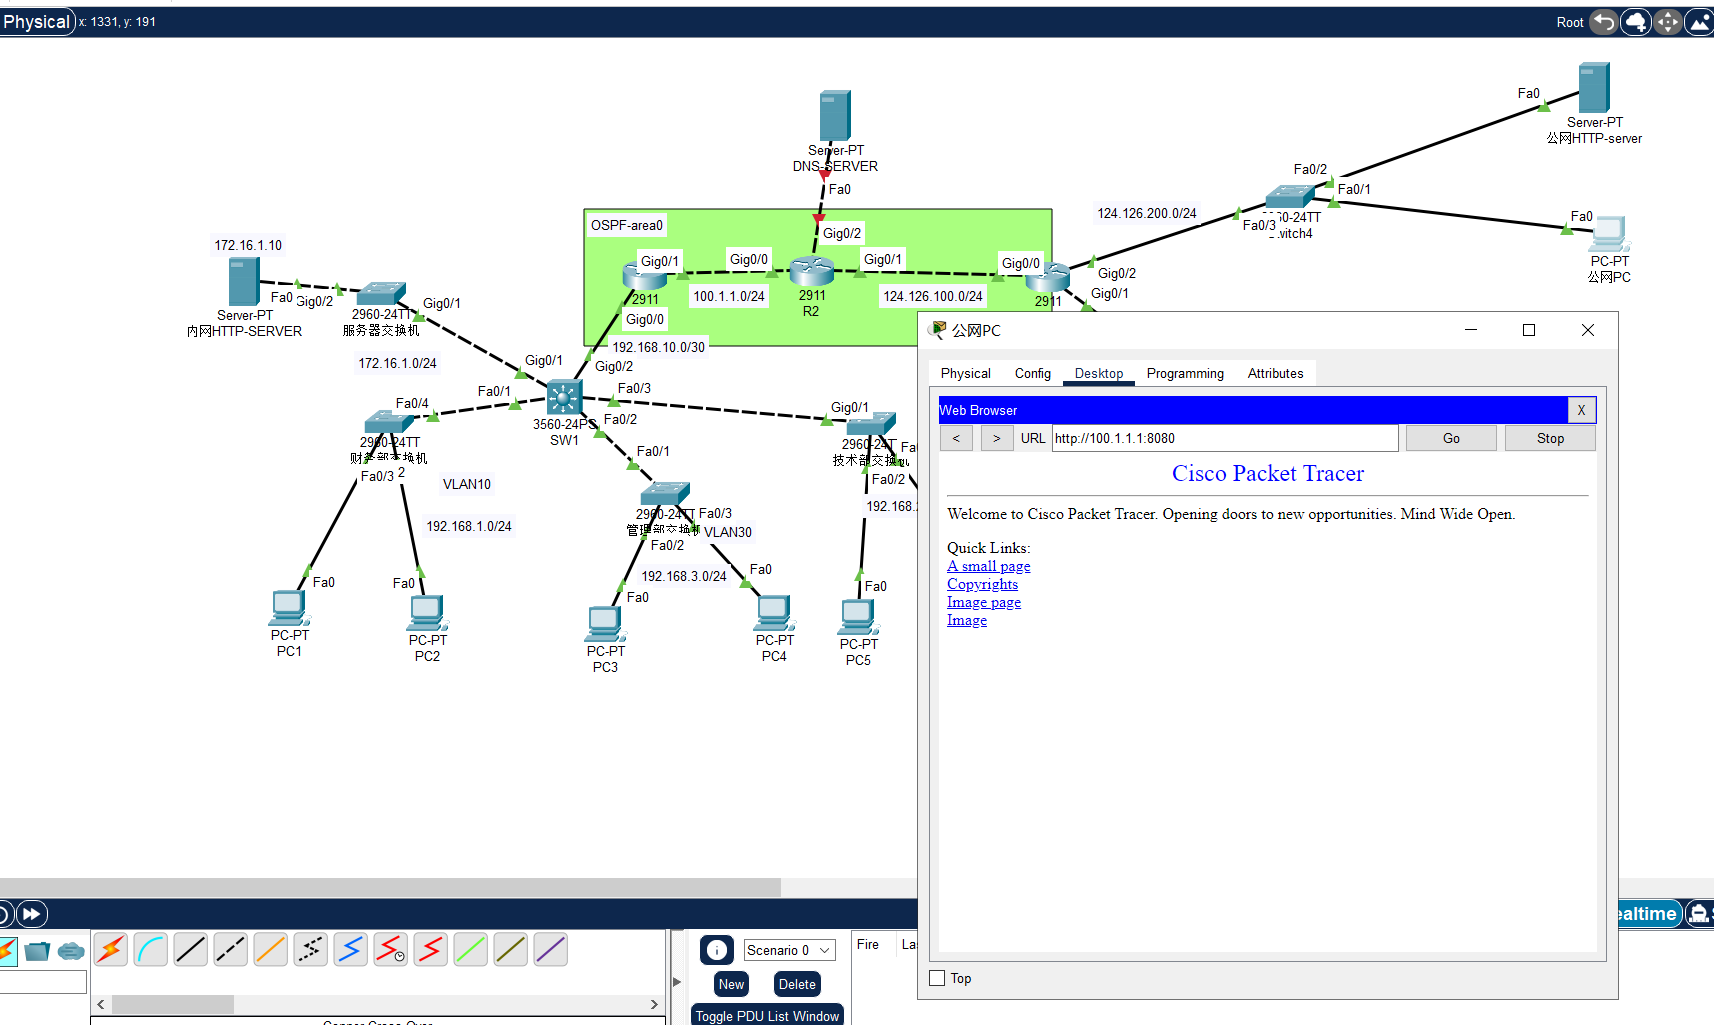
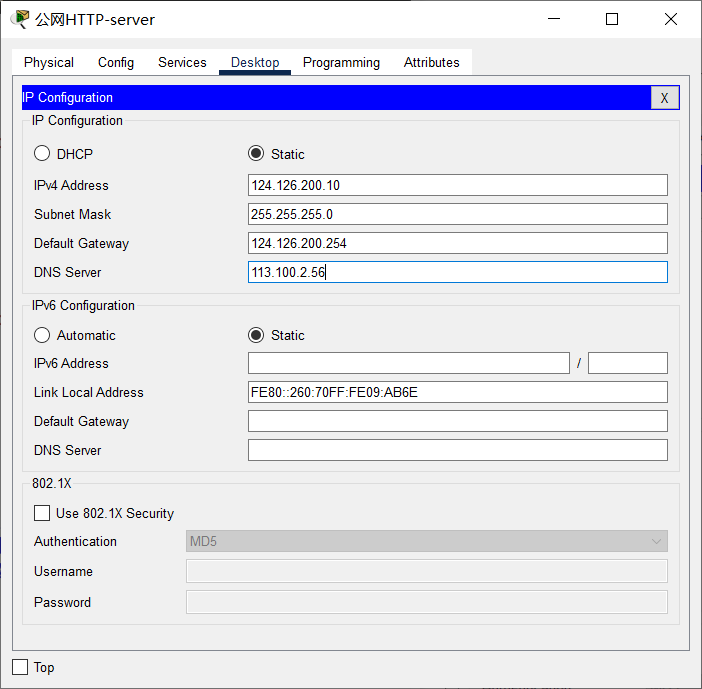
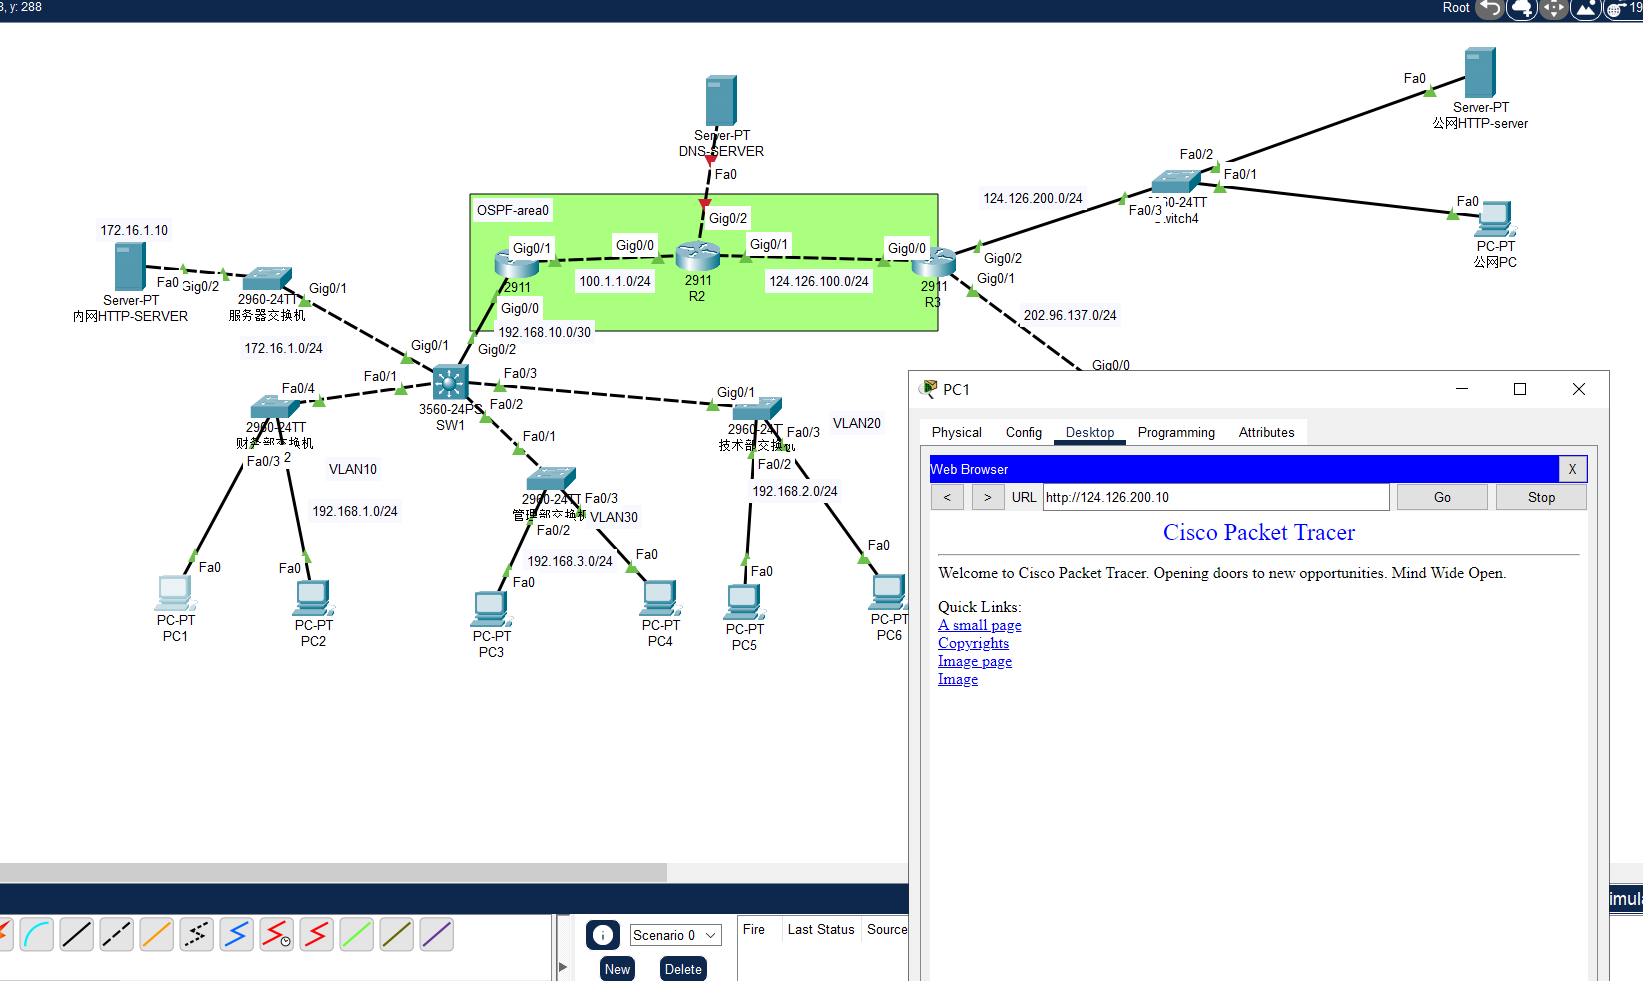
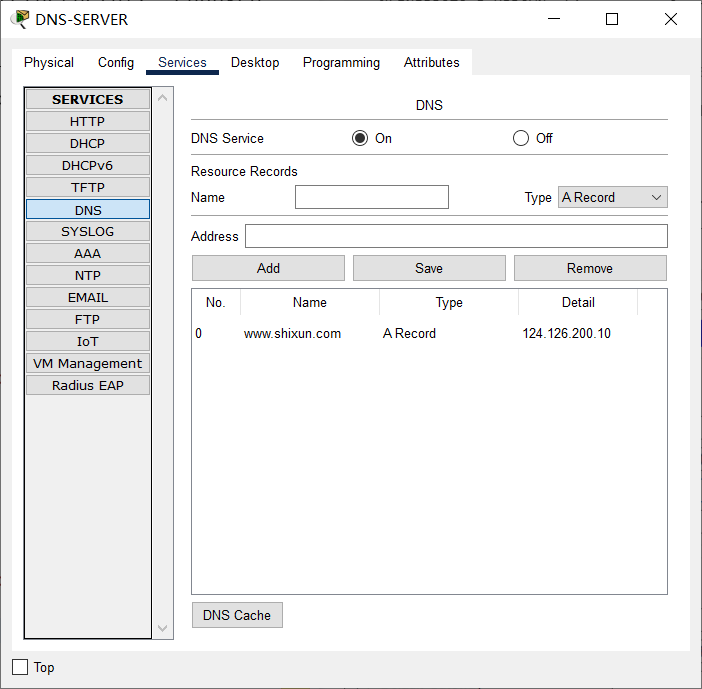
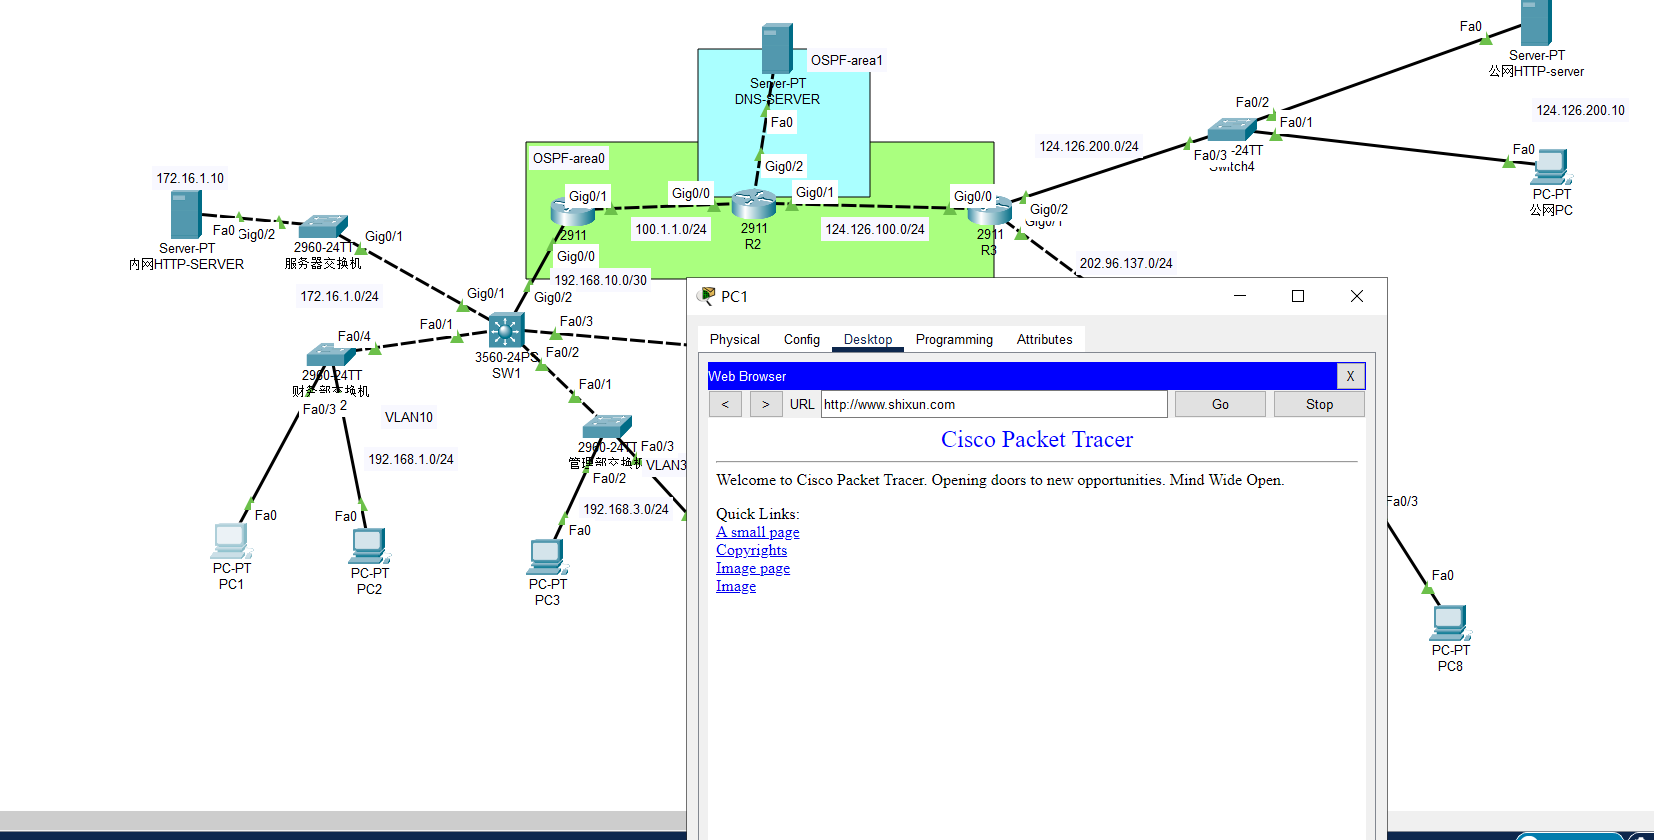
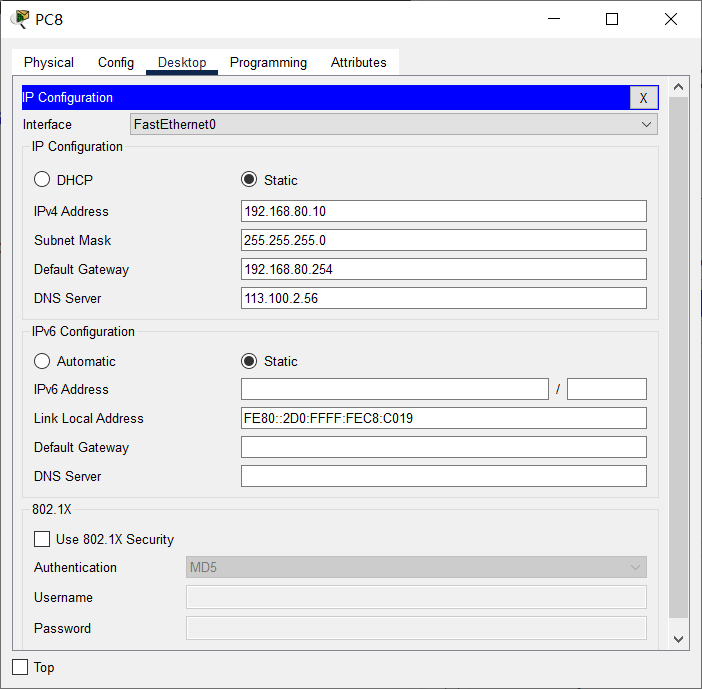
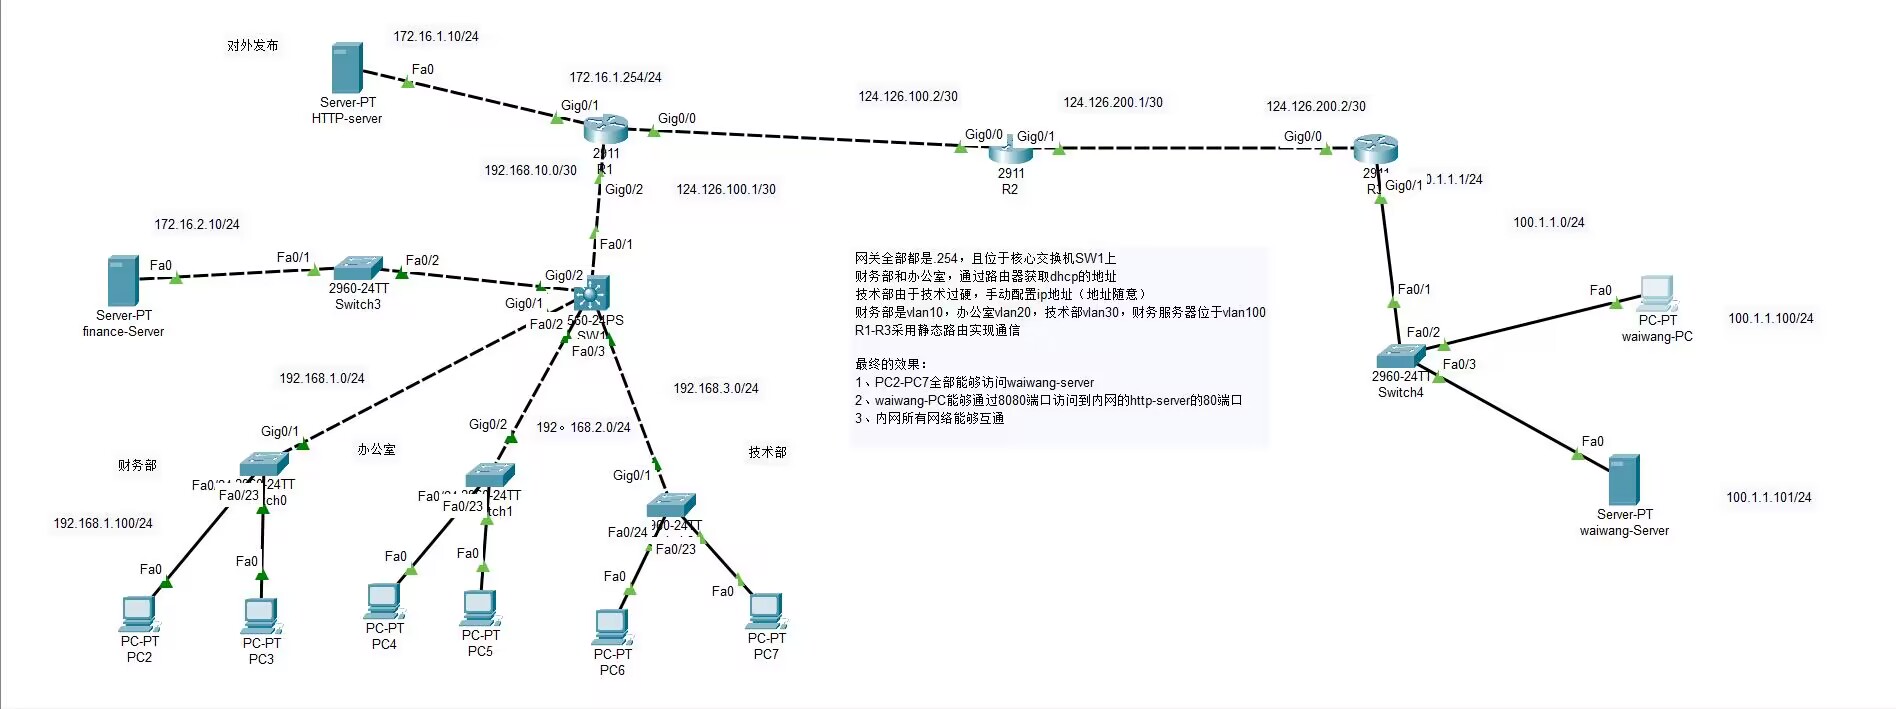
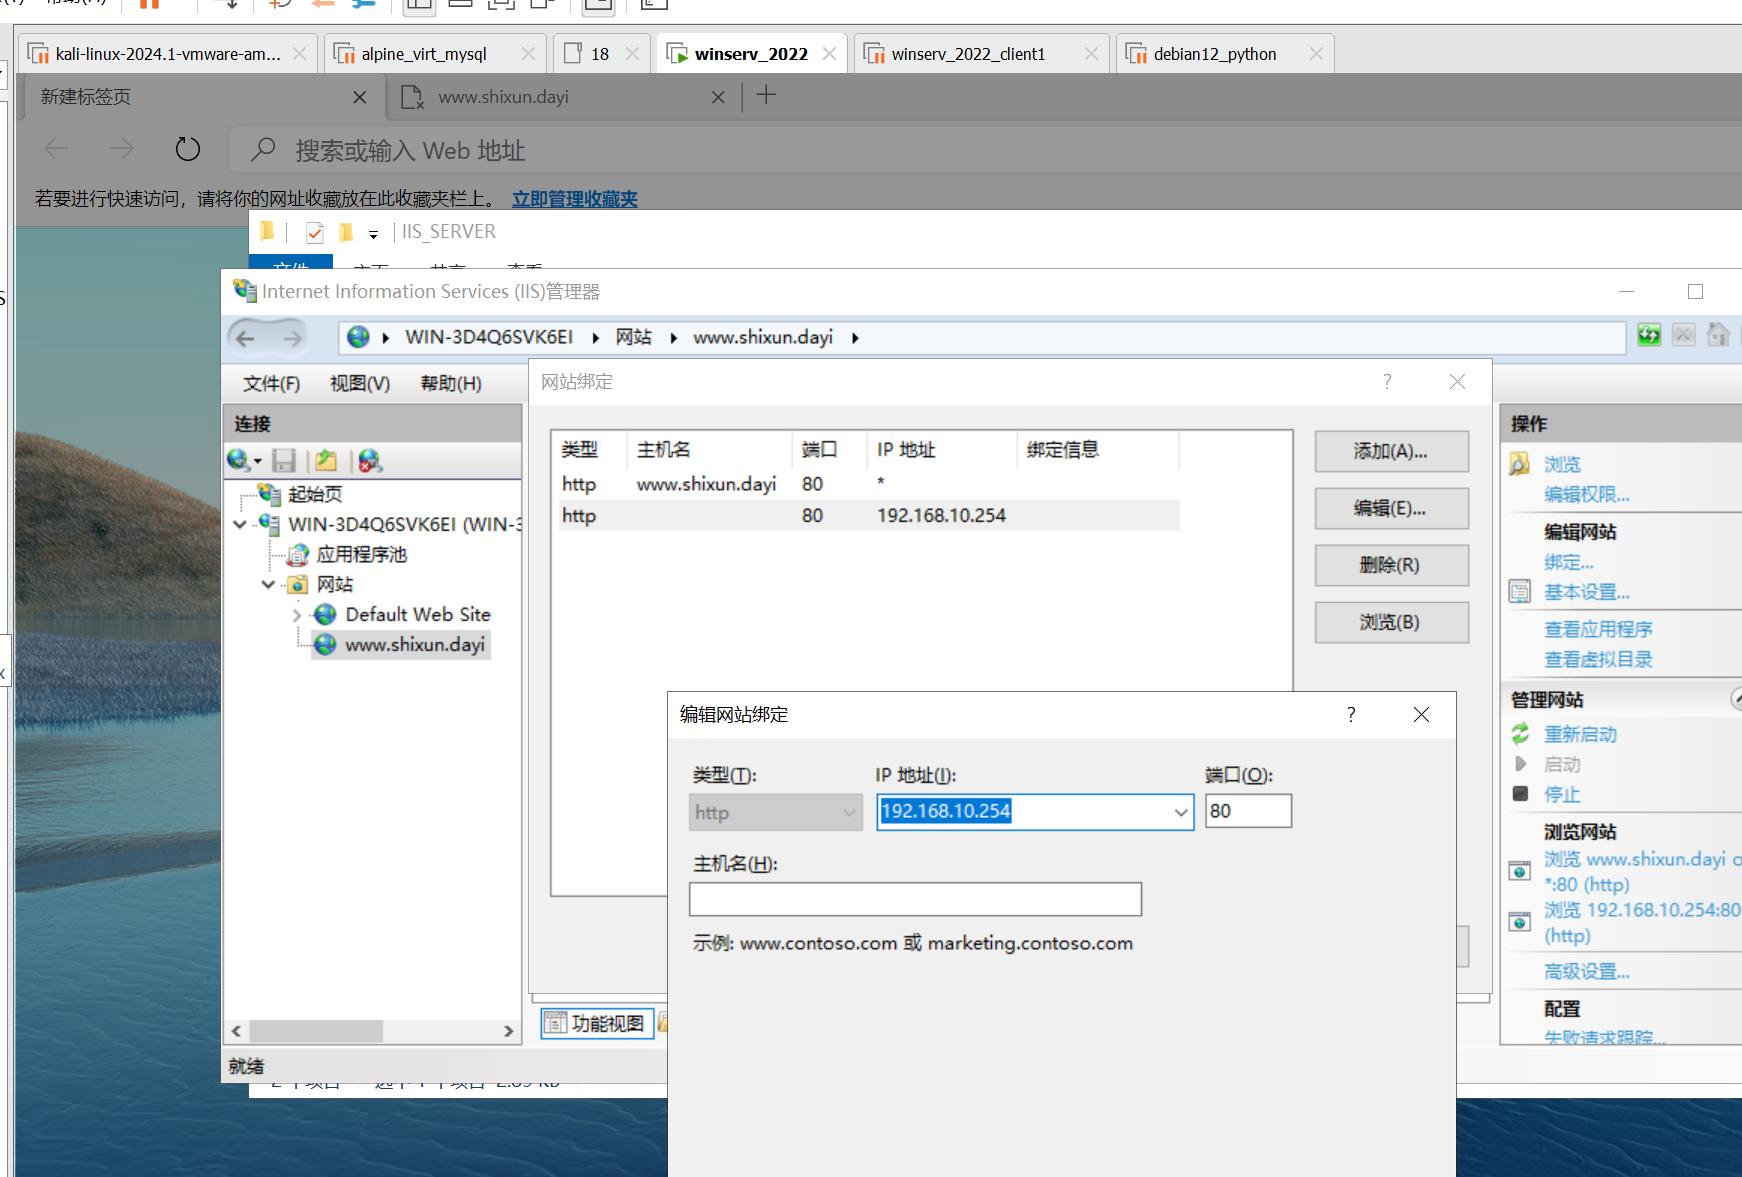
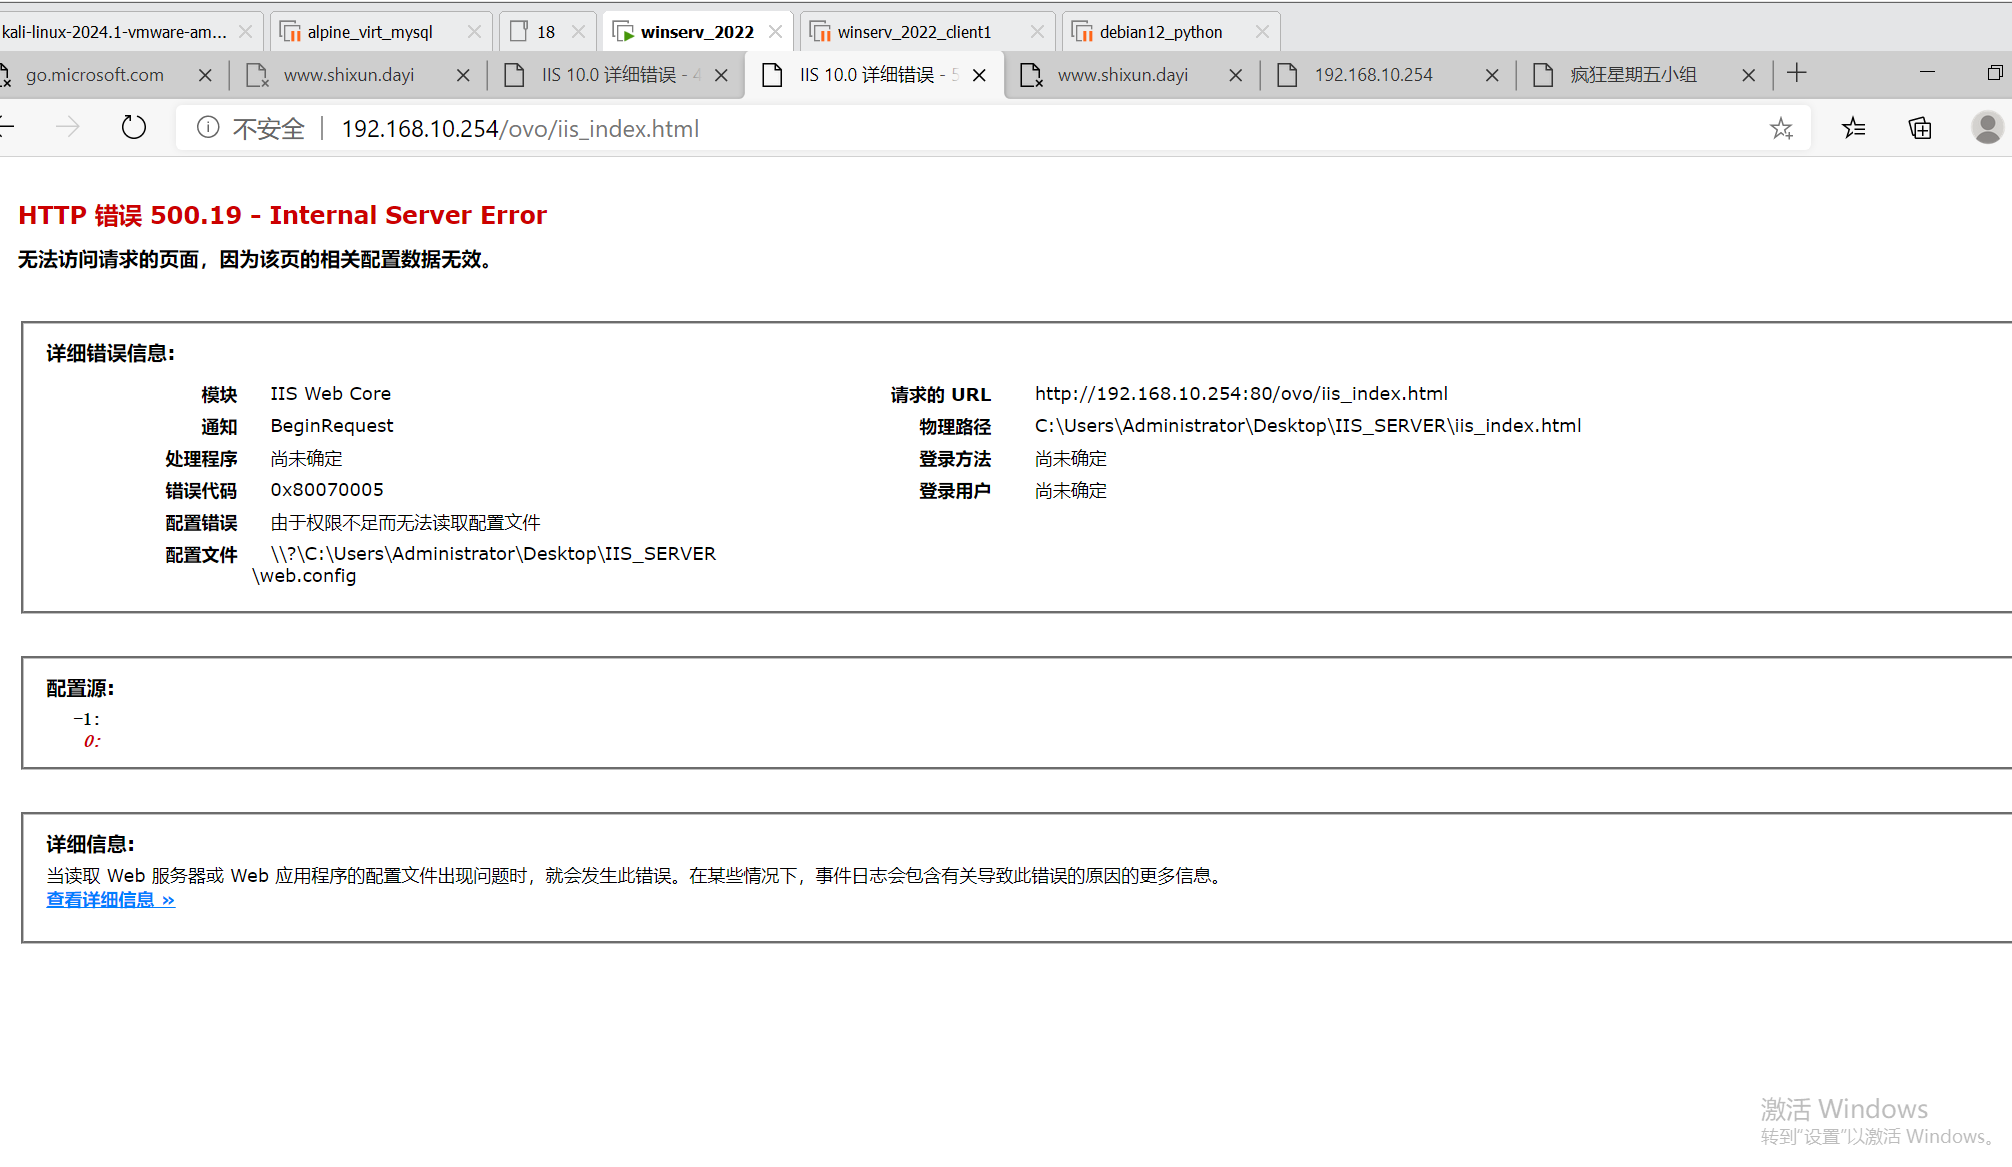
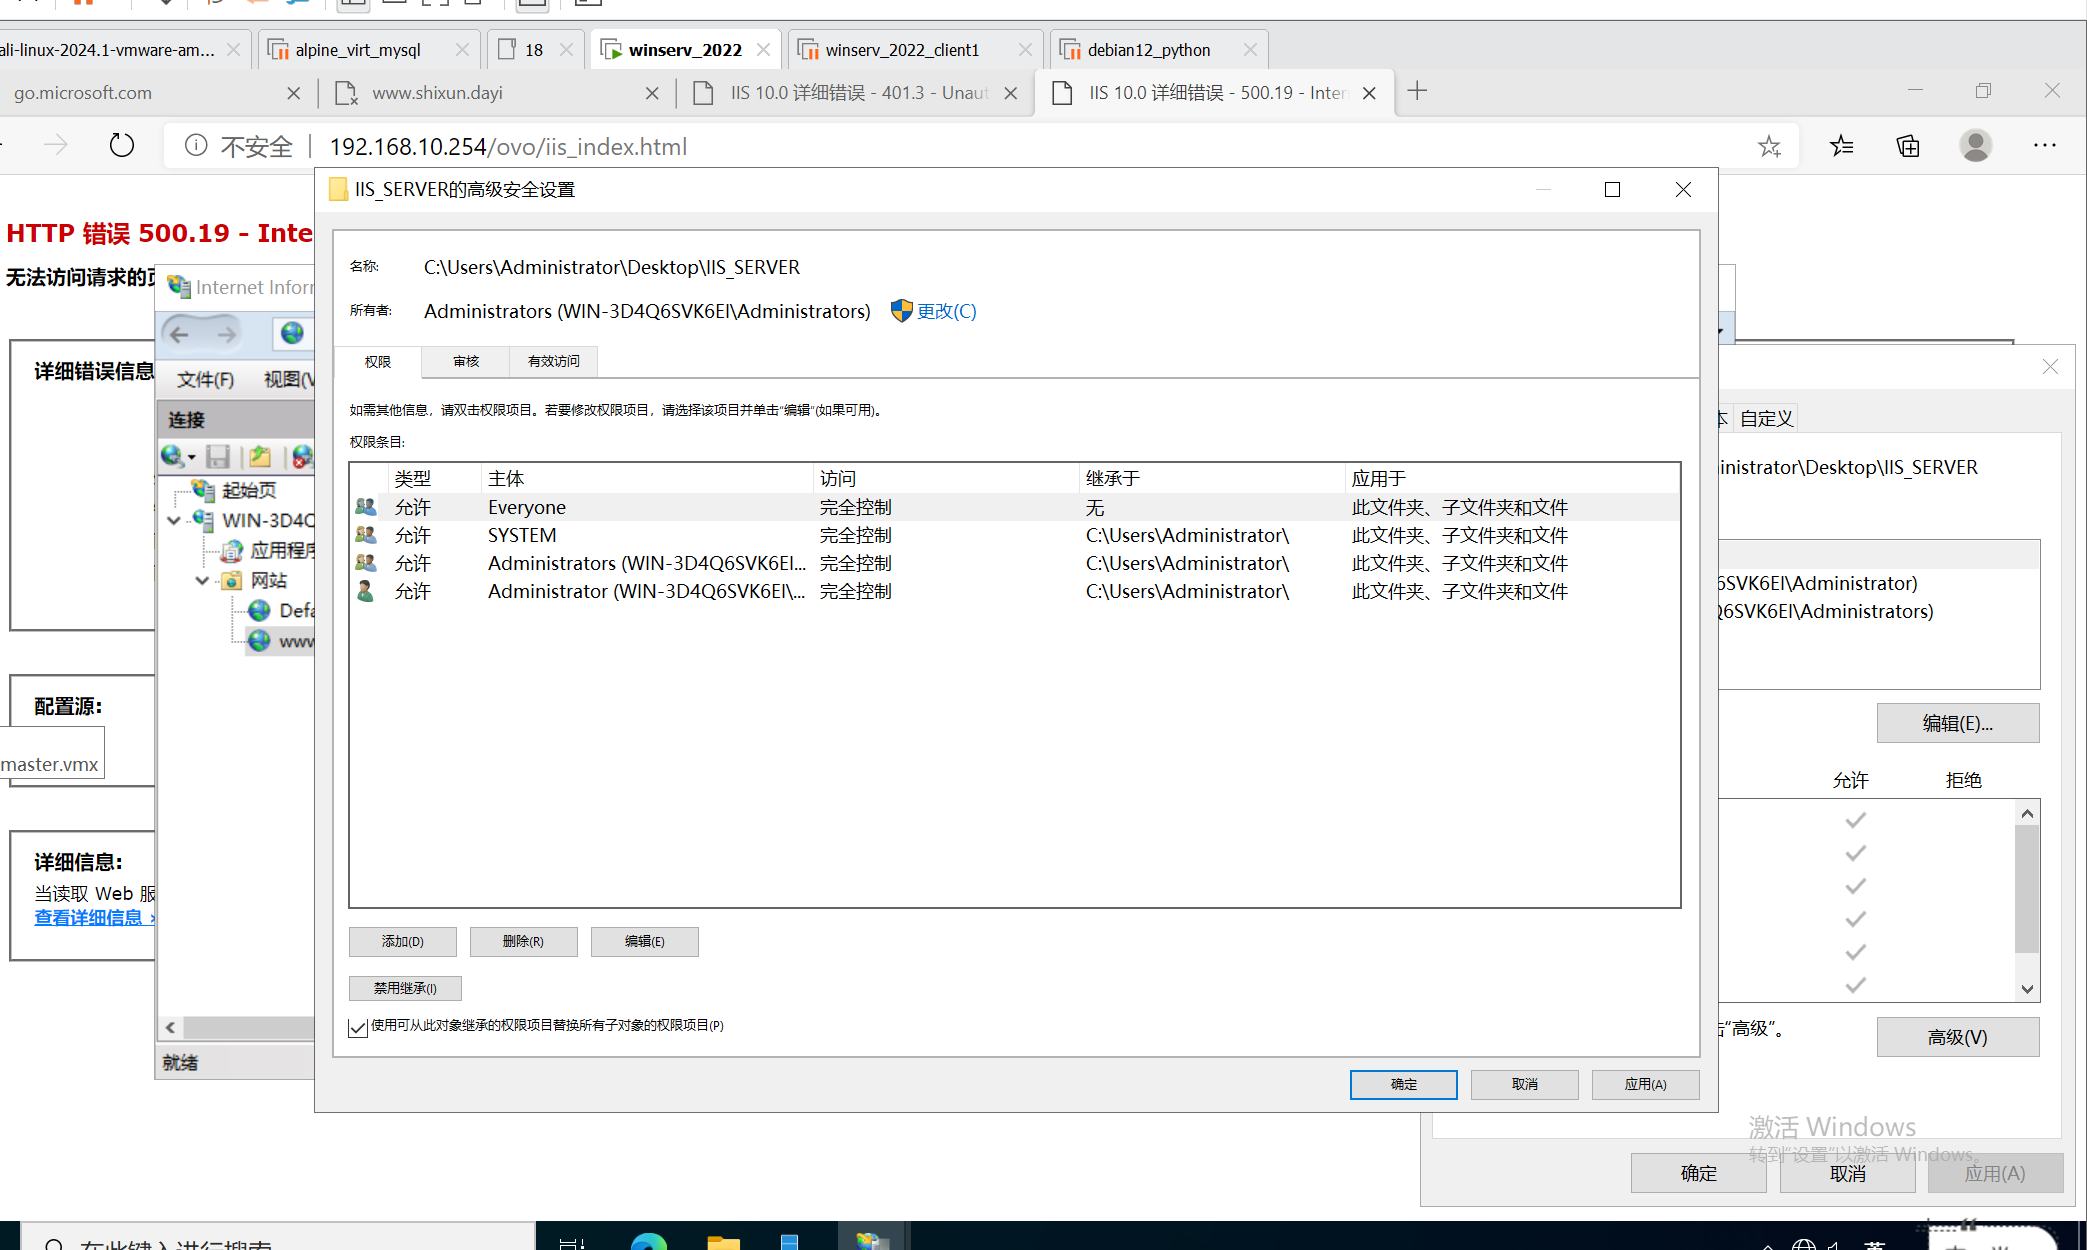
公司内网:服务器IP配置
IP:172.16.1.10/24
网关:172.16.1.254
DNS:临时:113.100.2.56
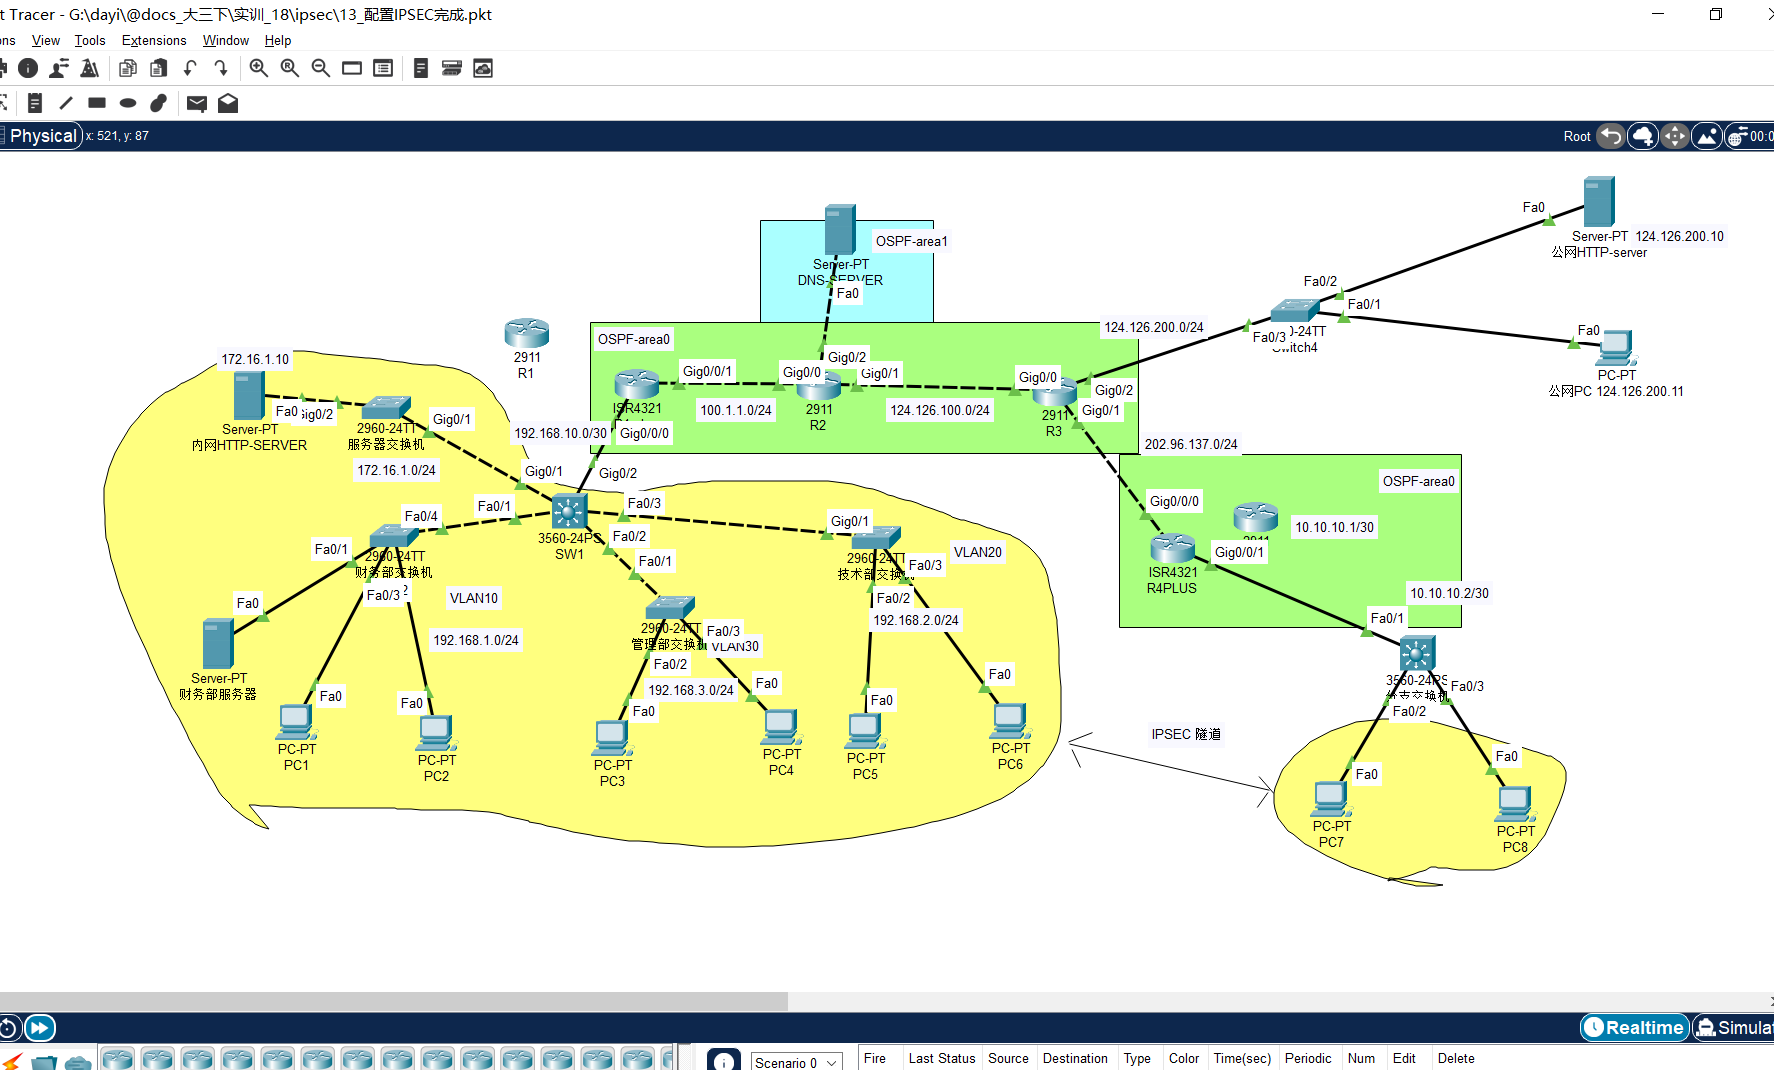
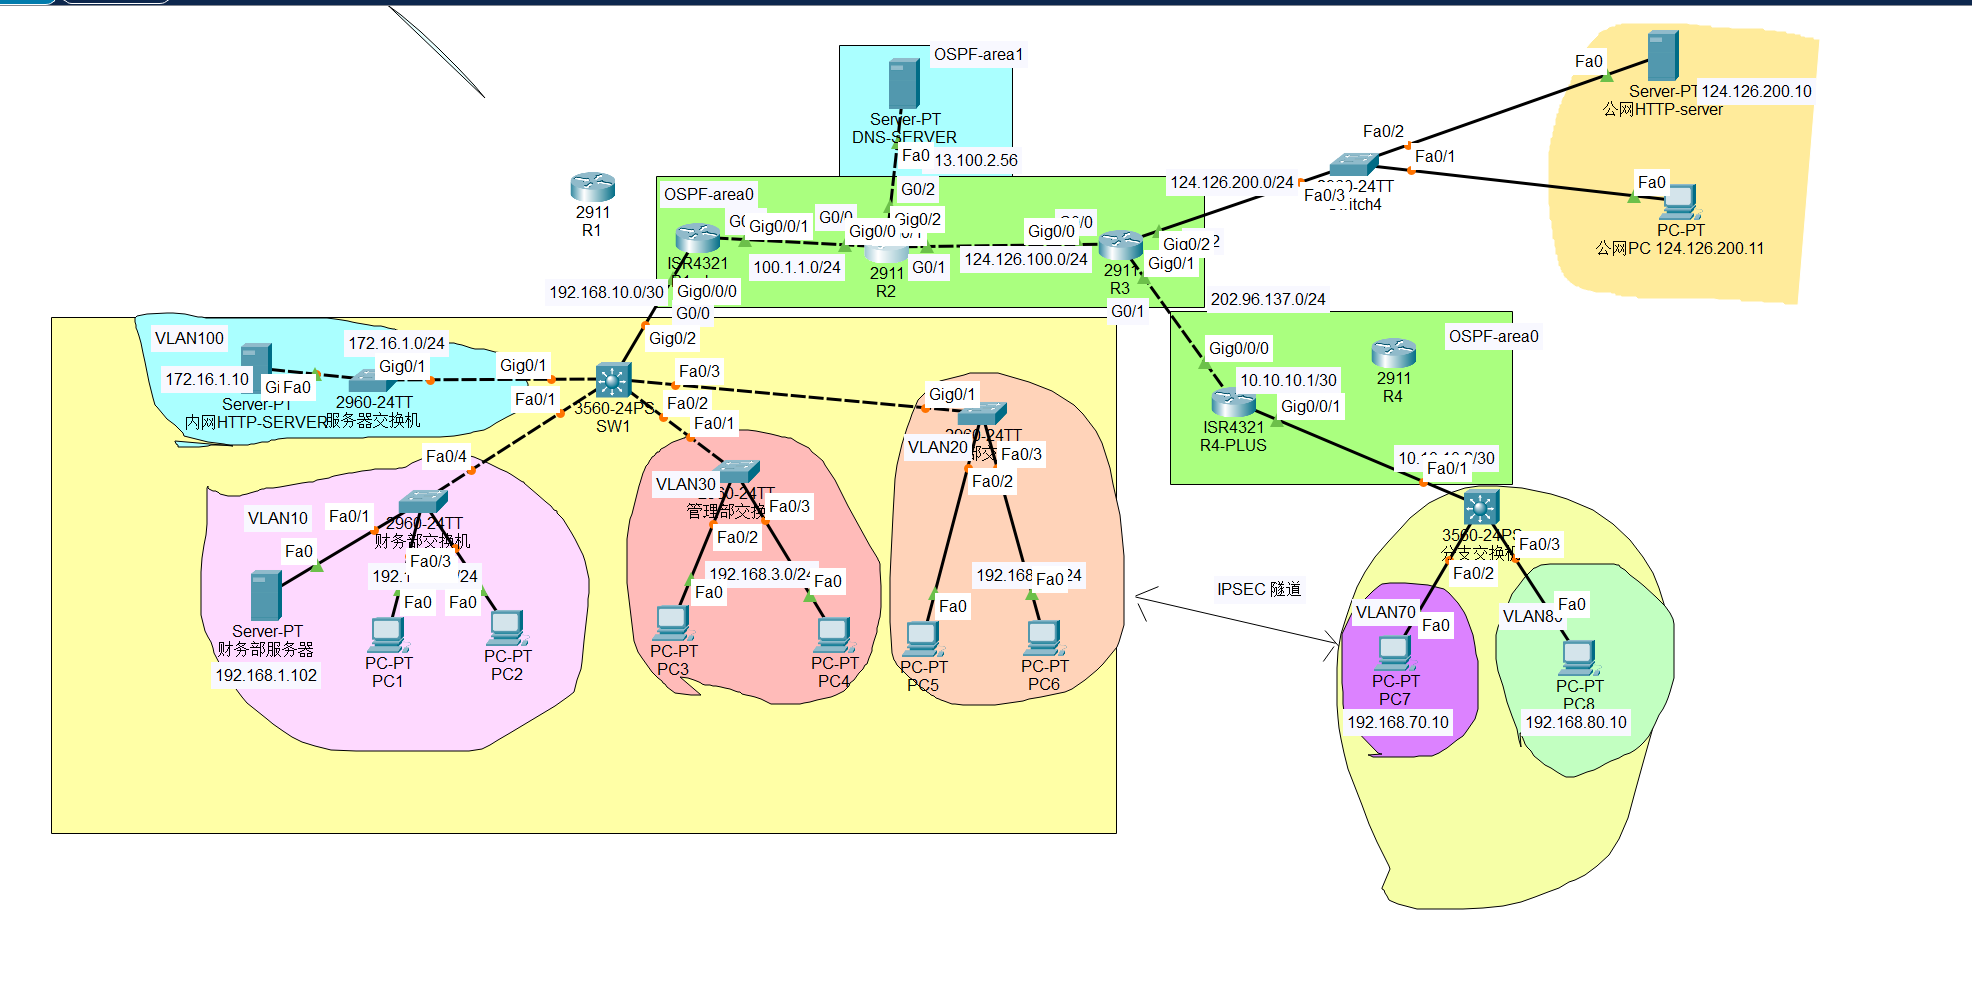
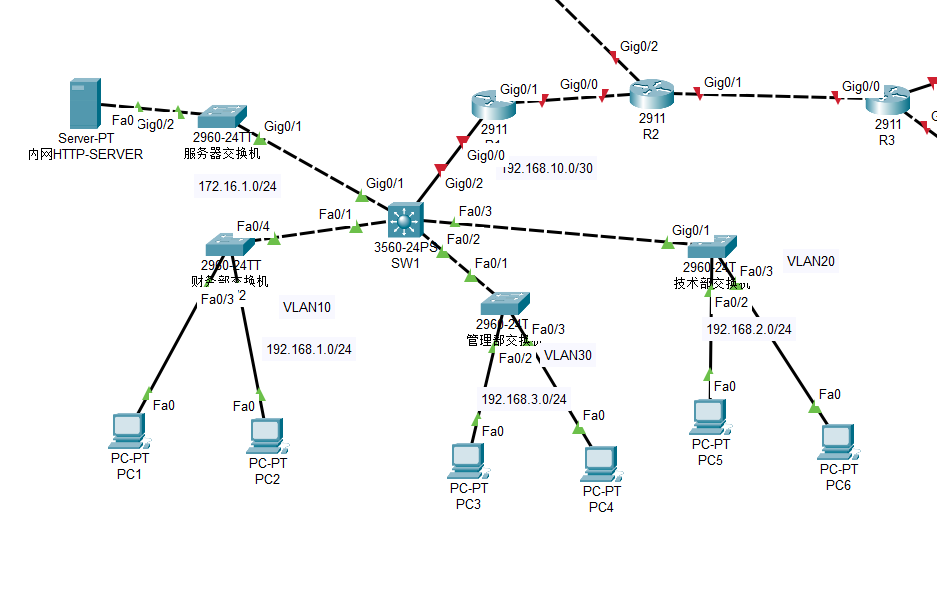
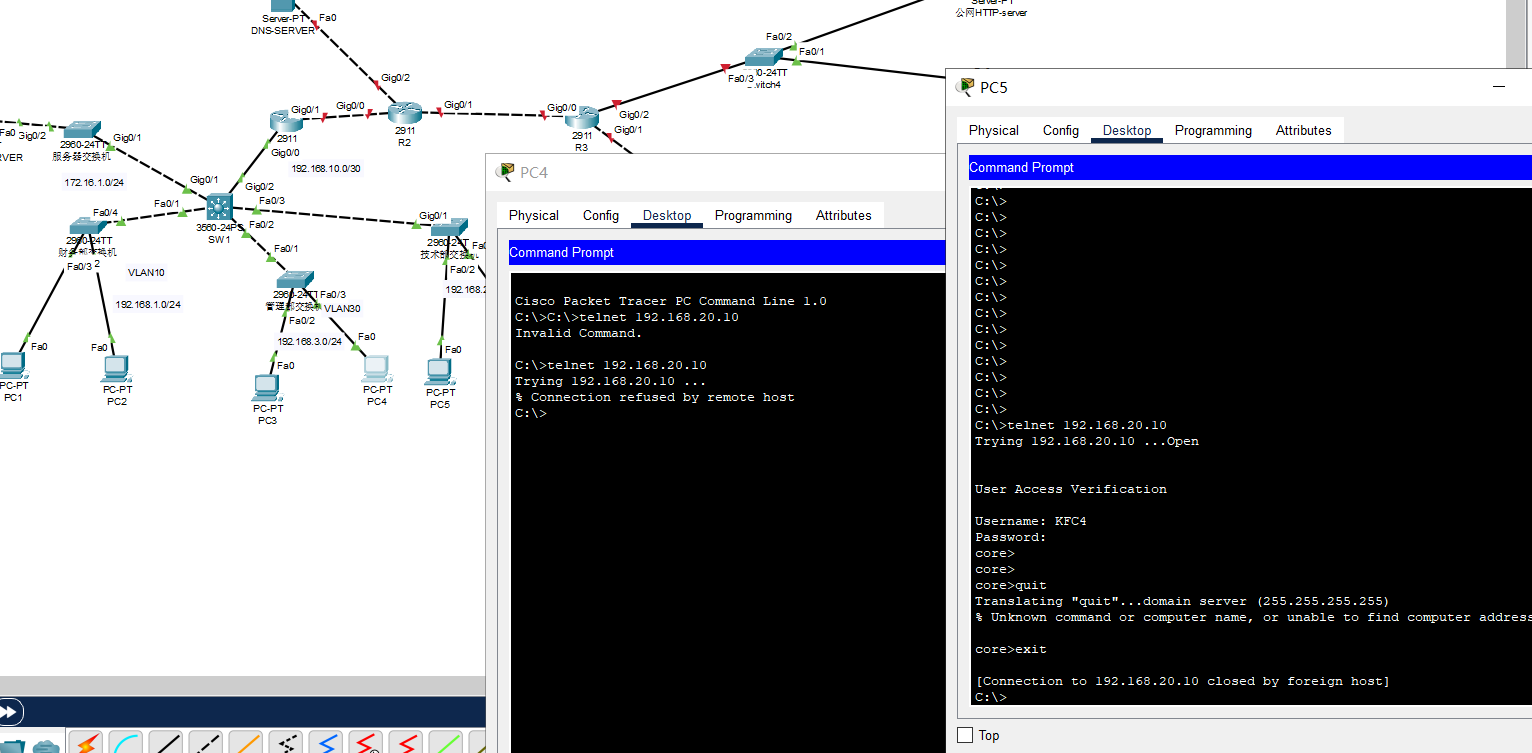
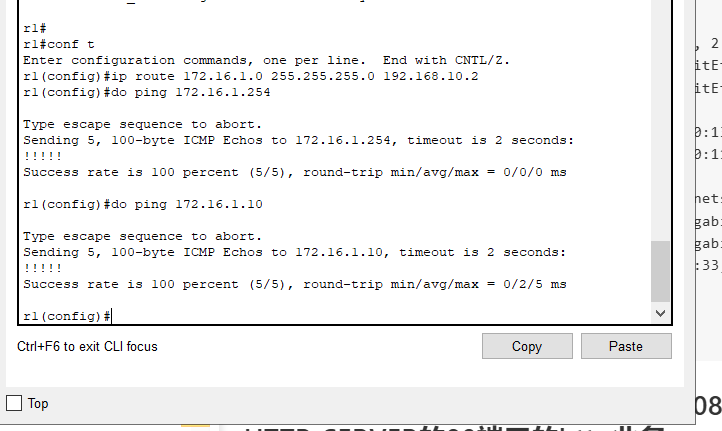
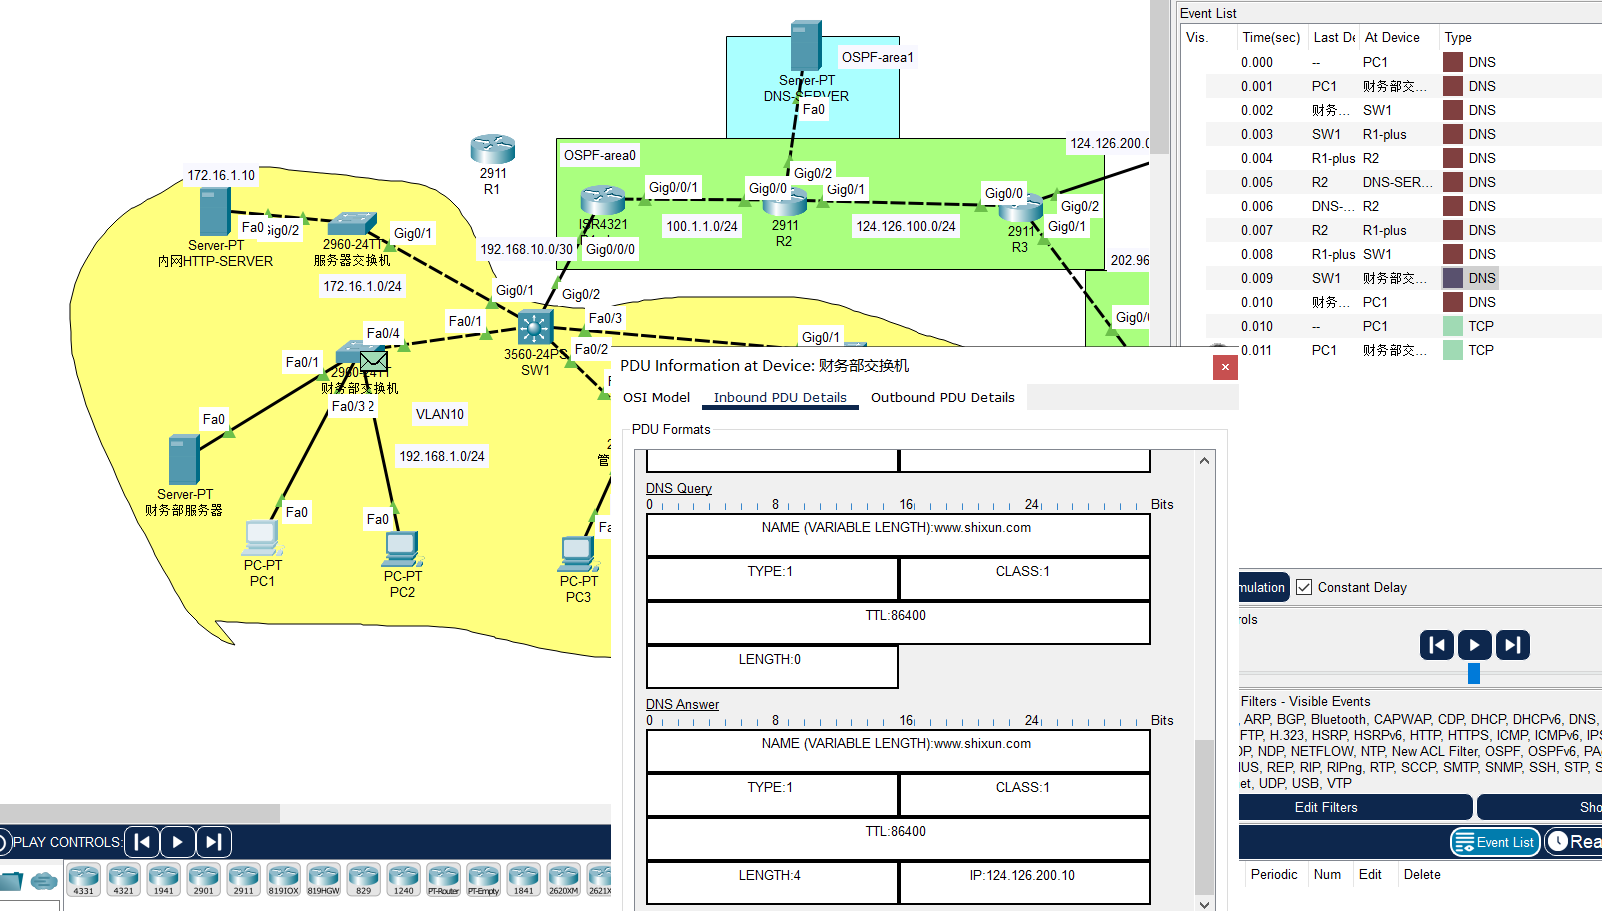
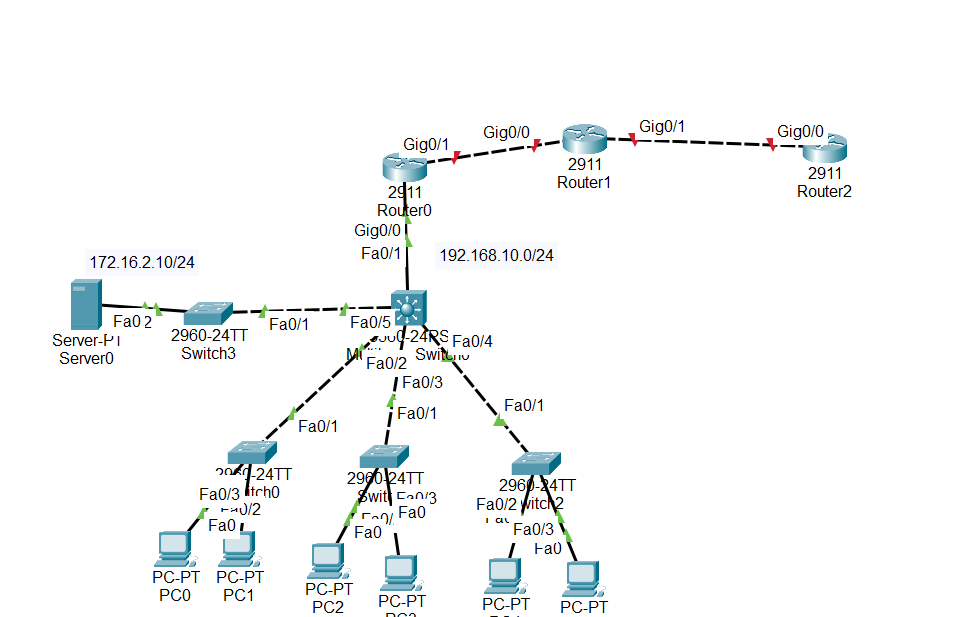
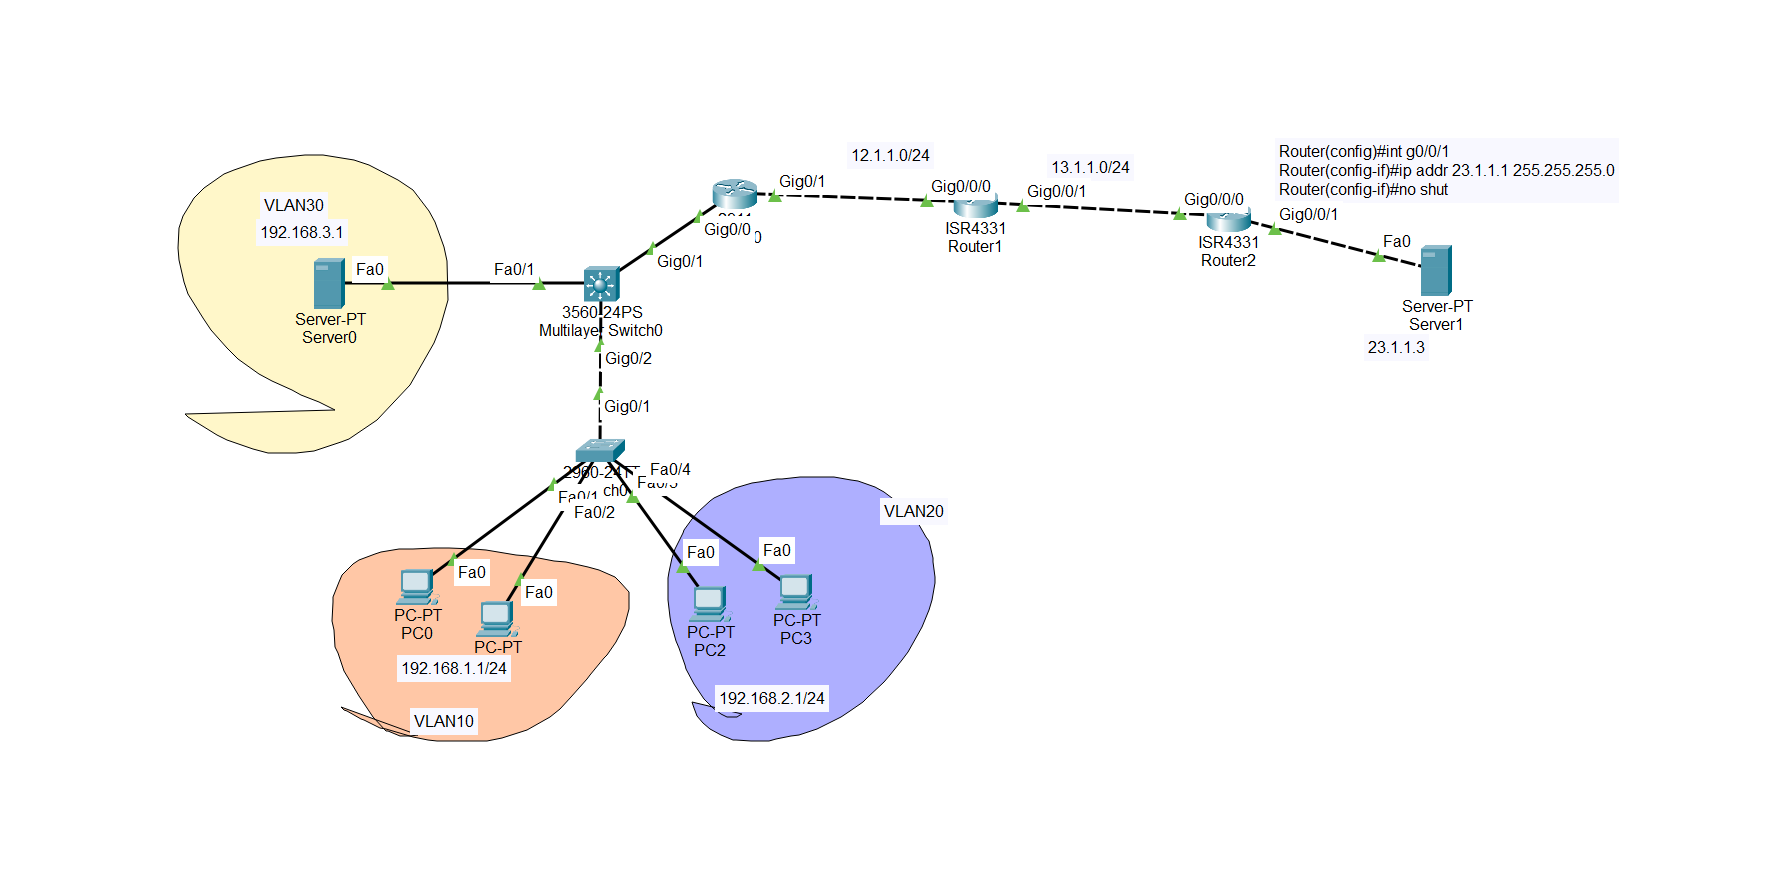
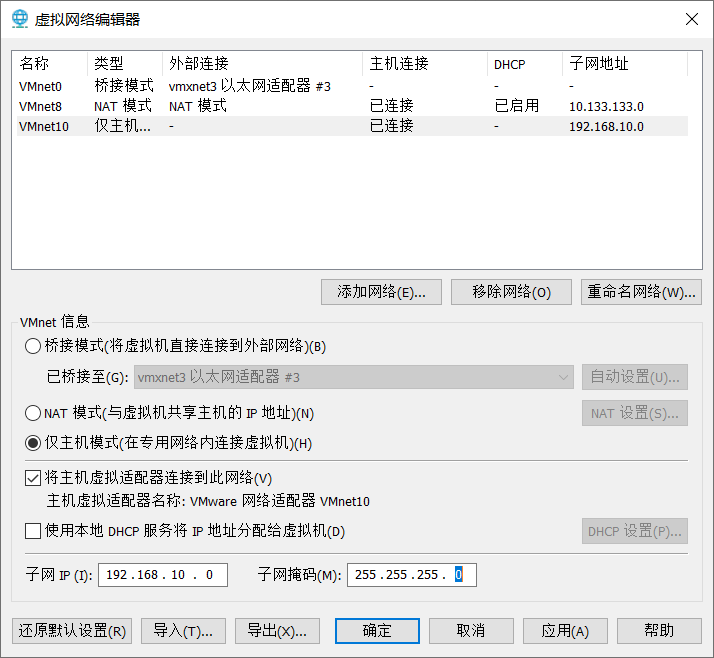
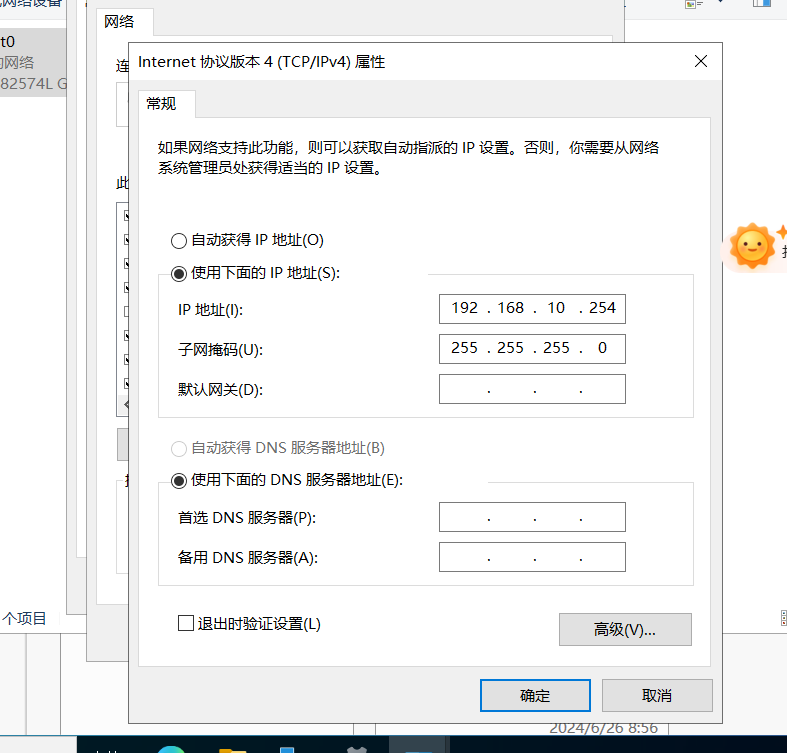
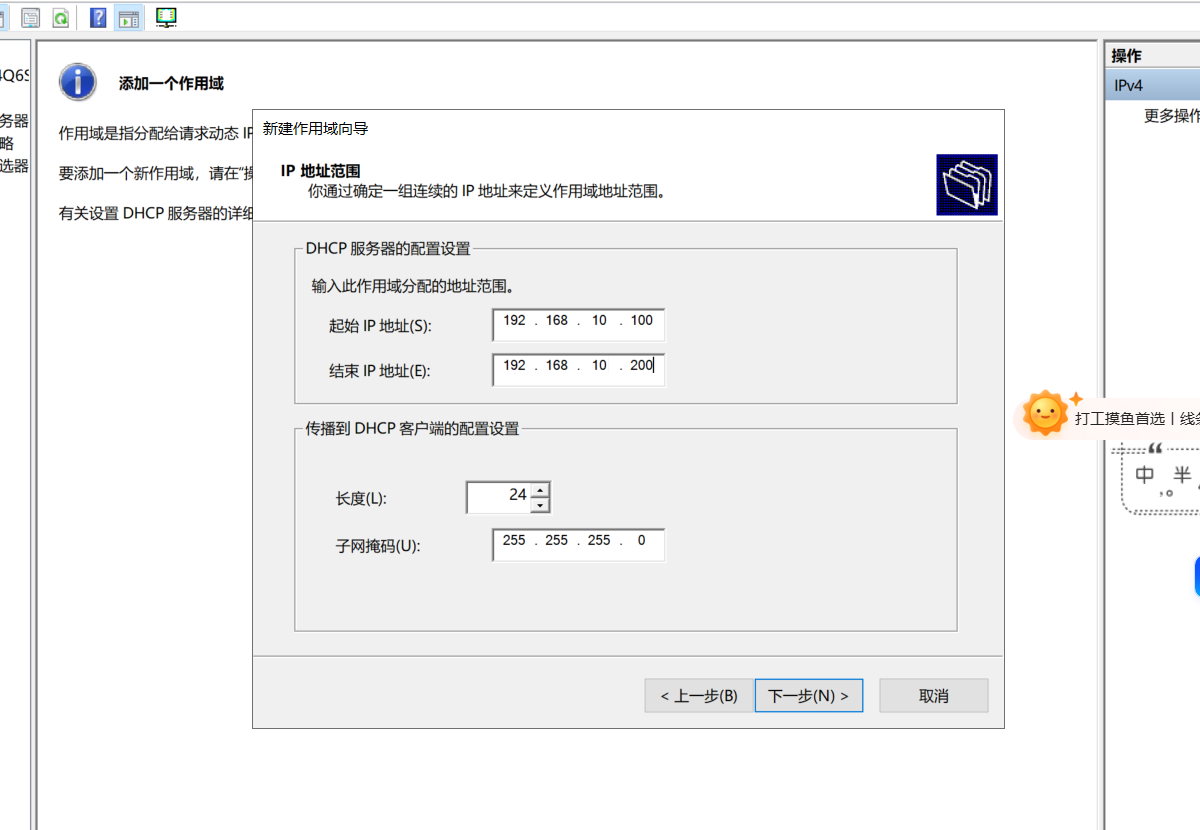
公司内网: 2.5: 5)R1和SW1之间互联的地址为192.168.10.0/30的地址
公司内网:核心交换机
1 2 3 4 5 6 7 8 9 10 11 12 13 14 15 16 17 18
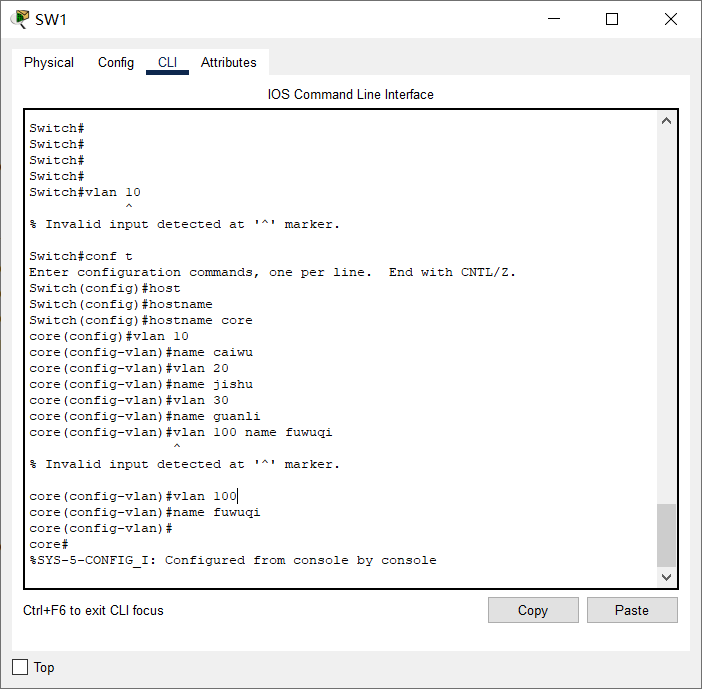
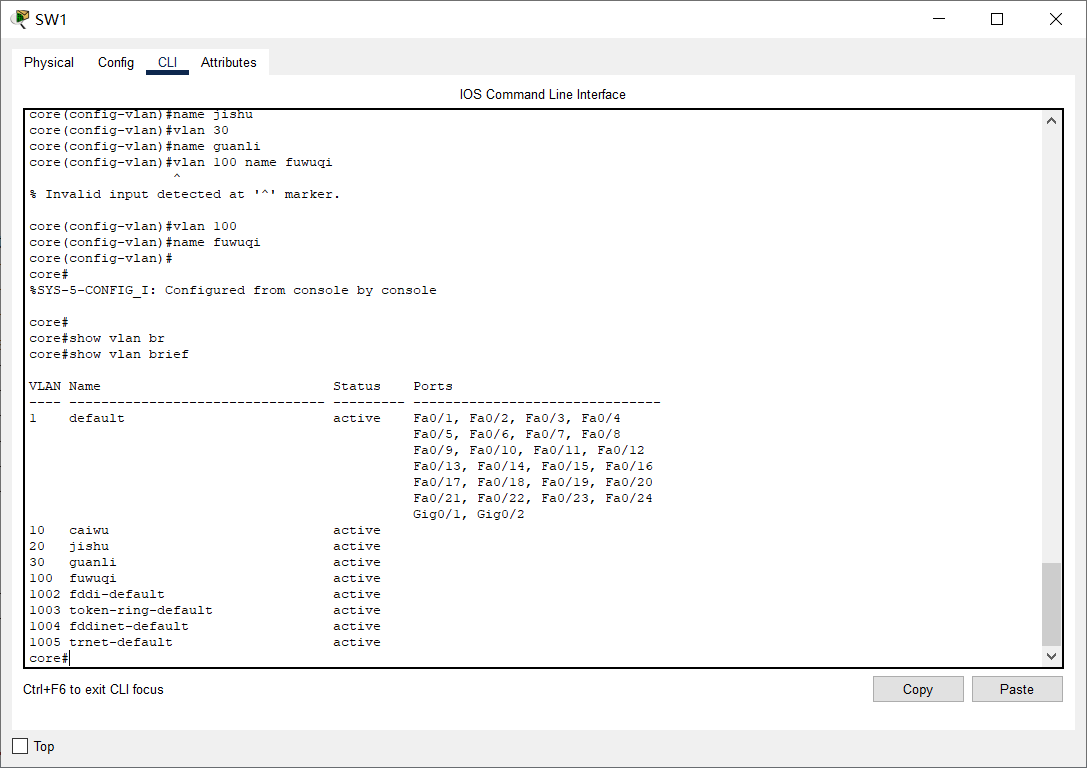
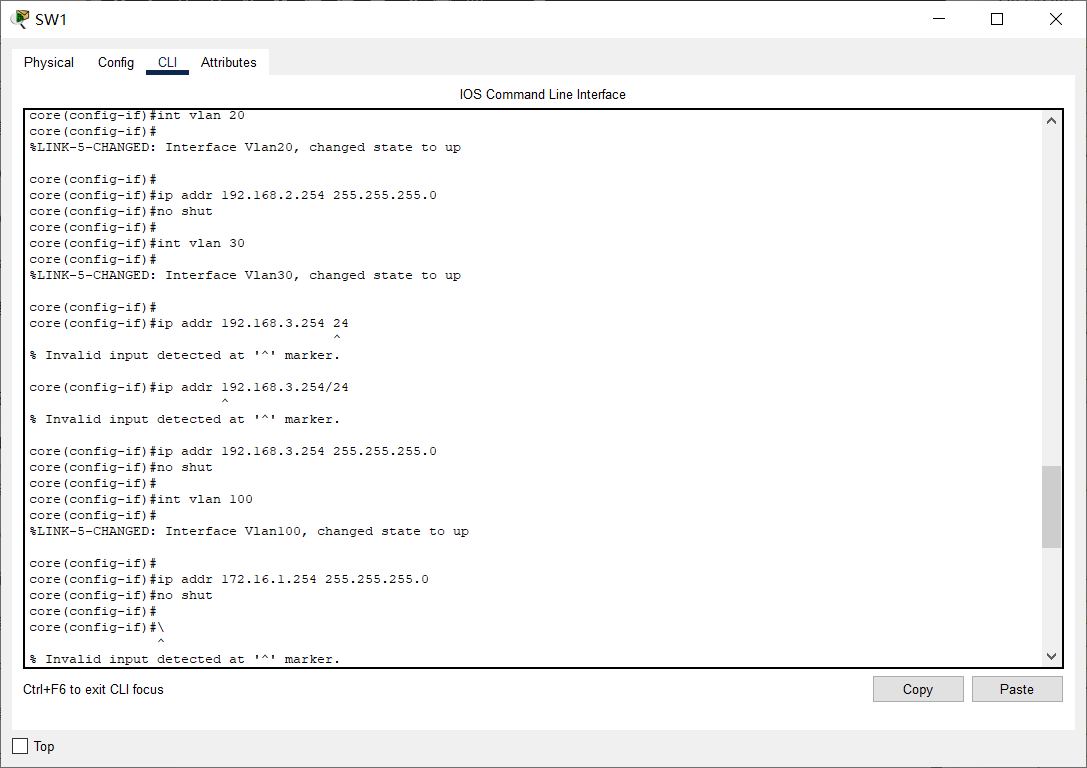
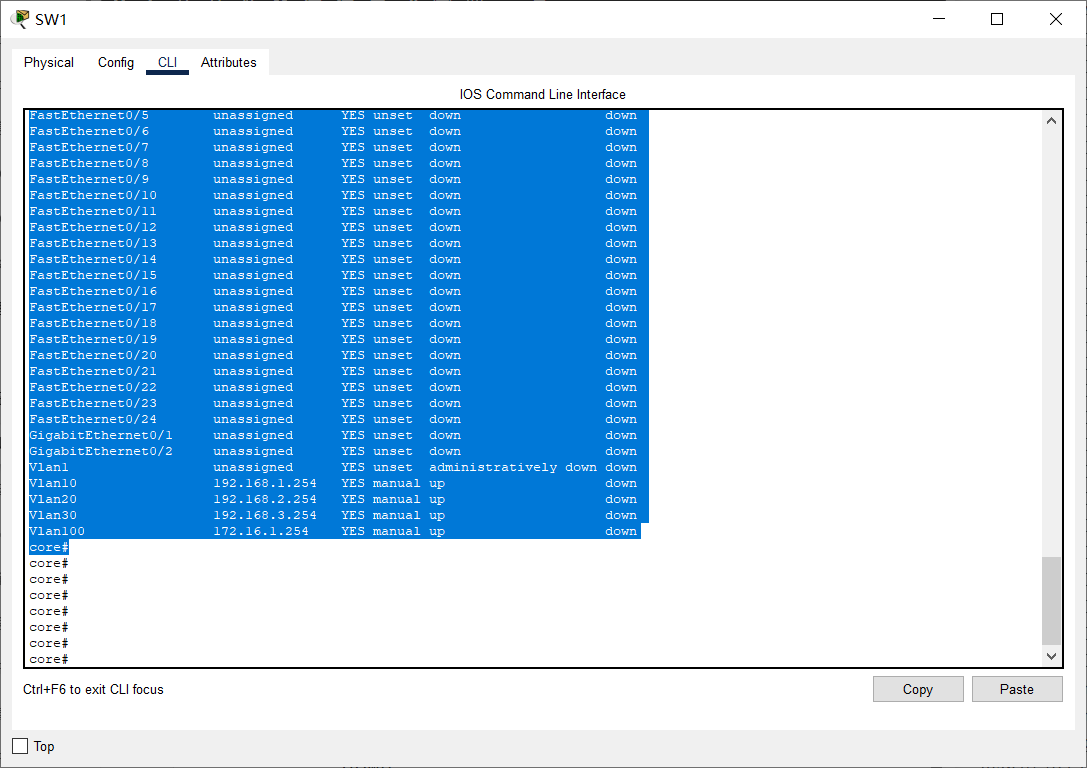
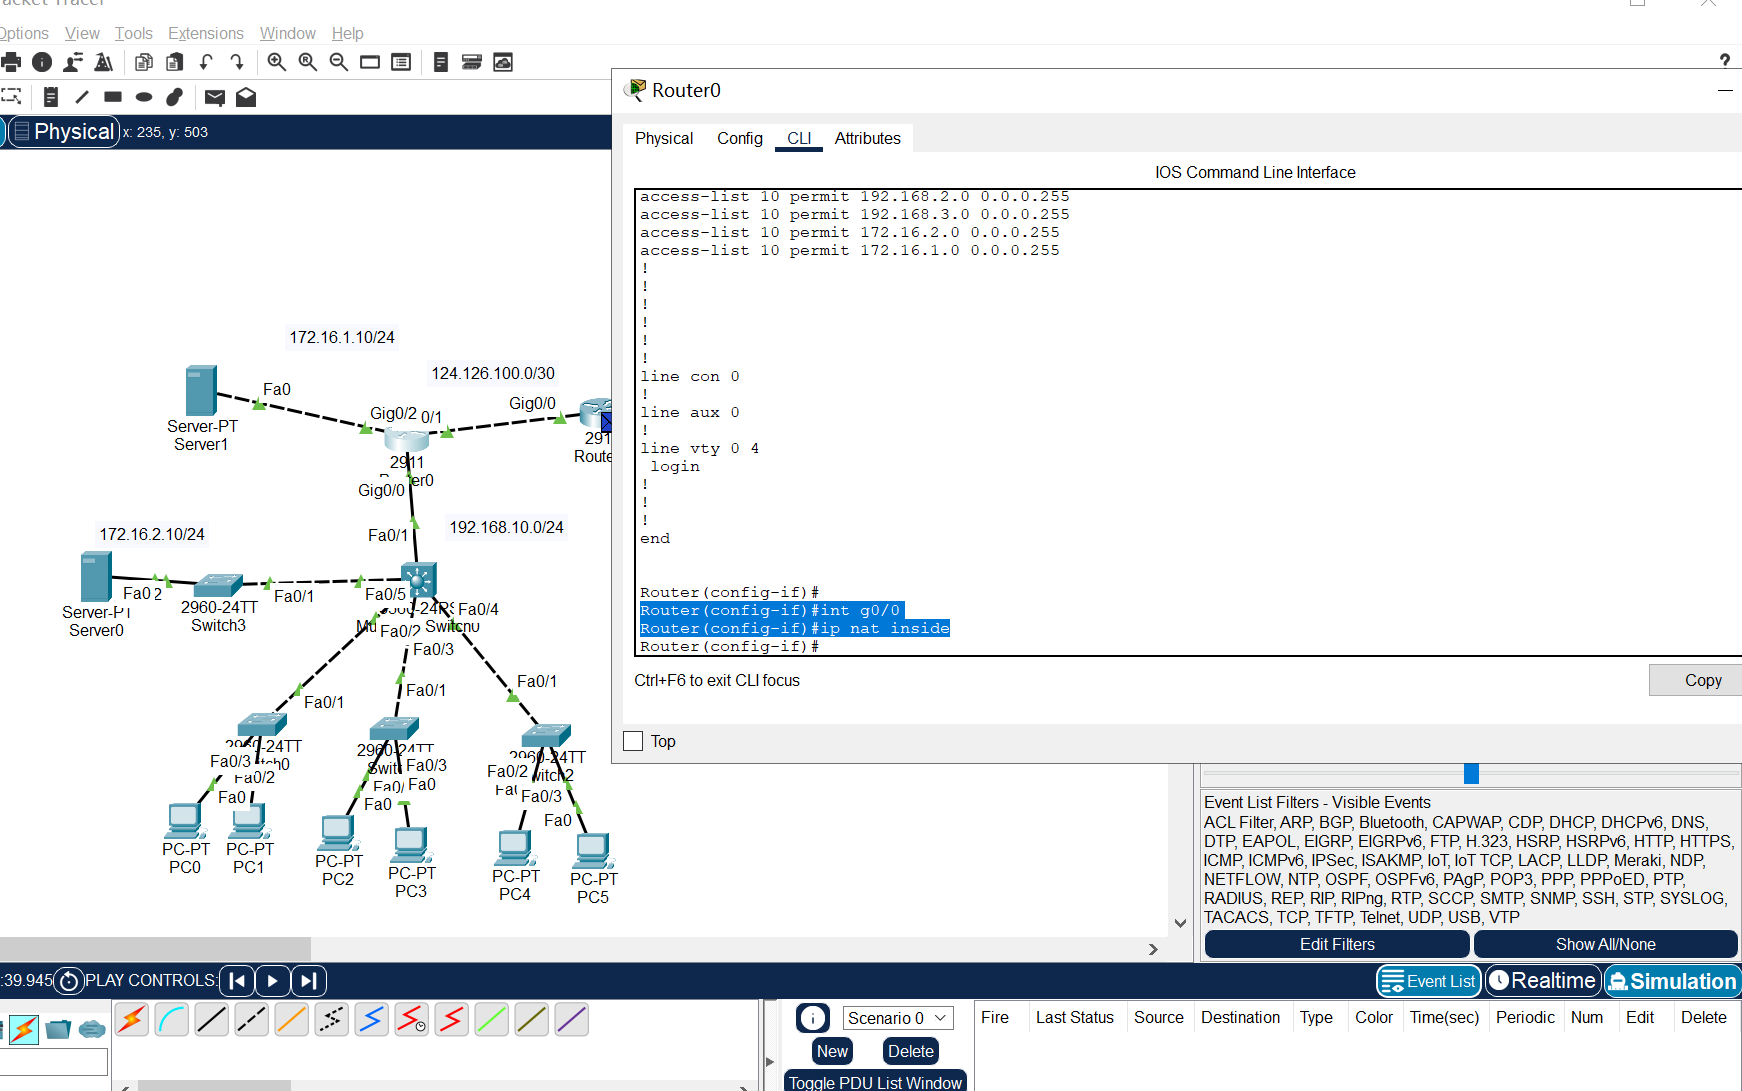
core#conf t Enter configuration commands, one per line. End with CNTL/Z. core(config)#vlan 1000 core(config-vlan)#name R1-SW1-Interconnect core(config-vlan)#interface vlan 1000 core(config-if)# %LINK-5-CHANGED: Interface Vlan1000, changed state to up core(config-if)#ip address 192.168.10.2 255.255.255.252 core(config-if)#no shutdown core(config-if)#interface GigabitEthernet0/0 core(config-if)#switchport mode access core(config-if)#switchport access vlan 1000 core(config-if)# %LINEPROTO-5-UPDOWN: Line protocol on Interface Vlan1000, changed state to up no shut core(config-if)#no shut #配置静态路由 core(config-if)#ip route 0.0.0.0 0.0.0.0 192.168.10.1
公司内网:路由器
1 2 3 4 5 6 7 8
Router>en Router#conf t Enter configuration commands, one per line. End with CNTL/Z. Router(config)#int g0/0 Router(config-if)#ip address 192.168.10.1 255.255.255.252 Router(config-if)#no shutdown #子网静态路由 Router(config-if)#ip route 192.168.0.0 255.255.0.0 192.168.10.2
server-sw>en server-sw#conf t Enter configuration commands, one per line. End with CNTL/Z. server-sw(config)#int g0/1 server-sw(config-if)#switchport trunk allowed vlan 10,20,30,100
finance-sw>en finance-sw#conf t Enter configuration commands, one per line. End with CNTL/Z. finance-sw(config)#int f0/4 finance-sw(config-if)#switchport trunk allowed vlan 10,20,30,100
manage-sw#conf t Enter configuration commands, one per line. End with CNTL/Z. manage-sw(config)#int fa0/1 manage-sw(config-if)#switchport trunk allowed vlan 10,20,30,100
tech-sw>en tech-sw#conf t Enter configuration commands, one per line. End with CNTL/Z. tech-sw(config)#int g0/1 tech-sw(config-if)#switchport trunk allowed vlan 10,20,30,100
核心交换机
1 2 3 4
core#conf t Enter configuration commands, one per line. End with CNTL/Z. core(config)#int range g0/1,fa0/1-3 core(config-if-range)#switchport trunk allowed vlan 10,20,30,100
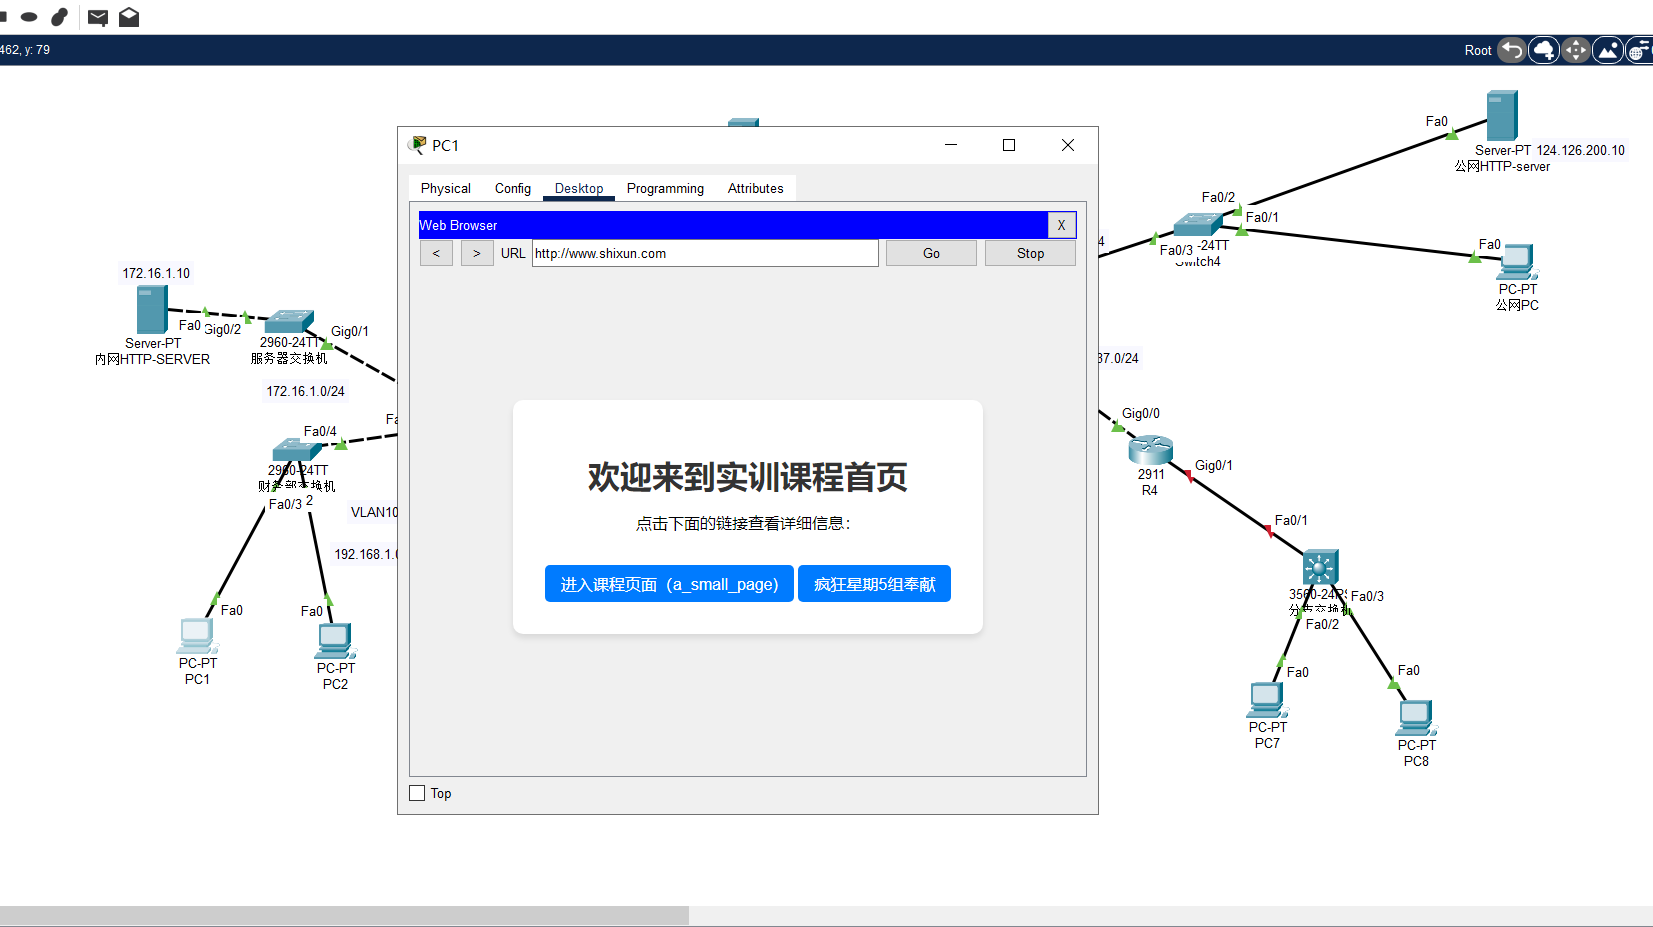
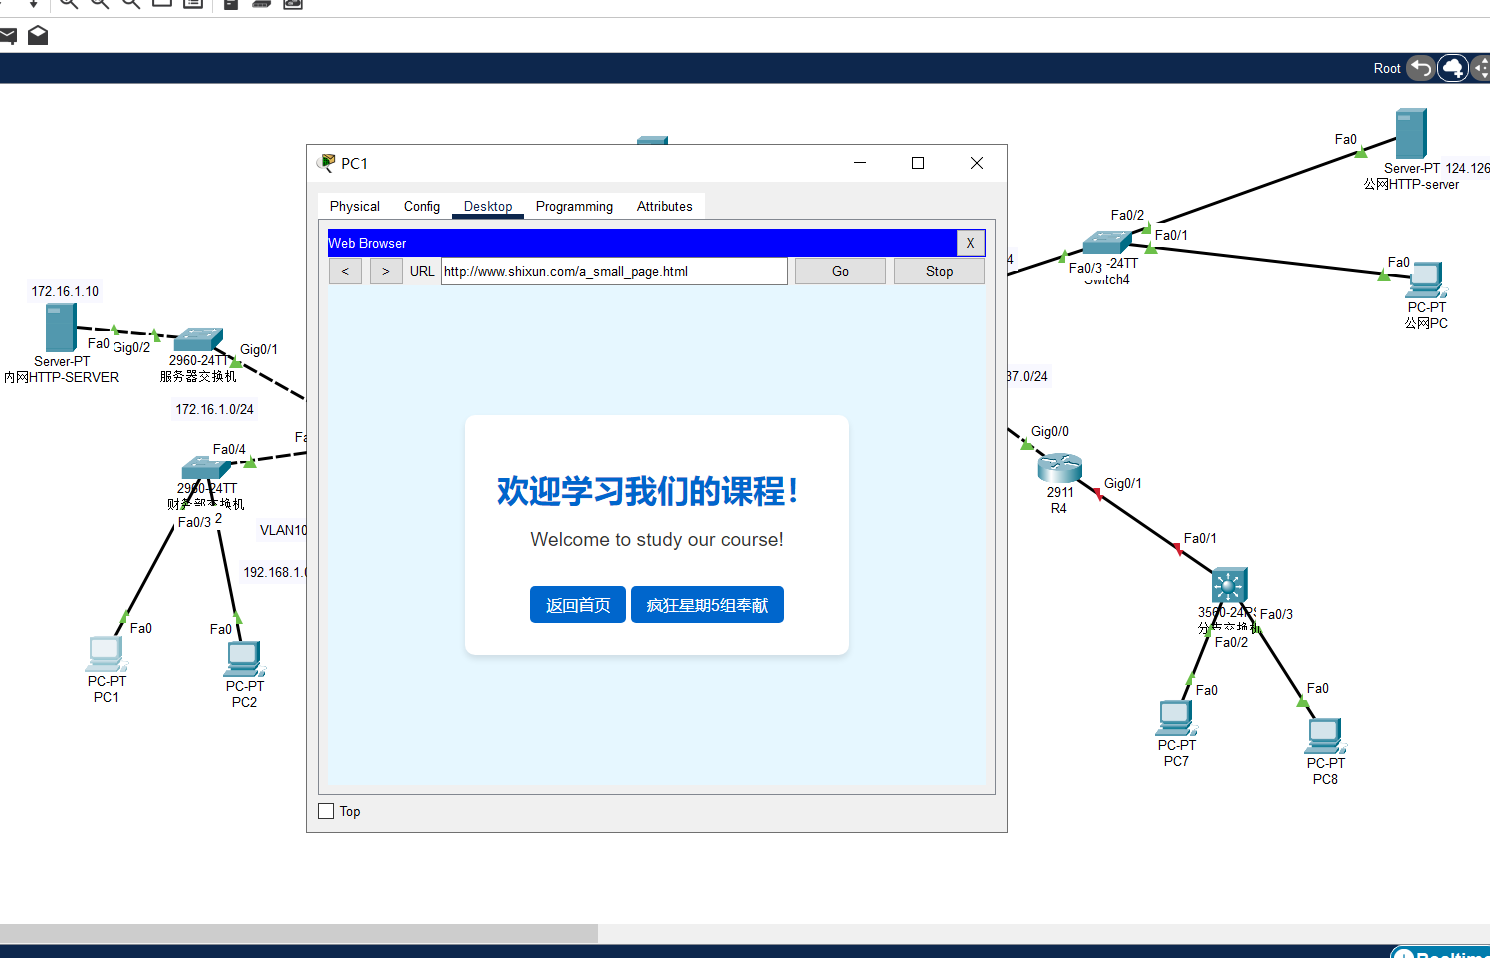
使用服务器进行测试
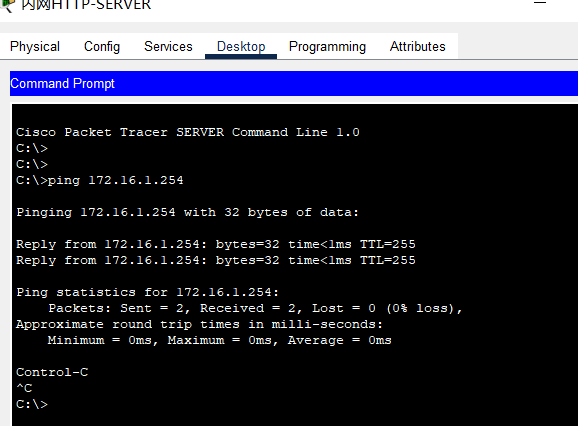
ping:172.16.1.254
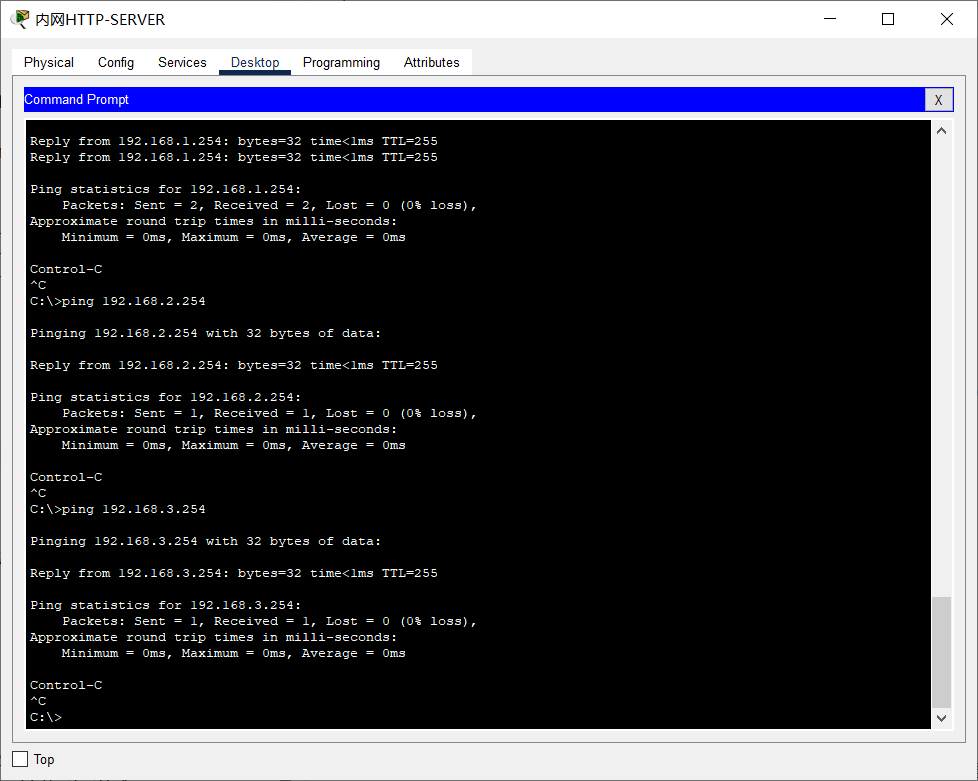
ping 192.168.1.254
1 2 3 4 5 6 7 8 9 10 11 12 13 14
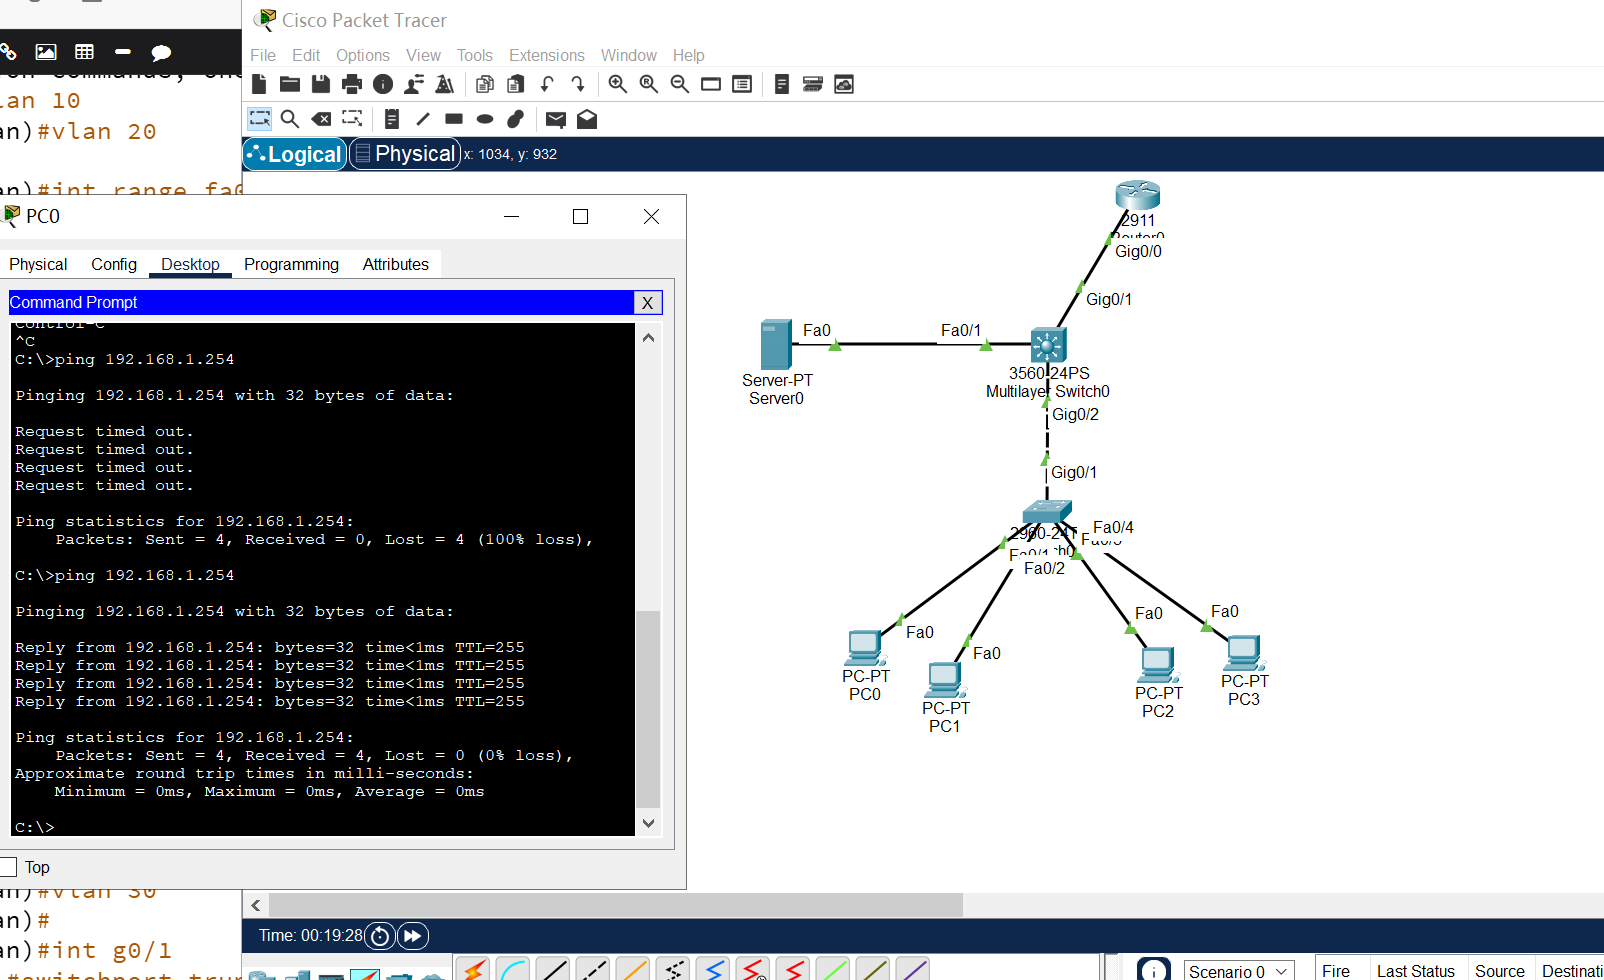
C:\> C:\>ping 192.168.1.254
Pinging 192.168.1.254 with 32 bytes of data:
Reply from 192.168.1.254: bytes=32 time<1ms TTL=255 Reply from 192.168.1.254: bytes=32 time<1ms TTL=255
Ping statistics for 192.168.1.254: Packets: Sent = 2, Received = 2, Lost = 0 (0% loss), Approximate round trip timesin milli-seconds: Minimum = 0ms, Maximum = 0ms, Average = 0ms
Control-C
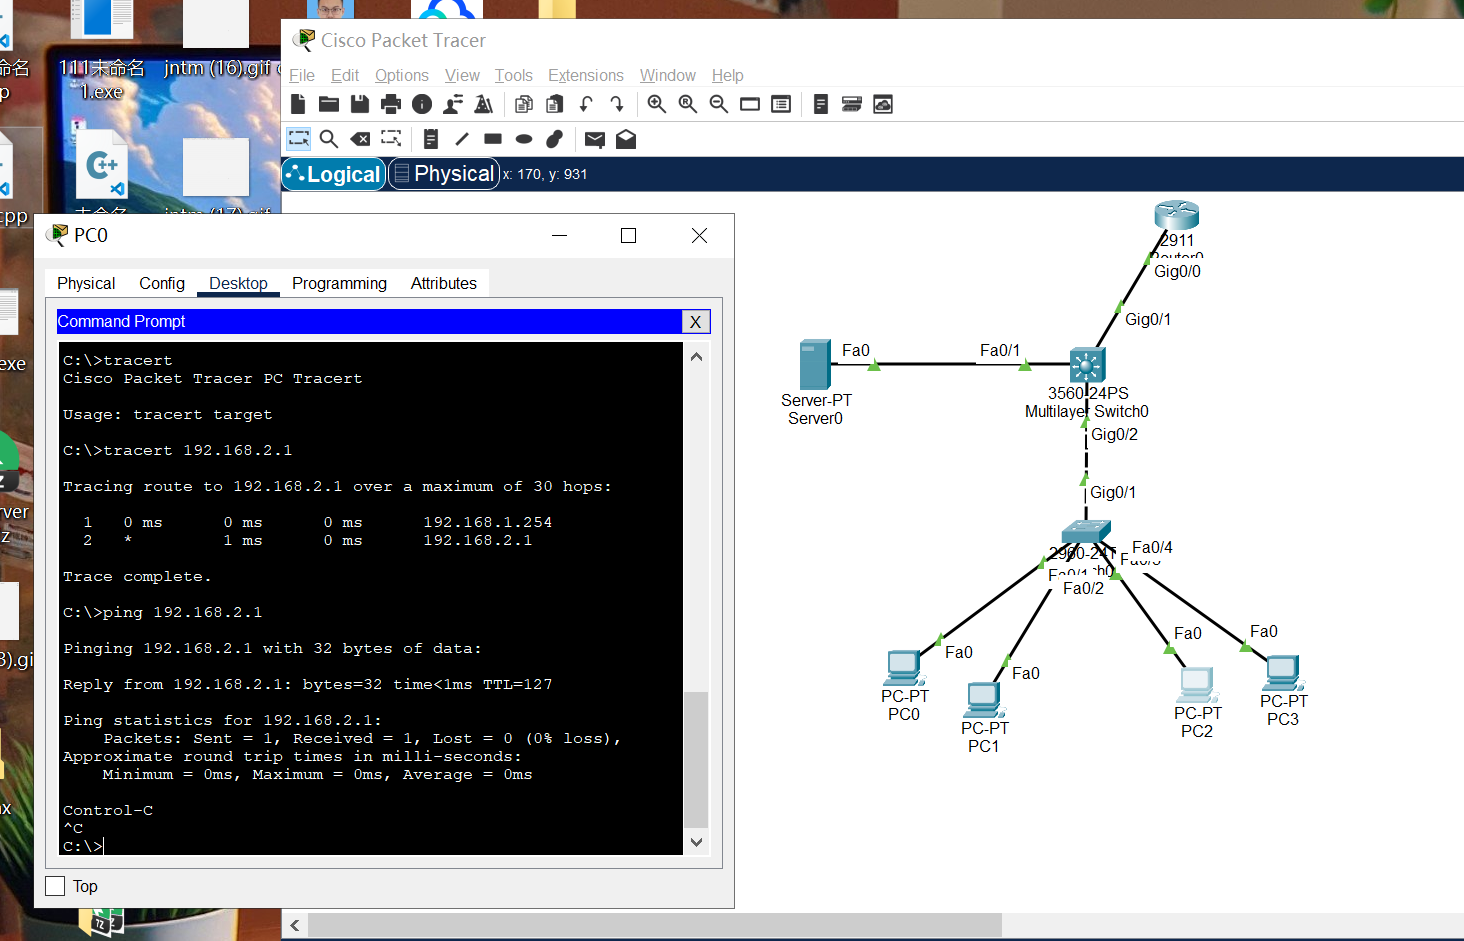
ping 192.168.2.254
1 2 3 4 5 6 7 8 9 10 11 12
C:\>ping 192.168.2.254
Pinging 192.168.2.254 with 32 bytes of data:
Reply from 192.168.2.254: bytes=32 time<1ms TTL=255
Ping statistics for 192.168.2.254: Packets: Sent = 1, Received = 1, Lost = 0 (0% loss), Approximate round trip timesin milli-seconds: Minimum = 0ms, Maximum = 0ms, Average = 0ms
Control-C
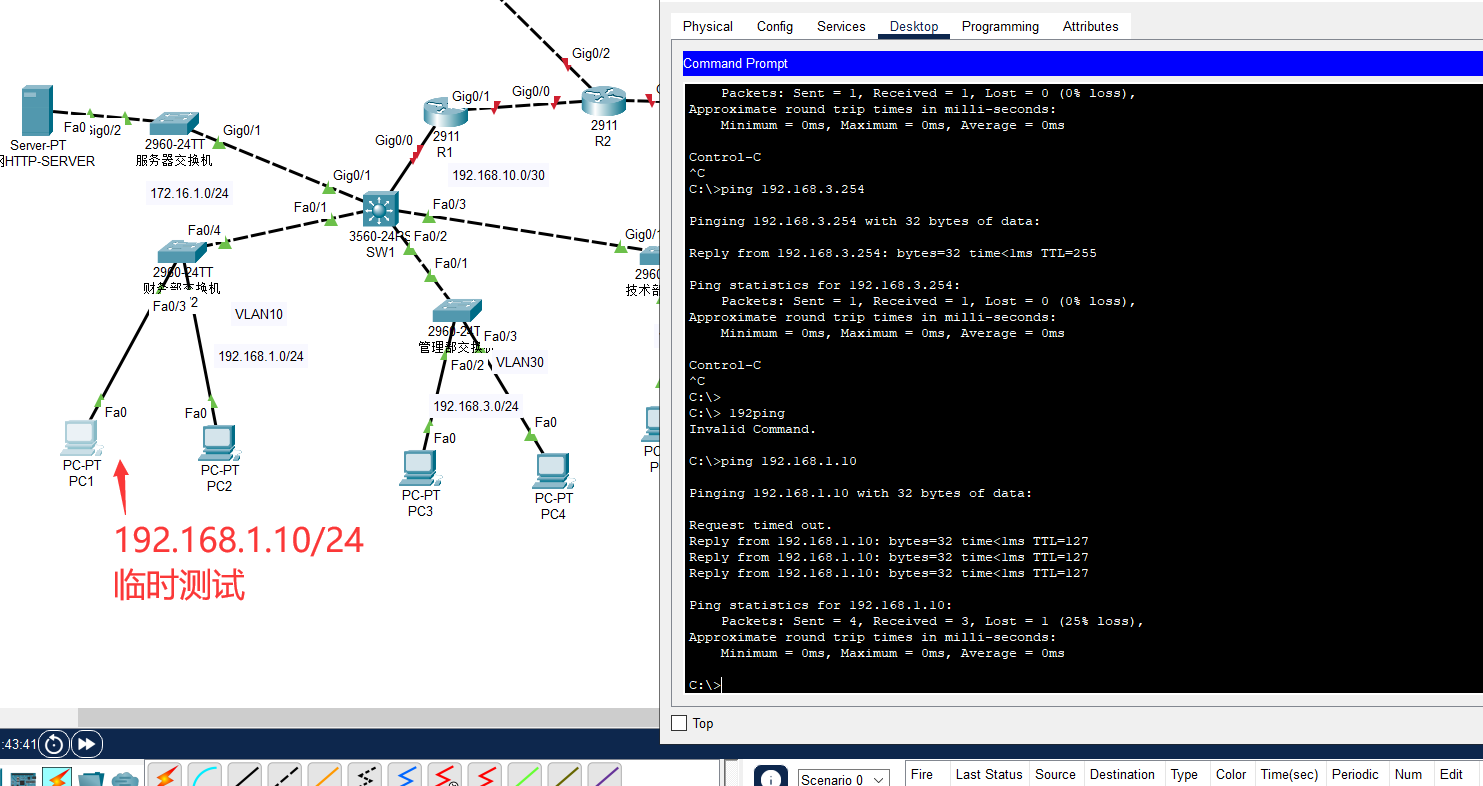
ping 192.168.3.254
1 2 3 4 5 6 7 8 9 10 11 12
C:\>ping 192.168.3.254
Pinging 192.168.3.254 with 32 bytes of data:
Reply from 192.168.3.254: bytes=32 time<1ms TTL=255
Ping statistics for 192.168.3.254: Packets: Sent = 1, Received = 1, Lost = 0 (0% loss), Approximate round trip timesin milli-seconds: Minimum = 0ms, Maximum = 0ms, Average = 0ms
Router#configure terminal Router(config)#ip access-list standard TELNET-ACL Router(config-std-nacl)#permit 192.168.2.0 0.0.0.255 Router(config-std-nacl)#deny any Router(config-std-nacl)#exit Router(config)#line vty 0 4 Router(config-line)#access-class TELNET-ACL in Router(config-line)#exit
技术部SW:
1 2 3 4 5 6 7 8 9 10 11 12 13 14
tech-sw#conf t Enter configuration commands, one per line. End with CNTL/Z. tech-sw(config)#interface vlan 500 tech-sw(config-if)# %LINK-5-CHANGED: Interface Vlan500, changed state to up tech-sw(config-if)#ip address 192.168.20.120 255.255.255.0 tech-sw(config-if)#no shut tech-sw(config-if)#interface g0/1 tech-sw(config-if)#switchport trunk allowed vlan add 500
Router>en Router#conf t Enter configuration commands, one per line. End with CNTL/Z. Router(config)#int g0/1 Router(config-if)#ip address 100.1.1.1 255.255.255.0 Router(config-if)#no shut %LINK-5-CHANGED: Interface GigabitEthernet0/1, changed state to up Router(config-if)#router ospf 1 Router(config-router)#network 100.1.1.0 0.0.0.255 area 0 Router(config-router)#hostname r1 r1(config)#
公网部分:R2-IP
IP地址:
配置项
接口 g0/0
接口 g0/1
IP 地址
100.1.1.2
124.126.100.1
子网掩码
255.255.255.0
255.255.255.0
OSPF 进程
1
1
OSPF 网络
100.1.1.0
124.126.100.0
OSPF 区域
0
0
1 2 3 4 5 6 7 8 9 10 11 12 13 14 15 16 17
Router>en
Router#conf t
Enter configuration commands, one per line.  End with CNTL/Z.
Router(config)#hostname r2
r2(config)#int g0/0
r2(config-if)#ip address 100.1.1.2 255.255.255.0
r2(config-if)#no shut
  %LINK-5-CHANGED: Interface GigabitEthernet0/0, changed state to up
  %LINEPROTO-5-UPDOWN: Line protocol on Interface GigabitEthernet0/0, changed state to up
r2(config-if)#int g0/1
r2(config-if)#ip address 124.126.100.1 255.255.255.0
r2(config-if)#no shut
  %LINK-5-CHANGED: Interface GigabitEthernet0/1, changed state to up
#配置OSPF
r2(config-if)#router ospf 1
r2(config-router)#network 100.1.1.0 0.0.0.255 area 0
r2(config-router)#network 124.126.100.0 0.0.0.255 area 0
Router>en
Router#conf t
Enter configuration commands, one per line.  End with CNTL/Z.
Router(config)#hostname r4
r4(config)#int g0/0
r4(config-if)#ip addr 202.96.137.2 255.255.255.0
r4(config-if)#no shut
r1#show ip route Codes: L - local, C - connected, S - static, R - RIP, M - mobile, B - BGP D - EIGRP, EX - EIGRP external, O - OSPF, IA - OSPF inter area N1 - OSPF NSSA external type 1, N2 - OSPF NSSA external type 2 E1 - OSPF external type 1, E2 - OSPF external type 2, E - EGP i - IS-IS, L1 - IS-IS level-1, L2 - IS-IS level-2, ia - IS-IS inter area * - candidate default, U - per-user static route, o - ODR P - periodic downloaded static route
Gateway of last resort is not set
100.0.0.0/8 is variably subnetted, 2 subnets, 2 masks C 100.1.1.0/24 is directly connected, GigabitEthernet0/1 L 100.1.1.1/32 is directly connected, GigabitEthernet0/1 124.0.0.0/24 is subnetted, 2 subnets O 124.126.100.0/24 [110/2] via 100.1.1.2, 00:13:02, GigabitEthernet0/1 O 124.126.200.0/24 [110/3] via 100.1.1.2, 00:11:52, GigabitEthernet0/1 S 192.168.0.0/16 [1/0] via 192.168.10.2 192.168.10.0/24 is variably subnetted, 2 subnets, 2 masks C 192.168.10.0/30 is directly connected, GigabitEthernet0/0 L 192.168.10.1/32 is directly connected, GigabitEthernet0/0 O 202.96.137.0/24 [110/3] via 100.1.1.2, 00:00:33, GigabitEthernet0/1
r2>en
r2#conf t
Enter configuration commands, one per line.  End with CNTL/Z.
r2(config)#int g0/2
r2(config-if)#
r2(config-if)#ip address 113.100.2.1 255.255.255.0
r2(config-if)#no shut
  %LINK-5-CHANGED: Interface GigabitEthernet0/2, changed state to up
  %LINEPROTO-5-UPDOWN: Line protocol on Interface GigabitEthernet0/2, changed state to up
#配置OSPF
r2(config-if)# router ospf 1
r2(config-router)#network 113.100.2.0 0.0.0.255 area 1
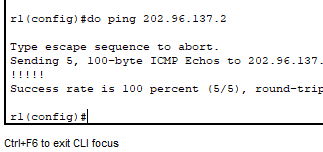
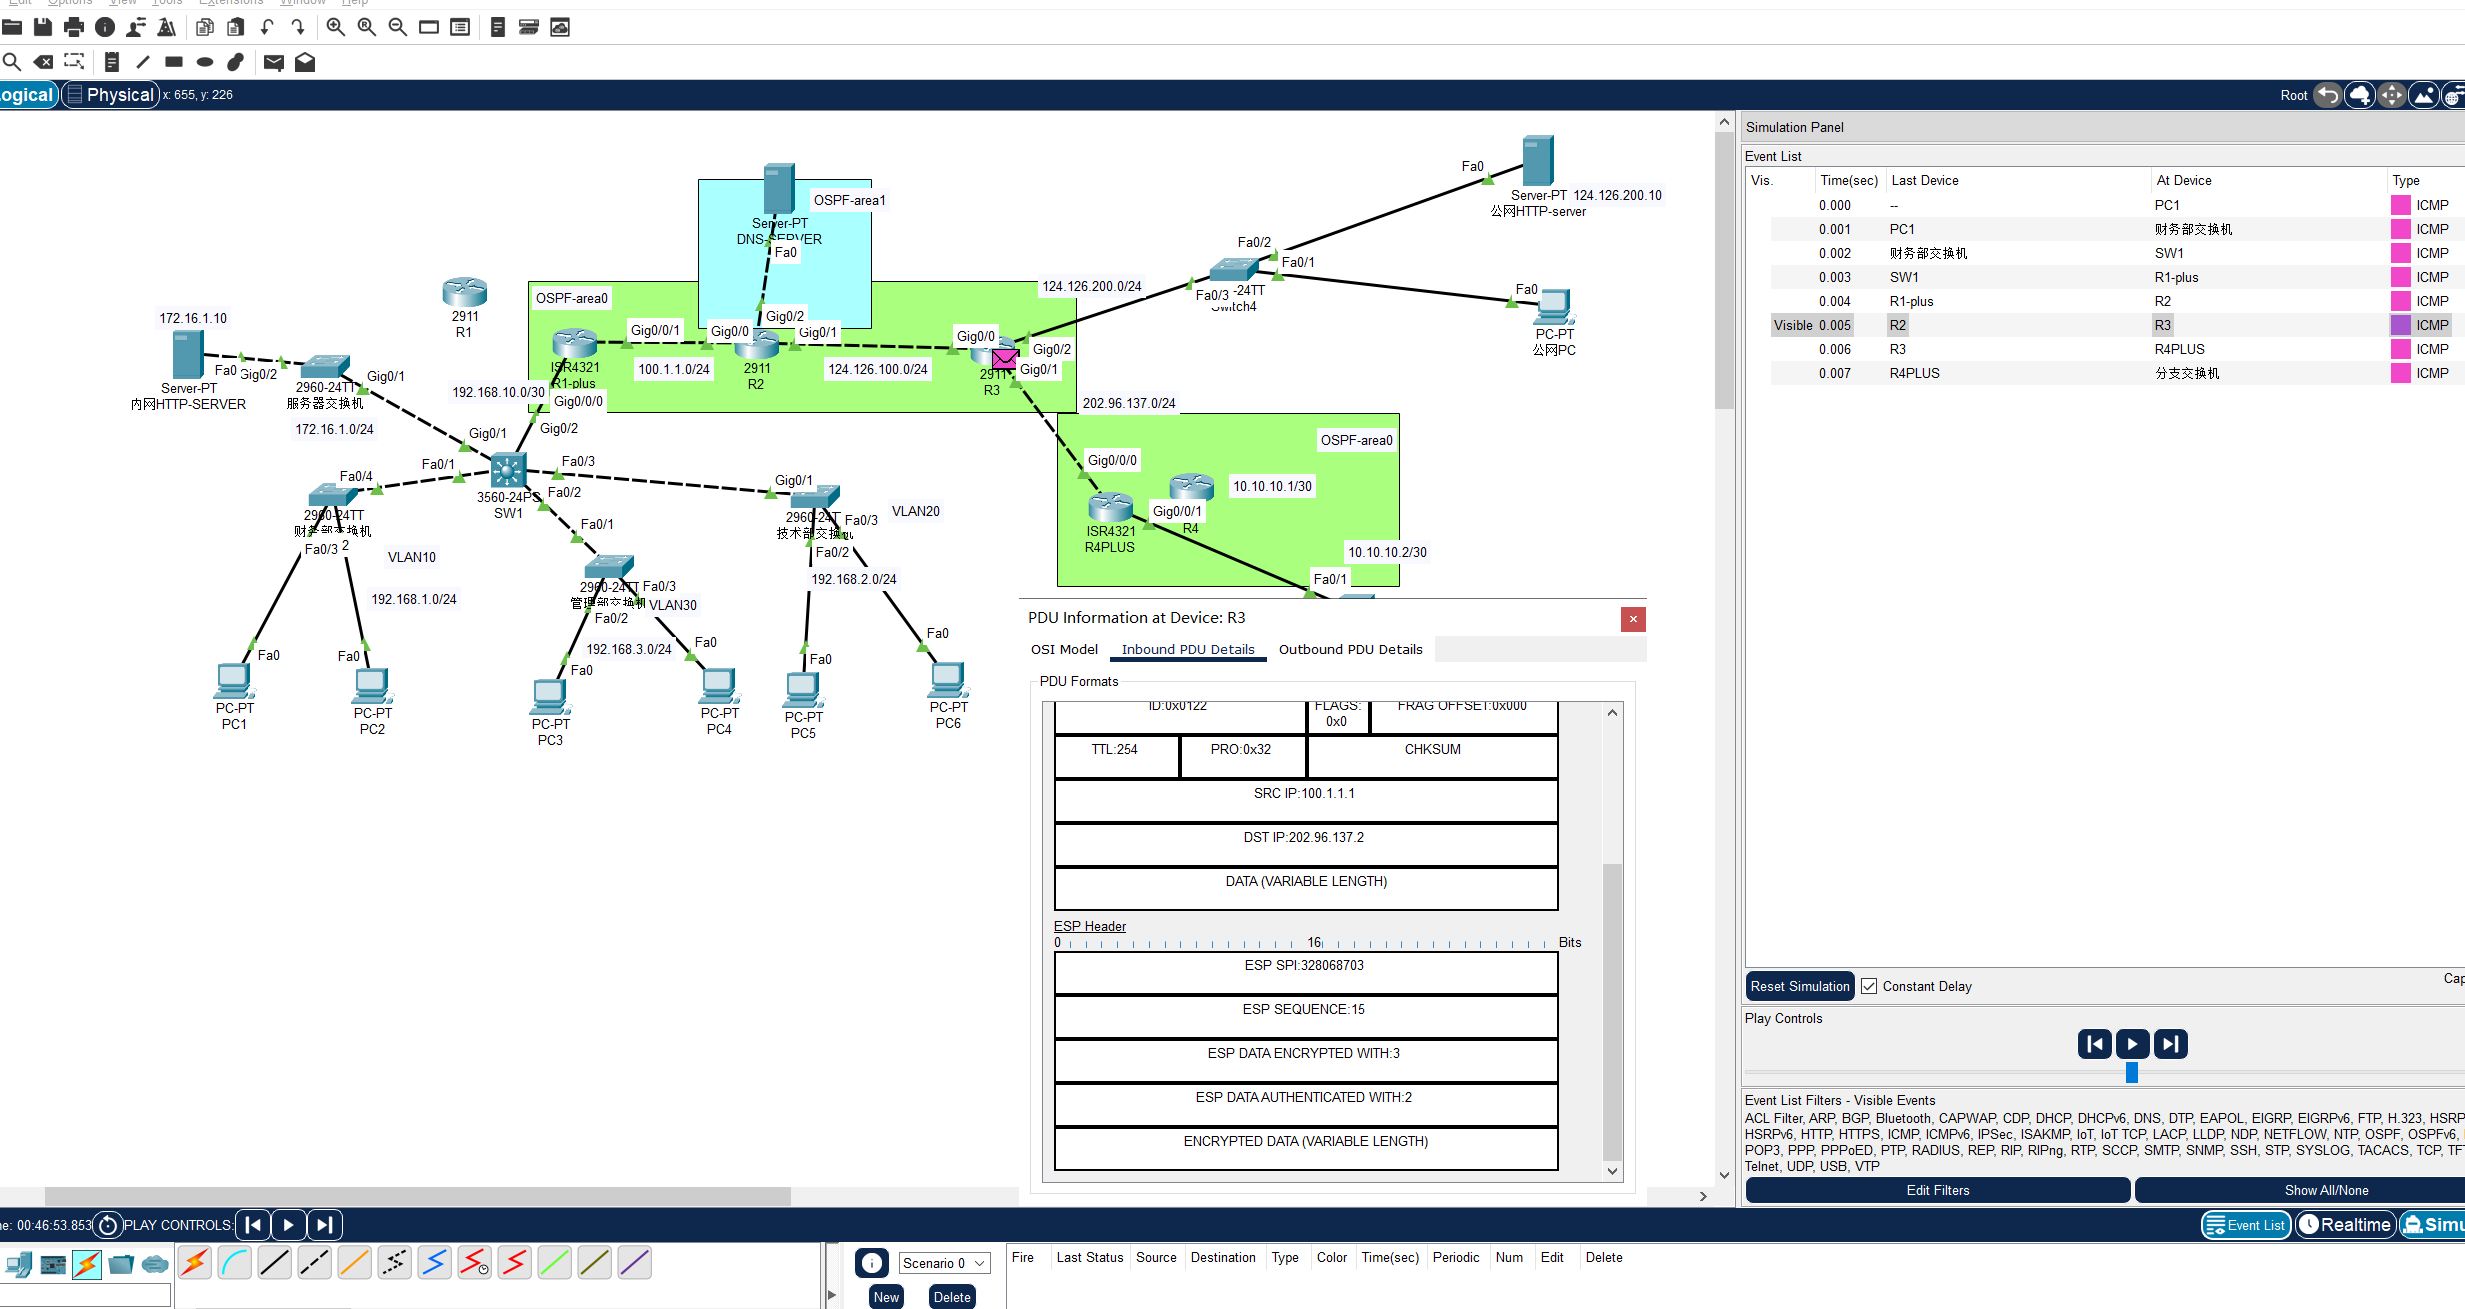
Type escape sequence to abort. Sending 5, 100-byte ICMP Echos to 202.96.137.2, timeout is 2 seconds: !!!!! Success rate is 100 percent (5/5), round-trip min/avg/max = 0/0/0 ms
r1(config)#crypto ipsec transform-set R1-R4 esp-aes 256 esp-sha-hmac r1(config)#crypto map IPSEC-CRYPTOMAP 10 ipsec-isakmp % NOTE: This new crypto map will remain disabled until a peer and a valid access list have been configured. r1(config-crypto-map)# set peer 202.96.137.2 r1(config-crypto-map)# set pfs group5 r1(config-crypto-map)# set security-association lifetime seconds 86400 r1(config-crypto-map)# set transform-set R1-R4 r1(config-crypto-map)# match address 100 r1(config-crypto-map)#interface GigabitEthernet0/0 %Invalid interface type and number r1(config)#interface GigabitEthernet0/0/1 r1(config-if)#crypto map IPSEC-CRYPTOMAP *Jan 3 07:16:26.785: %CRYPTO-6-ISAKMP_ON_OFF: ISAKMP is ON r1(config-if)#
ip route 0.0.0.0 0.0.0.0 100.1.1.2 - 配置默认路由,将所有目的地指向100.1.1.2
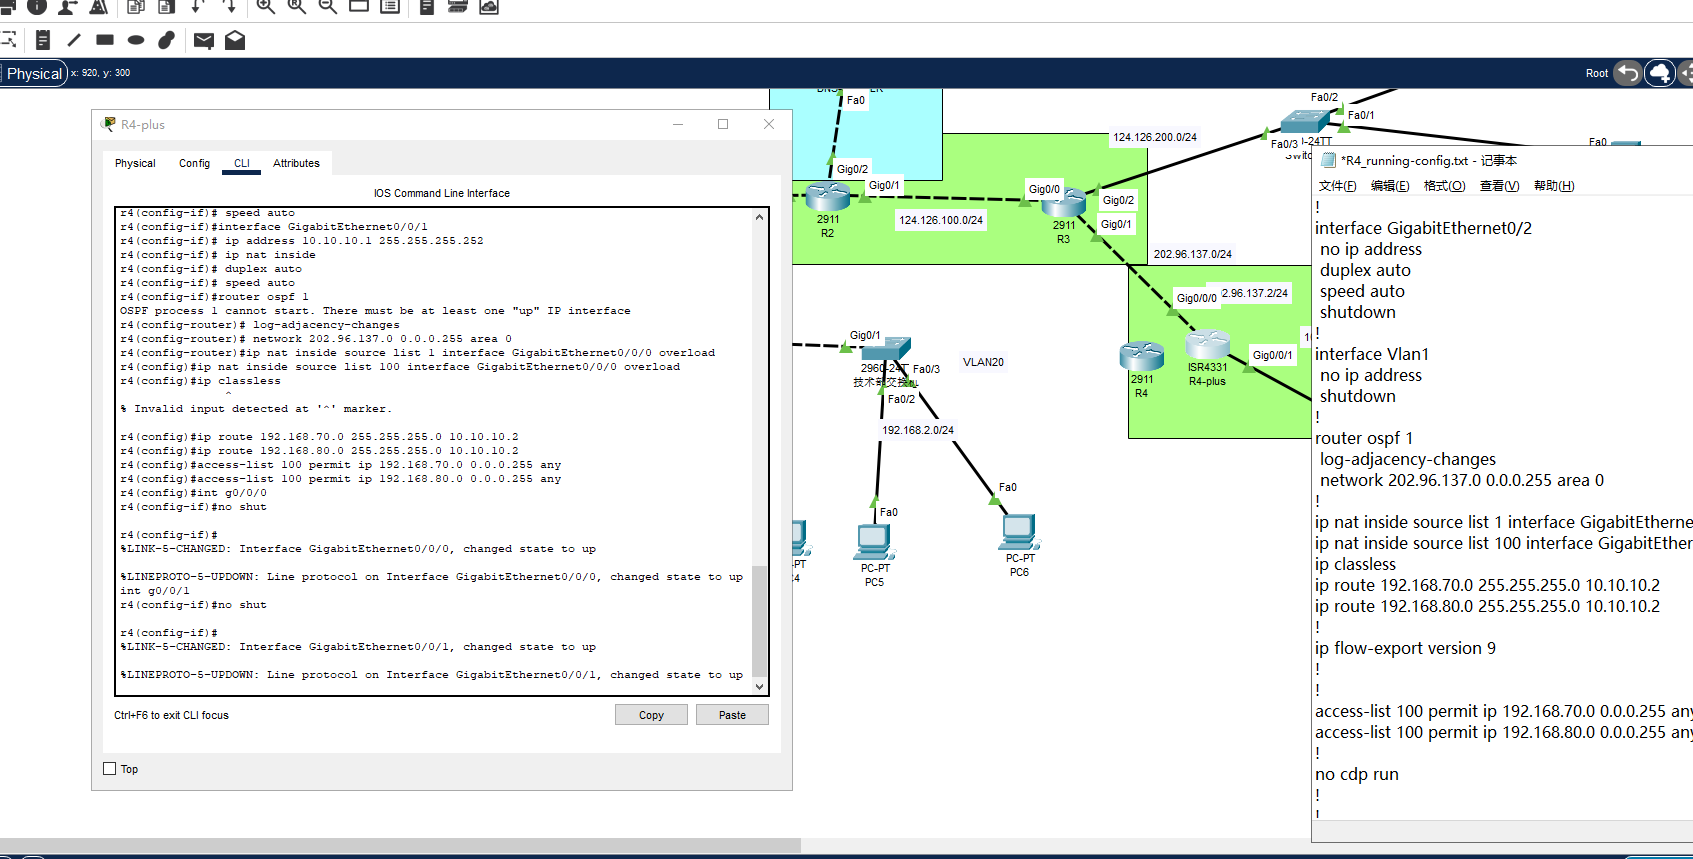
r4(config)#crypto map IPSEC-CRYPTOMAP 10 ipsec-isakmp % NOTE: This new crypto map will remain disabled until a peer and a valid access list have been configured. r4(config-crypto-map)# set peer 100.1.1.1 r4(config-crypto-map)# set pfs group5 r4(config-crypto-map)# set security-association lifetime seconds 86400 r4(config-crypto-map)# set transform-set R4-R1 r4(config-crypto-map)# match address 101
no access-list 100 ip access-list extended 100 permit ip 192.168.1.0 0.0.0.255 192.168.70.0 0.0.0.255 permit ip 192.168.1.0 0.0.0.255 192.168.80.0 0.0.0.255 permit ip 192.168.2.0 0.0.0.255 192.168.70.0 0.0.0.255 permit ip 192.168.2.0 0.0.0.255 192.168.80.0 0.0.0.255 permit ip 192.168.3.0 0.0.0.255 192.168.70.0 0.0.0.255 permit ip 192.168.3.0 0.0.0.255 192.168.80.0 0.0.0.255 permit ip 172.16.1.0 0.0.0.255 192.168.70.0 0.0.0.255 permit ip 172.16.1.0 0.0.0.255 192.168.80.0 0.0.0.255 ip access-list extended NO-NAT deny ip 192.168.1.0 0.0.0.255 192.168.70.0 0.0.0.255 deny ip 192.168.1.0 0.0.0.255 192.168.80.0 0.0.0.255 deny ip 192.168.2.0 0.0.0.255 192.168.70.0 0.0.0.255 deny ip 192.168.2.0 0.0.0.255 192.168.80.0 0.0.0.255 deny ip 192.168.3.0 0.0.0.255 192.168.70.0 0.0.0.255 deny ip 192.168.3.0 0.0.0.255 192.168.80.0 0.0.0.255 deny ip 172.16.1.0 0.0.0.255 192.168.70.0 0.0.0.255 deny ip 172.16.1.0 0.0.0.255 192.168.80.0 0.0.0.255 permit ip 192.168.0.0 0.0.255.255 any permit ip 172.16.1.0 0.0.0.255 any no ip nat inside source list 1 interface GigabitEthernet0/0/1 overload no ip nat inside source list 10 interface GigabitEthernet0/0/1 overload ip nat inside source list NO-NAT interface GigabitEthernet0/0/1 overload
crypto map IPSEC-CRYPTOMAP 10 ipsec-isakmp match address 100 interface GigabitEthernet0/0/0 ip nat inside ! interface GigabitEthernet0/0/1 ip nat outside crypto map IPSEC-CRYPTOMAP no access-list 1 no access-list 10
#VTP服务器 core(config)#vtp mode server Device mode already VTP SERVER. core(config)#vtp domain ovo Changing VTP domain name from NULL to ovo core(config)#vlan 10 core(config-vlan)#vlan 20 core(config-vlan)#vlan 30 core(config-vlan)#vlan 40
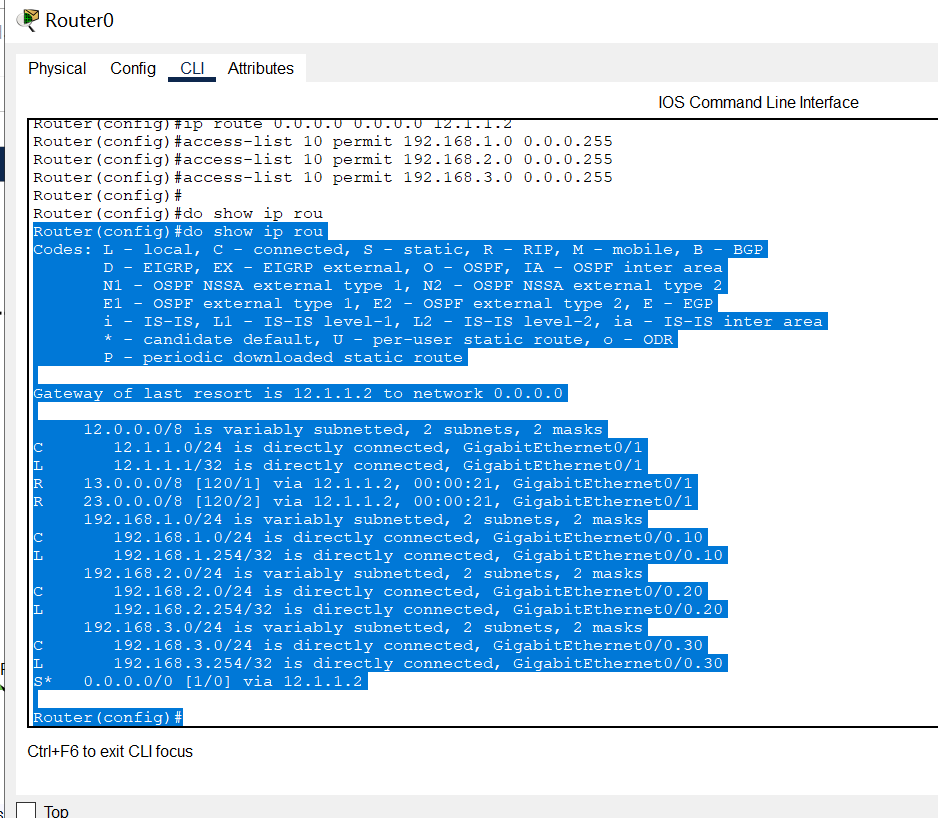
R    13.0.0.0/8 [120/1] via 12.1.1.2, 00:00:21, GigabitEthernet0/1
R    23.0.0.0/8 [120/2] via 12.1.1.2, 00:00:21, GigabitEthernet0/1
     192.168.1.0/24 is variably subnetted, 2 subnets, 2 masks