第九周实训 ansible 周一 Centos 安装 1. 镜像下载
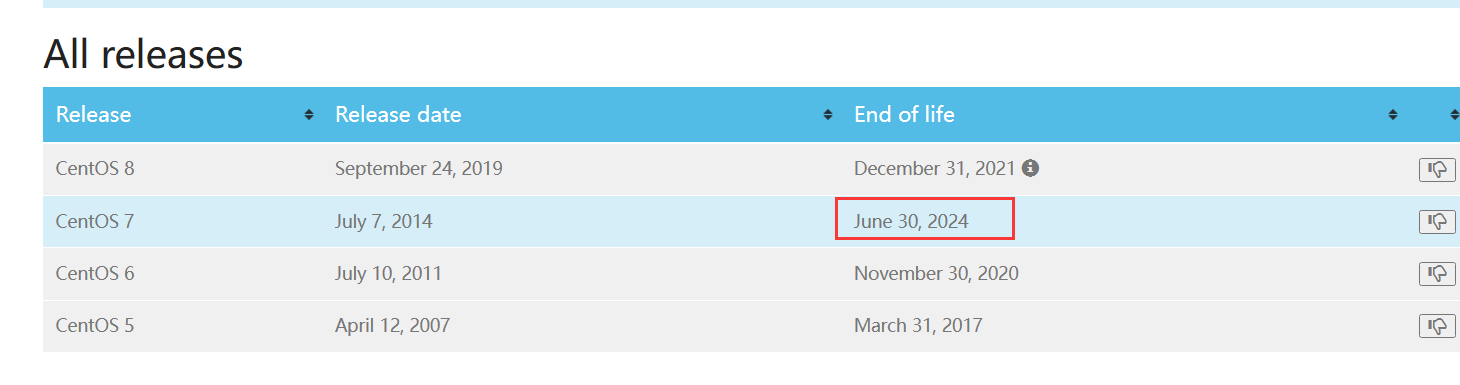
Centos7 今年 6 月就停止维护(会撤源,然后几乎就不能用了)
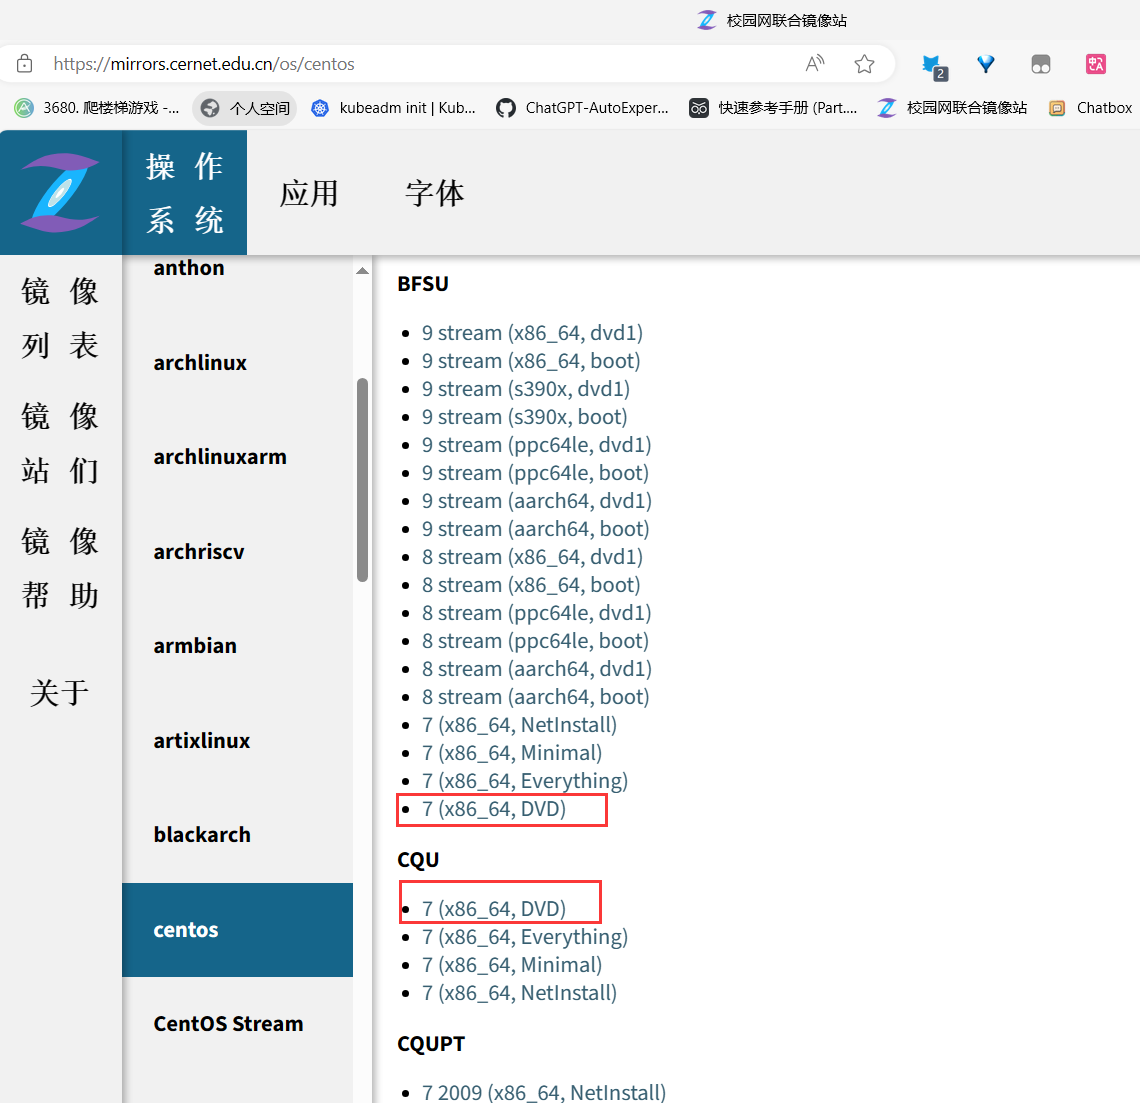
可以下百度网盘,也可以用这个地址(选7 (x86_64, DVD) )
https://mirrors.cernet.edu.cn/os/centos
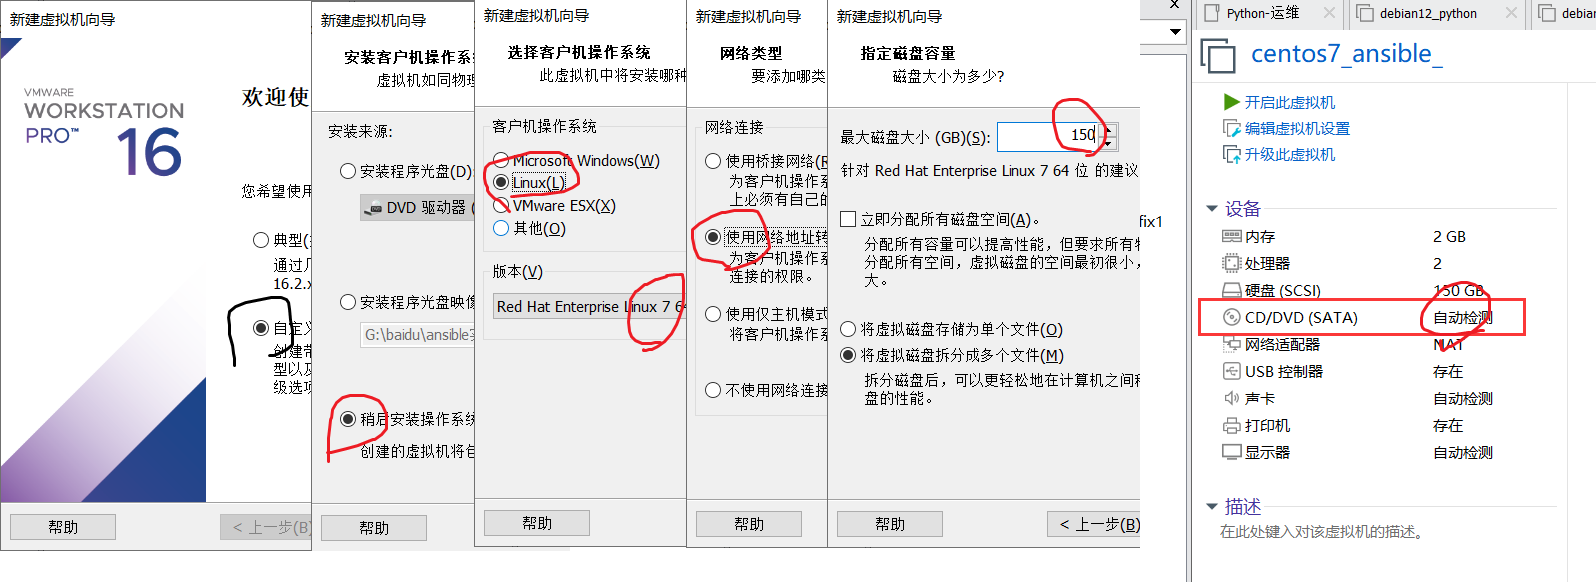
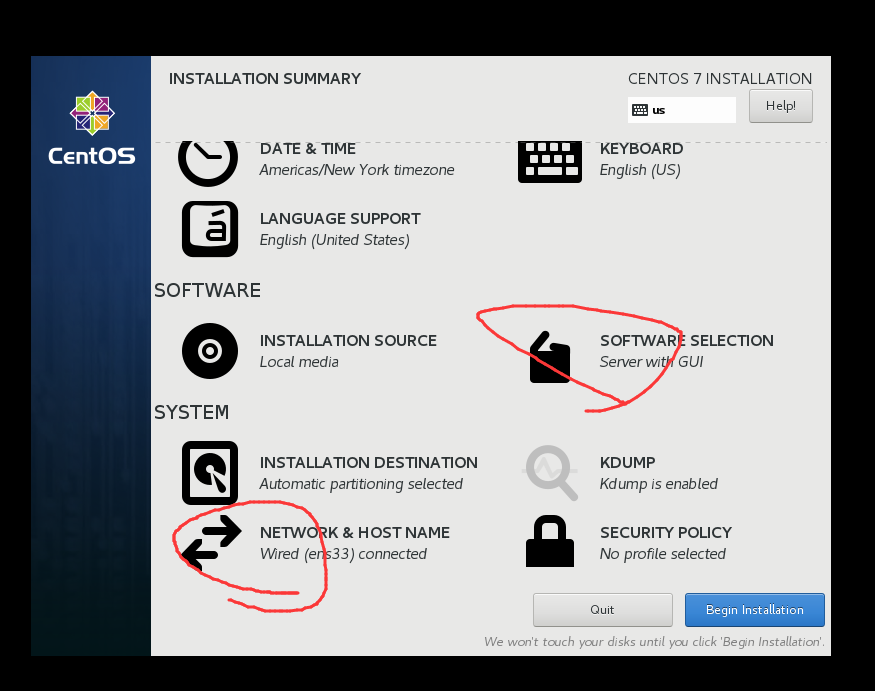
2. 安装
推荐英文
可能需要的小点
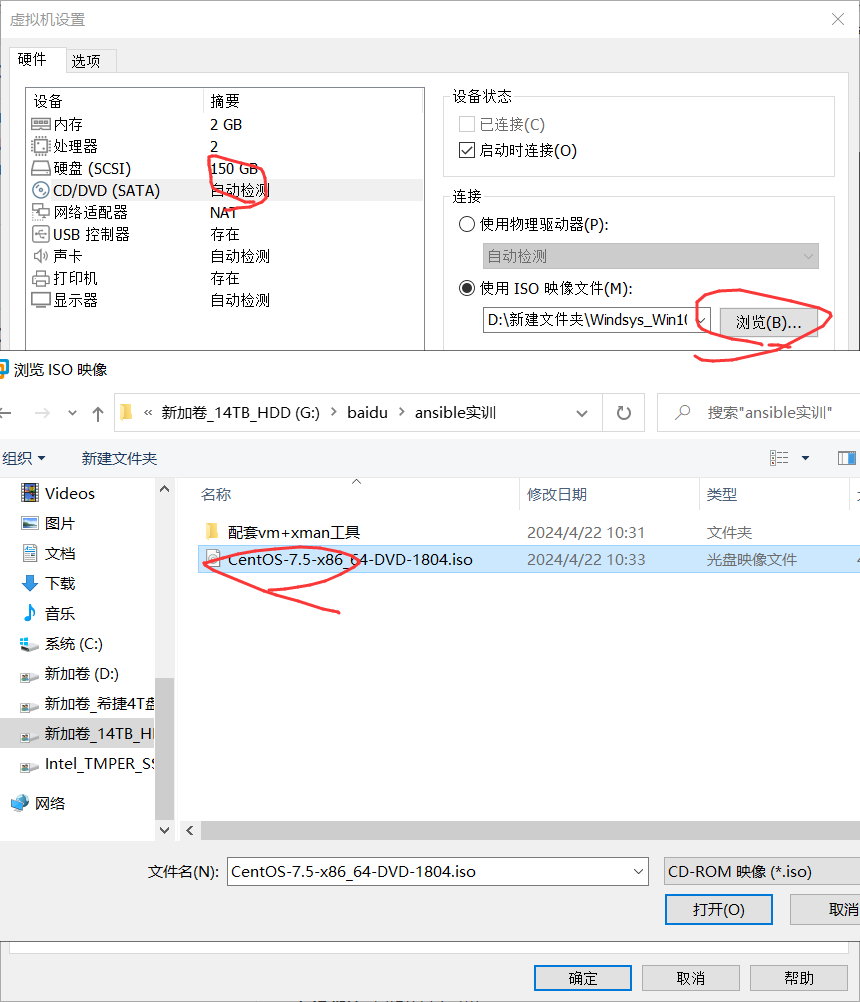
ISO 镜像:
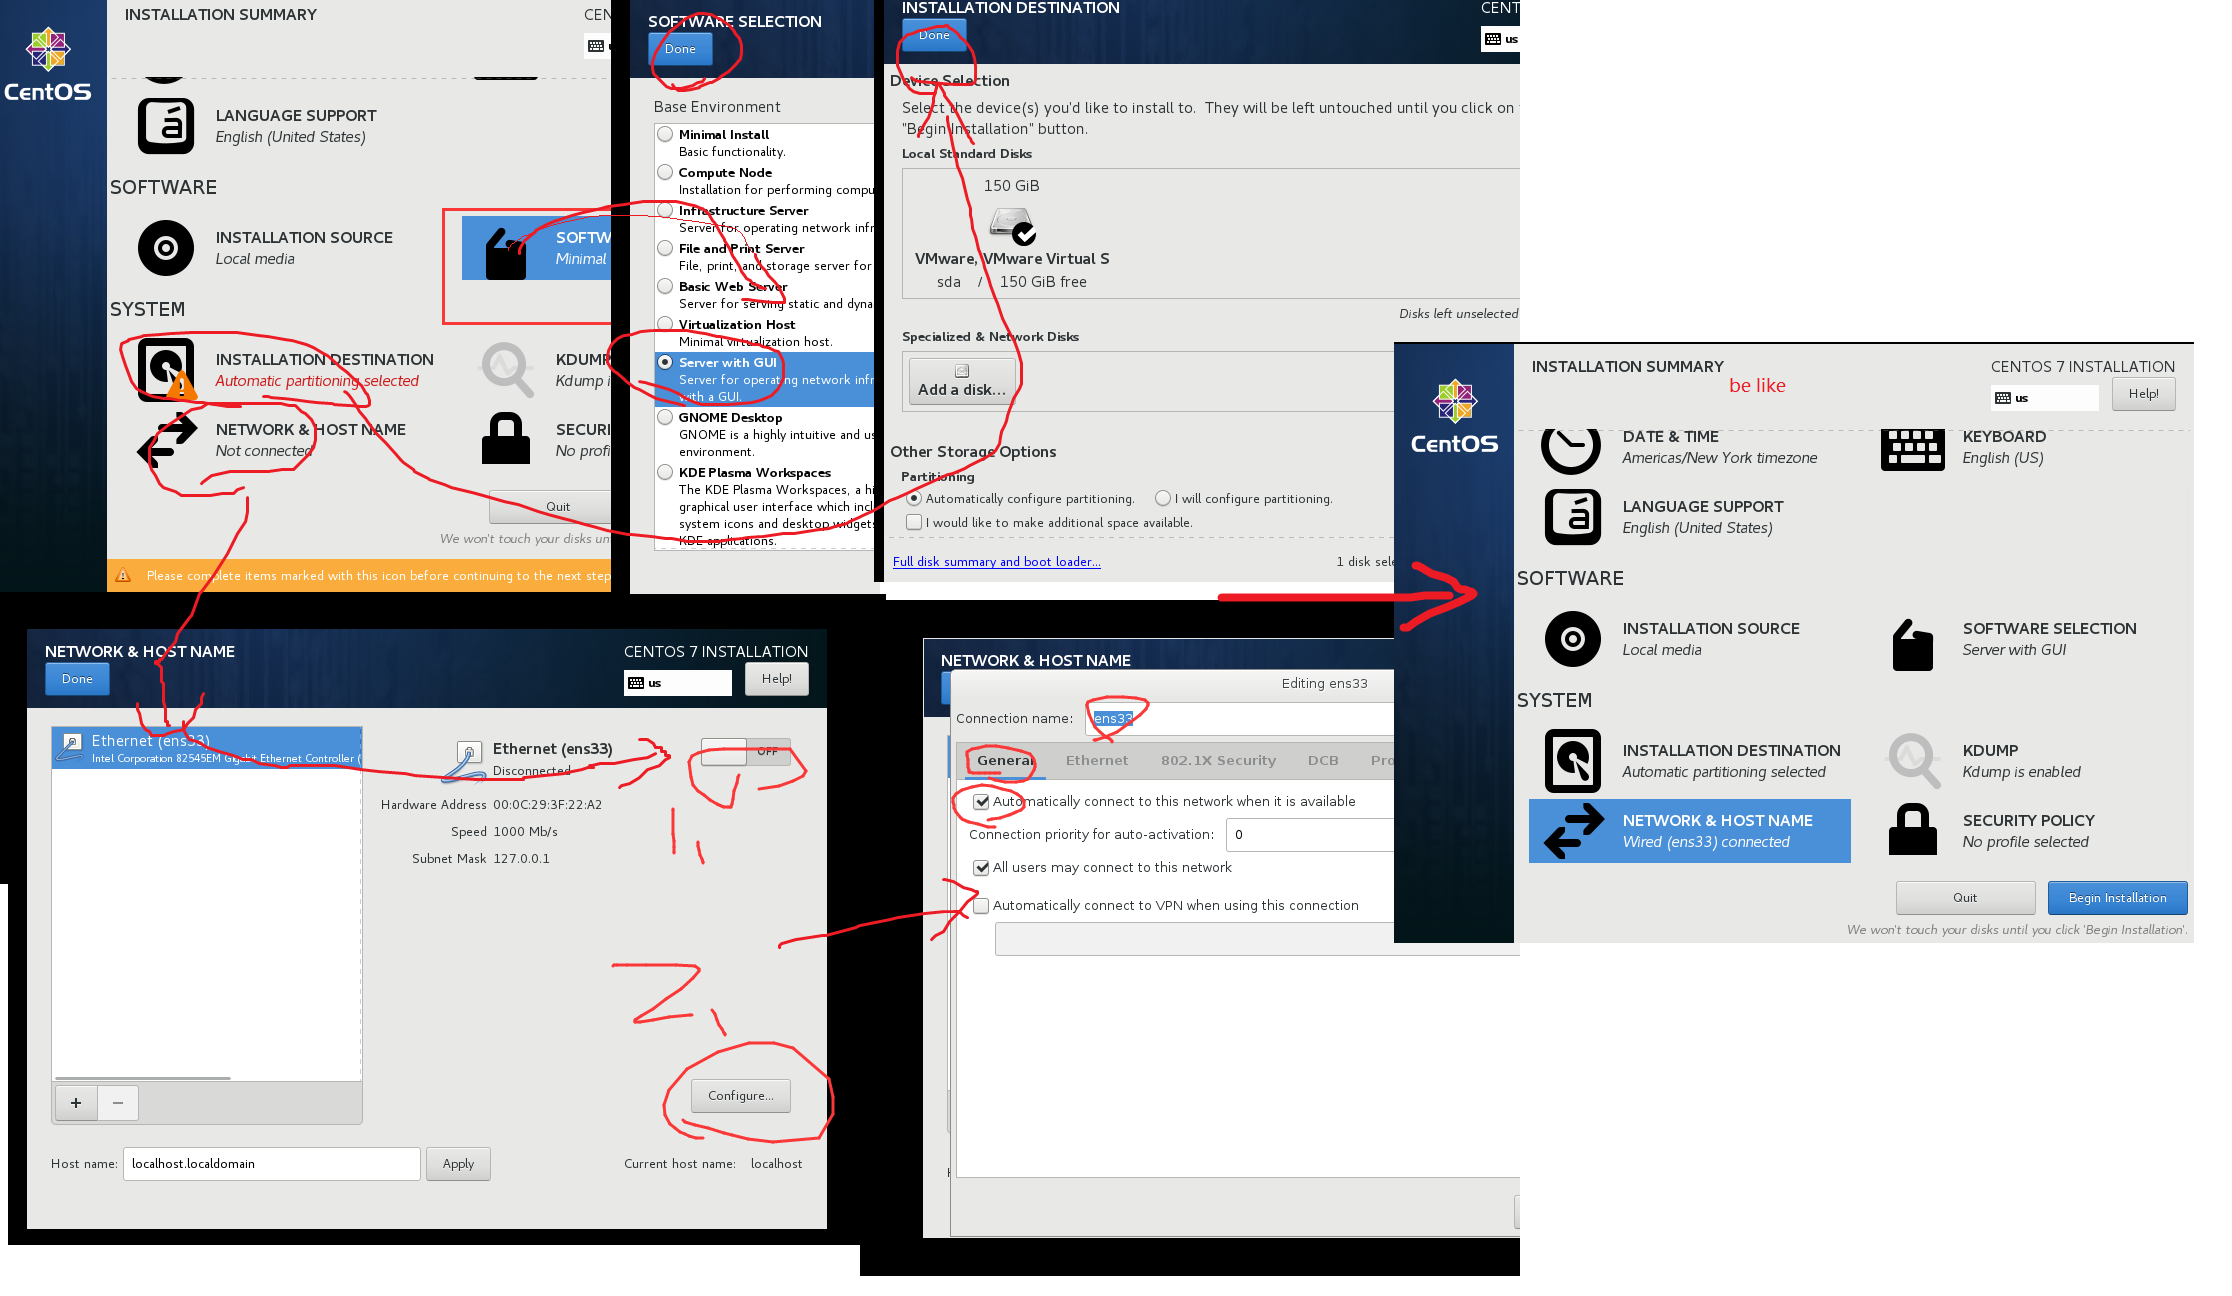
安装,选第一个 INSTALL CENTOS7
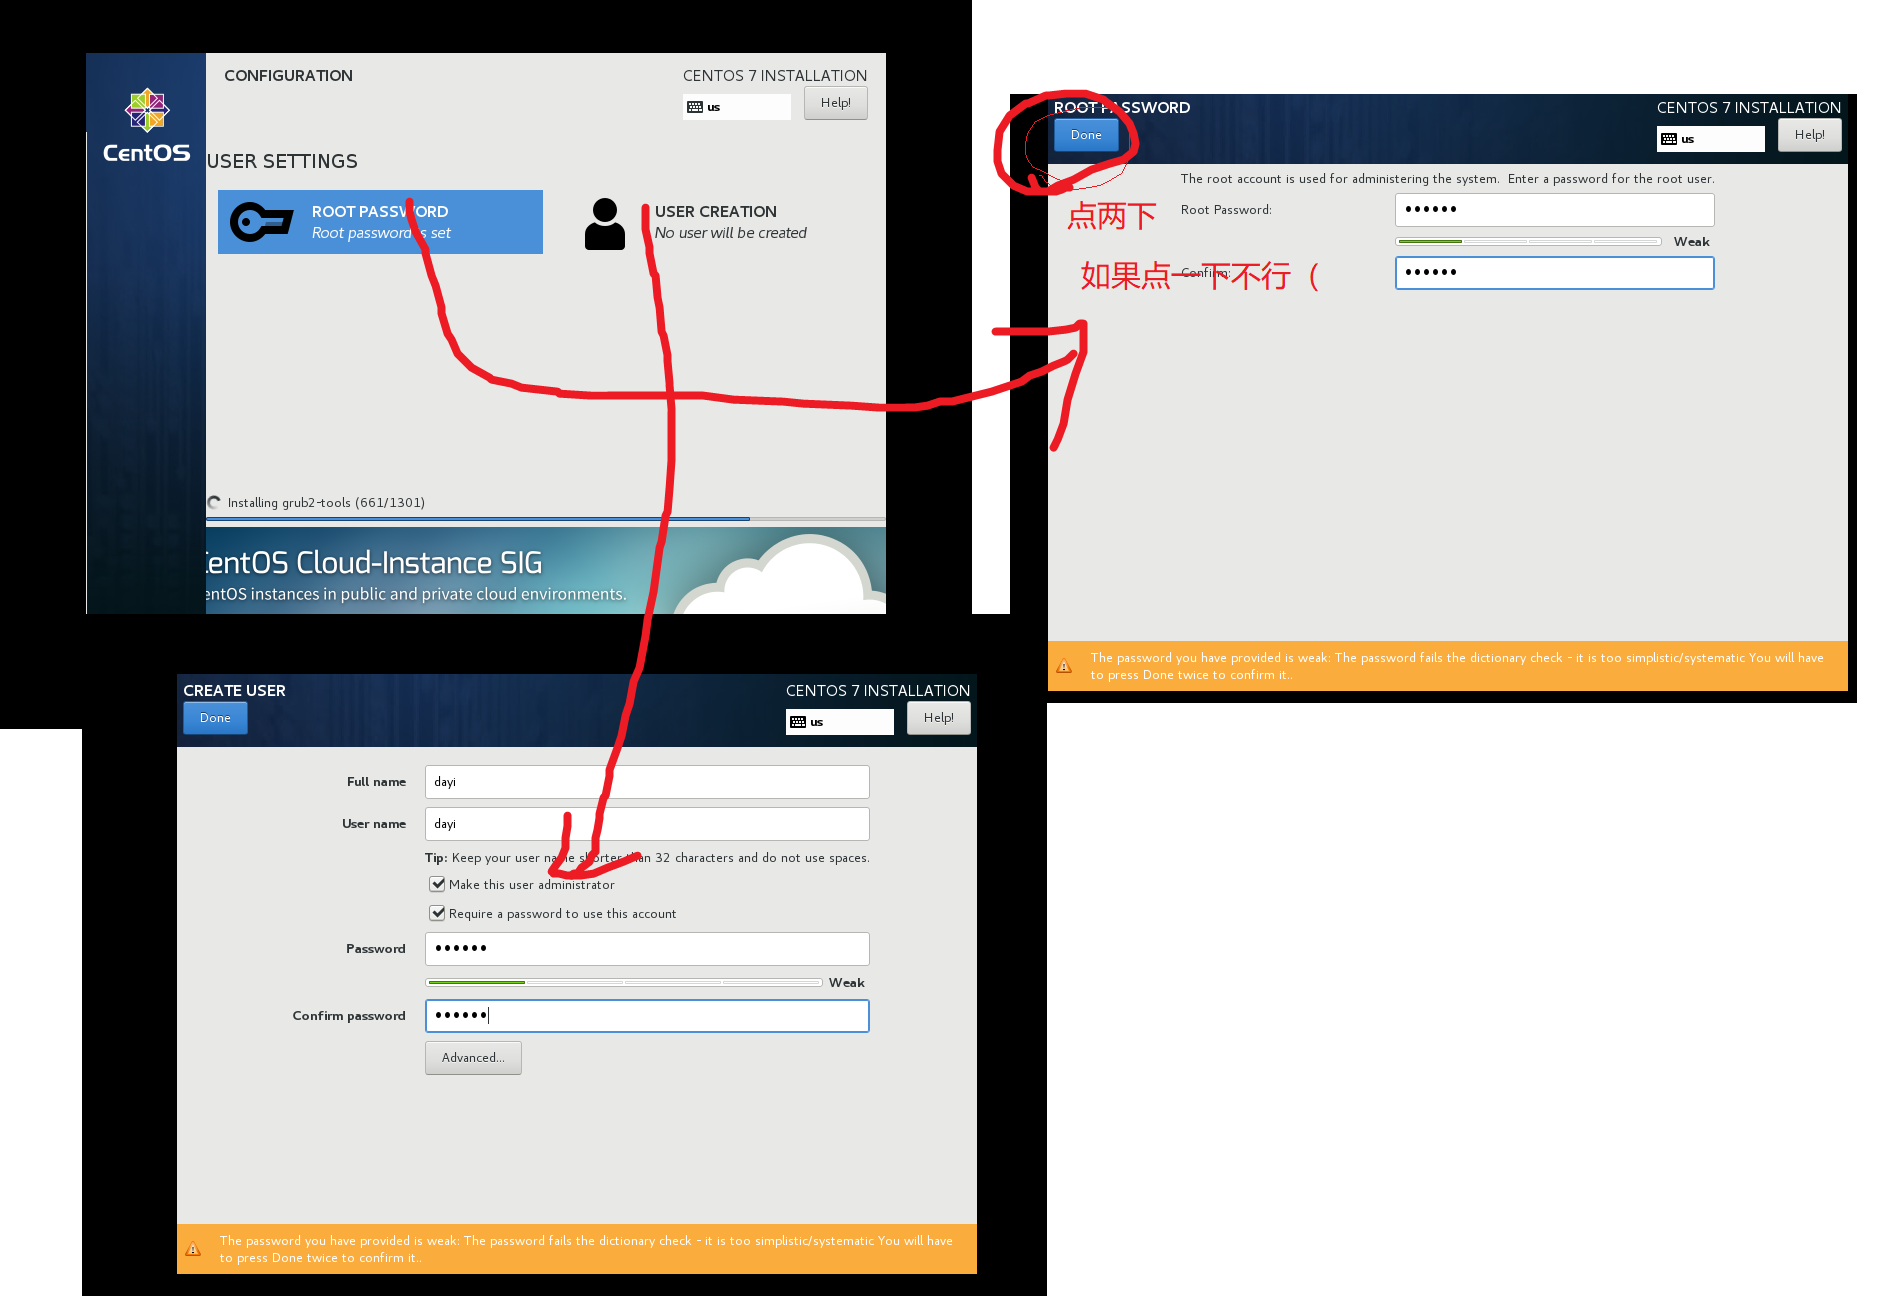
root 用户名密码
进系统
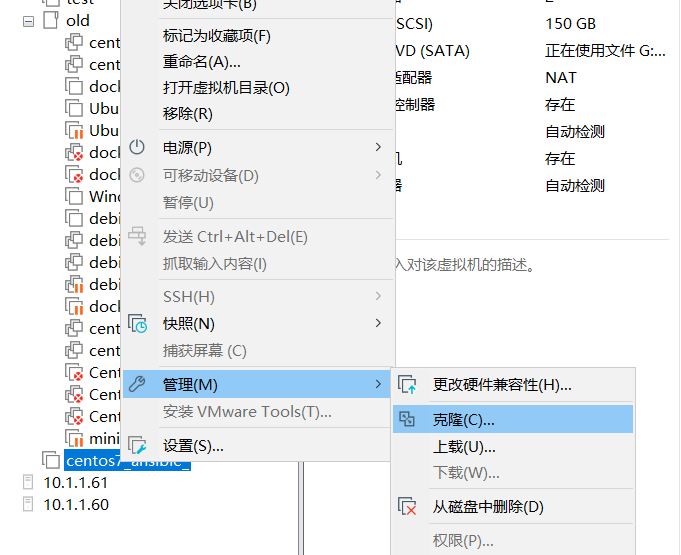
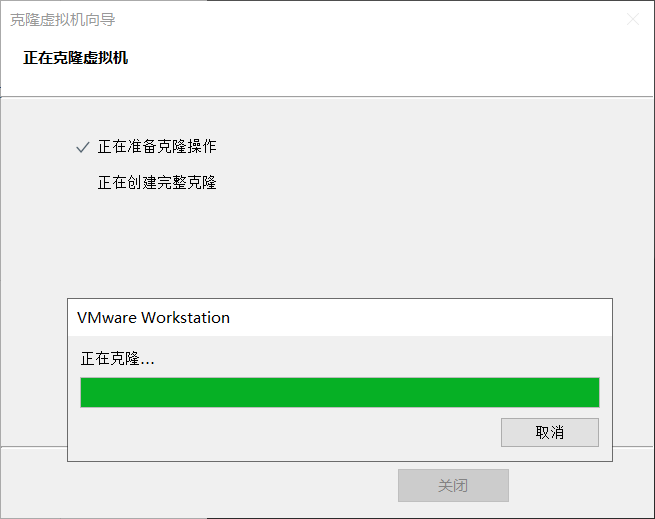
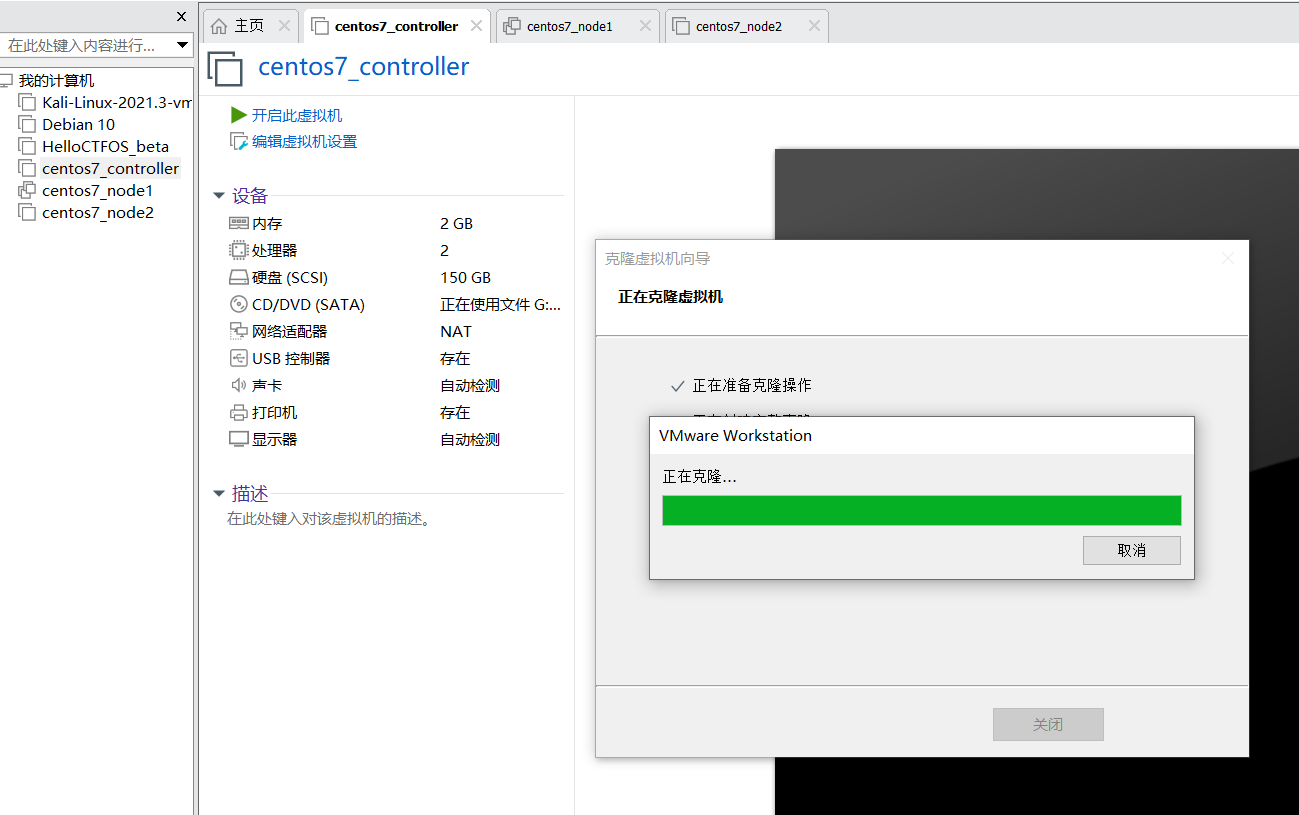
3. 克隆 可有可无,有被控机子就行。
配置 EPEL 源、安装 Ansible
粘贴:CTRL+SHIFT+V
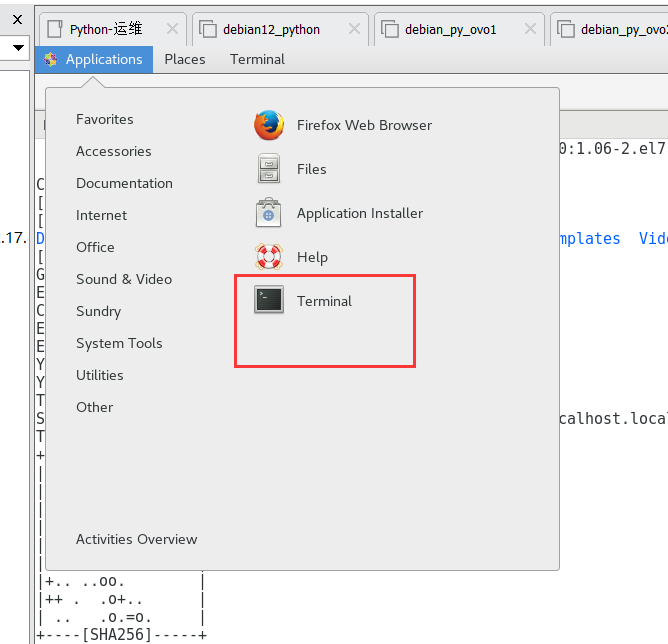
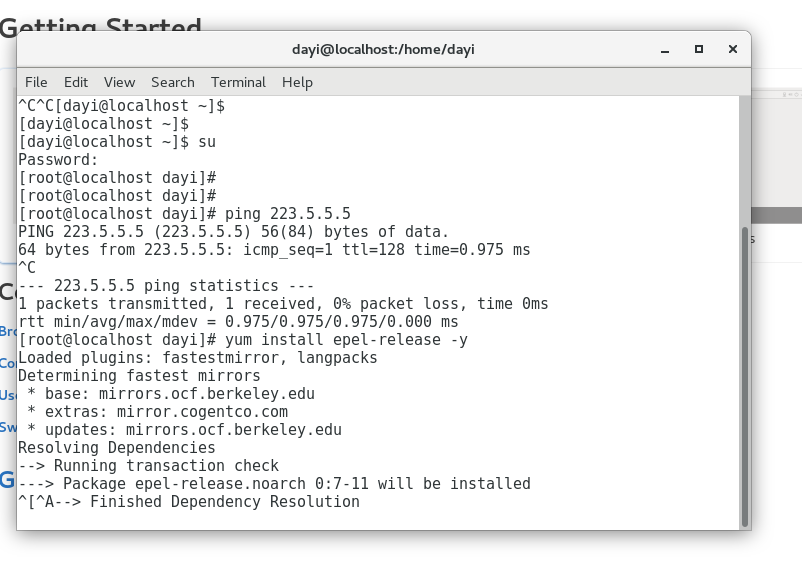
master(非克隆机子)上,开机,左上角,开终端
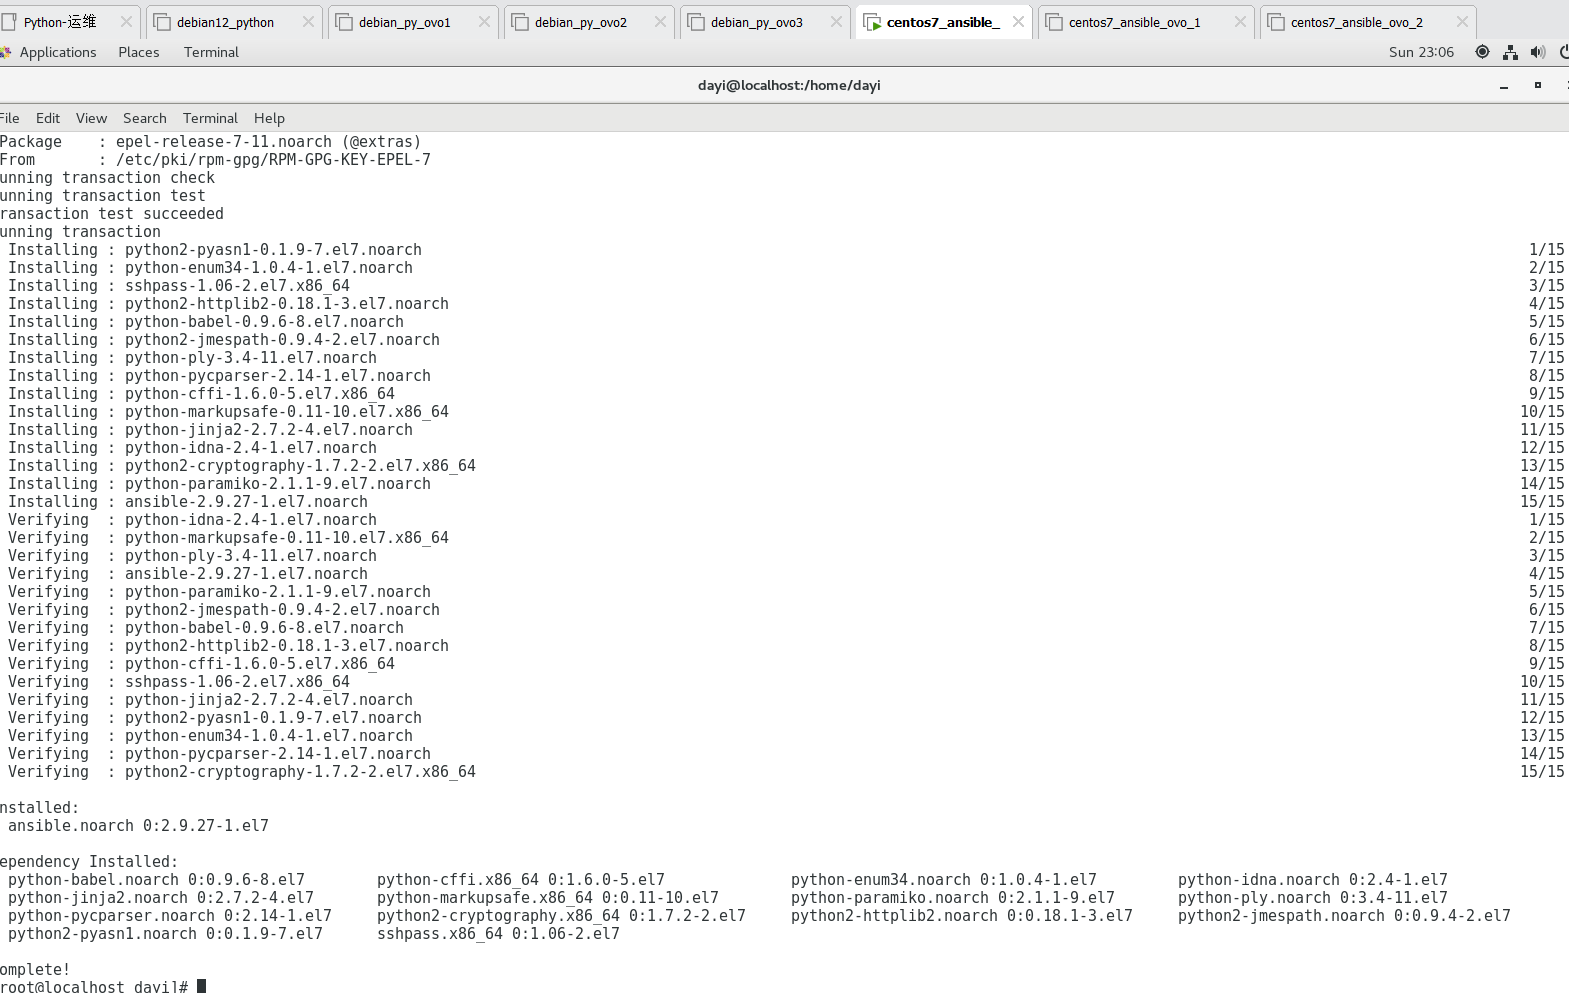
1
2
3
4
su ping 223.5.5.5 yum install epel-release -y yum install ansible -y
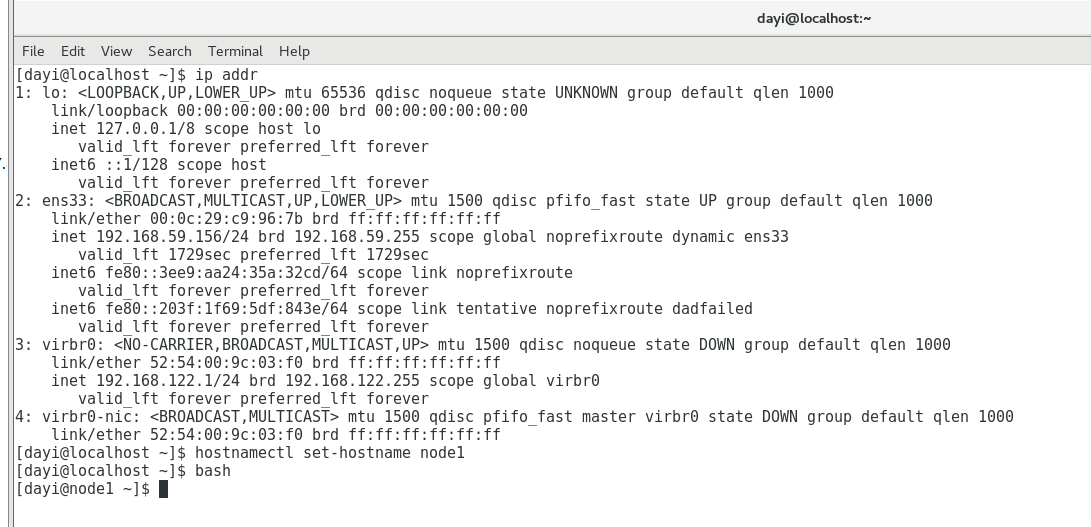
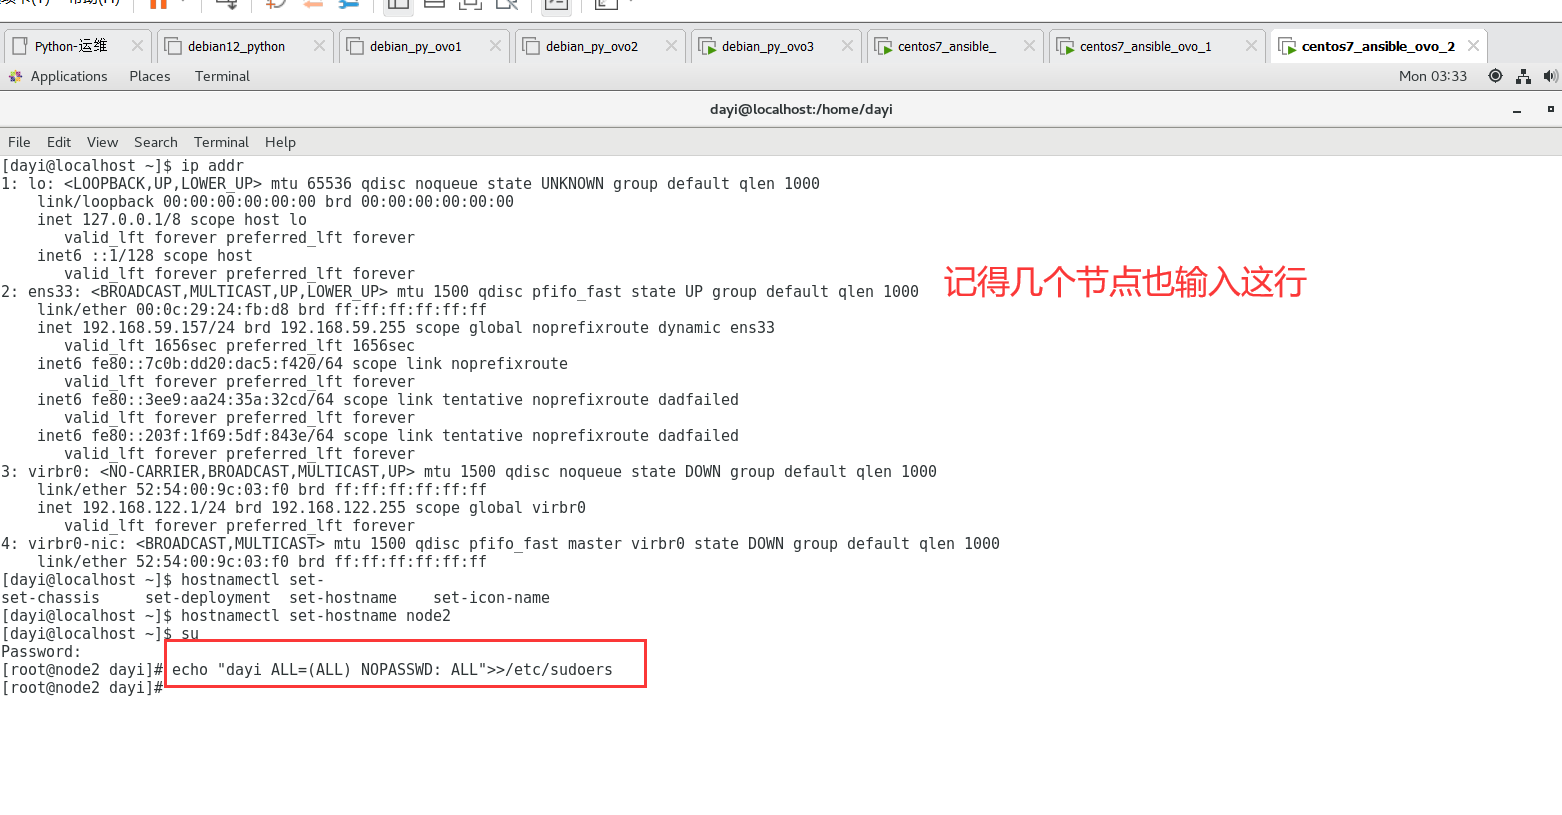
设置从节点主机名
不知道有没有必要性,可以先弄一下(
搭嘎这样:
1
2
3
4
su hostnamectl set-hostname node1 [dayi@localhost ~]$ bash [dayi@node1 ~]$
Centos 关闭自动锁屏
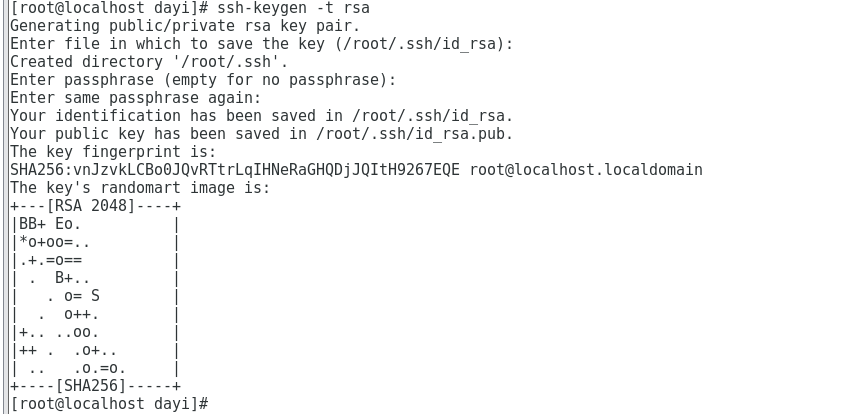
配置免密登录 在主机生成 RSA 密钥对
查看 IP 地址 先查看 IP 地址:
下面俩小节选一个就可以
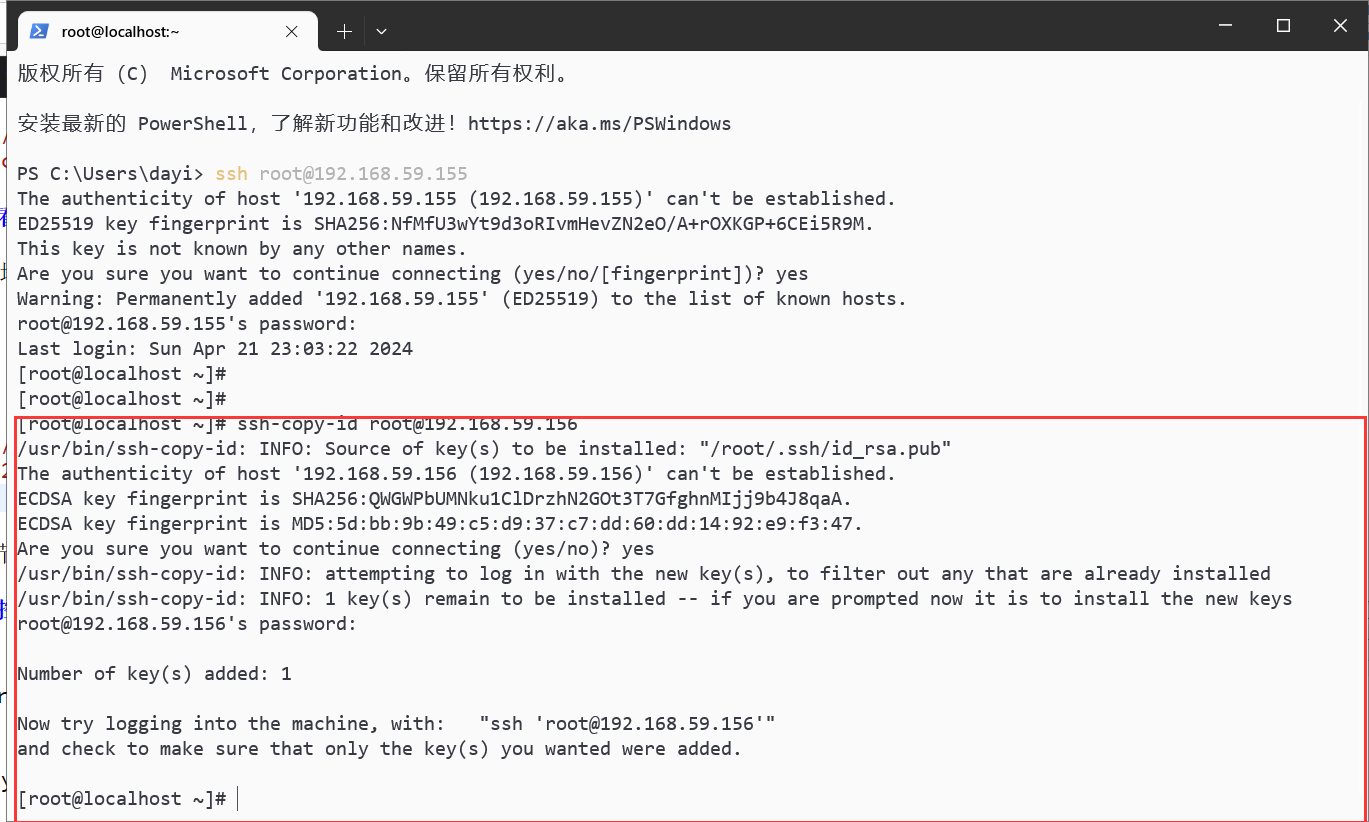
【centos 系】[被控机是 centos 红帽子 系,一般是默认允许 root 直接 ssh 登录] 在 master 上:
1
2
su ssh-copy-id root@[IP地址]
be-like:
1 2 3 4 5 6 7 8 9 10 11 12 13 14 15 16 [root@localhost ~] /usr/bin/ssh-copy-id: INFO: Source of key(s) to be installed: "/root/.ssh/id_rsa.pub" The authenticity of host '192.168.59.156 (192.168.59.156)' can't be established. ECDSA key fingerprint is SHA256:QWGWPbUMNku1ClDrzhN2GOt3T7GfghnMIjj9b4J8qaA. ECDSA key fingerprint is MD5:5d:bb:9b:49:c5:d9:37:c7:dd:60:dd:14:92:e9:f3:47. Are you sure you want to continue connecting (yes/no)? yes /usr/bin/ssh-copy-id: INFO: attempting to log in with the new key(s), to filter out any that are already installed /usr/bin/ssh-copy-id: INFO: 1 key(s) remain to be installed -- if you are prompted now it is to install the new keys root@192.168.59.156' s password:Number of key(s) added: 1 Now try logging into the machine, with: "ssh 'root@192.168.59.156'" and check to make sure that only the key(s) you wanted were added. [root@localhost ~]
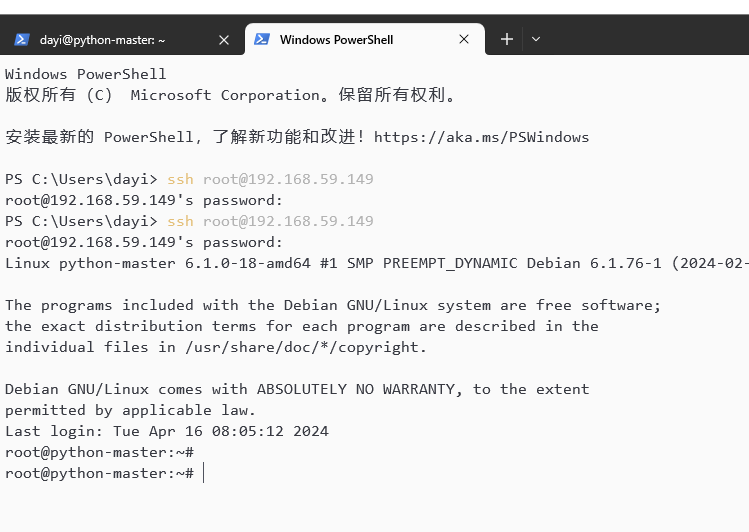
【debian 系】 [被控机是 Debian 系,一般不允许 root 直接登录]
注意这个跟上面做一个就可以。【debian 系和 centos 系】
跟作业一样啦:
先被控机允许 ROOT 登录
然后ssh-copy-id复制秘钥到主机。
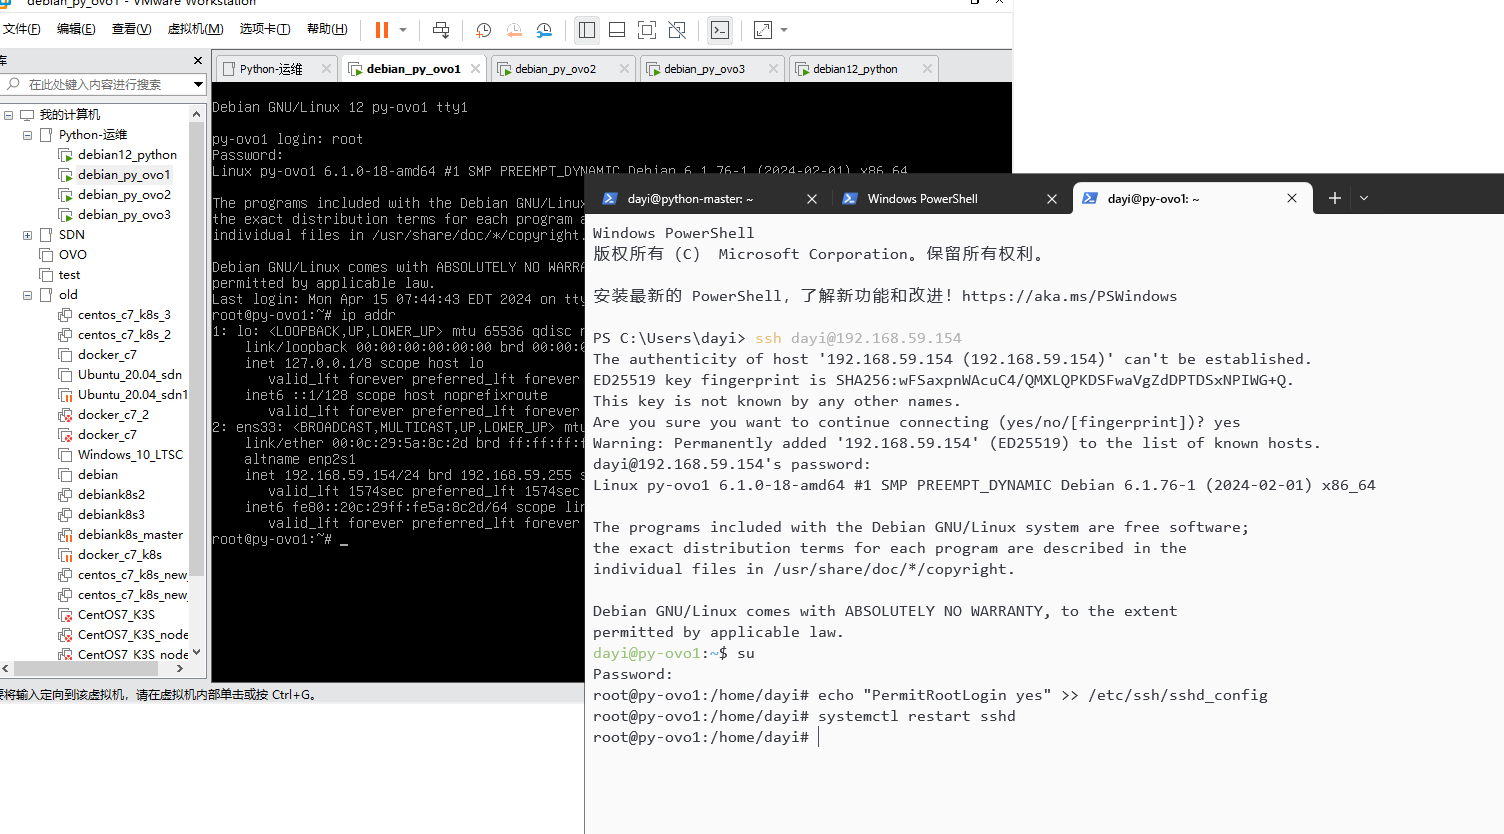
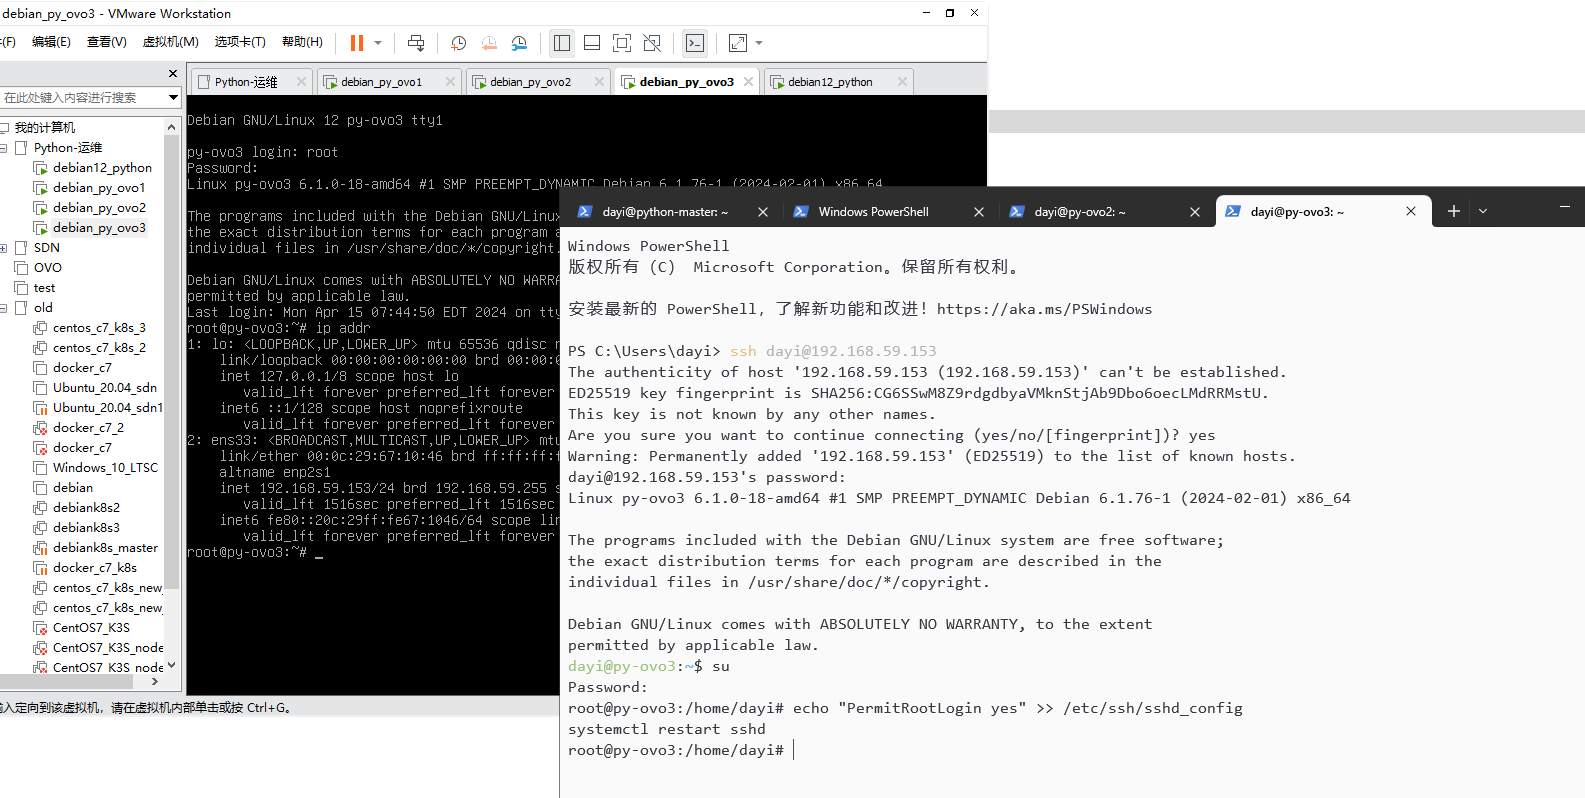
【debian 系】先设置允许 root 通过 ssh 登陆 在被控机:
如果你发现 root 用户无法通过 ssh 登陆到主机(会提示密码错误什么的):(主控机和被控机)
1 2 3 su echo "PermitRootLogin yes" >> /etc/ssh/sshd_configsystemctl restart sshd
这样就好啦。
主控机和被控机都做一下
如果你发现可以直接 root 登陆就不用做这一步了。
【debian 系】设置免密登陆
debian 系包括 Debian kali ubuntu 等
在 master 上
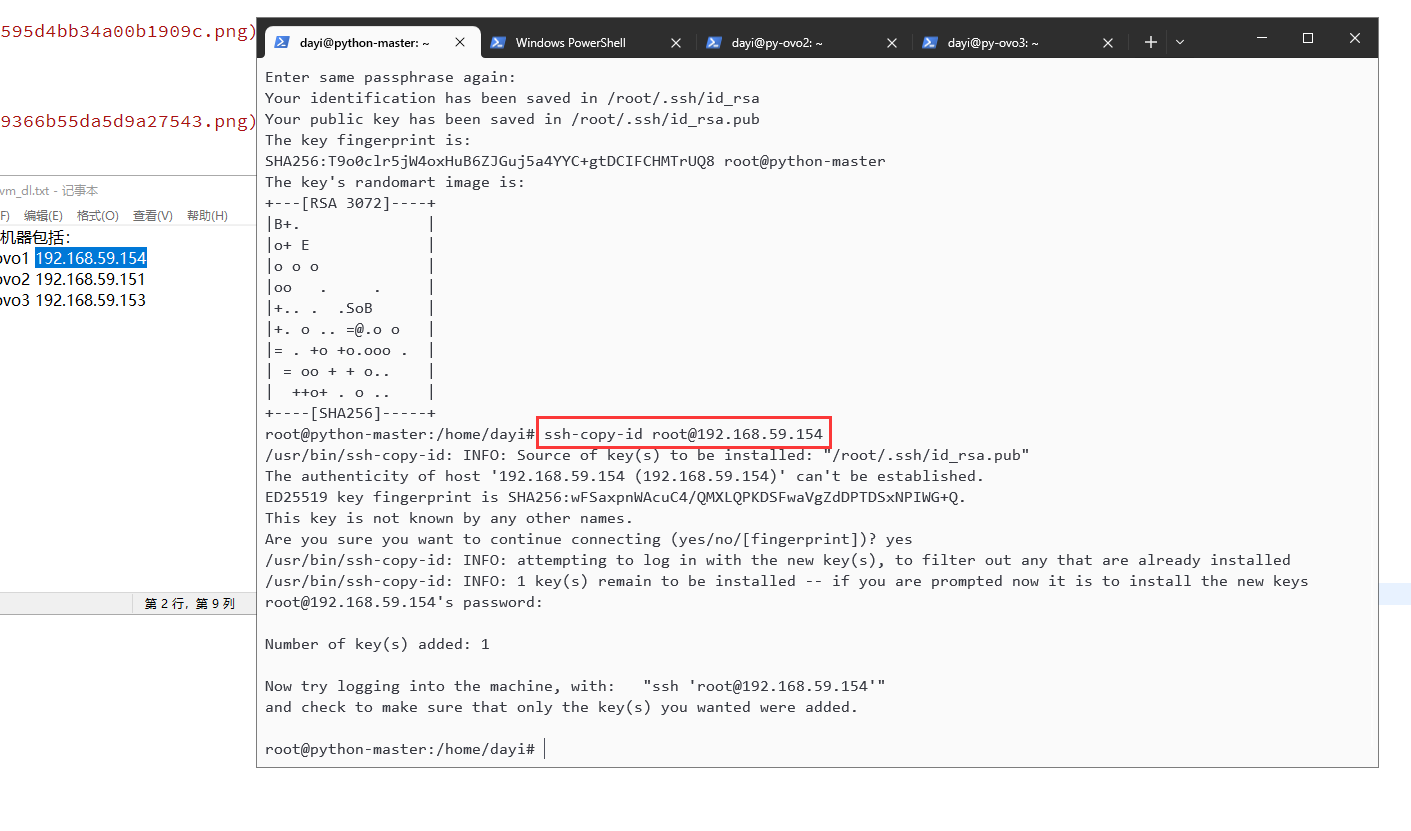
复制 controler(master 机器)的公钥,到其他的几个被控机器上。(会提示输入密码和 yes)(在 master 上输入)
1 2 3 4 su ssh-copy-id root@192.168.59.154 [你的IP地址] ssh-copy-id root@192.168.59.151 ssh-copy-id root@192.168.59.153
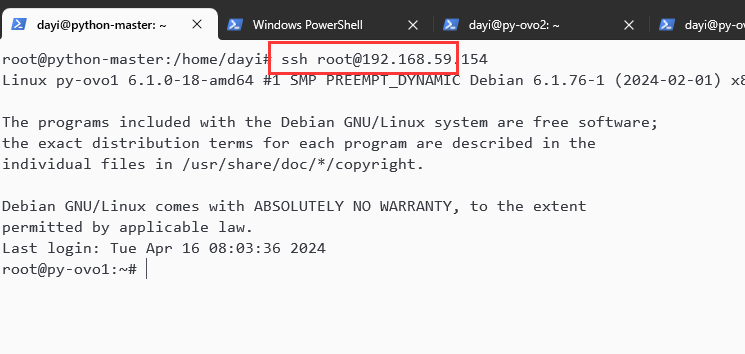
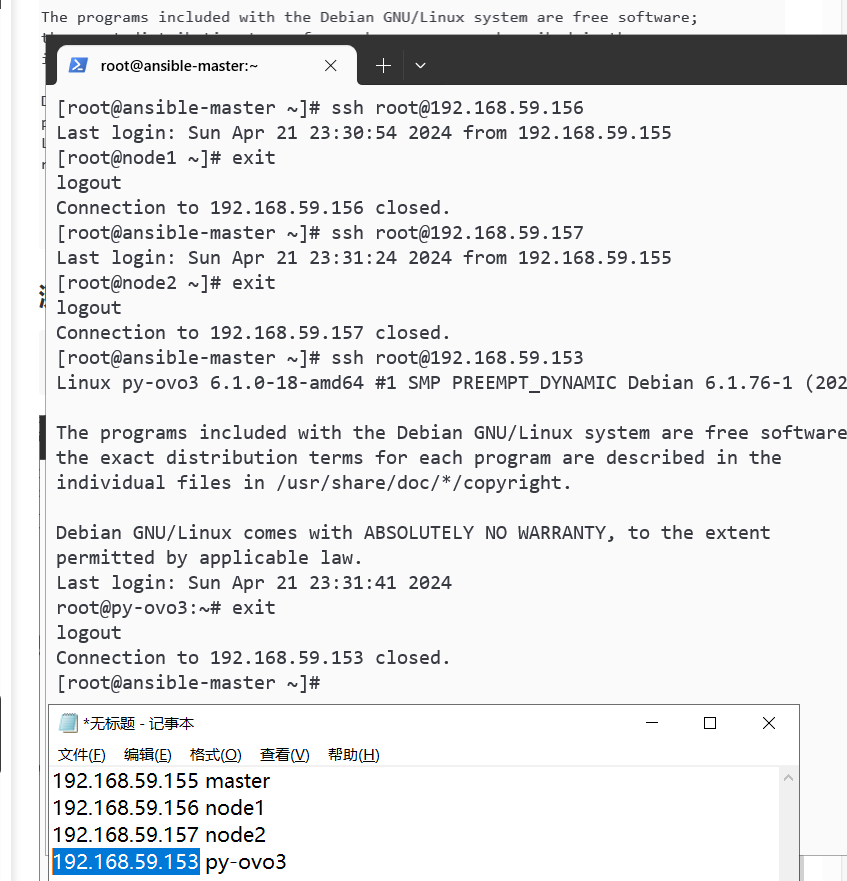
测试免密登陆
这样不输入密码就登陆上就可以啦(退出的话输入 exit)
测试免密登录 1 2 3 4 5 su ssh root@【被控机IP地址】 ssh root@192.168.59.156 ssh root@192.168.59.157 ssh root@192.168.59.153
大概就这样,想控几个配几个
Ansible 配置
这个是 ROOT 用户的:原话:上午做的 ROOT 用户,下午要改。普通用户的。
如果你在图形化界面
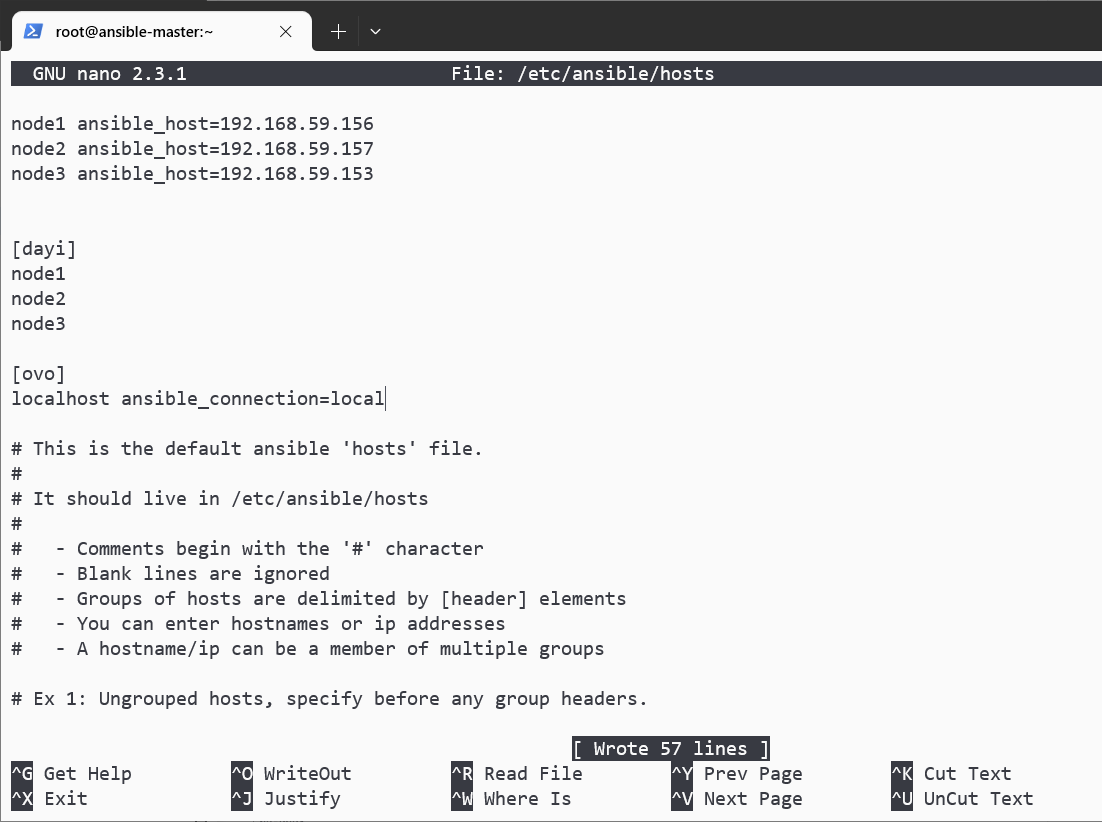
1 2 3 su mkdir -pv /etc/ansible/nano /etc/ansible/hosts
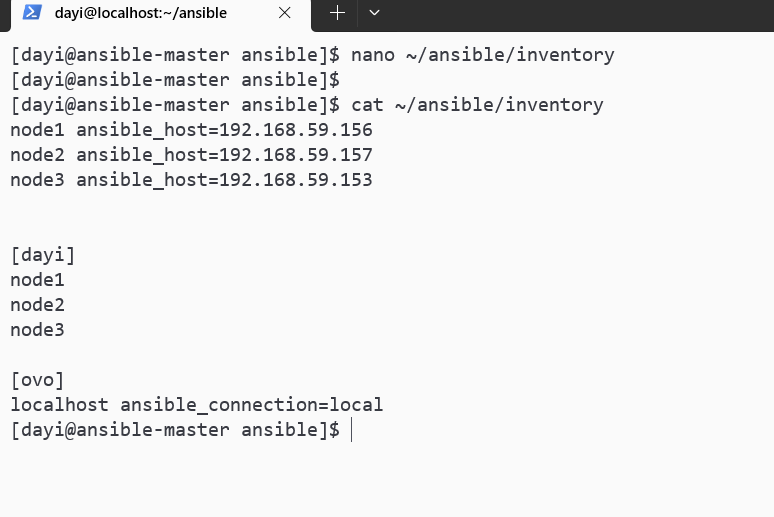
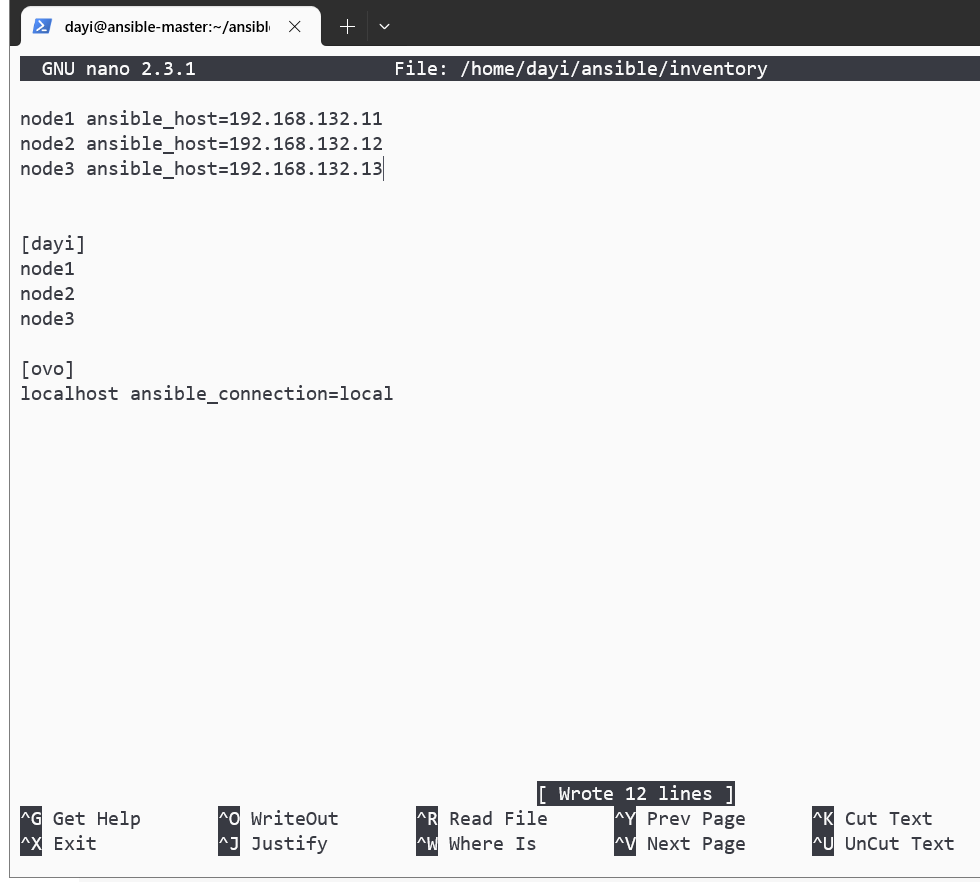
文件内容类似这样:
1 2 3 4 5 6 7 8 9 10 11 12 node1 ansible_host =192.168 .59.156 node2 ansible_host =192.168 .59.157 node3 ansible_host =192.168 .59.153 [dayi] node1 node2 node3 [ovo] localhost ansible_connection =local
CTRL+W 写入文件
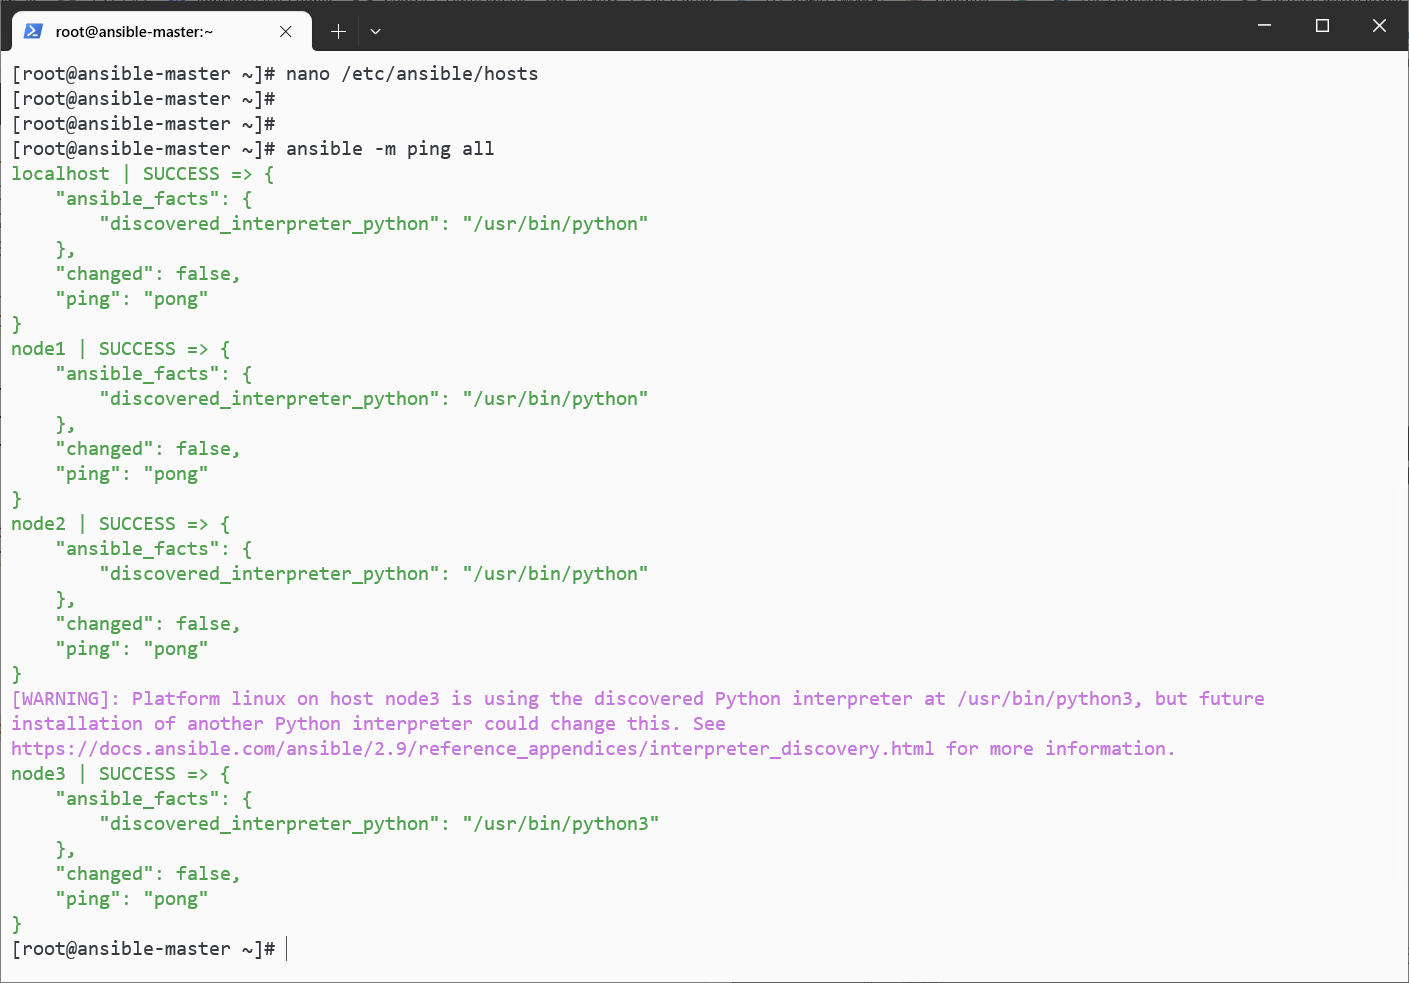
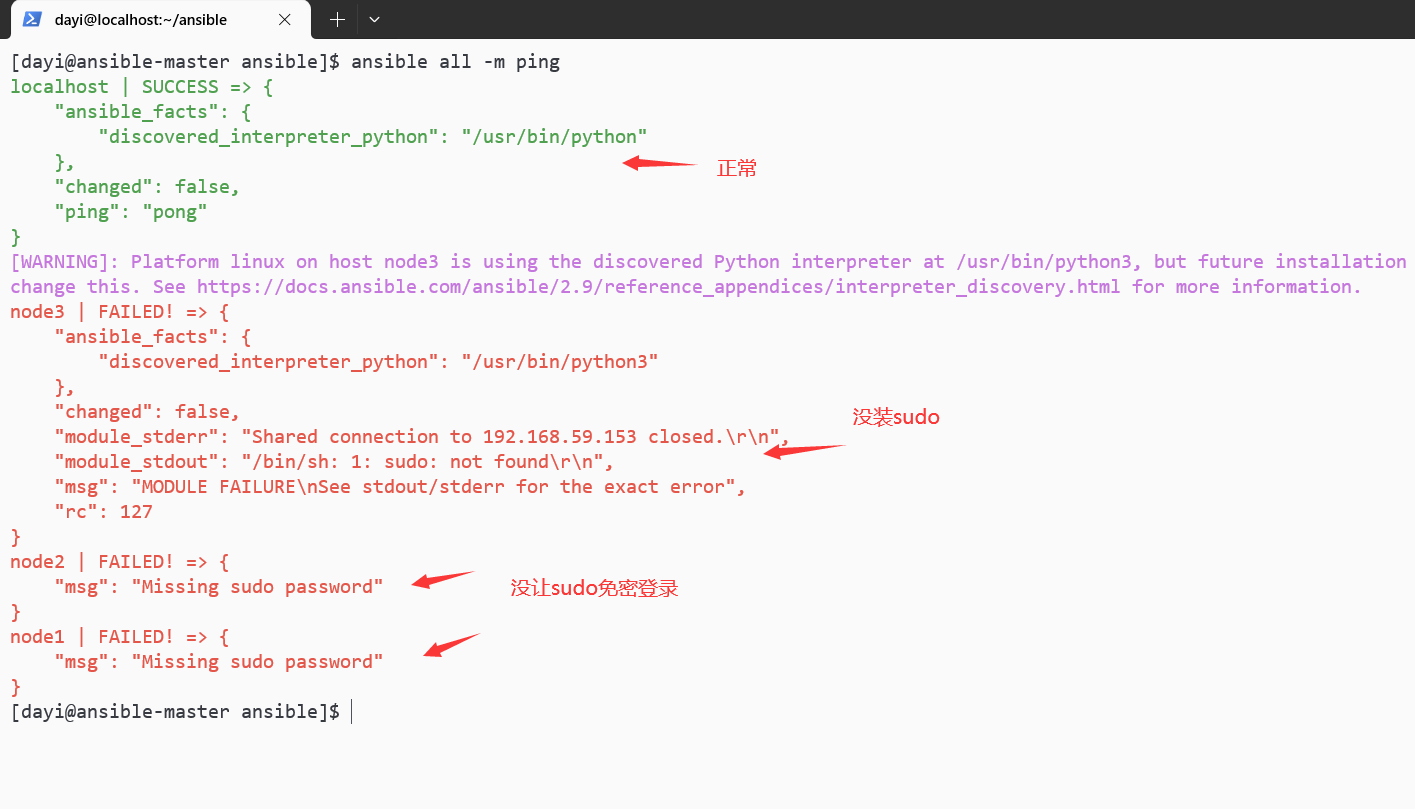
测试下 belike:
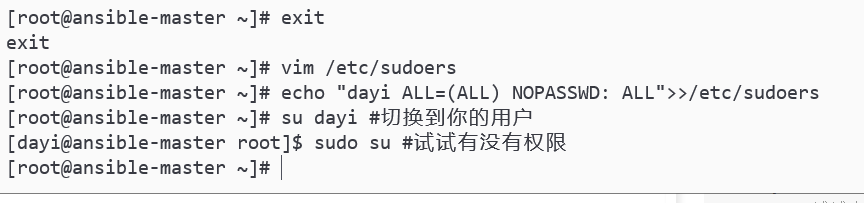
非 ROOT 用户使用 ansible(救命) 配置 sudo 权限 【controller 机子、和其他所有的机子】
这个命令要在所有机子上执行(controller(主机)和 slaves(被控几)上)
1 2 3 4 5 su echo "dayi ALL=(ALL) NOPASSWD: ALL" >>/etc/sudoerssu dayi sudo su
这样就可以了
记得被控机也弄一下
然后重新配置 ansible (救命) 【controller 机子的】
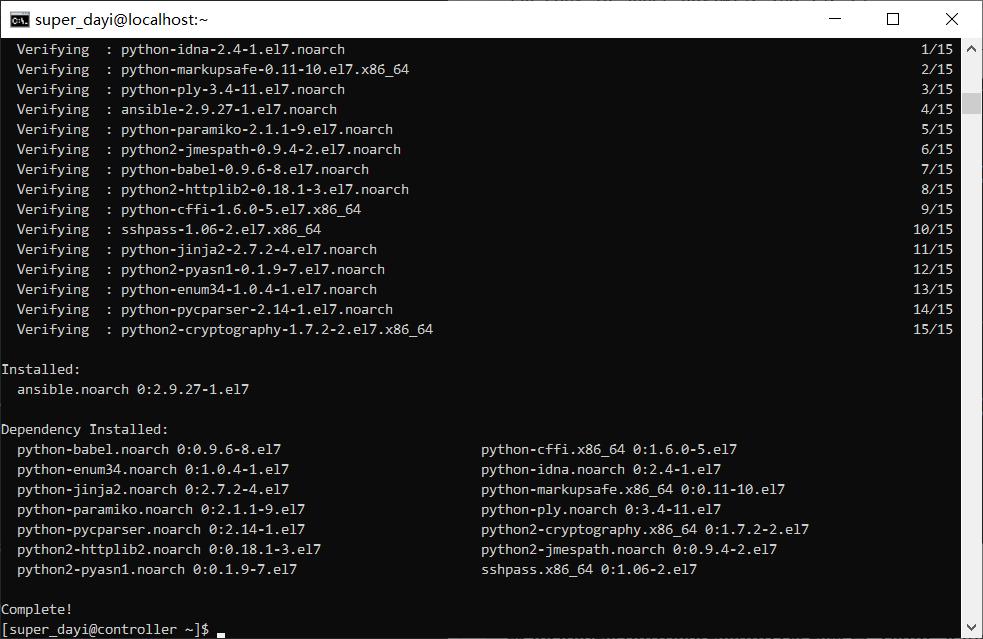
救命高建鑫没装 ansible 1 2 3 su sudo yum install epel-release -y sudo yum install ansible -y
下一步 1 2 3 4 5 su dayi cd ~mkdir ansiblecd ansiblecp -a /etc/ansible/ansible.cfg .
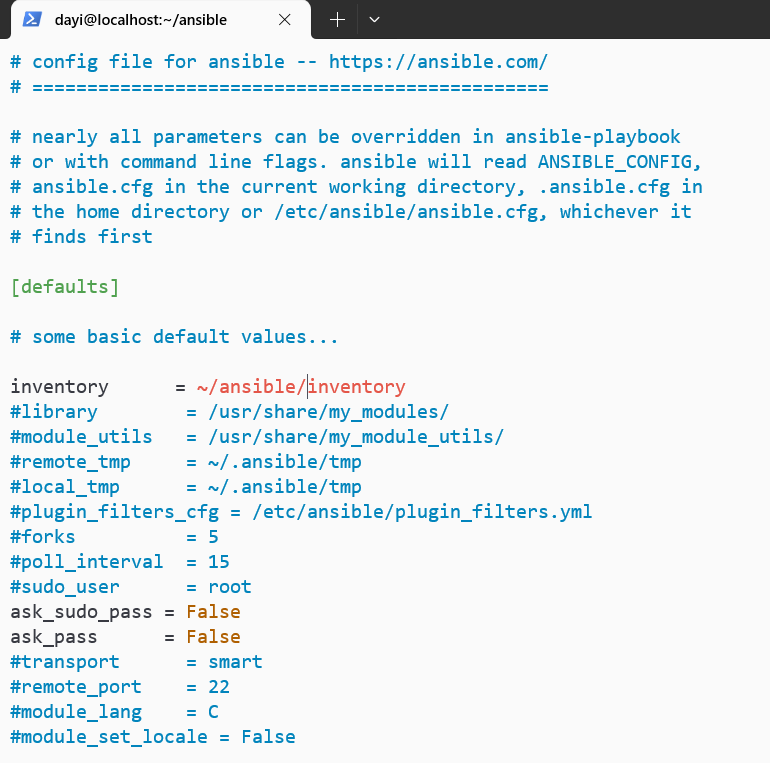
需改配置 1 1 2 su dayi vim ~/ansible/ansible.cfg
VIM 使用:(高建鑫打不上字看这个)
键盘
作用
i
输入模式
ECS -> 输入:wq
保存+退出
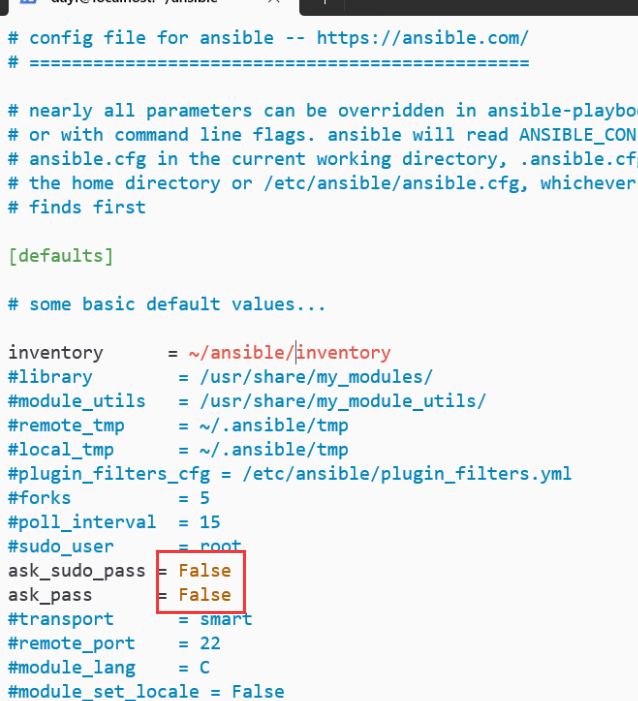
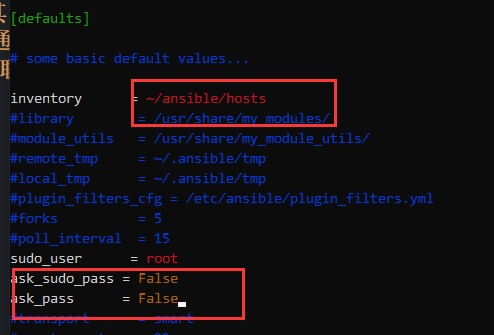
这里两种改法:/home/dayi/ansible/inventory或者~/ansible/inventory, dayi是你的用户名
这里,改成 False
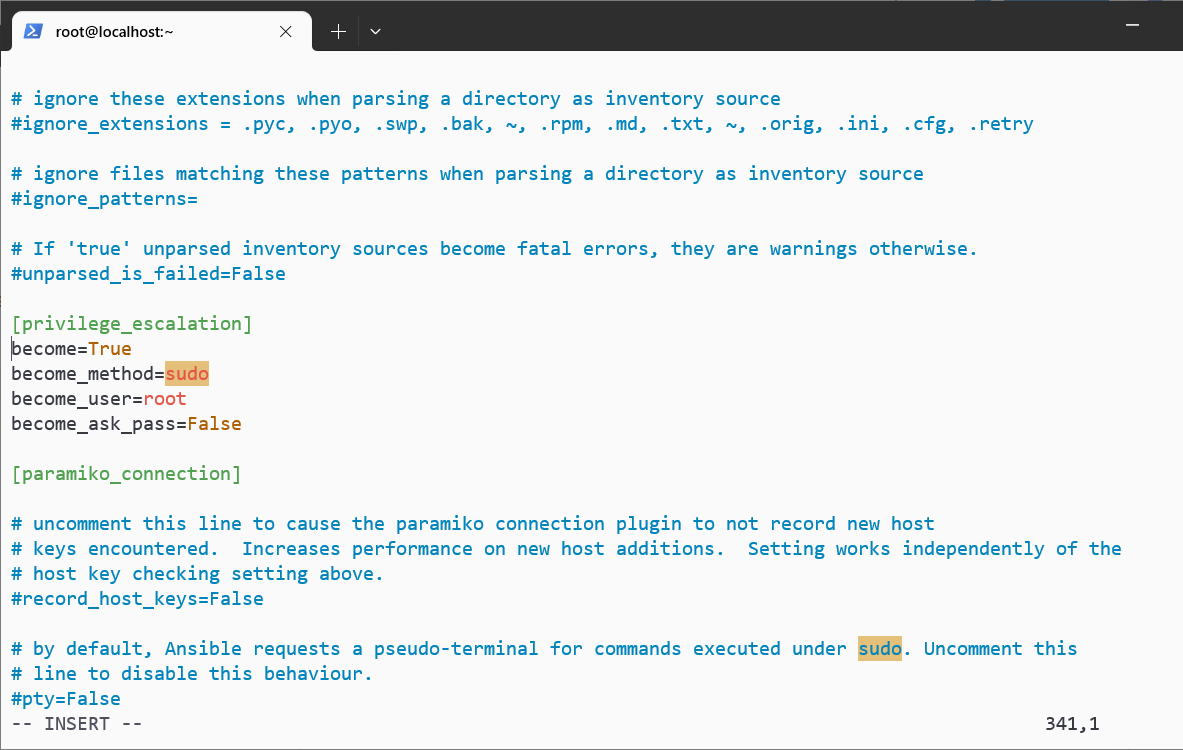
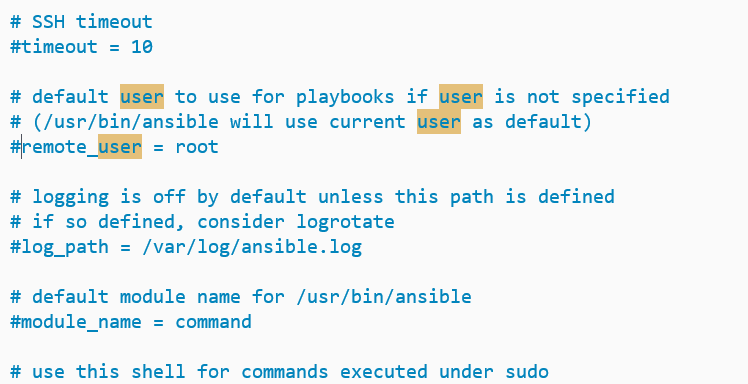
需要改配置 2 还是同样一个文件
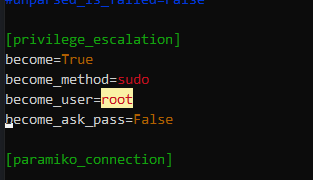
在 vim 下搜索,先 ESC 退出插入模式,输入/privilege_escalation然后回车,然后再按 I 键
把#去掉:
这样子。
输入 ESC 然后输入 :wq 保存文件
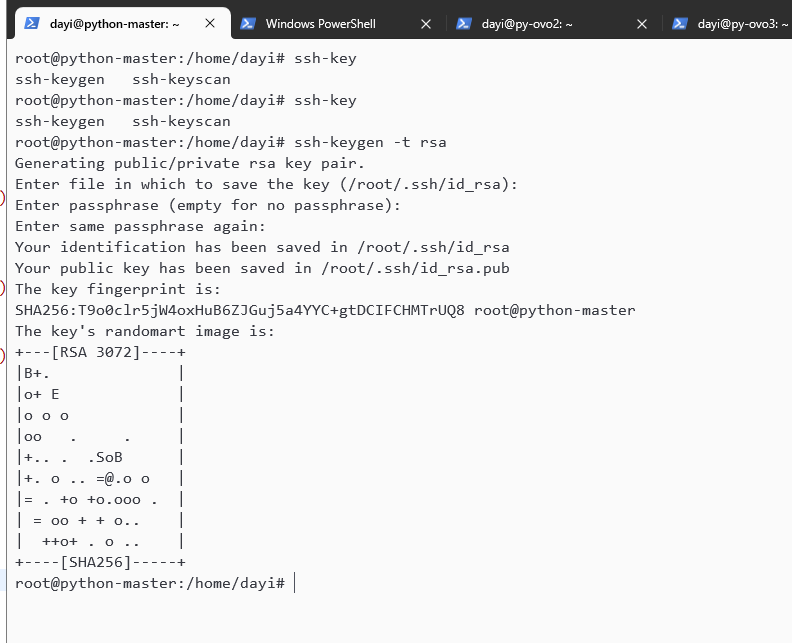
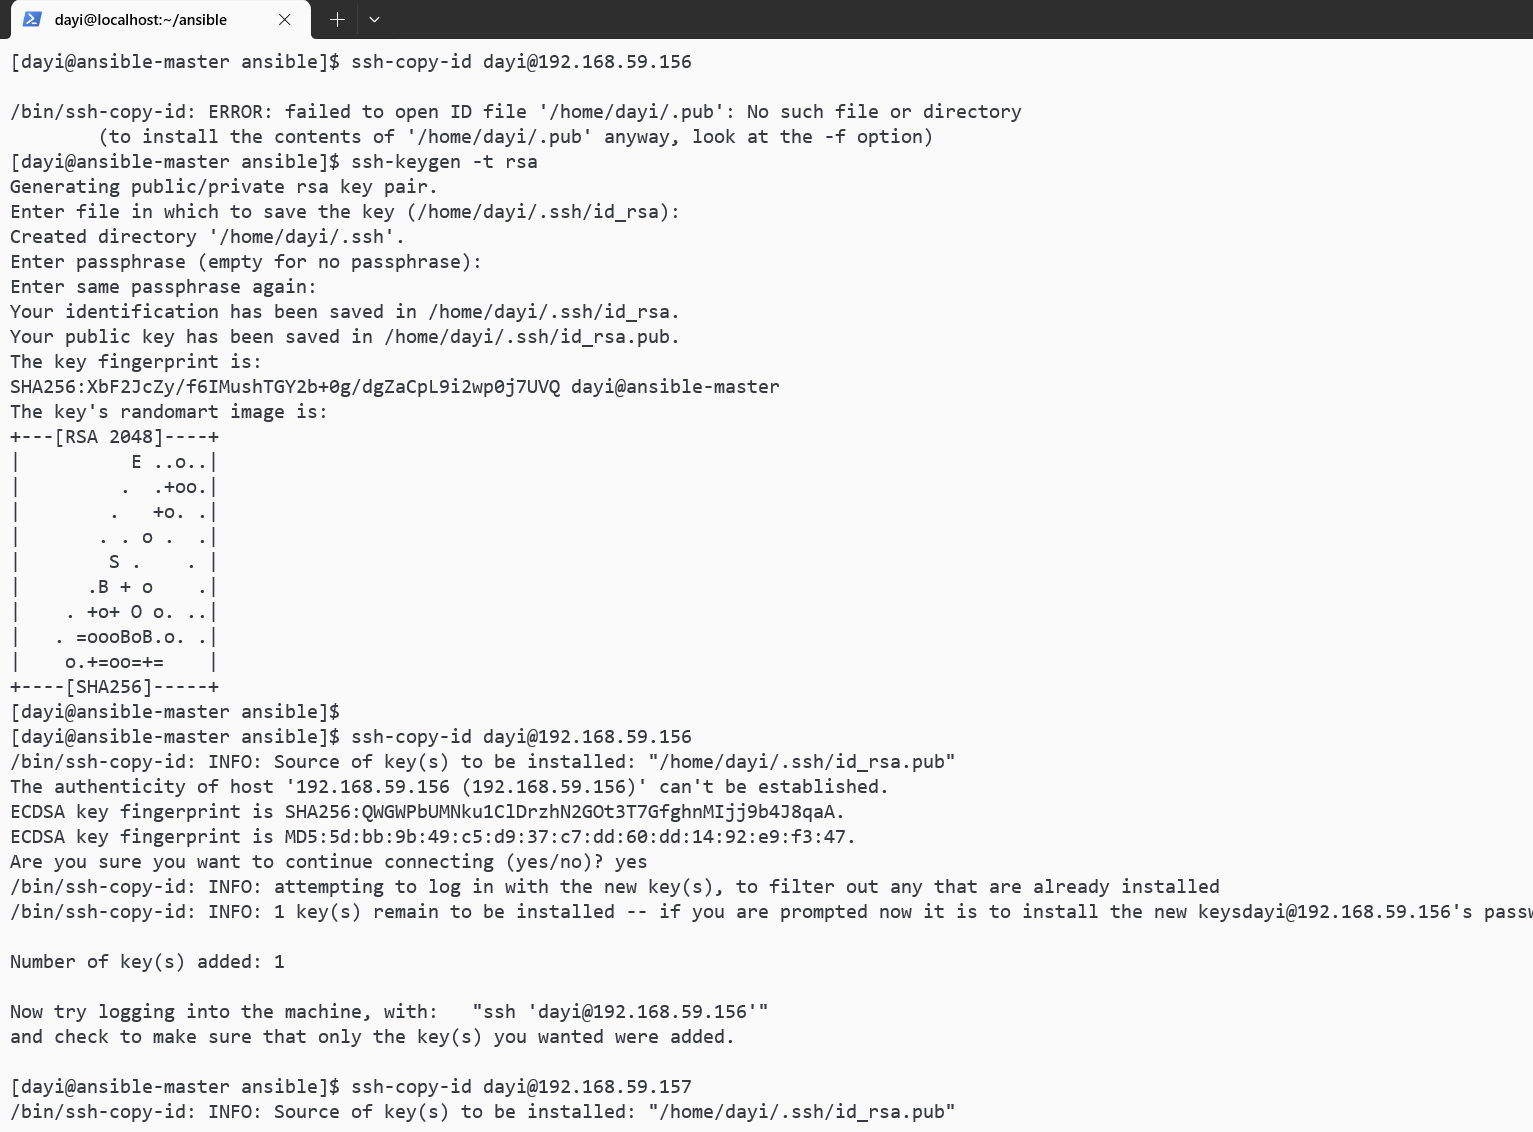
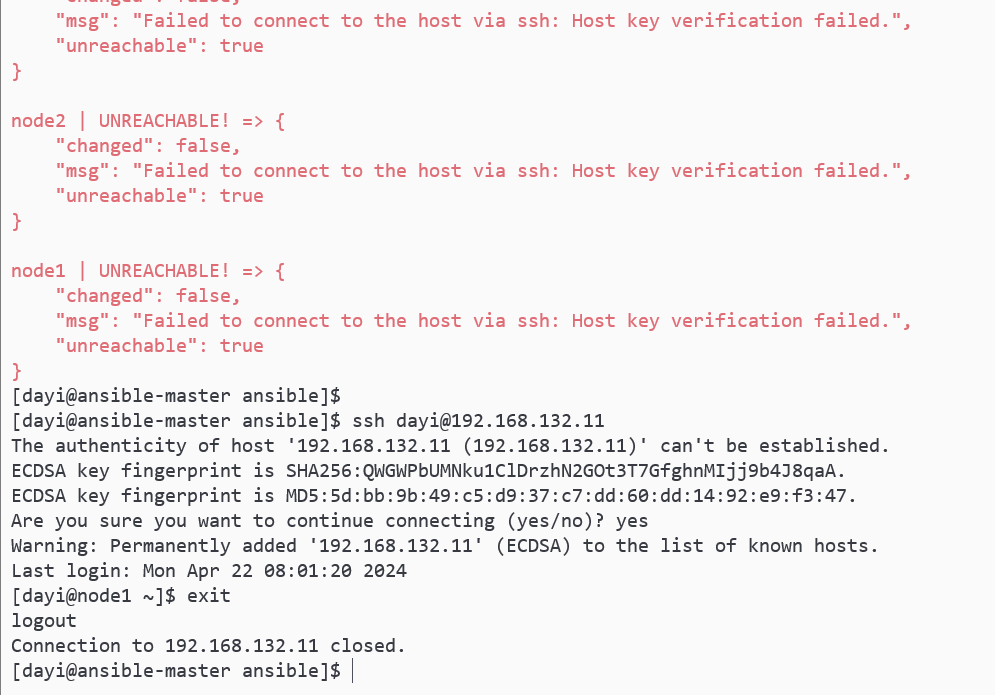
复制 controller 的普通用户的公钥到 slave普通用户的免密登录(again) 1 2 3 4 5 su dayi ssh-keygen -t rsa ssh-copy-id dayi@192.168.59.156 ssh-copy-id dayi@192.168.59.157 ssh-copy-id dayi@192.168.59.153
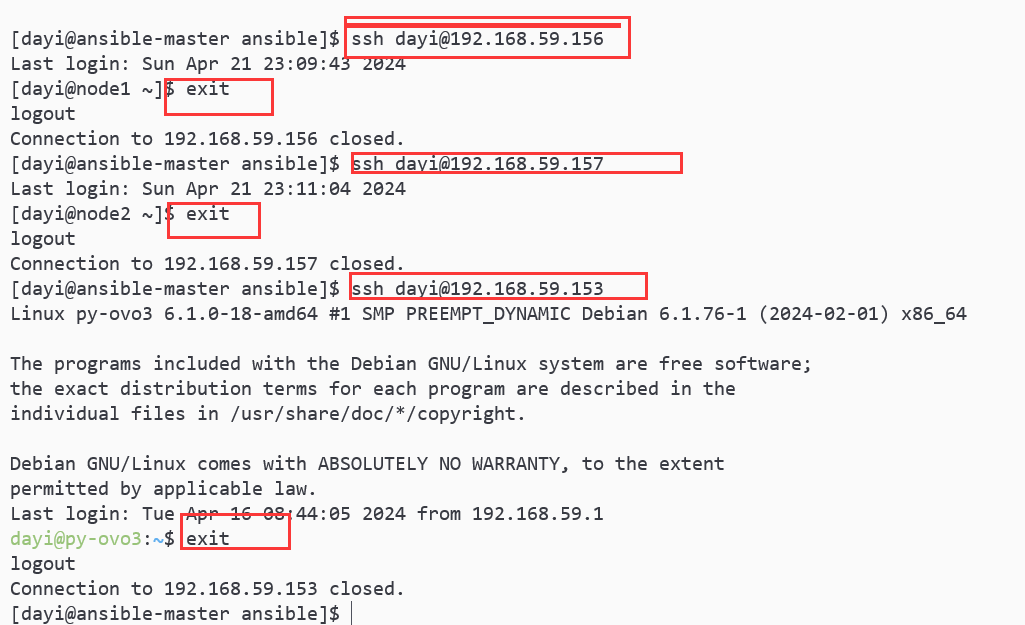
测试免密登录 1 2 3 ssh dayi@192.168.59.156 ssh dayi@192.168.59.157 ssh dayi@192.168.59.153
这样就可以了
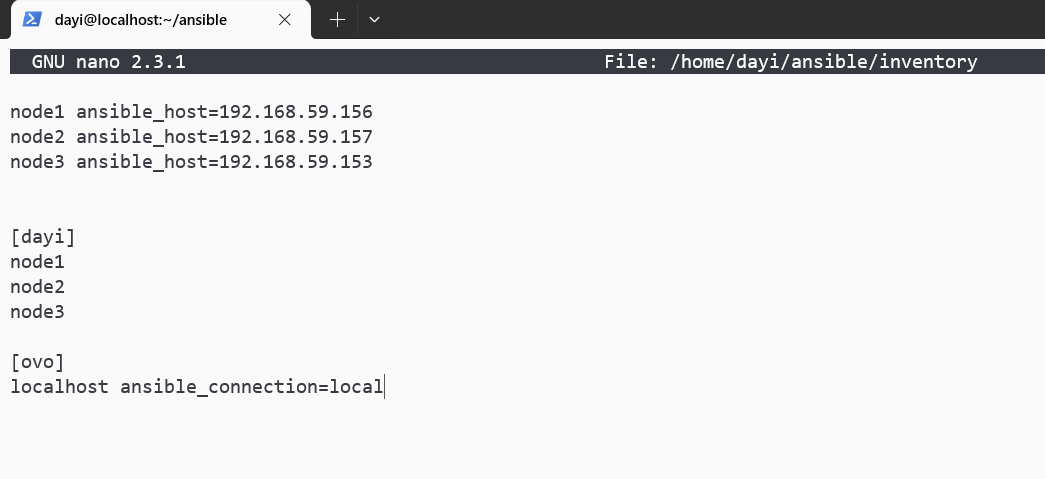
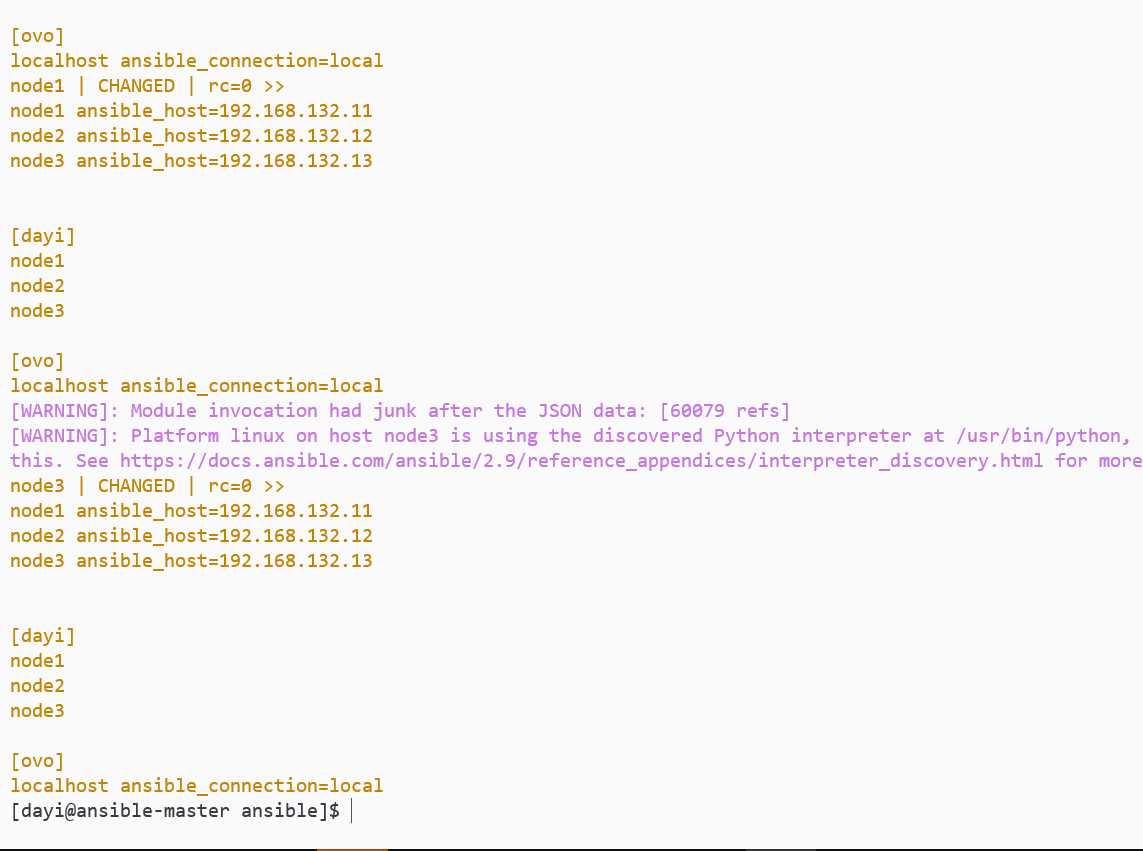
修改那个vim inventory 1 2 su dayi nano ~/ansible/inventory
1 2 3 4 5 6 7 8 9 10 11 12 node1 ansible_host =192.168 .59.156 node2 ansible_host =192.168 .59.157 node3 ansible_host =192.168 .59.153 [dayi] node1 node2 node3 [ovo] localhost ansible_connection =local
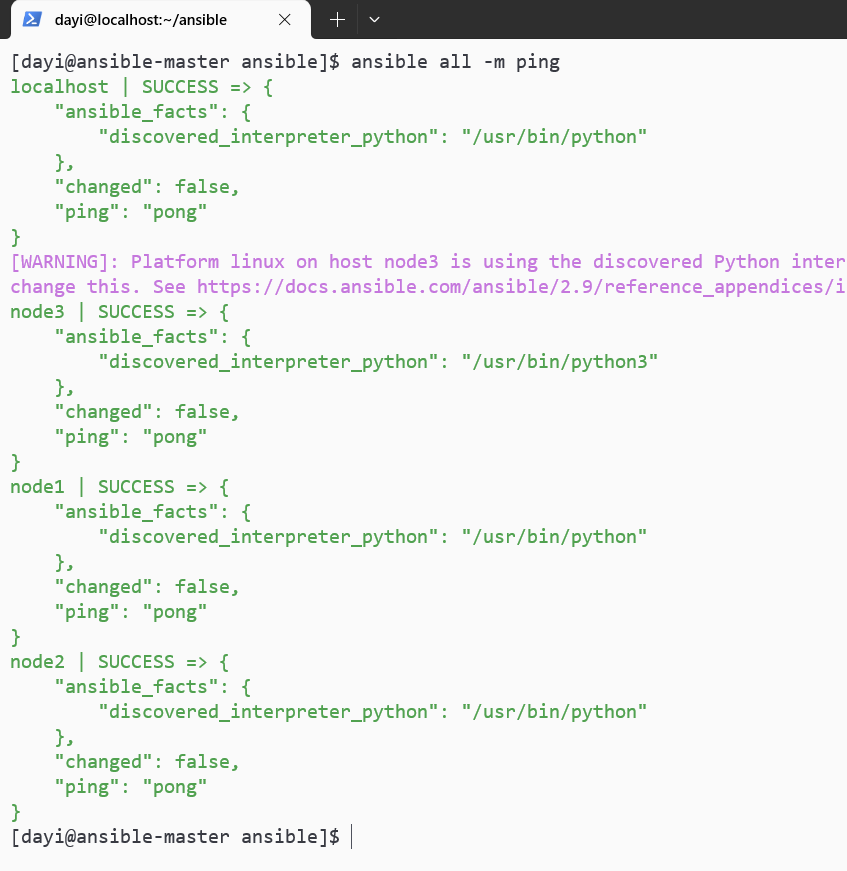
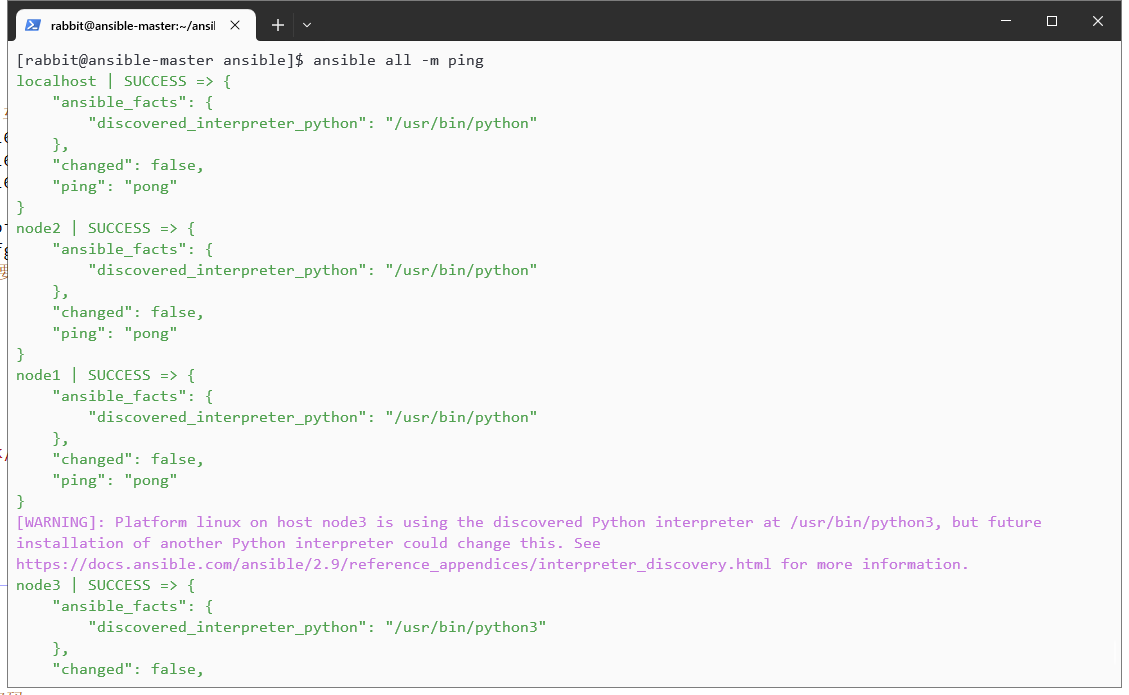
测试 1 2 cd ~/ansibleansible all -m ping
这样就可以了。
常见错误
对于 debian 系统没有 sudo
1 2 3 4 5 6 7 su apt install sudo -y echo "dayi ALL=(ALL) NOPASSWD: ALL" >>/etc/sudoerssu dayi echo "export PATH=\$PATH:/sbin" >> ~/.bashrcsource ~/.bashrcsudo su
提示什么./.tmp/ XXXX 没有权限 关键词“Permission denied”,这说明你在 root 用户下操作了一些在普通用户的文件:
1 2 3 4 5 6 7 8 9 10 11 12 13 14 15 16 17 sudo su rm -rf /home/dayi/.ansiblechmod +777 -R /home/dayi/.ansiblechmod +777 -R /home/* su dayi chmod +600 ~/.ssh/id_rsa chmod u+x,g-wx,o-wx ansible
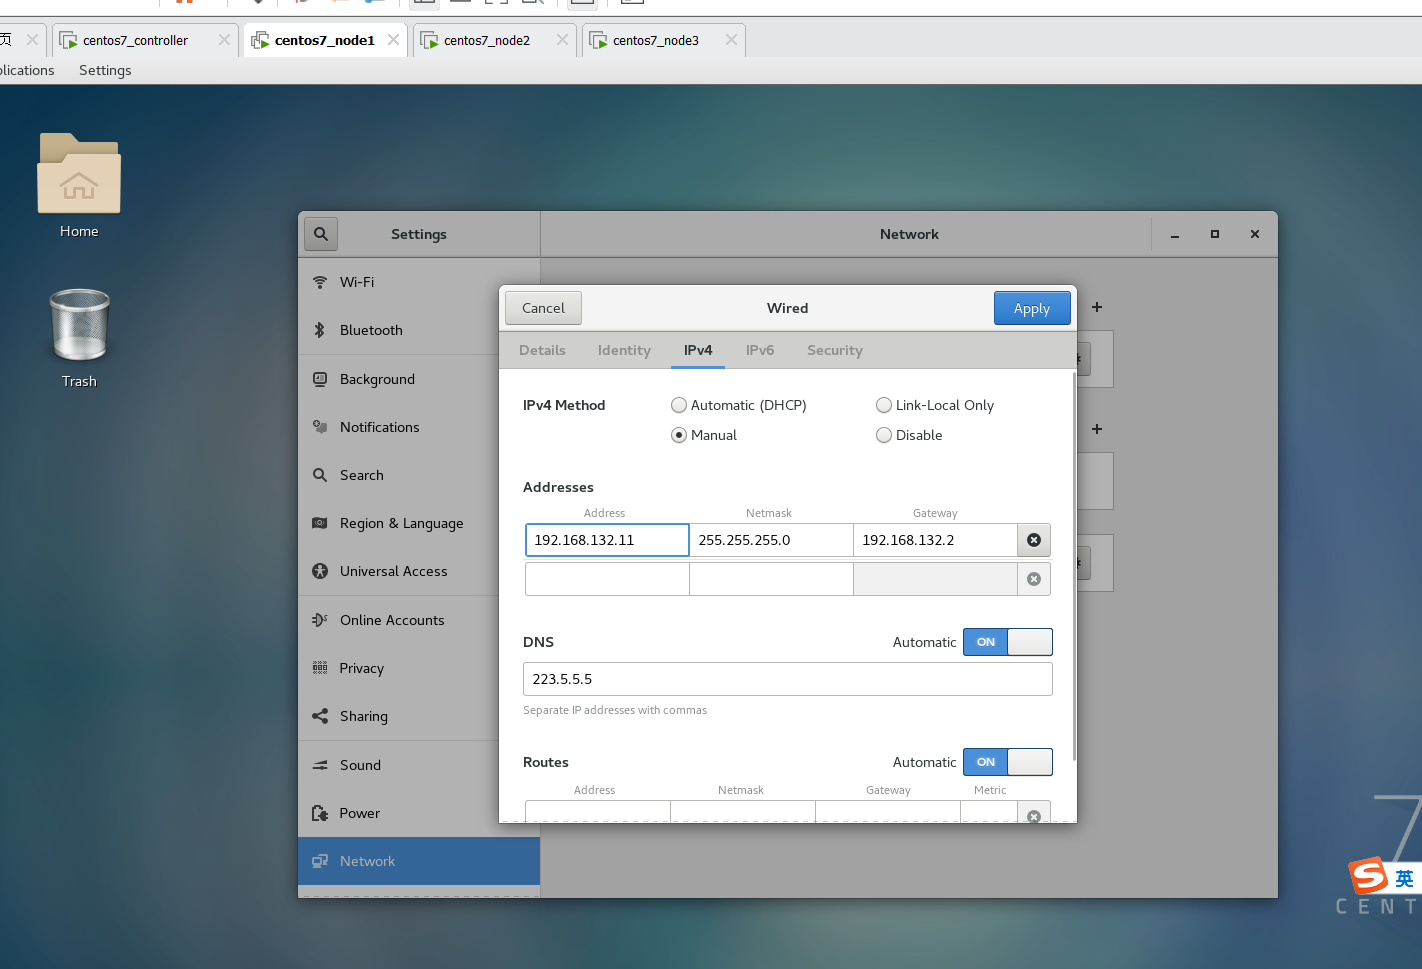
修改 IP 地址
不知道为什么好像要固定 IP,但是我好像没听清这个是不是必须的要求。
我只能说,改 IP 是个大活(
说是要改成这样:
先把分配 IP 的地方改过来
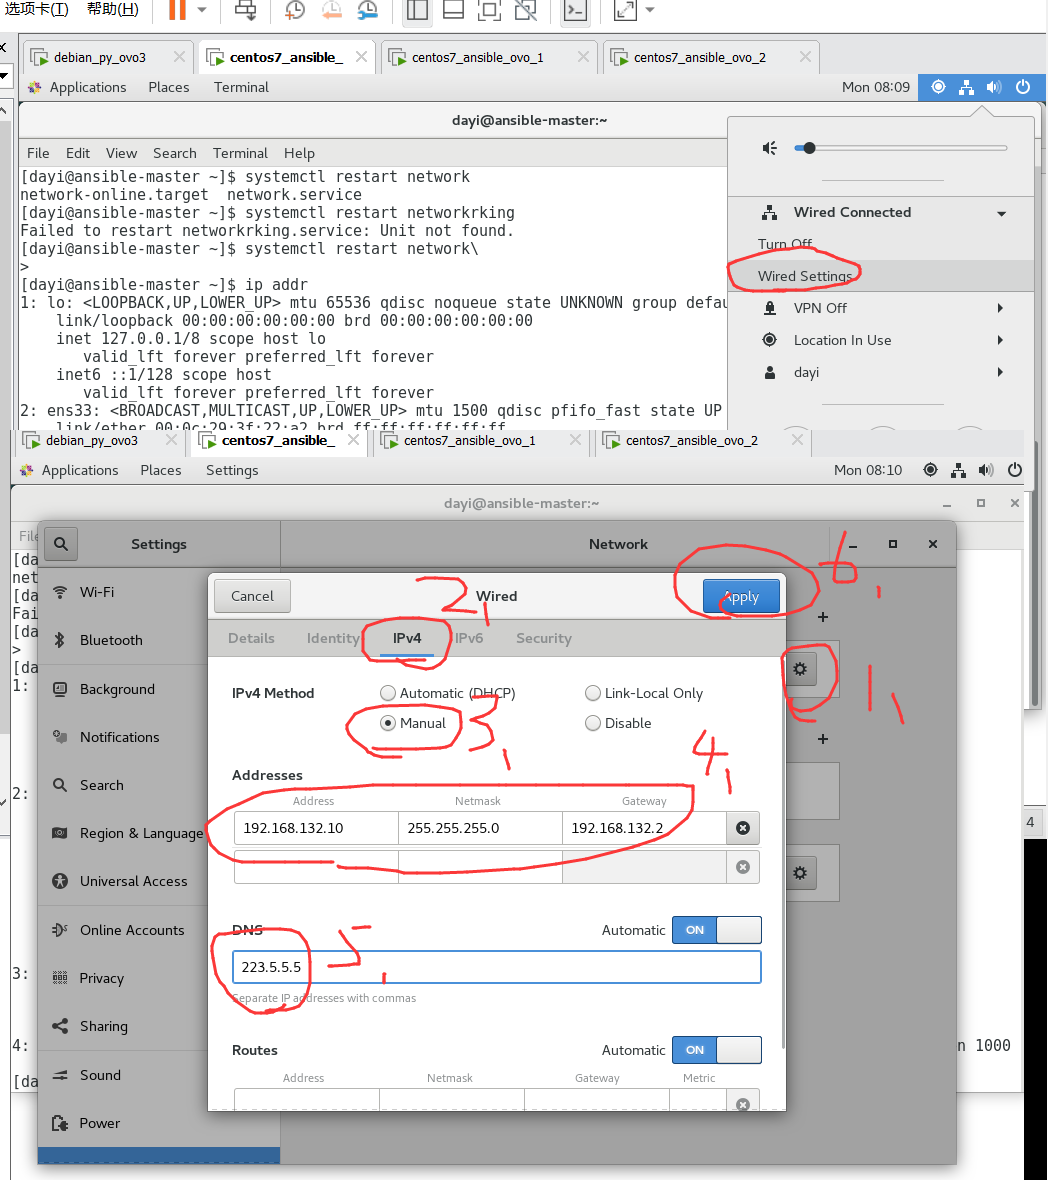
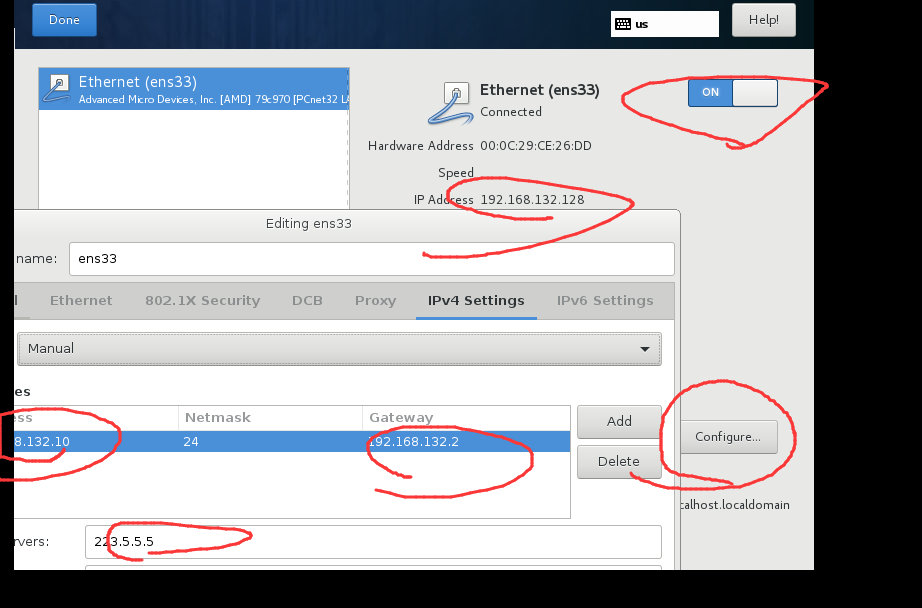
机子执行命令 图形化界面(UI)修改 centos7
关了再开:
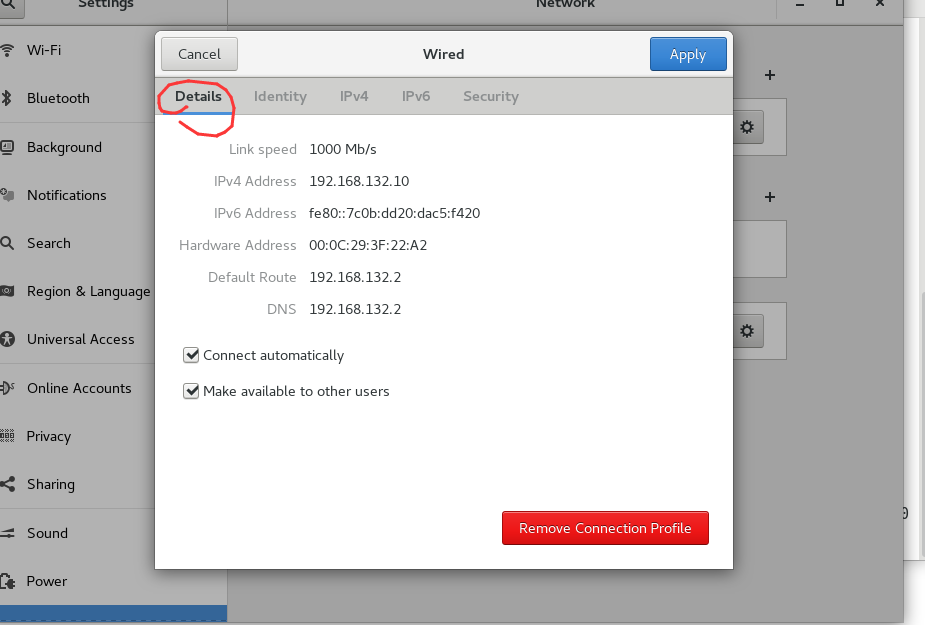
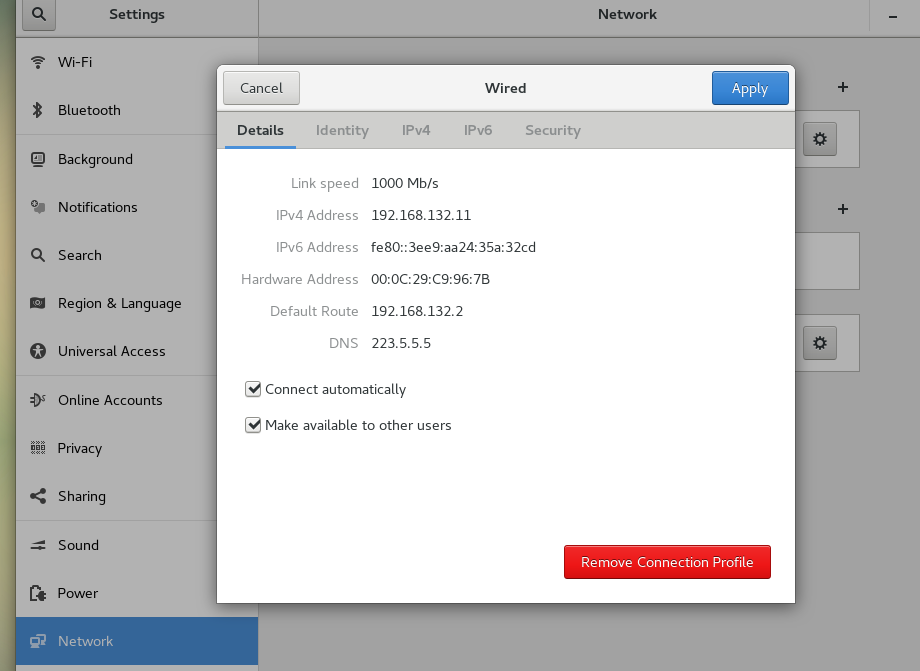
查看生效(不生效重新设一次,重启试试)
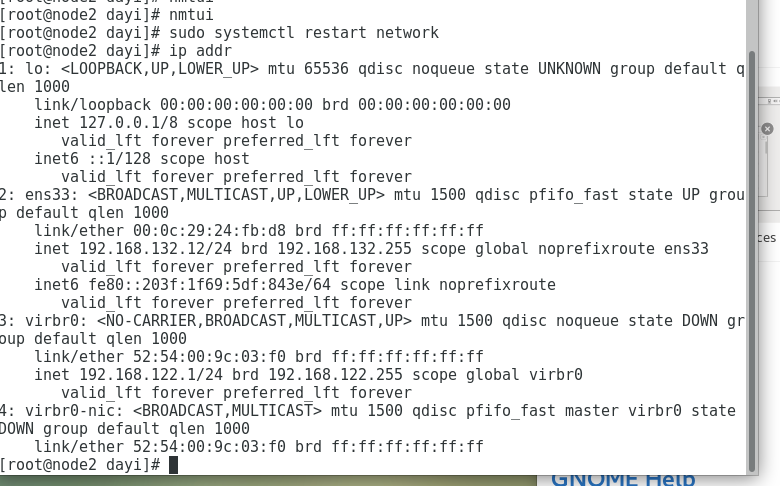
SHELL 修改 centos7
1 sudo systemctl restart network
SHELL 修改 debian
debian 不推荐用 nmtui,因为默认的网络管理器不同,但是对于有线也可以用
nmtui 方法:
1 2 sudo apt-get install network-manager -y sudo nmtui
推荐:
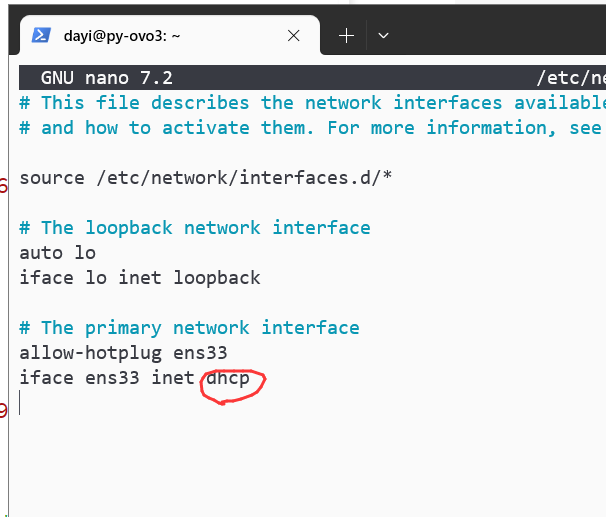
1 2 sudo nano /etc/network/interfaces
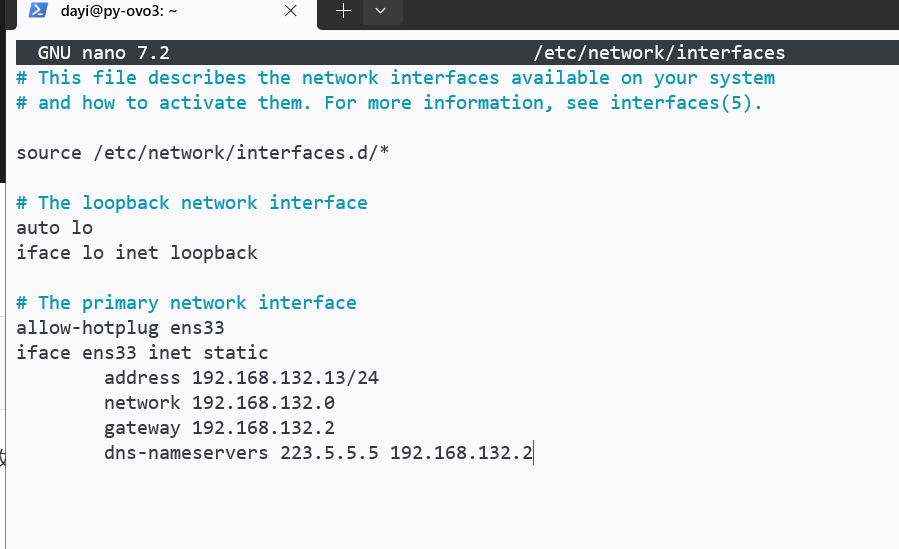
修改这里:
注意你不一定是 ens33
1 2 3 4 5 iface ens33 inet static address 192.168.132.13/24 network 192.168.132.0 gateway 192.168.132.2 dns-nameservers 223.5.5.5 192.168.132.2
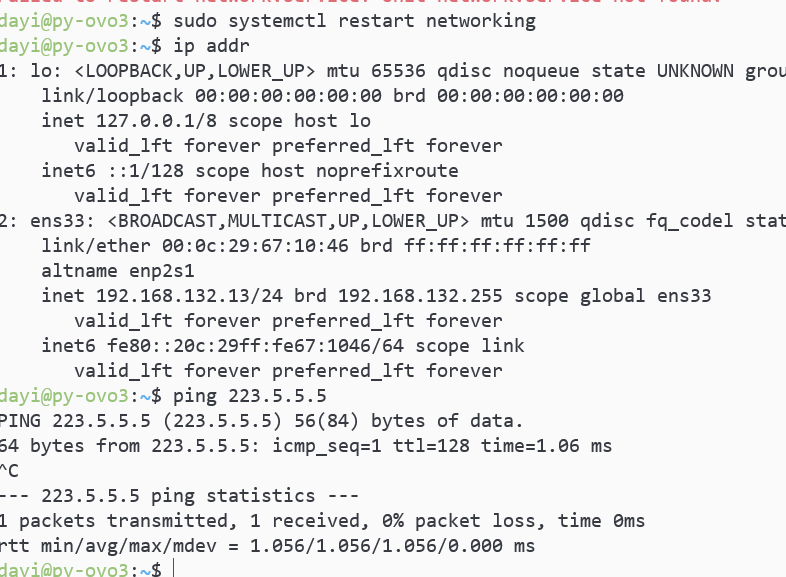
重启网络服务
1 sudo systemctl restart networking
记得改完 IP 测下是否还可以上网 无损修改 IP(DHCP 分配)
感觉好像反而复杂了,干脆用【修改 IP 地址】章节手动改吧。
好像要一起固定 IP?我好像没听清这个是不是必须的要求。
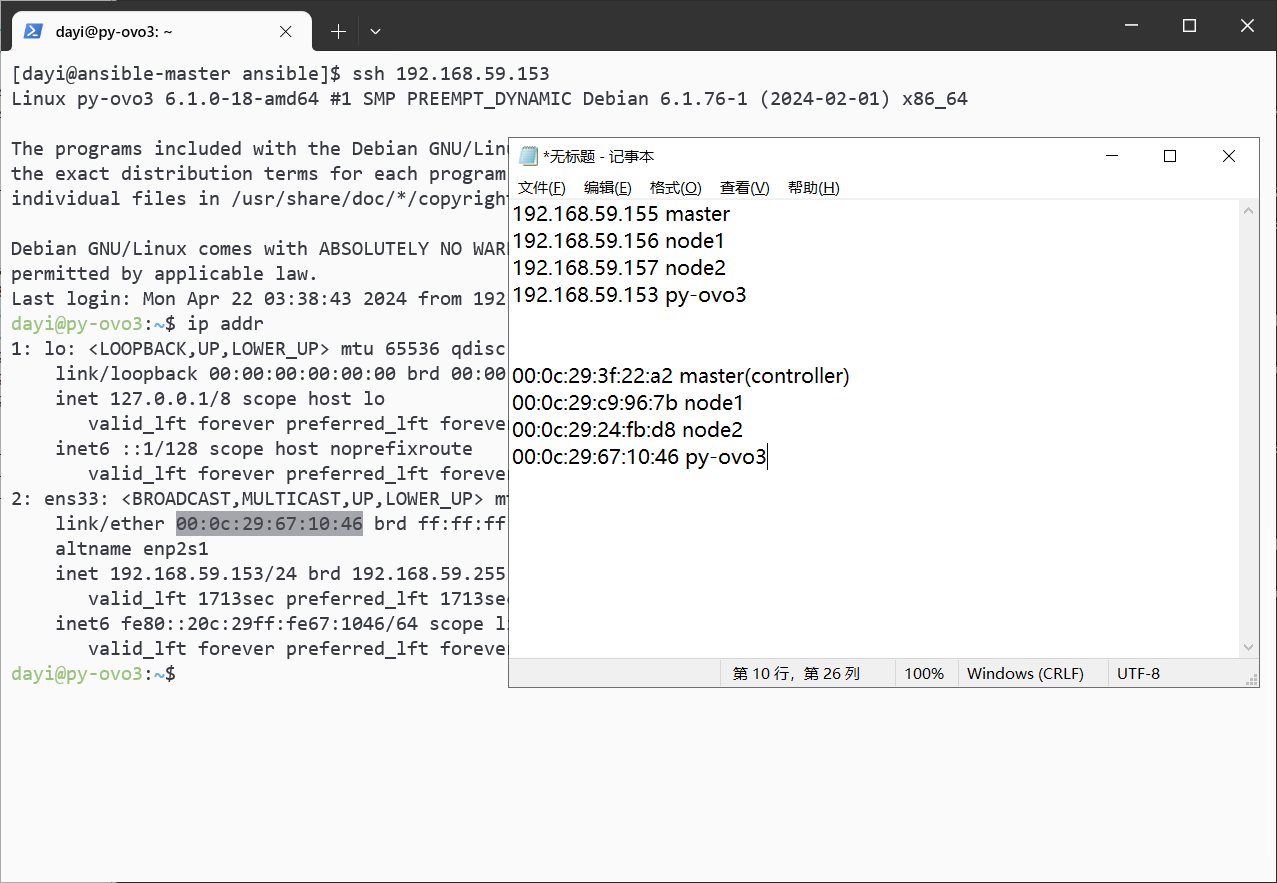
我现在的大概这个样子:
1 2 3 4 192.168.59.155 master 192.168.59.156 node1 192.168.59.157 node2 192.168.59.153 py-ovo3
要改成:
其实也挺好,那样后面的 IP 就统一啦。
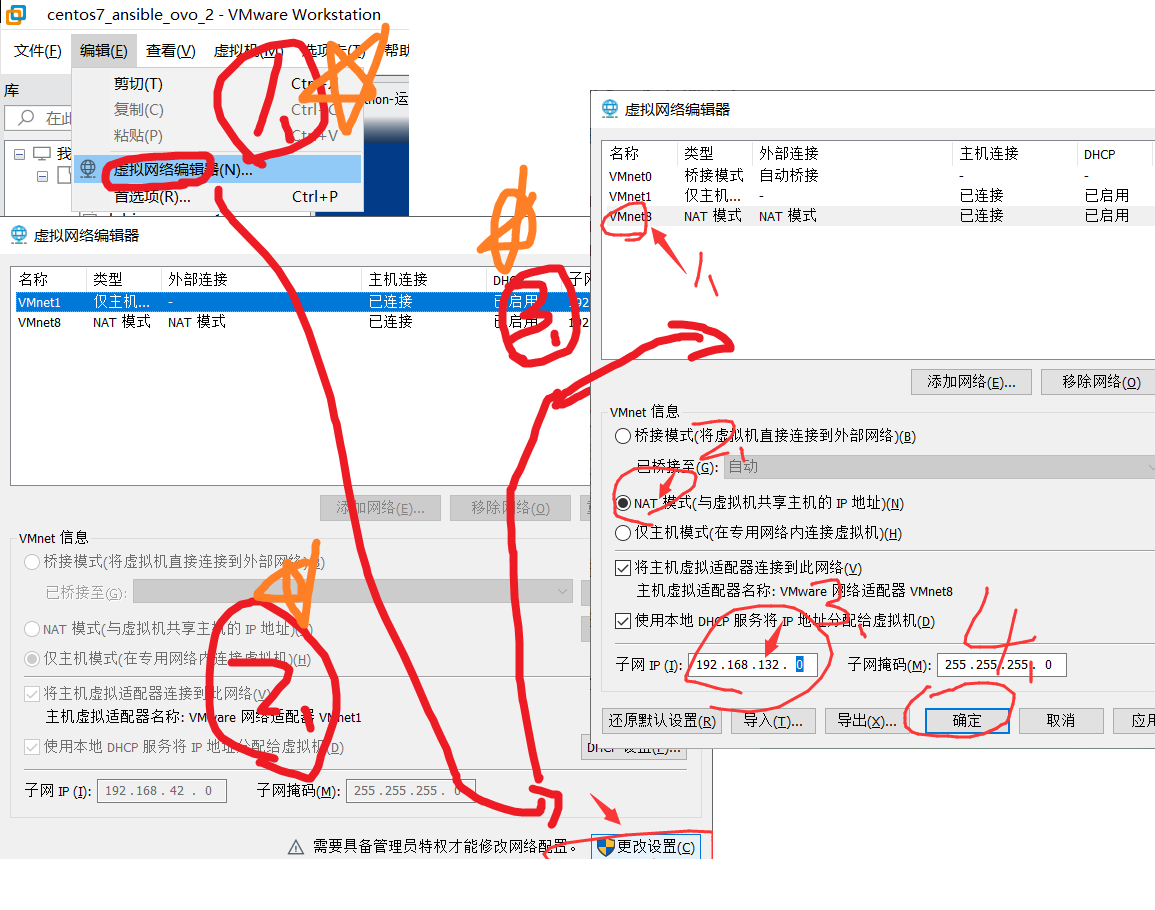
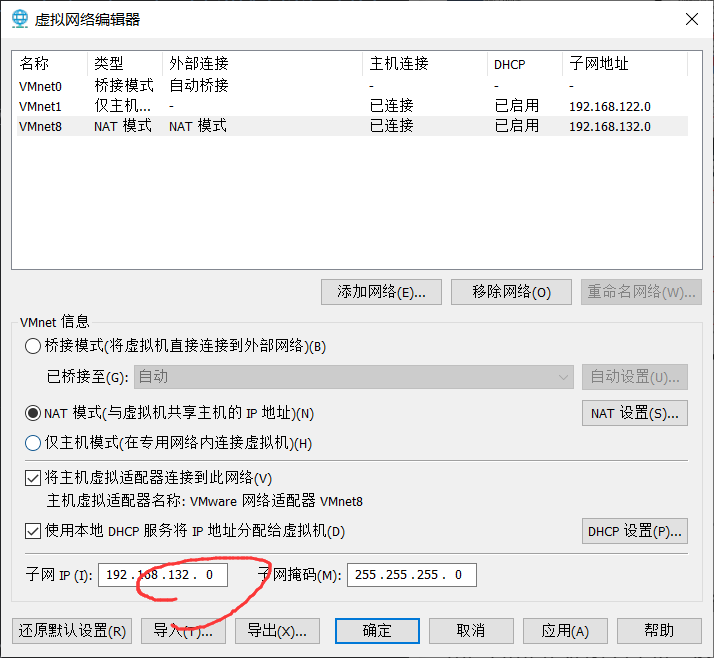
无损(指不动现有的虚拟机、从 DHCP 来整)这样做 1 2 3 4 5 6 7 8 9 10 1. 虚拟网络管理器 2. 更改设置 3. 找那个NAT模式的 4. 改IP段,保存 5. 查MAC地址(四个机子的 记录下来) 6. WIN+X 选择管理员(终端 或者 powershell) 7. 写配置文件 8. 保存文件 9. 重启DHCP 10. 重启虚拟机
1-4 步
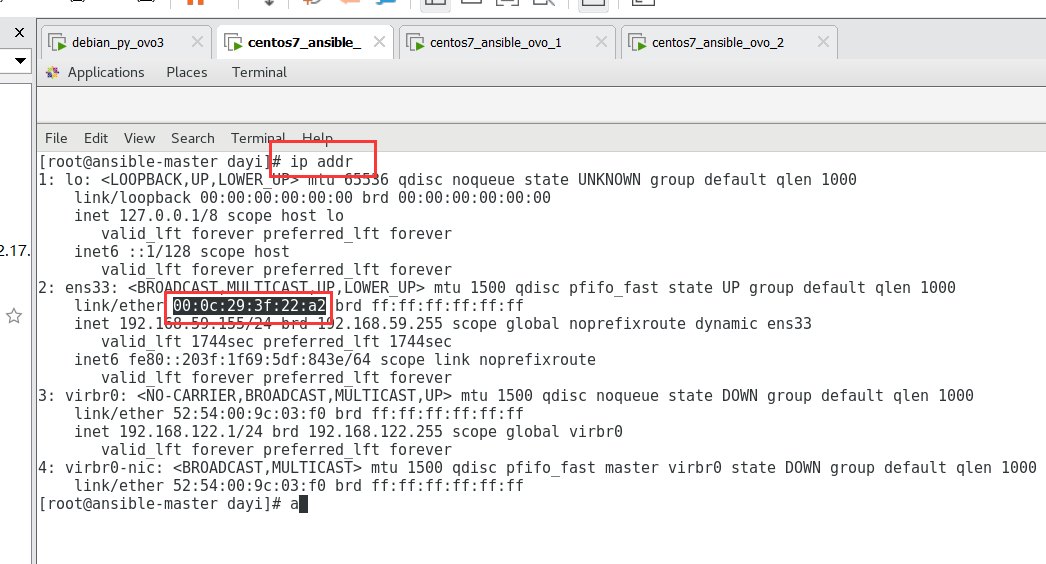
5 步 记录着三个地方的 MAC 地址:
记录一下四个机子的 IP 地址
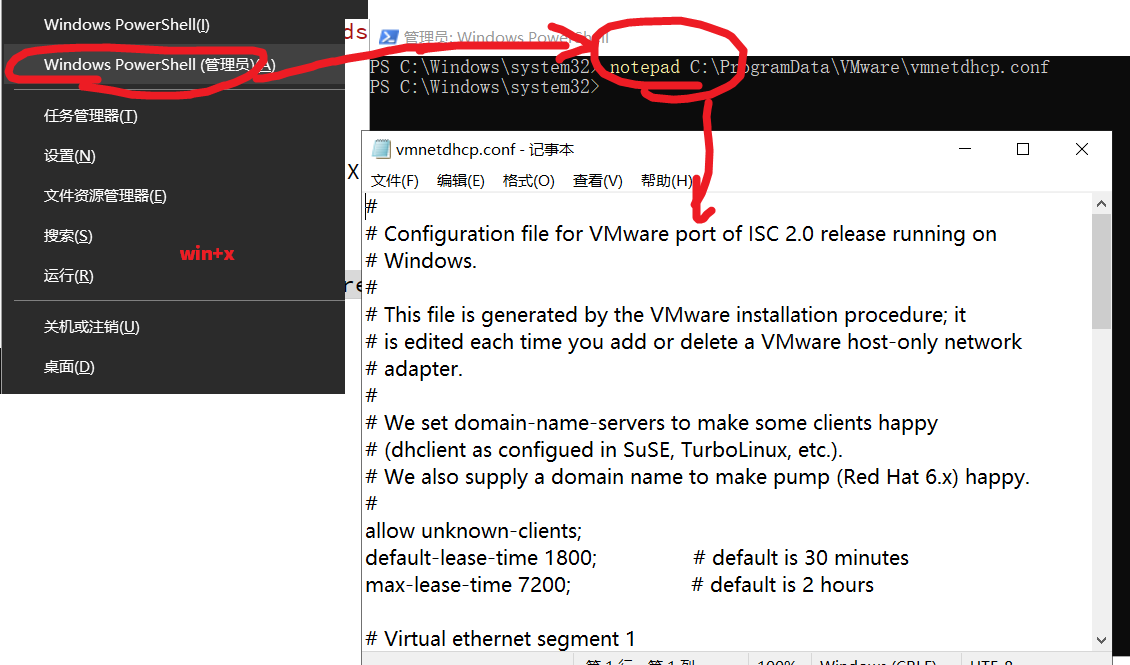
6 步 在你的 windows(宿主机)上,WIN+X 打开 cmd 或者 powershell 或者记事本
输入
1 notepad C:\ProgramData\VMware\vmnetdhcp.conf
7 步
很遗憾的是,【编辑】->【虚拟网络编辑器】后,会重置 vmnetdhcp.conf 文件 ,所以你改的这个内容,最好要备份一下)
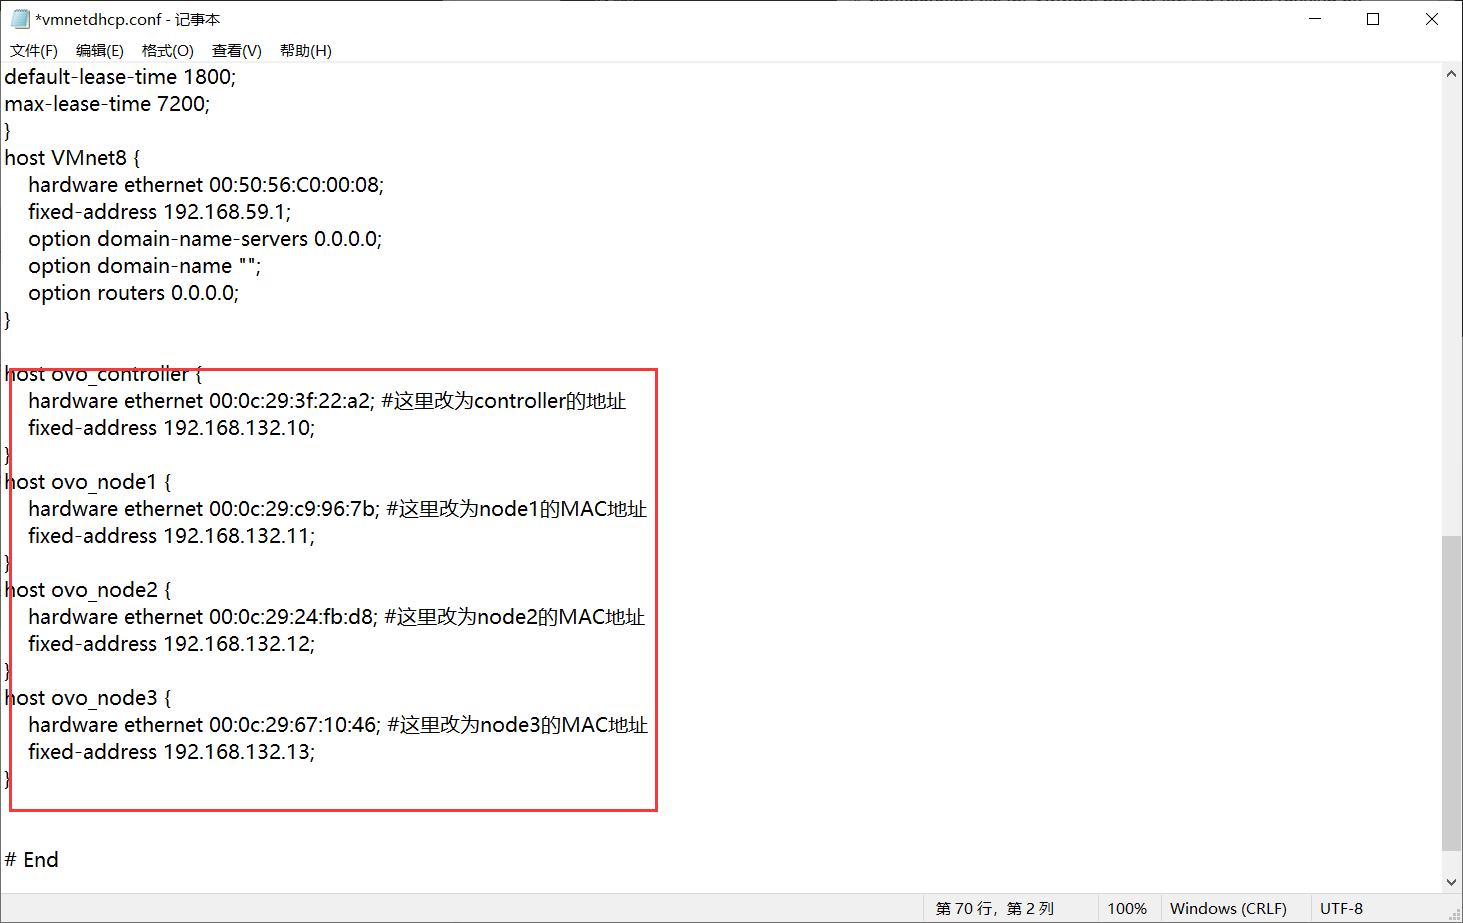
输入
1 2 3 4 5 6 7 8 9 10 11 12 13 14 15 16 host ovo_controller { hardware ethernet 00:0c:29:3f:22:a2; fixed-address 192.168.132.10; } host ovo_node1 { hardware ethernet 00:0c:29:c9:96:7b; fixed-address 192.168.132.11; } host ovo_node2 { hardware ethernet 00:0c:29:24:fb:d8; fixed-address 192.168.132.12; } host ovo_node3 { hardware ethernet 00:0c:29:67:10:46; fixed-address 192.168.132.13; }
8 步,塞后面。保存
保存不了可以另存为桌面,然后在手动复制到:C:\ProgramData\VMware\
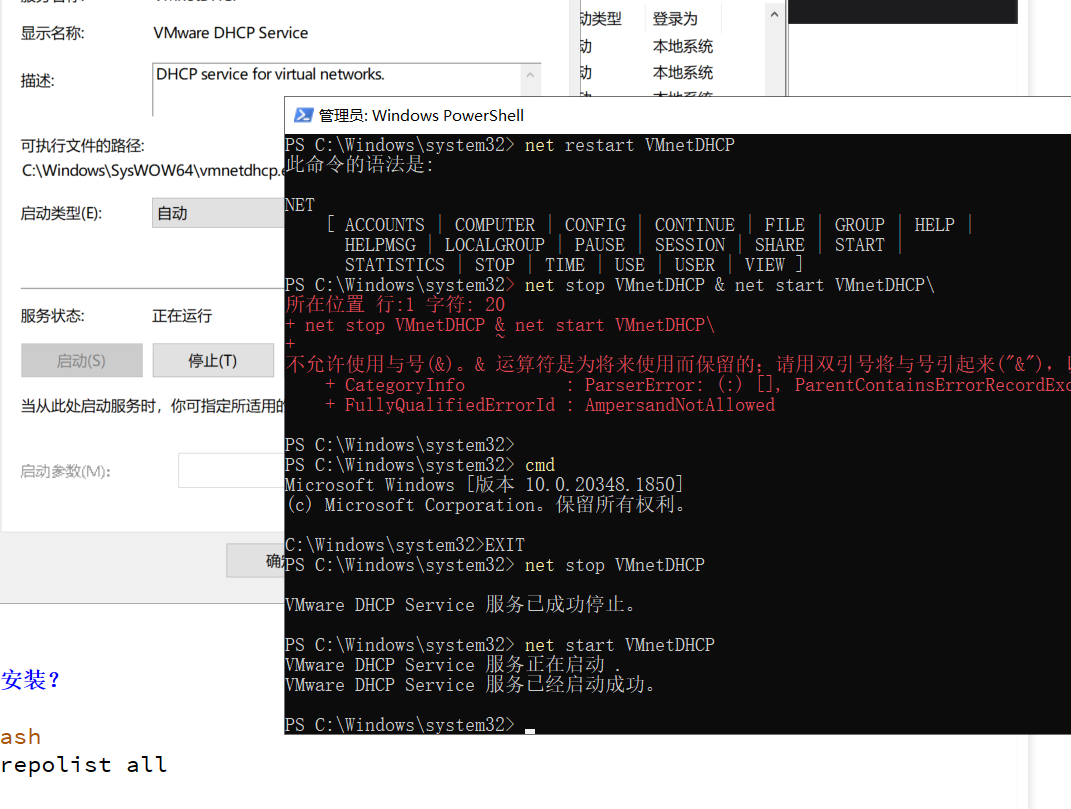
9-10 步 管理员终端
1 2 net stop VMnetDHCP net start VMnetDHCP
然后把虚拟机重启了
也可以不重启,输入这个
1 systemctl restart network
改完 IP 再改下配置文件
是这样的,再在 controller 做:
1 2 3 su su dayi nano ~/ansible/inventory
改下 IP
救命,高建鑫没配置文件 1 2 3 4 5 6 7 8 9 10 11 12 node1 ansible_host =192.168 .132.11 node2 ansible_host =192.168 .132.12 node3 ansible_host =192.168 .132.13 [dayi] node1 node2 node3 [ovo] localhost ansible_connection =local
正常修改只需要注意这三行 1 2 3 node1 ansible_host=192.168.132.11 node2 ansible_host=192.168.132.12 node3 ansible_host=192.168.132.13
重新认下 IP
1 2 3 4 ssh dayi@192.168.132.11 ssh dayi@192.168.132.12 ssh dayi@192.168.132.13
再测试一遍:
1 2 cd ~/ansibleansible all -m ping
以上为周一。
周二
推荐 ssh 工具:Xterminal
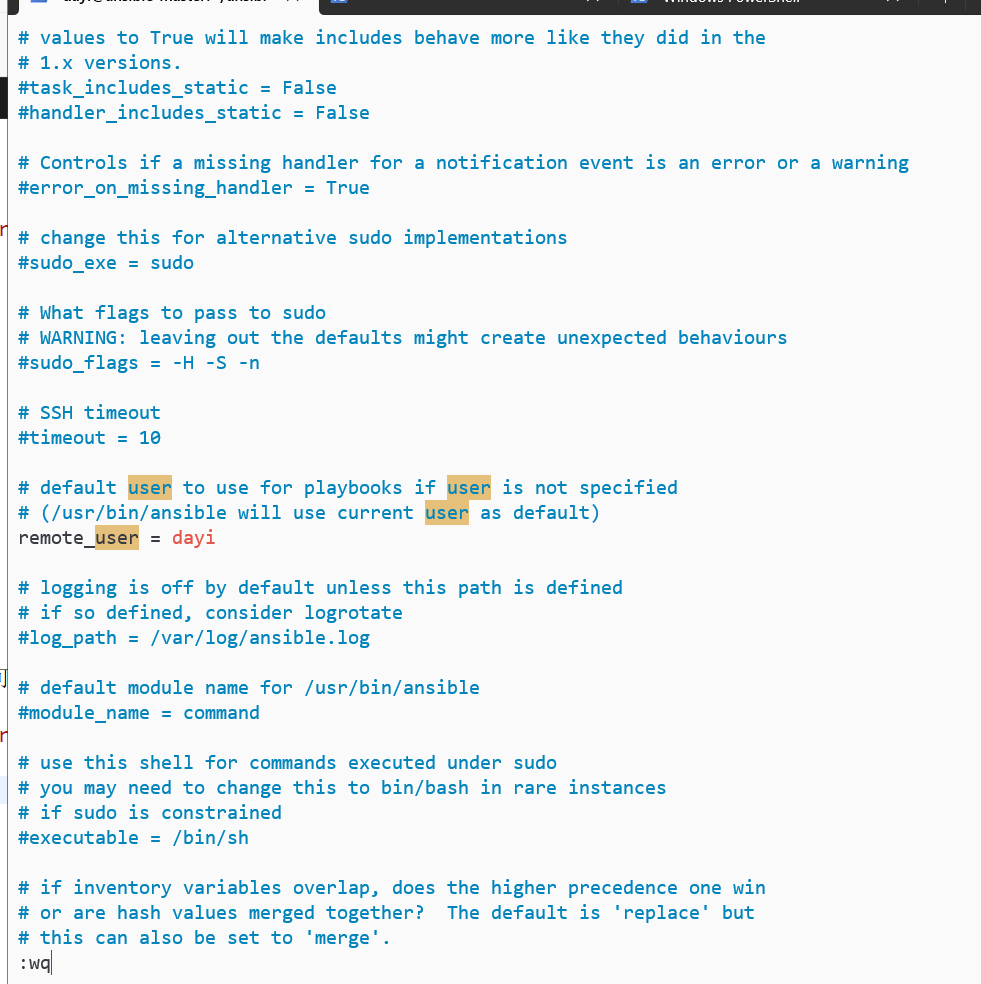
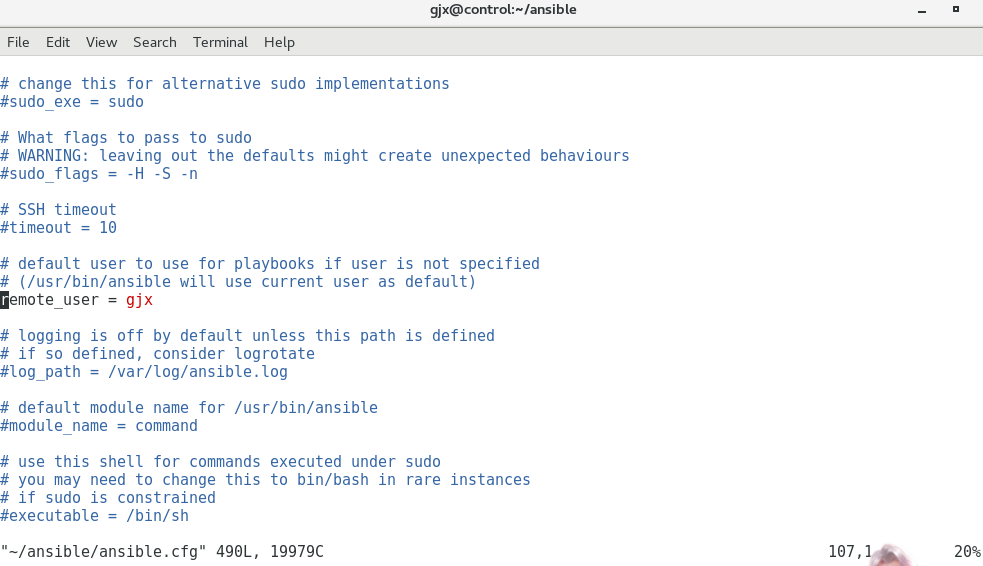
配置文件:登录用户
可以不修改,不做这一步。
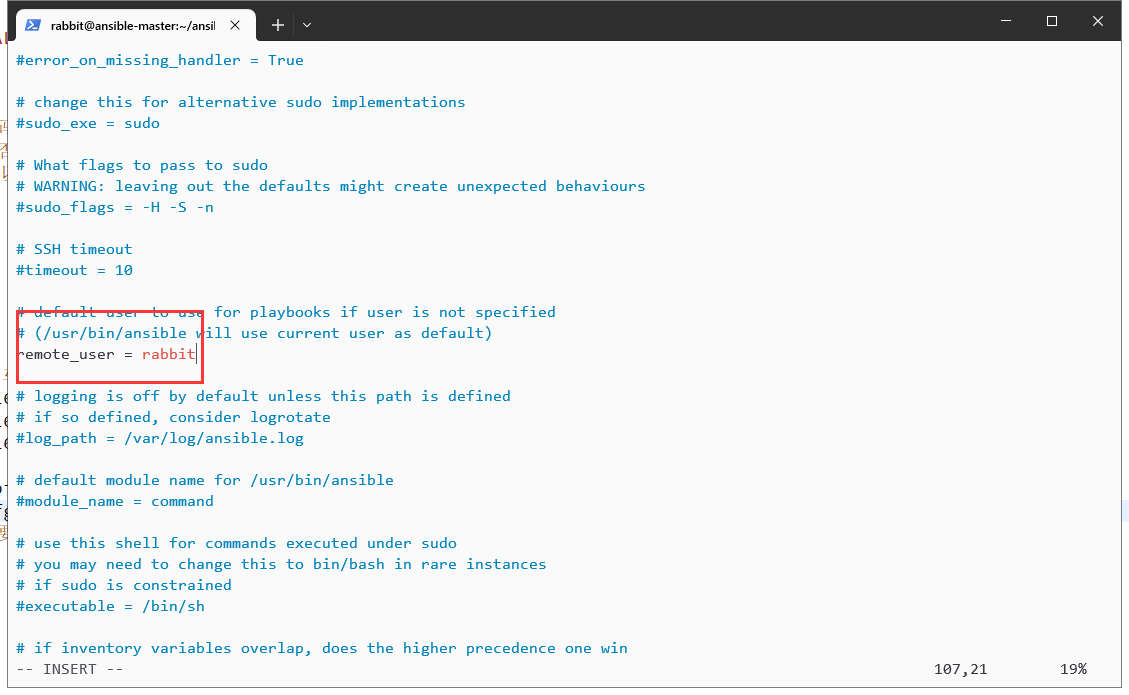
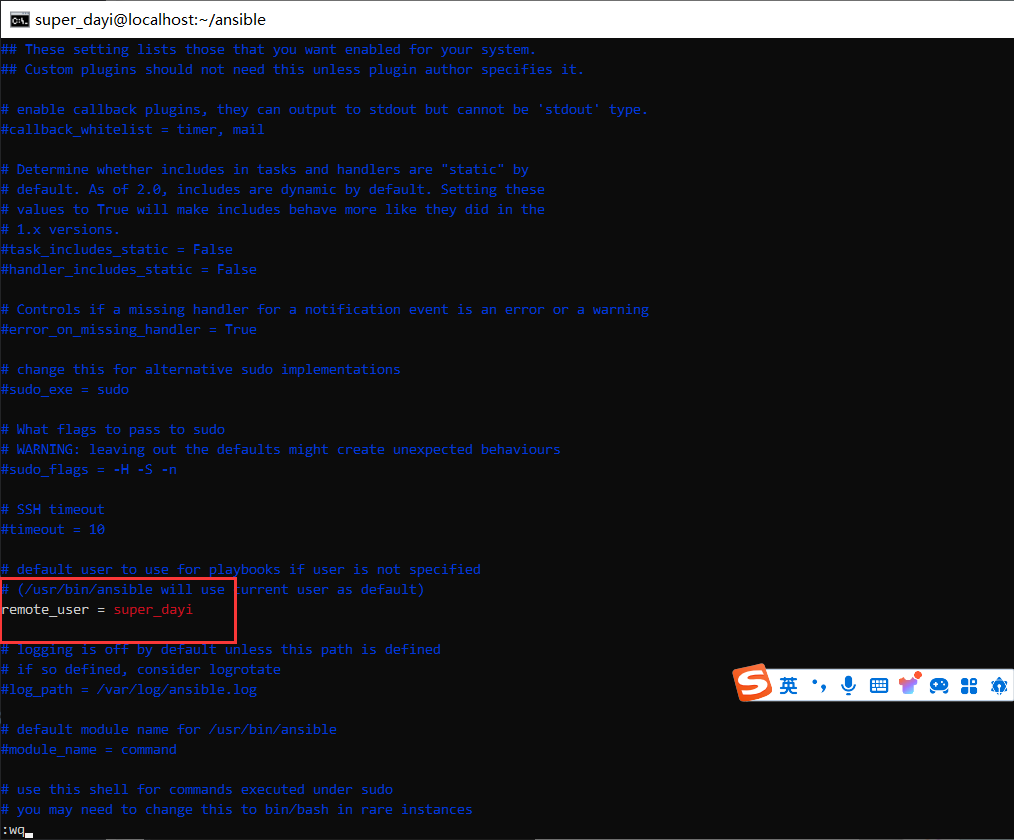
vim (文件位置vim ~/ansible/ansible.cfg)输入/remote_user可以找到这行,然后就可以改登录名了
比如这样(但默认也会是你默认当前登录的用户名)
inventory 配置文件
【仅为格式】不用复制进去。
1 2 3 4 5 6 7 8 9 10 11 12 13 14 192.168.132.[10-12] [sjc] node2 [dev] node1 [父组.儿子组] dev sjc
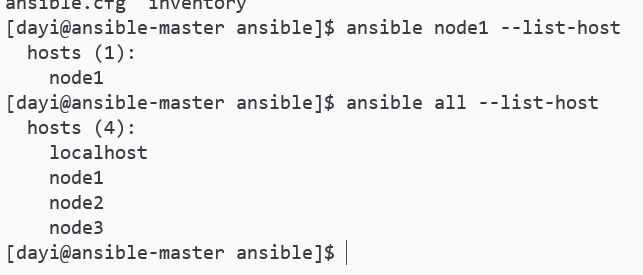
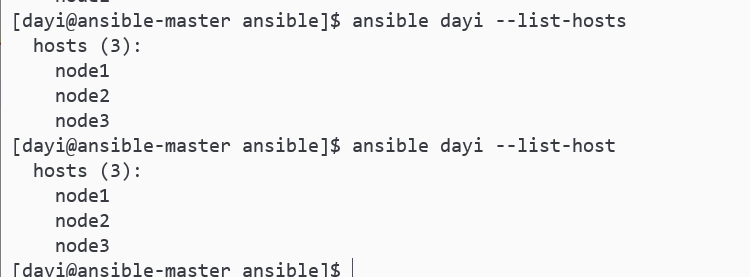
验证清单 1 2 3 4 ansible node1 --list-host ansible all --list-host
1 2 3 4 5 6 7 8 9 10 11 12 13 14 [dayi@ansible-master ansible]$ ansible node1 --list-host hosts (1): node1 [dayi@ansible-master ansible]$ ansible dayi --list-hosts hosts (3): node1 node2 node3 [dayi@ansible-master ansible]$ ansible dayi --list-host hosts (3): node1 node2 node3 [dayi@ansible-master ansible]$
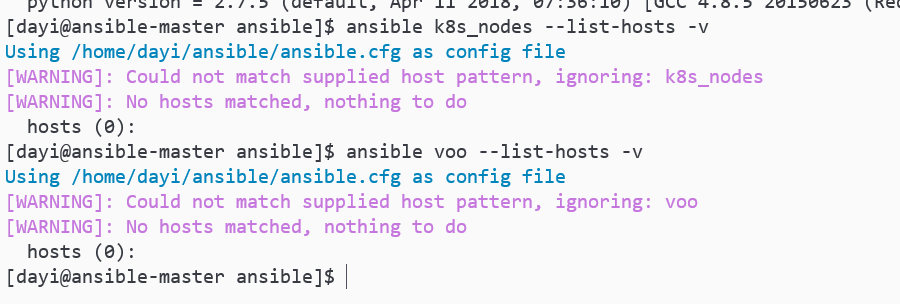
如果没有匹配,返回nothing to do
[debian] debian12 安装 python2
仅没有 python2 的环境,centos7 比较老所以有
1 2 3 4 5 6 7 8 9 10 11 12 13 14 15 16 17 18 19 20 21 22 23 24 25 26 27 28 29 su cd /optapt-get install build-essential echo "deb http://mirrors.ustc.edu.cn/debian bookworm main contrib non-free non-free-firmware" >> /etc/apt/sources.listecho "deb http://mirrors.ustc.edu.cn/debian bookworm-updates main contrib non-free non-free-firmware" >>/etc/apt/sources.listnano /etc/apt/sources.list apt update apt install gcc make -y apt install zlib1g-dev libbz2-dev libssl-dev libncurses5-dev libreadline-dev tk-dev libgdbm-dev libdb-dev libpcap-dev xz-utils libexpat-dev -y apt-get install libssl-dev -y apt-get install libsqlite3-dev -y apt-get install libnsl-dev libtirpc-dev -y wget https://www.python.org/ftp/python/2.7.13/Python-2.7.13.tgz tar -zxxf Python-2.7.13.tgz cd Python-2.7.13./configure --with-pydebug make -s -j16 nano /etc/profile export PATH=$PATH :/opt/Python-2.7.13/ln -s /opt/Python-2.7.13/python /usr/bin/python -V root@py-ovo3:/opt/Python-2.7.13 Python 2.7.13
指定配置文件路径 默认会寻找当前目录下的ansible.cfg找不到就用默认的/etc/ansible/ansible.cfg
具体就是:
当前目录 (./ansible.cfg) > 主目录 (~/.ansible.cfg)>环境变量 ($ANSIBLE_CONFIG)>系统级配置文件 (/etc/ansible/ansible.cfg)
氢弹文件 1 2 3 ansible -i [清单inventory文件位置] ansible --inventory
查看 ansible-doc 1 ansible-doc ping【这里是模块名】
查看全部模块 1 2 ansible-doc -l ansible-doc -l |grep ^fetch
模块命令 复制文件 controller -> node : copy 模块
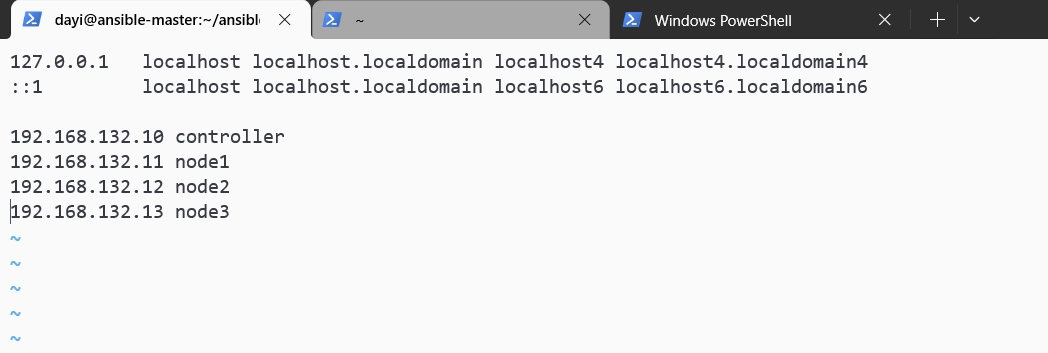
同步 hosts
这里推荐一起执行了
添加输入这个(i输入,:wq!保存)
1 2 3 4 192.168.132.10 controller 192.168.132.11 node1 192.168.132.12 node2 192.168.132.13 node3
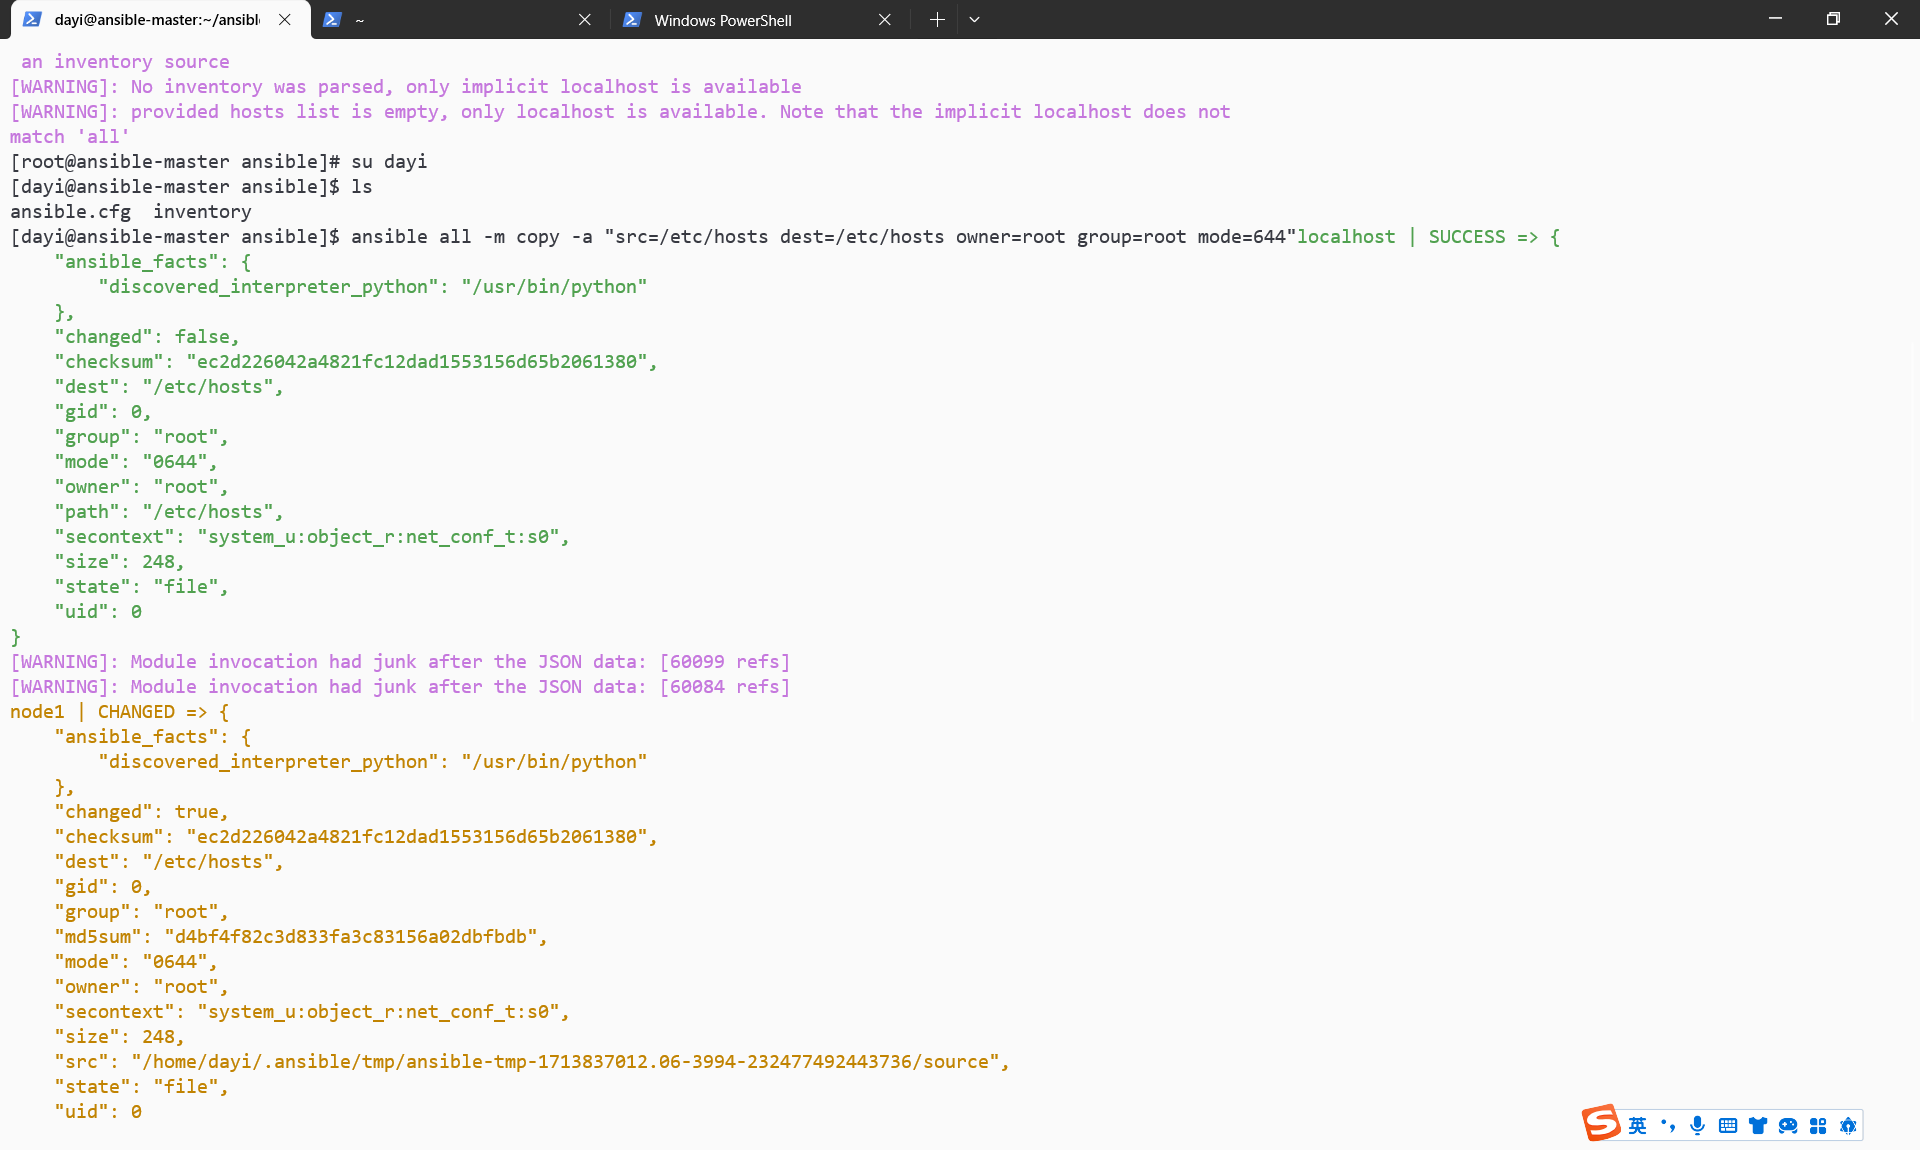
然后复制文件
1 2 3 su dayi cd ~/ansible/ansible all -m copy -a "src=/etc/hosts dest=/etc/hosts mode=644"
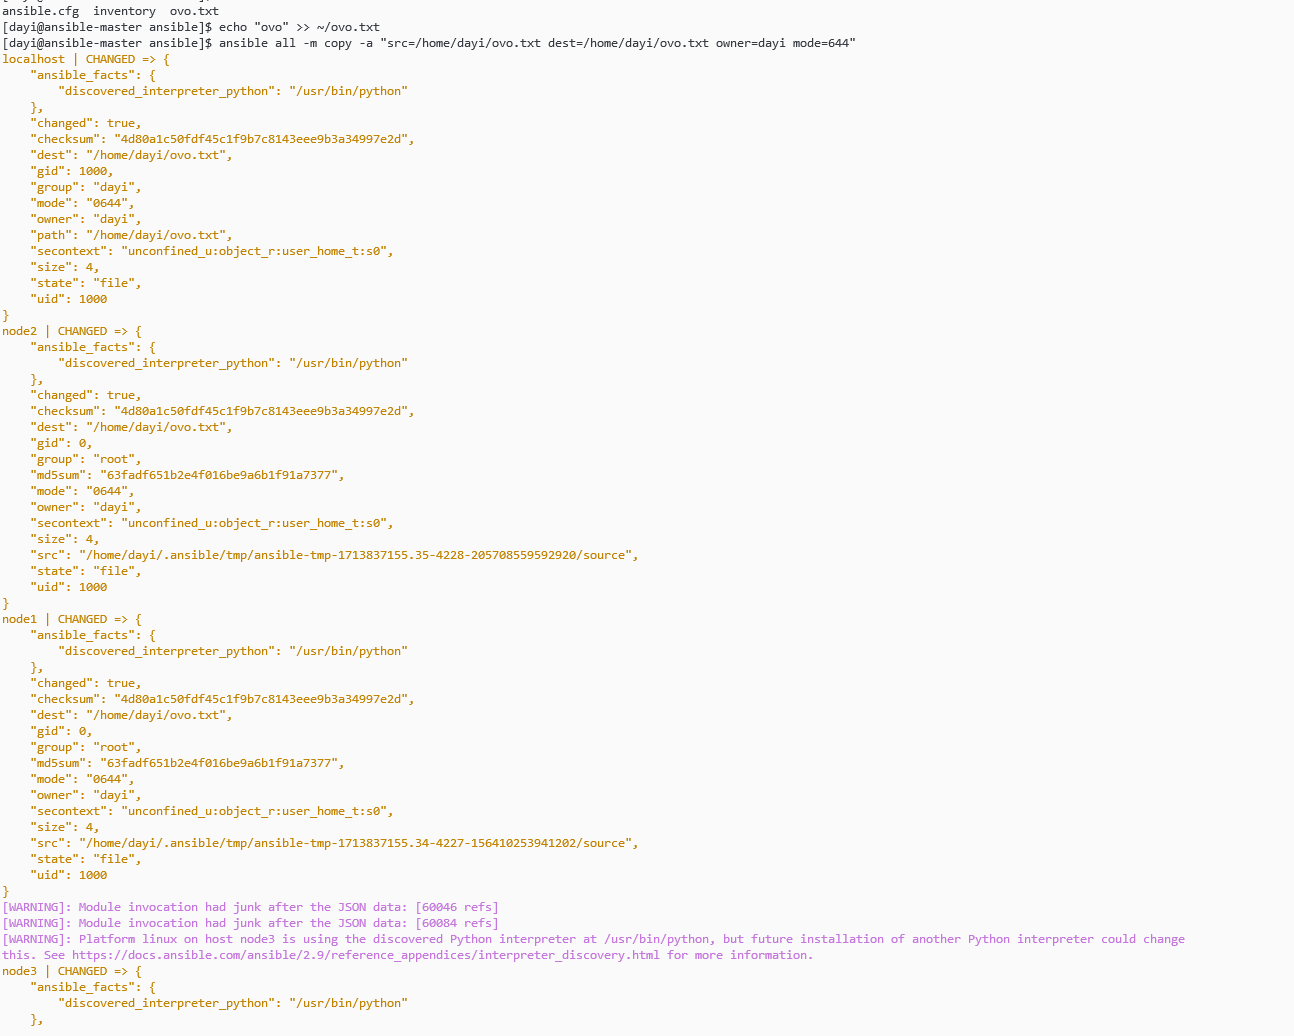
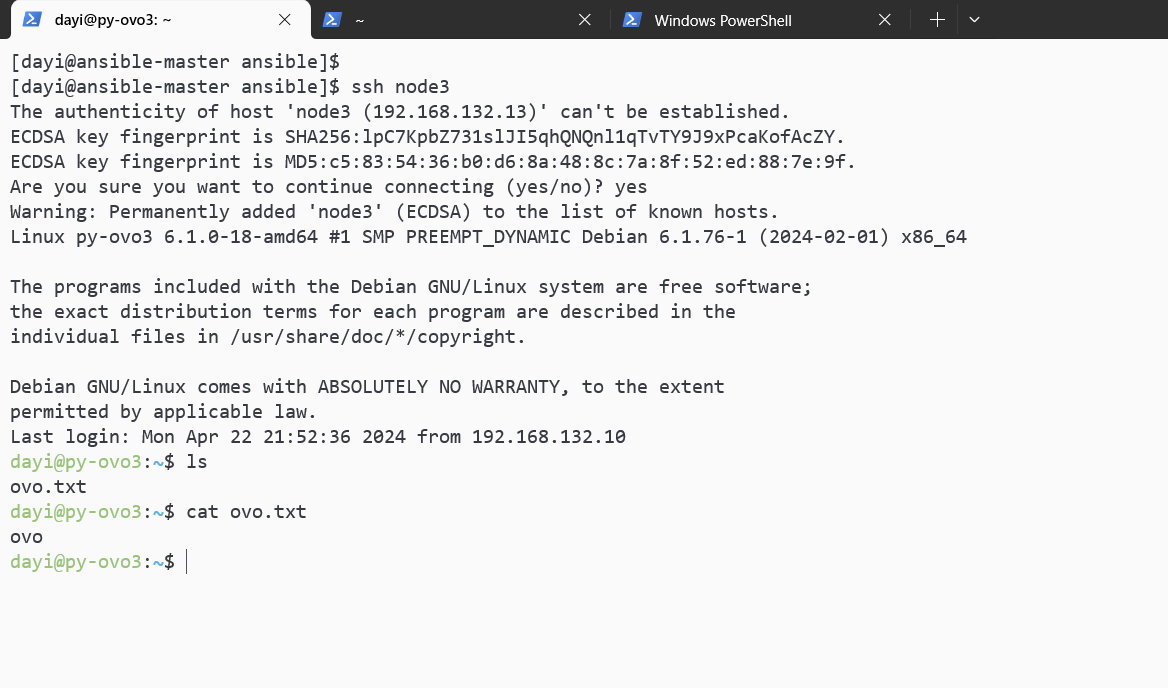
复制一个普通文件 1 2 3 su dayi echo "ovo" >> ~/ovo.txtansible all -m copy -a "src=/home/dayi/ovo.txt dest=/home/dayi/ovo.txt owner=dayi mode=644"
从机上有了:
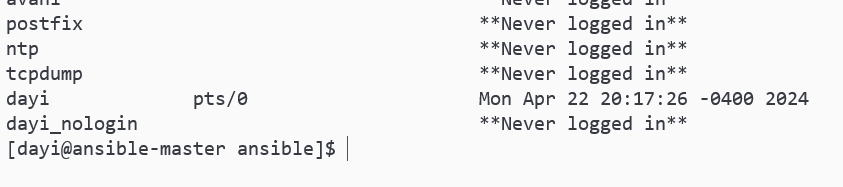
建用户 1 ansible all -m user -a "name=dayi_nologin comment=ovo uid=1200 group=root shell=/sbin/nologin"
查看当前用户们
被控几上也有咧:
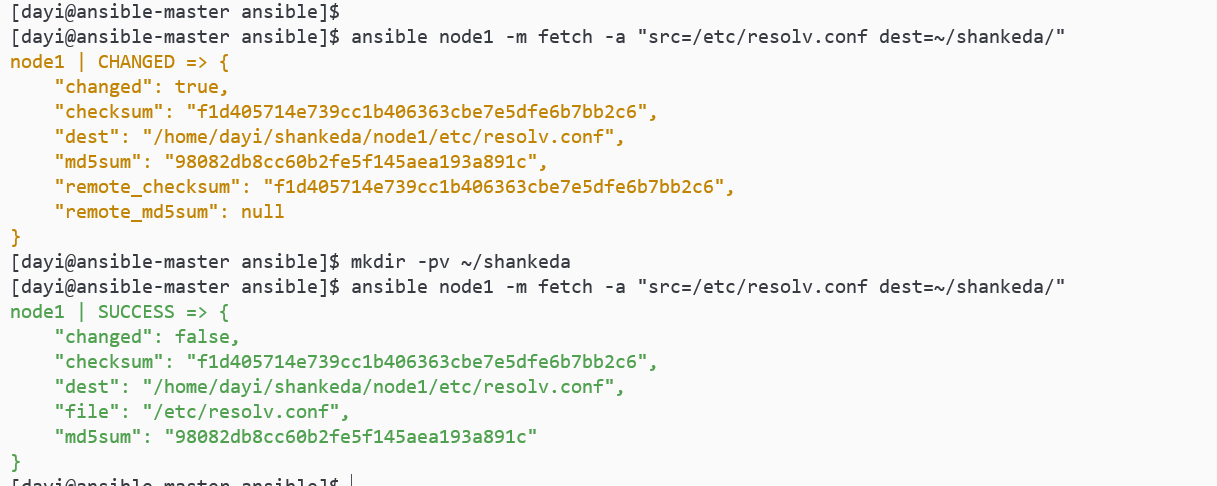
【课上作业 1】1、通过 fetch 命令将 node1 上的/etc/resolv.conf 复制到 control 节点、2、利用 file 模块,在 node1 上创建一个软连接 要求 1、通过 fetch 命令将 node1 上的/etc/resolv.conf 复制到 control 节点的/home/upwen/shankeda/,并重命名为 hello.conf
2、利用 file 模块,在 node1 上创建一个软连接,将 hosts-link 连接到/home/upwen/hosts
1. fetch 1 2 mkdir -pv ~/shankeda/ansible node1 -m fetch -a "src=/etc/resolv.conf dest=~/shankeda/"
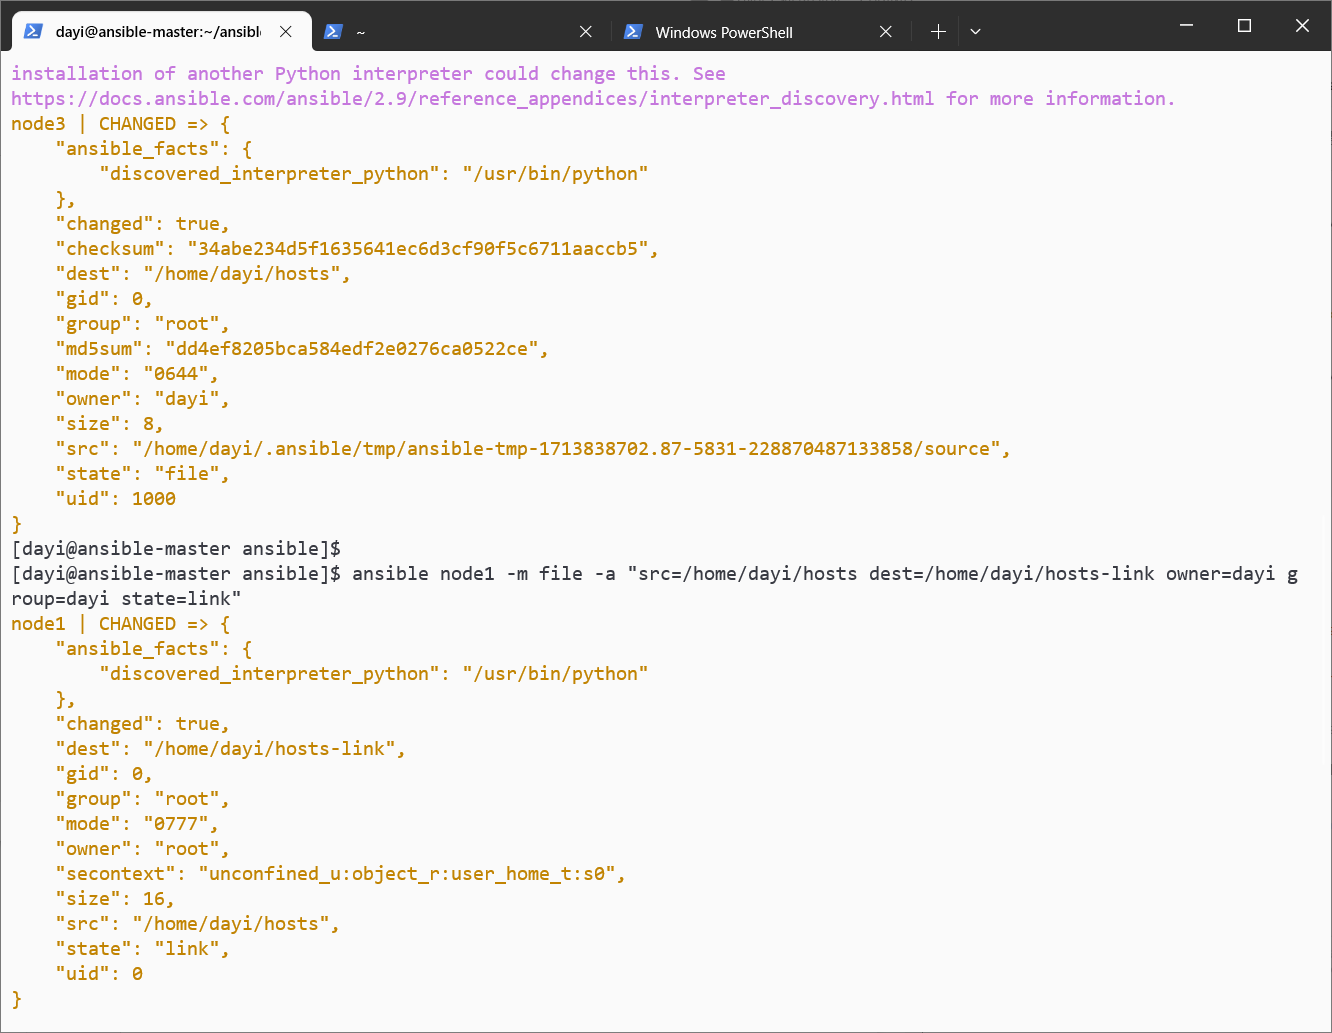
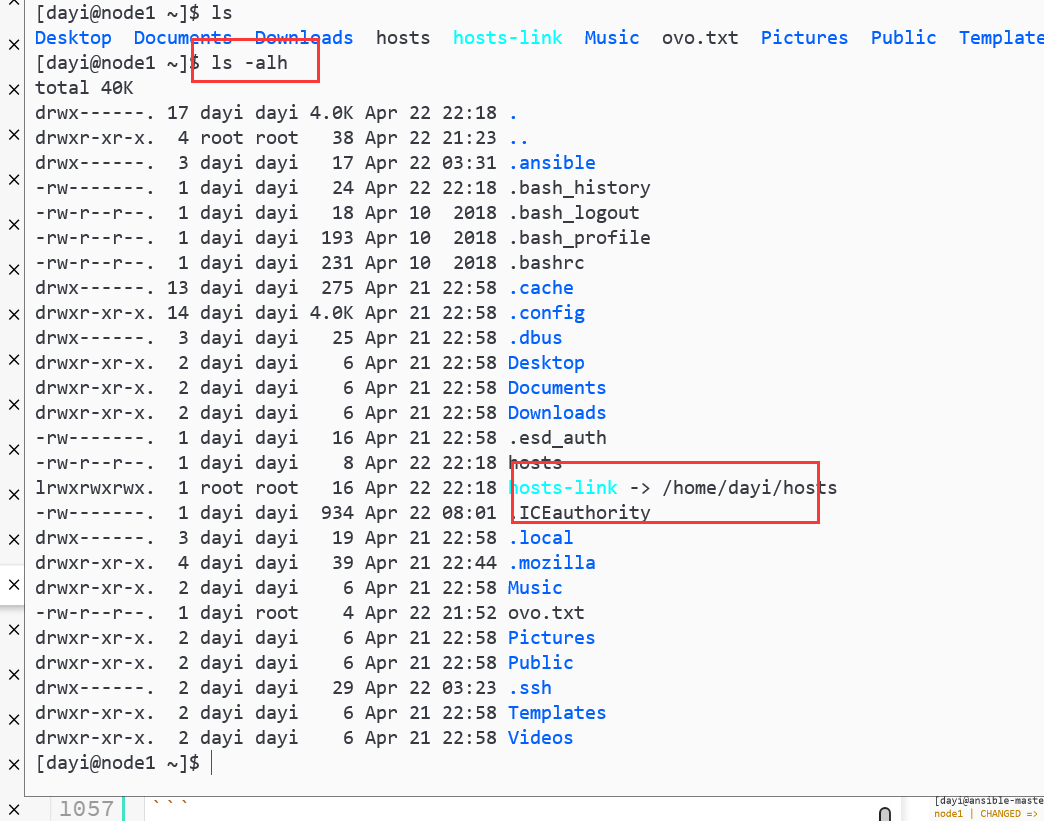
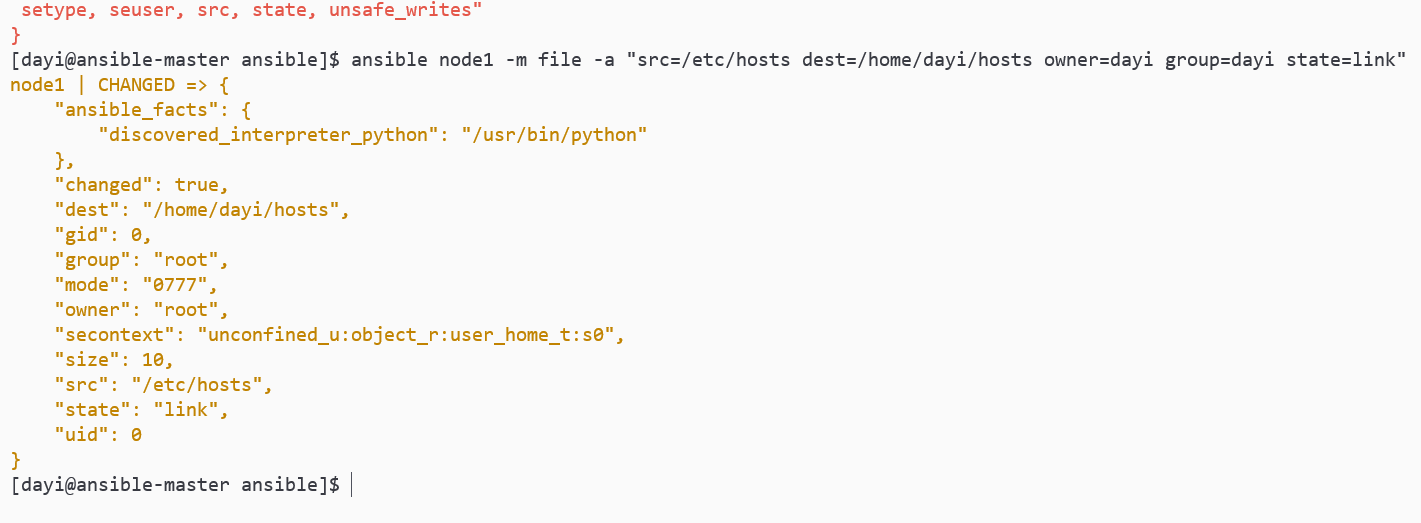
2. file 1 2 3 4 5 echo "ovo_ovo" >> ~/hostsansible all -m copy -a "src=/home/dayi/hosts dest=/home/dayi/hosts owner=dayi mode=644" ansible node1 -m file -a "src=/home/dayi/hosts dest=/home/dayi/hosts-link owner=dayi group=dayi state=link"
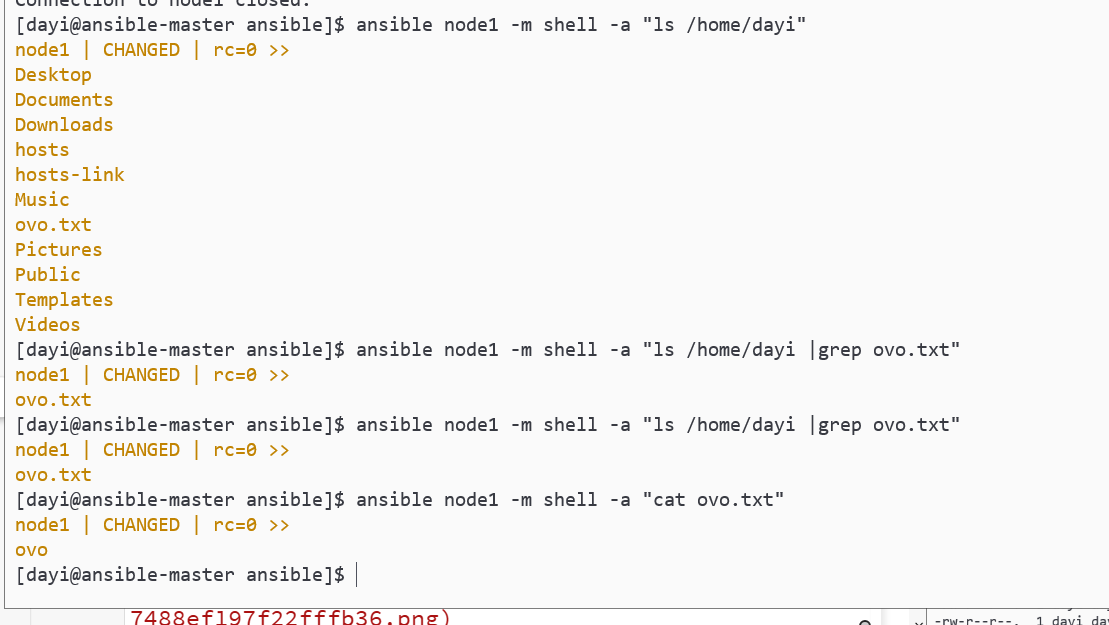
模块命令 2 shell 模块 1 ansible node1 -m shell -a "ls /home/dayi"
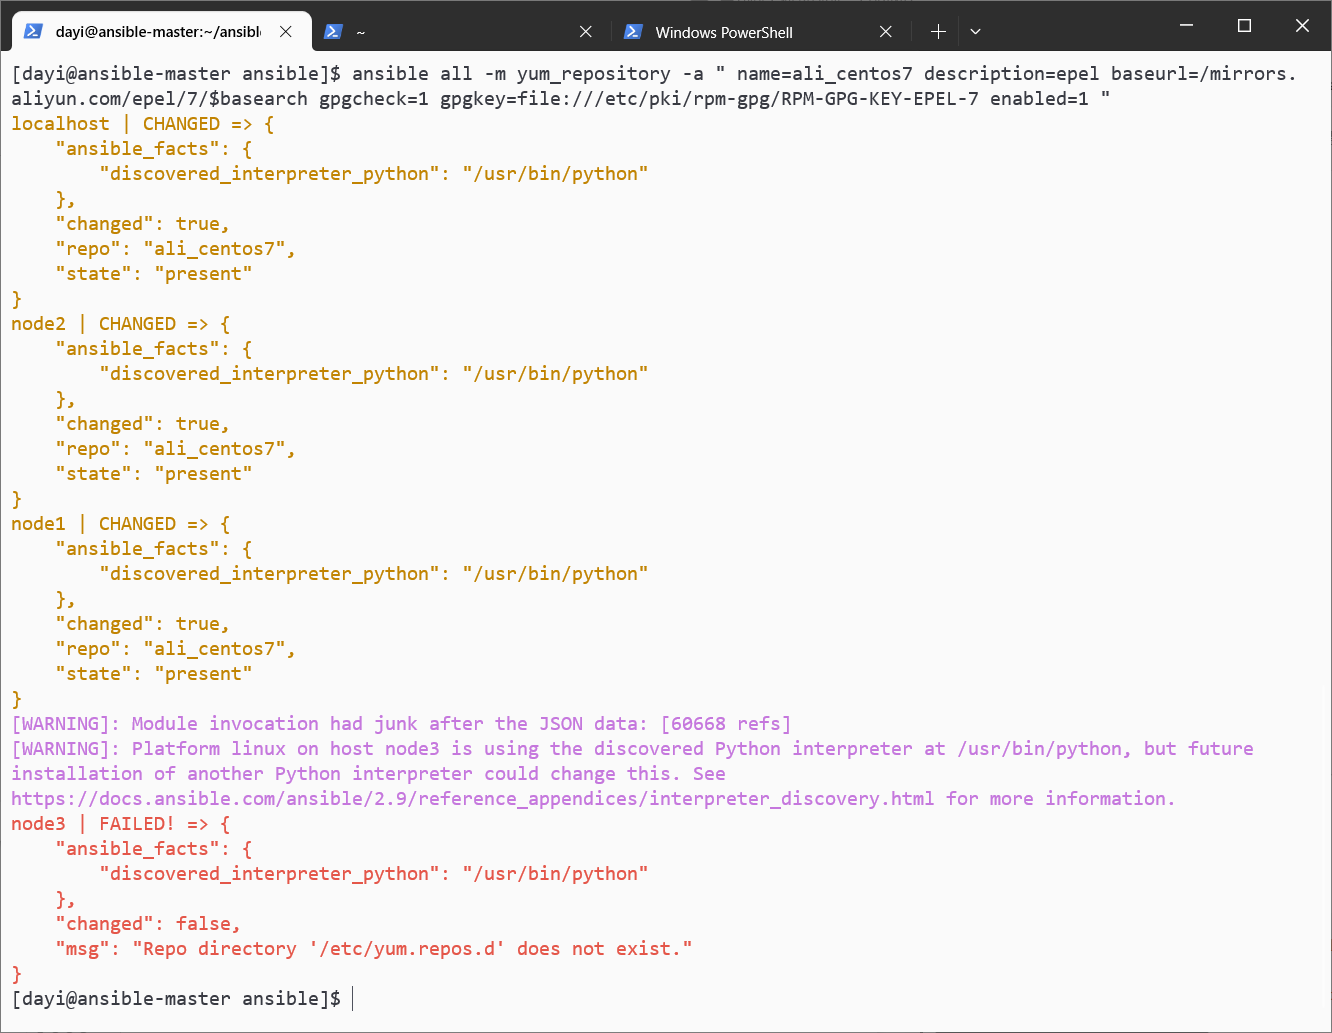
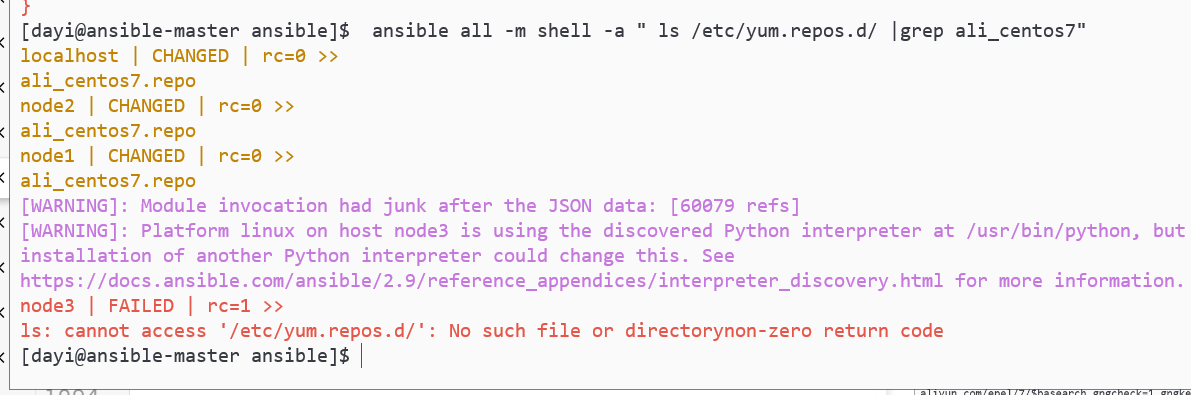
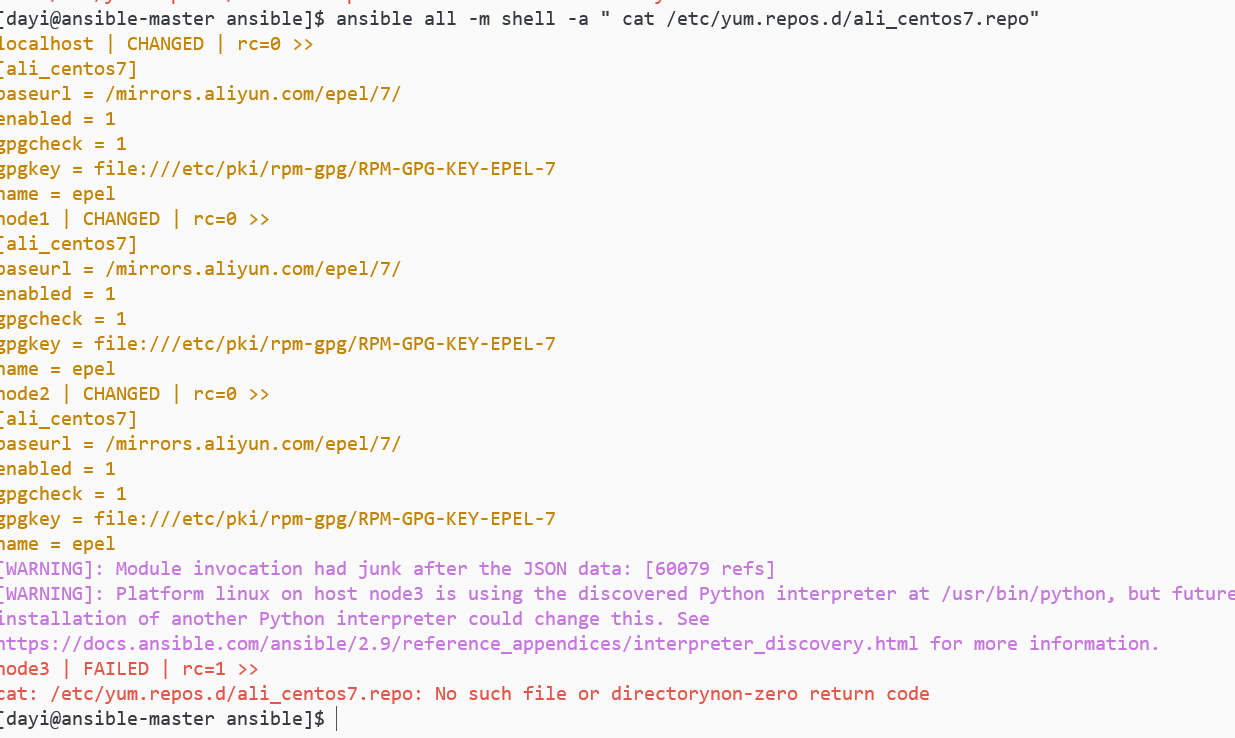
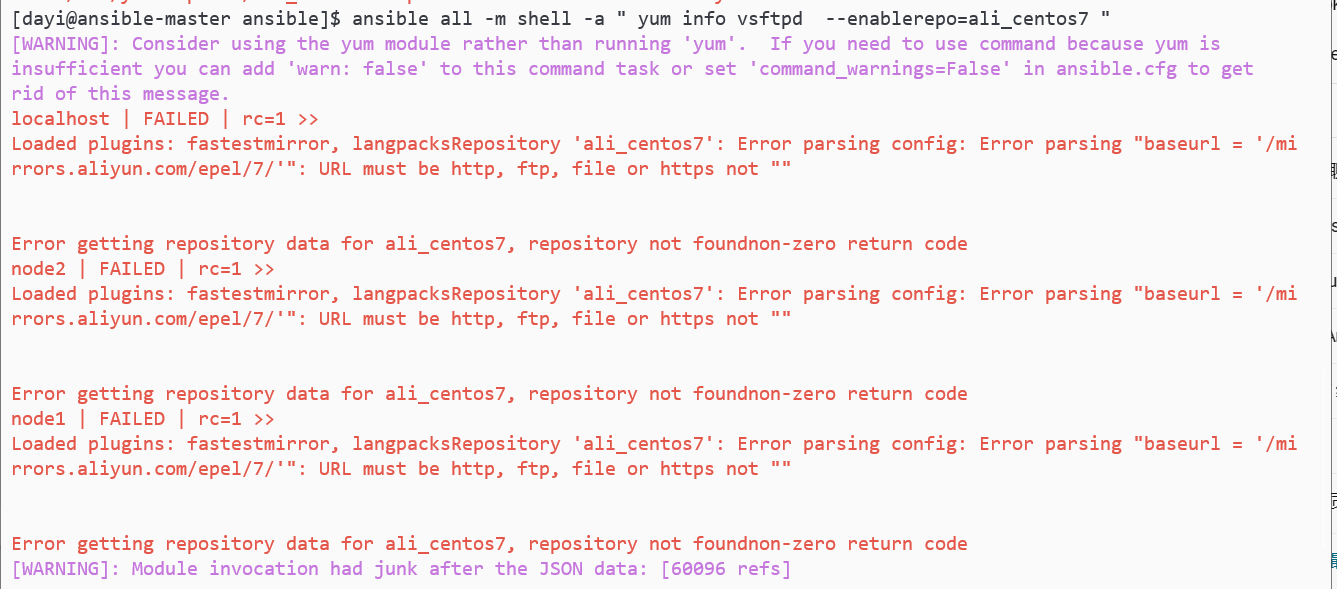
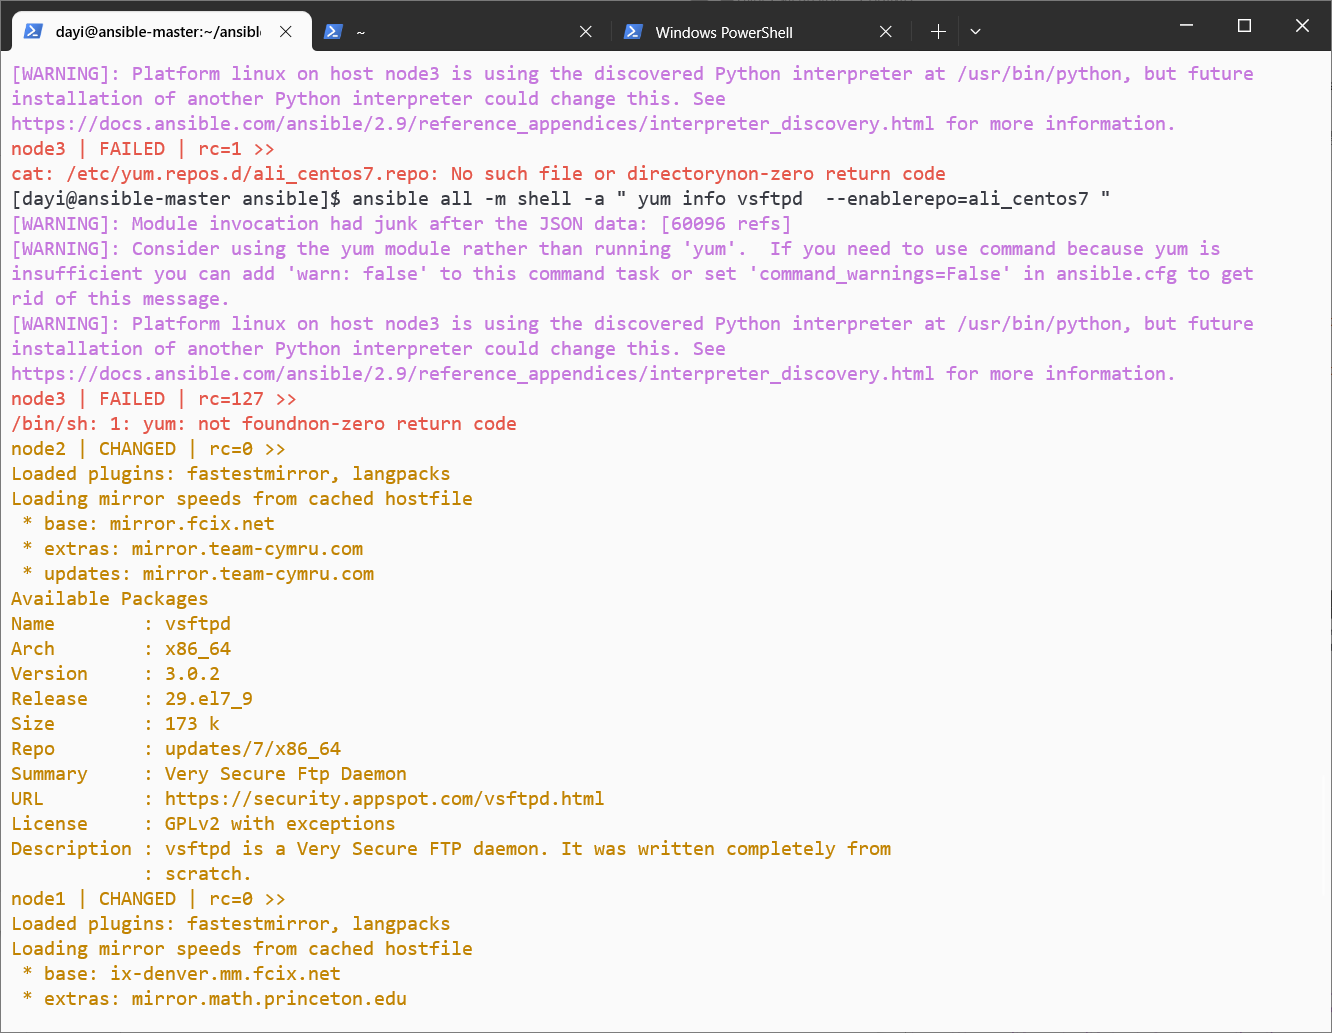
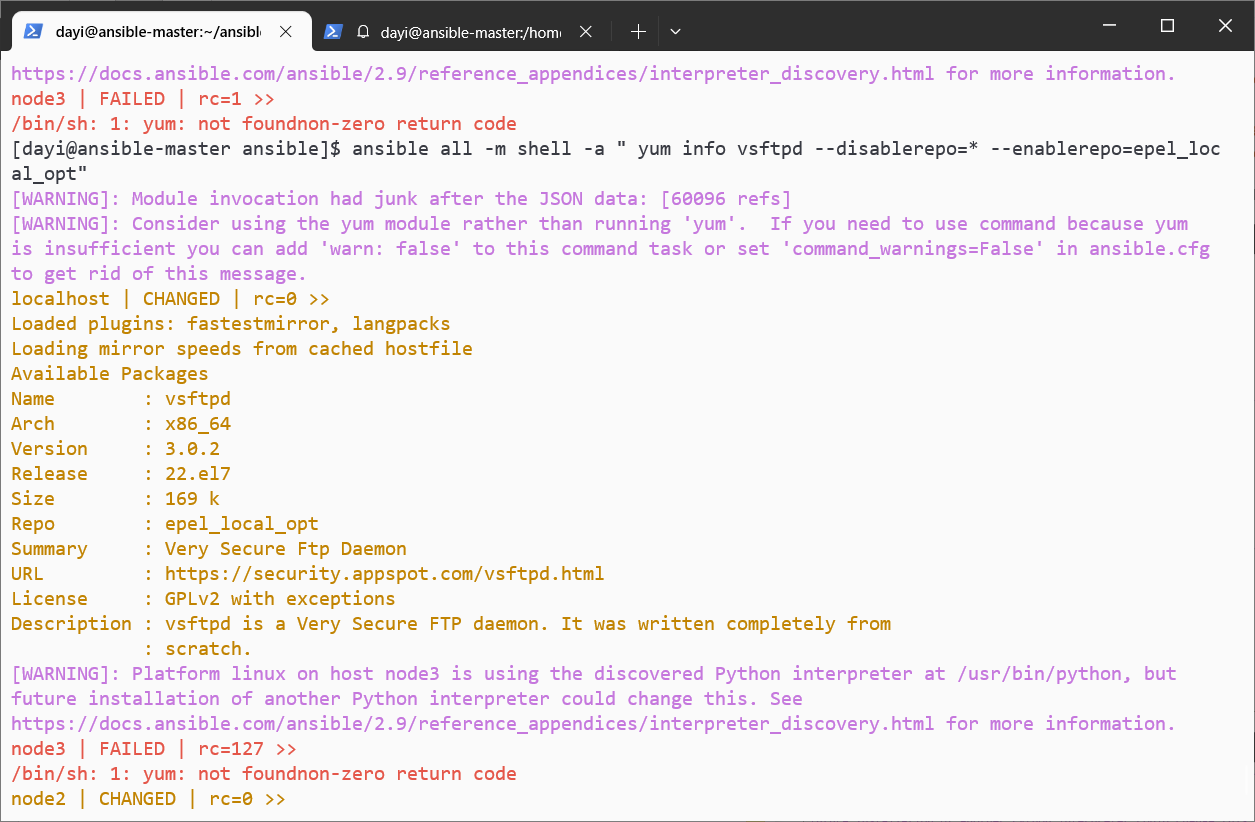
yum 模块 1 2 3 4 5 6 7 8 9 10 11 12 13 14 15 16 17 18 19 20 21 22 23 ansible all -m yum_repository -a " name=ali_centos7 description=epel baseurl=/mirrors.aliyun.com/epel/7/$basearch gpgcheck=1 gpgkey=file:///etc/pki/rpm-gpg/RPM-GPG-KEY-EPEL-7 enabled=1 " ansible all -m shell -a " ls /etc/yum.repos.d/ |grep ali_centos7" ansible all -m shell -a " cat /etc/yum.repos.d/ali_centos7.repo" ansible all -m shell -a " yum info vsftpd --enablerepo=ali_centos7 " ansible all -m shell -a " sudo sed -i 's#baseurl = /mirrors.aliyun.com/epel/7/#baseurl = https://mirrors.aliyun.com/epel/7/x86_64/#' /etc/yum.repos.d/ali_centos7.repo" ansible all -m shell -a " cat /etc/yum.repos.d/ali_centos7.repo" ansible all -m shell -a " yum info vsftpd --enablerepo=ali_centos7 " ansible all -m shell -a "yum makecache&& yum info vsftpd --disablerepo=* --enablerepo=ali_centos7 "
我这里,node3炸了正常,因为不是centos
报错:
小修:
还是可能有问题,阿里云的锅。正常。
Playbook COPY
如果觉得文本编辑很难用,推荐用 xterminal vscode-ssh 插件 xterminal mobaxterm 来进行修改
1 2 cd ~/ansiblenano copy_a_file.yaml
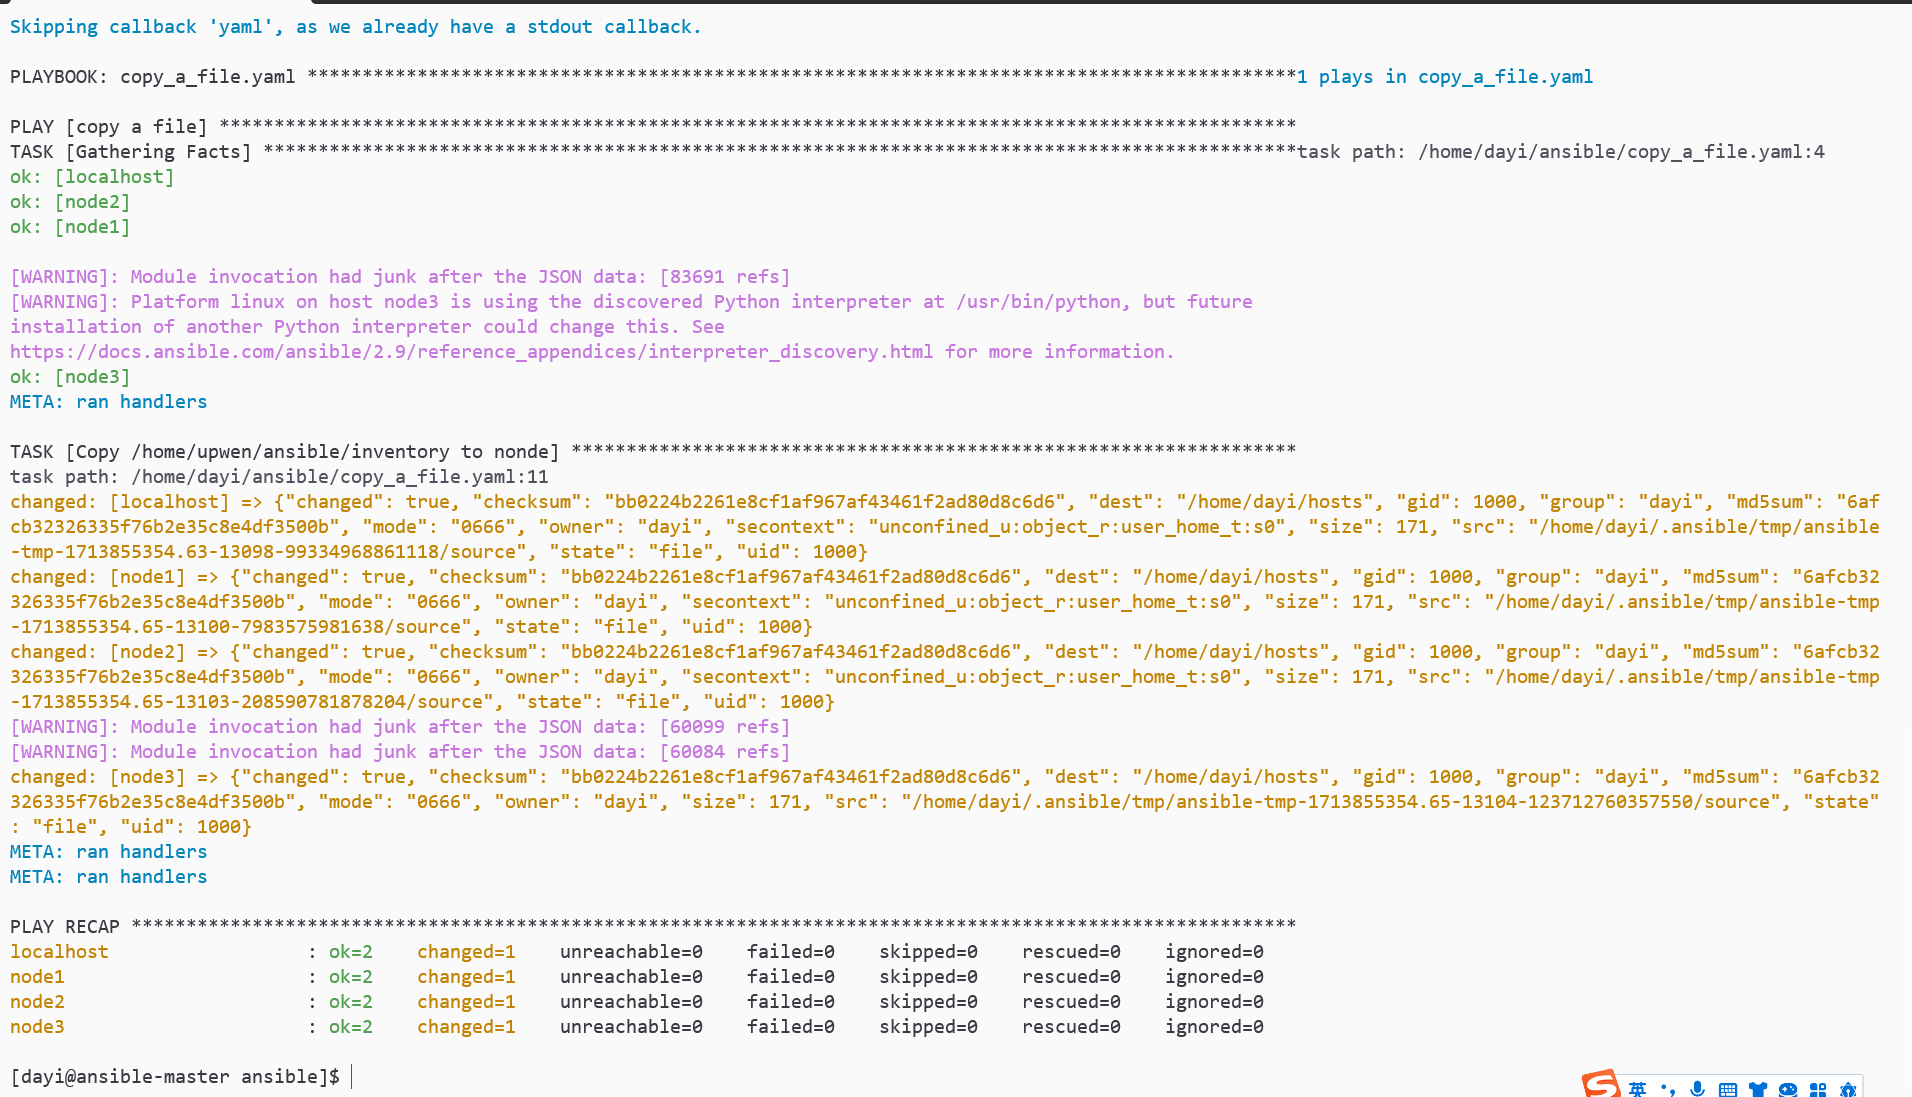
1 2 3 4 5 6 7 8 9 10 11 12 13 14 15 16 17 18 19 --- - name: copy a file hosts: all tasks: - name: Copy /home/upwen/ansible/inventory to nonde copy: src: /home/dayi/ansible/inventory/ dest: /home/dayi/hosts owner: dayi group: dayi mode: '0666'
验证+执行
1 2 3 4 5 ansible-playbook --syntax-check copy_a_file.yaml ansible-playbook --check copy_a_file.yaml ansible-playbook copy_a_file.yaml -vv ansible all -m shell -a "cat /home/dayi/hosts"
来份 114514
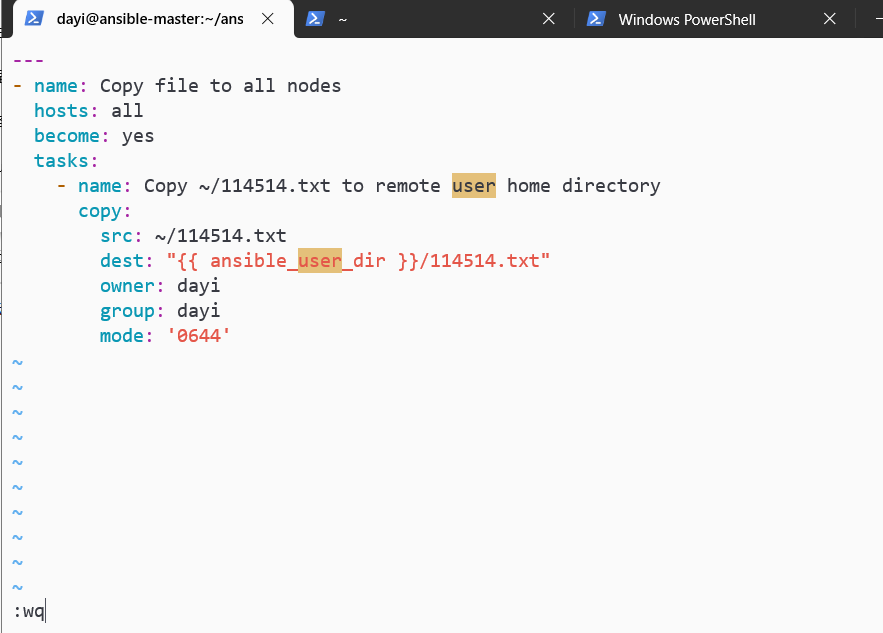
1 2 echo "114514" >>~/114514.txtvim copy_11451.yaml
1 2 3 4 5 6 7 8 9 10 11 12 --- - name: Copy file to all nodes hosts: all become: yes tasks: - name: Copy ~/114514.txt to remote user home directory copy: src: ~/114514.txt dest: "{{ ansible_user_dir }} /114514.txt" owner: dayi group: dayi mode: '0644'
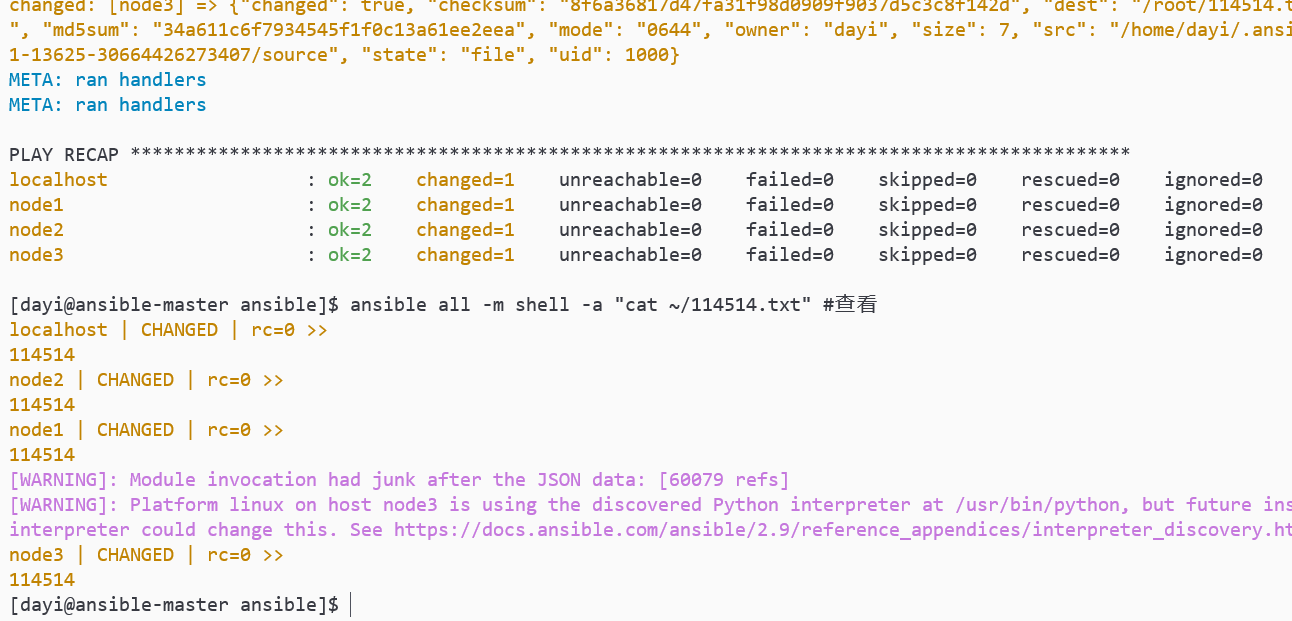
1 2 3 ansible-playbook --check copy_11451.yaml ansible-playbook copy_11451.yaml -vv ansible all -m shell -a "cat ~/114514.txt"
镜像源
该过程约占用 40G 的空间
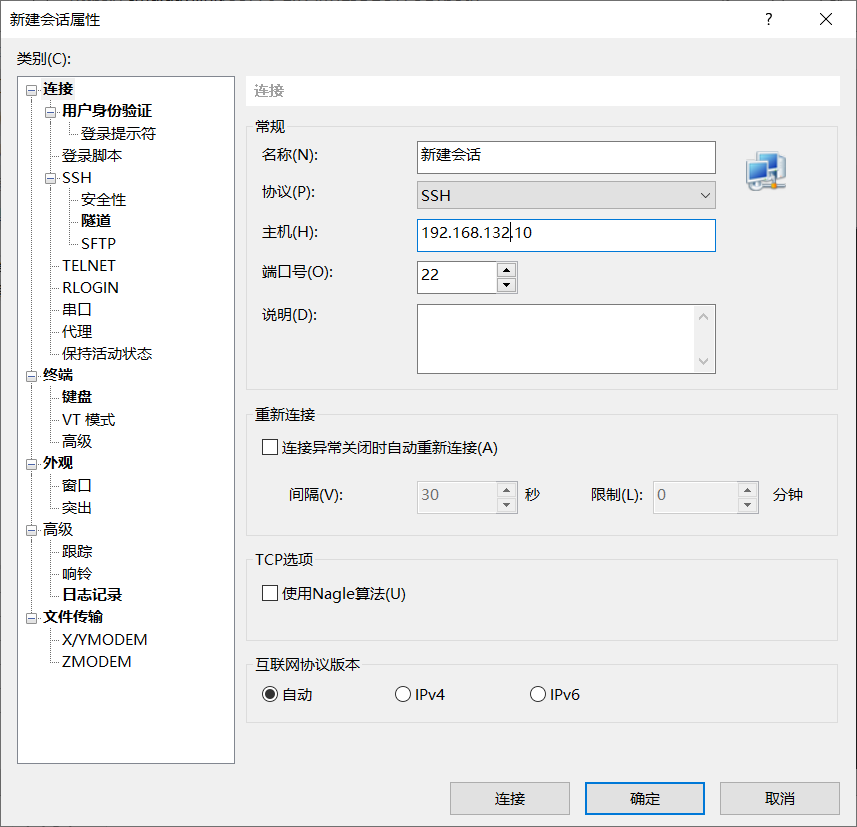
工具 Xshell 绿色版:https://p.dabbit.net/blog/pic_bed/sharex/_pn-2024-04-23-15-30-32_Murrelet_Junior_Realistic.7z
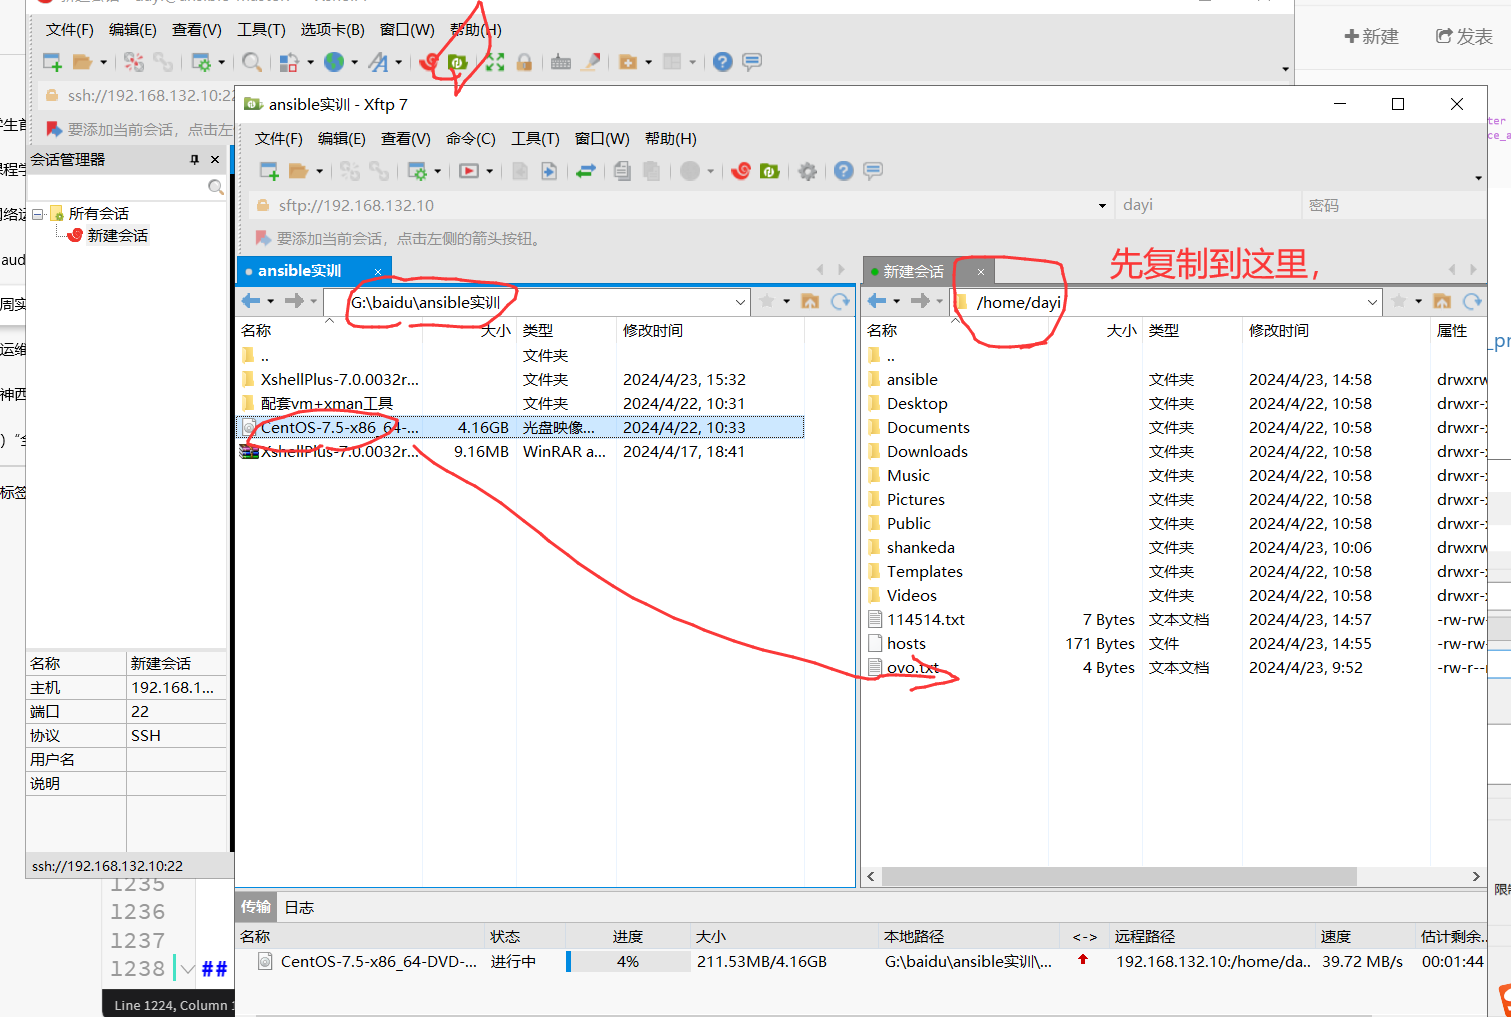
连接 SSH,复制 ISO 镜像到/opt
这样子:
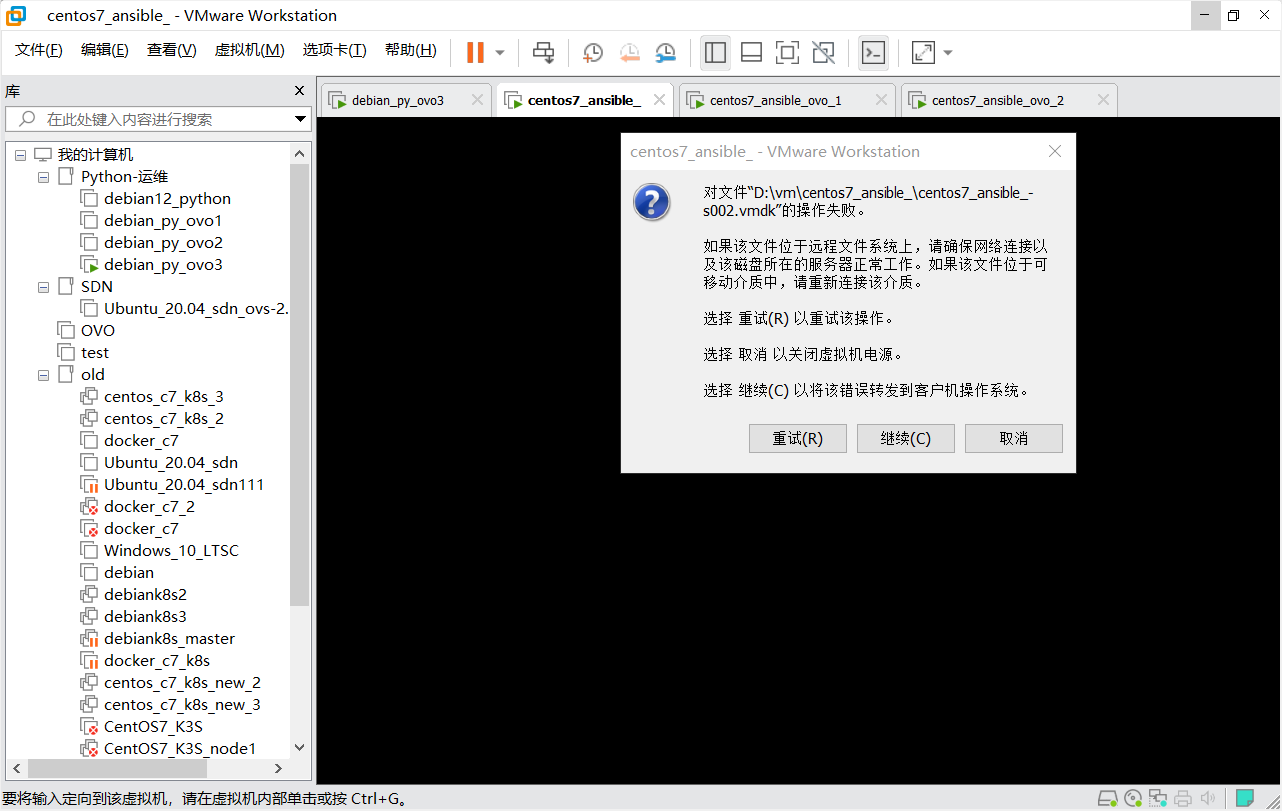
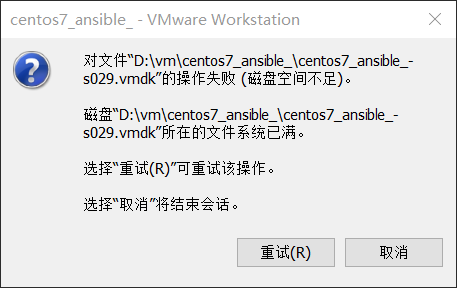
(谢邀,没磁盘空间了)
挂载镜像安装内容
如果你镜像名字不一样,对应改一下。
先把文件复制到/opt
1 2 3 4 5 [dayi@ansible-master ~]$ sudo su [root@ansible-master dayi] 114514.txt CentOS-7.5-x86_64-DVD-1804.iso Documents hosts ovo.txt Public Templates ansible Desktop Downloads Music Pictures shankeda Videos [root@ansible-master dayi]
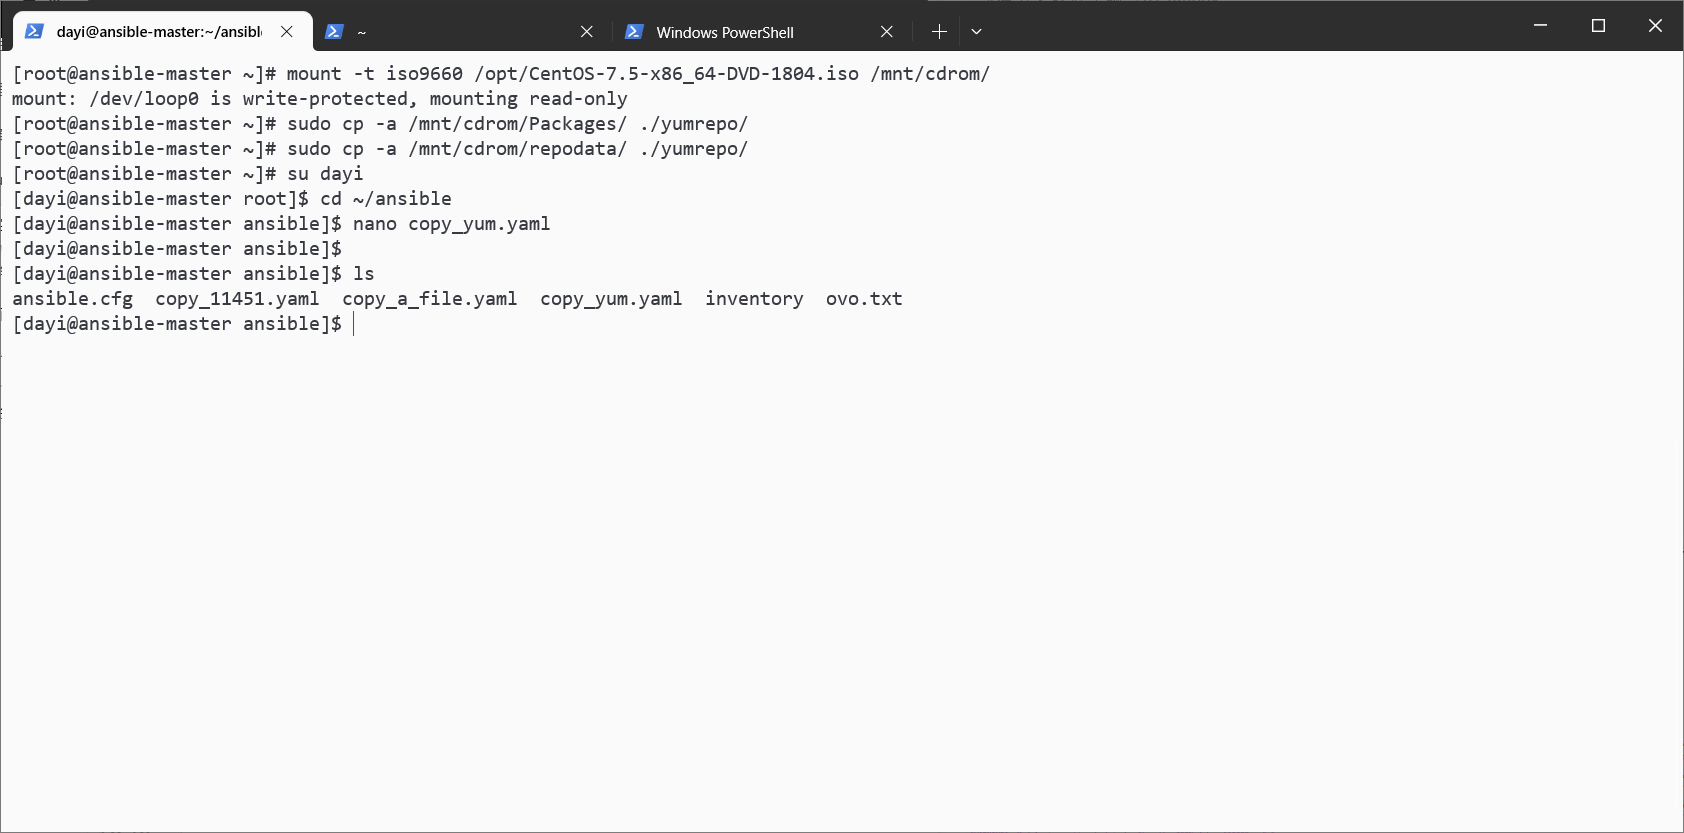
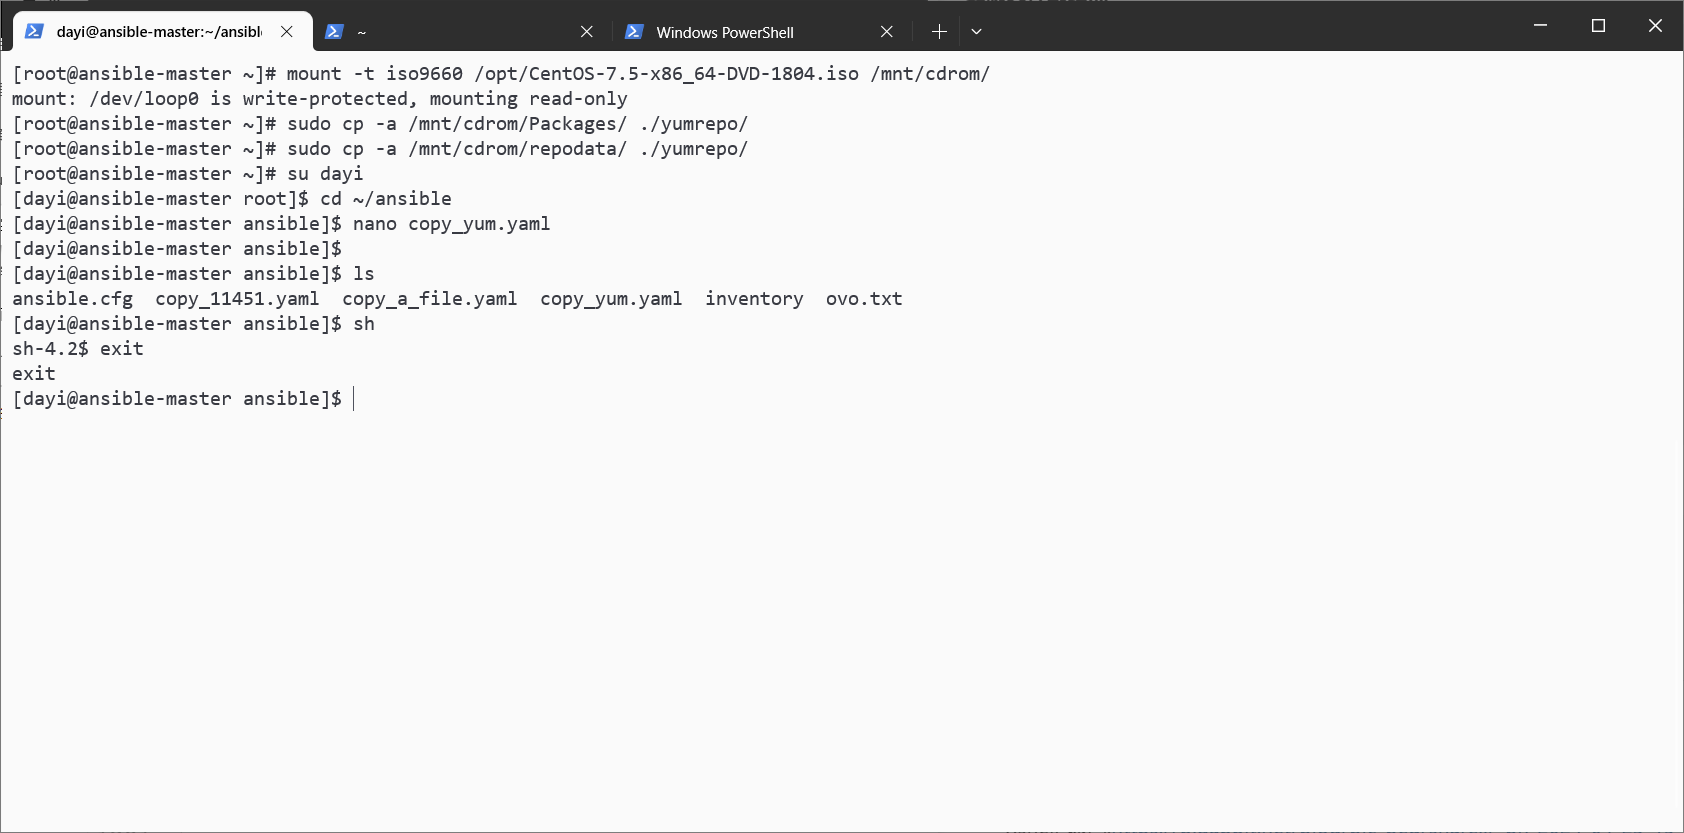
从光盘复制 yum 文件到本地 然后挂载镜像,复制出来
我感觉有点奇怪,咱先照着做了.
这里特地一个修复的
1 2 3 4 5 6 7 8 9 10 11 12 13 sudo su cd /optmkdir -p /mnt/cdrom/mount -t iso9660 /opt/CentOS-7.5-x86_64-DVD-1804.iso /mnt/cdrom/ mkdir -pv /opt/yumrepo sudo cp -a /mnt/cdrom/Packages/ ./yumrepo/ sudo cp -a /mnt/cdrom/repodata/ ./yumrepo/ sudo chmod +644 /opt/yumrepo sudo chmod +644 /opt/yumrepo/Packages sudo chmod +644 /opt/yumrepo/repodata
oppos
这里,如果你虚拟机分了 20G 磁盘,很容易出现磁盘空间不足导致的错误 关键词:”IO ERROR” “NO SPACE”
可以看一看这个文章,对的扩容磁盘超级超级 麻烦!
https://zhuanlan.zhihu.com/p/83340525
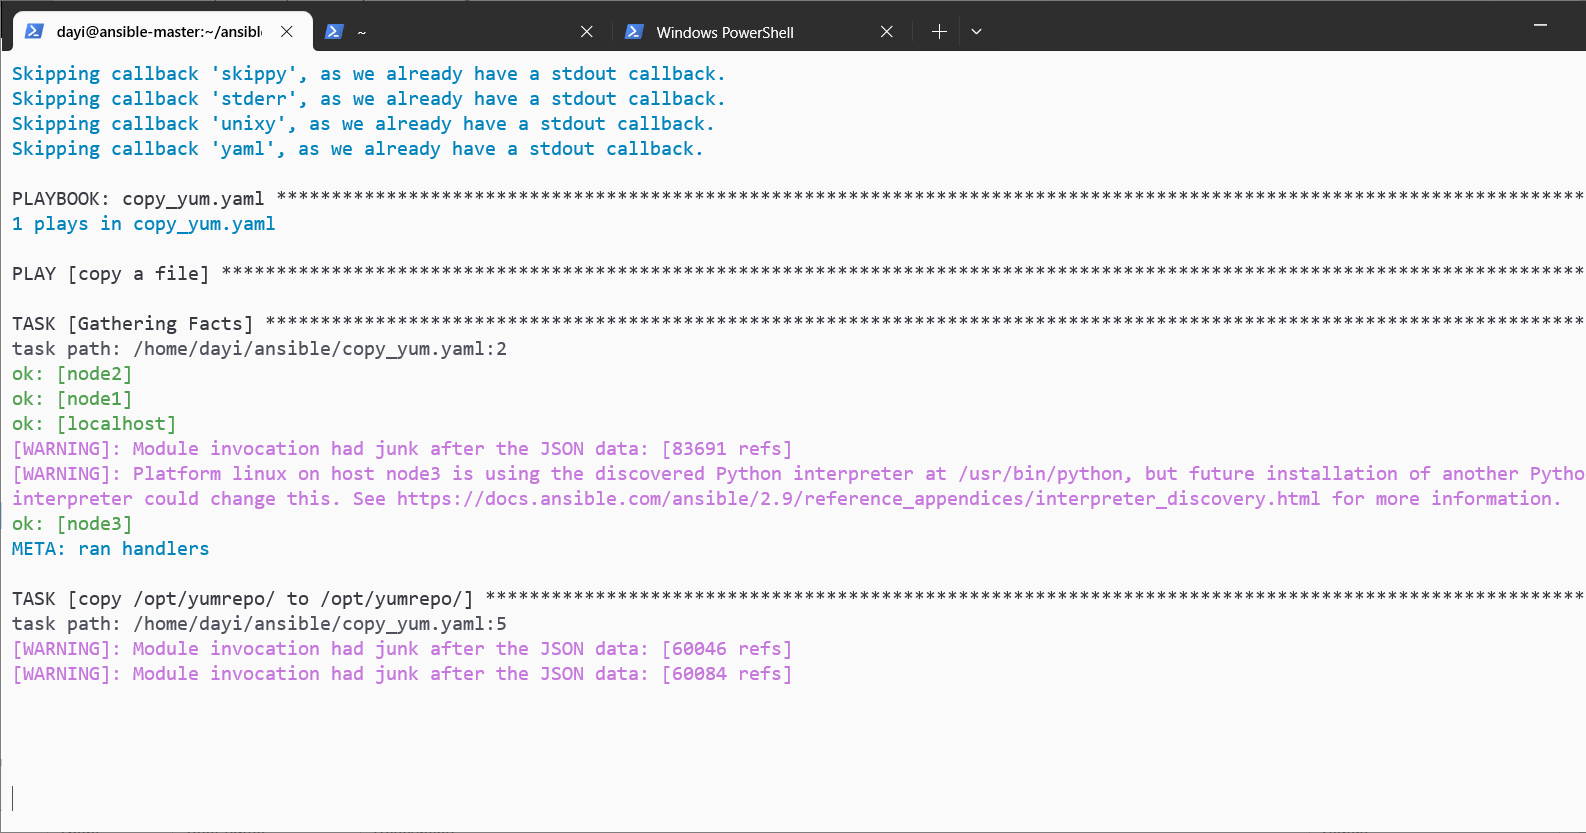
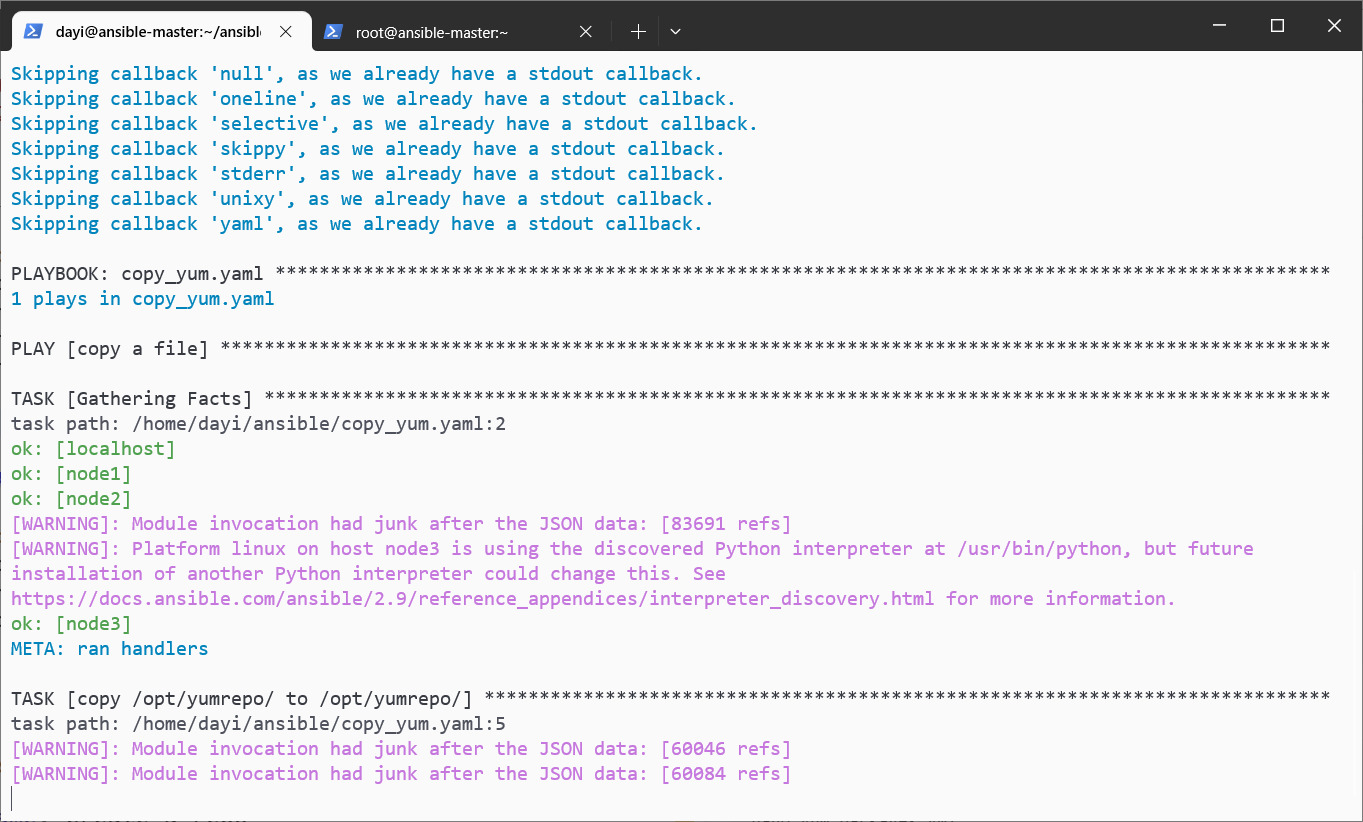
复制文件到结点 PLAYbook 1 2 3 su dayi cd ~/ansiblenano copy_yum.yaml
文件内容:
1 2 3 4 5 6 7 8 --- - name: copy a file hosts: all tasks: - name: copy /opt/yumrepo/ to /opt/yumrepo/ copy: src: /opt/yumrepo/ dest: /opt/yumrepo/
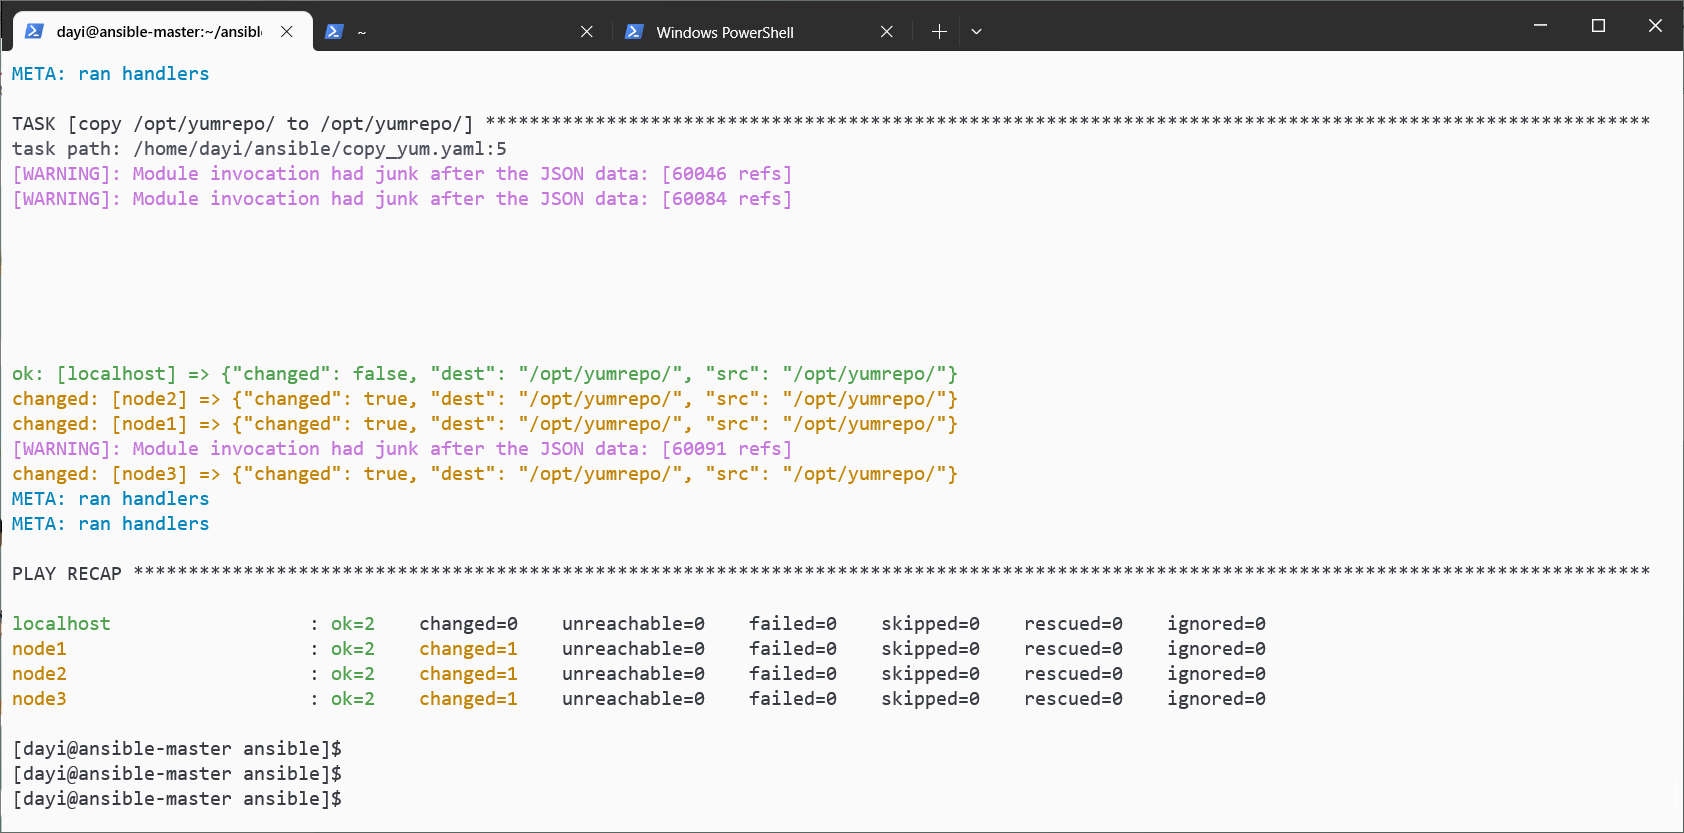
执行命令:
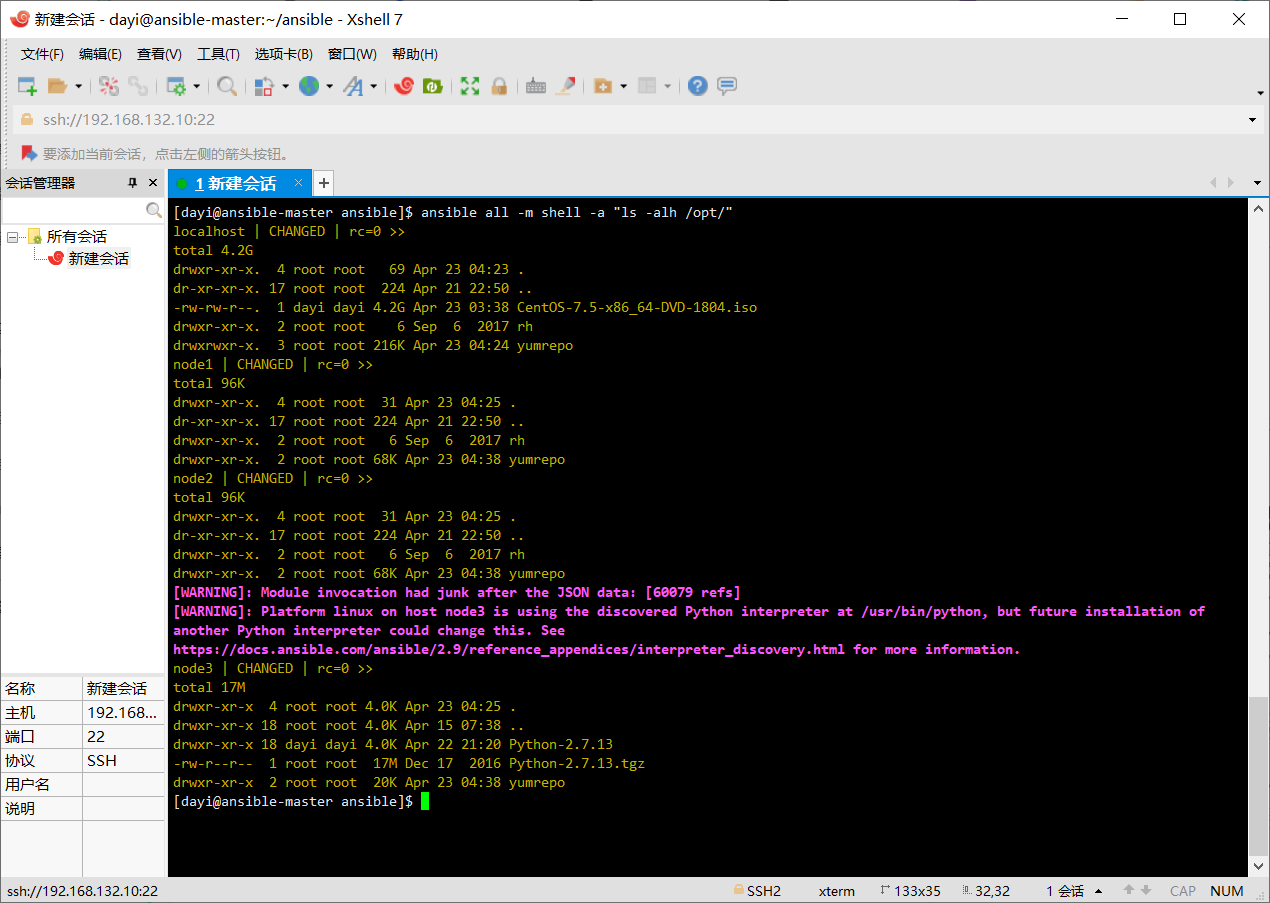
1 2 3 4 ansible-playbook copy_yum.yaml -vv ansible all -m shell -a "ls -alh /opt/"
挺慢的,等就可以咧
第二个命令执行结果:
该步骤过慢可以看下面的章节【周三】->【配仓库】->【小修】->【加速文件分发】
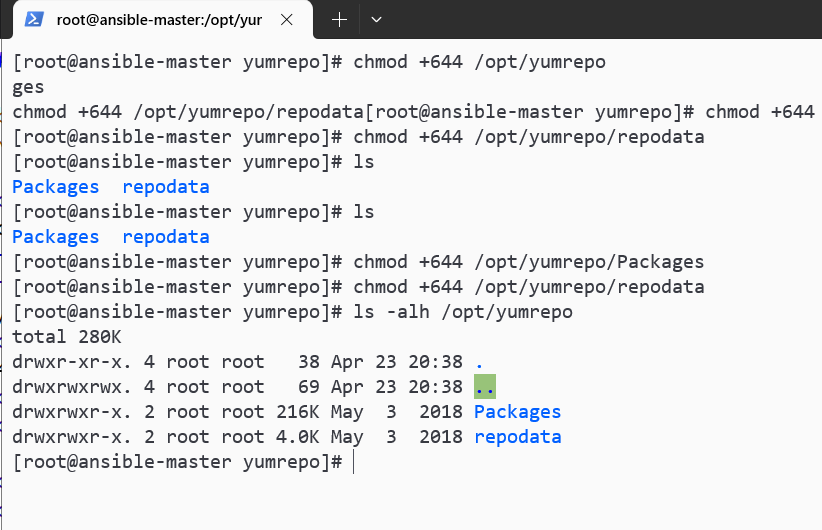
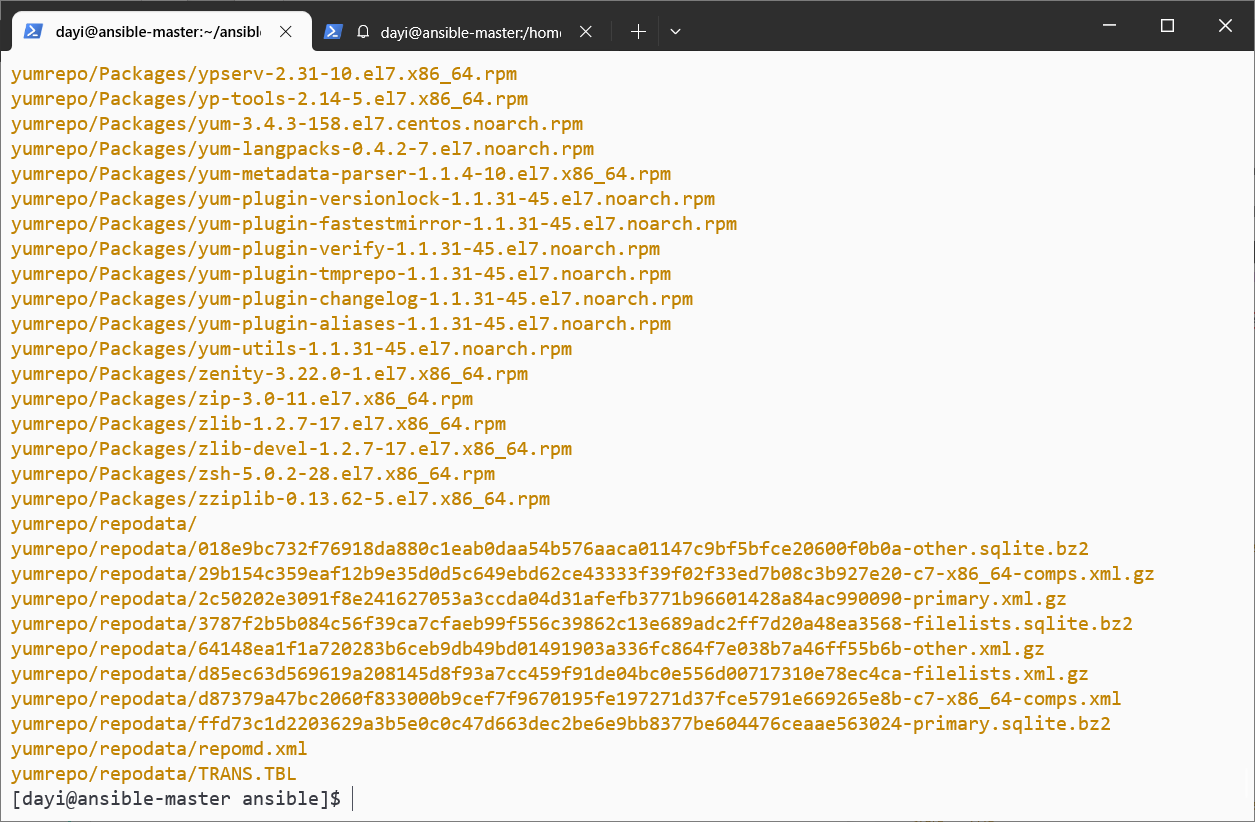
周三 配仓库 小修 为了让 /opt/yumrepo里要这个样子:
所以这样做
也就是已经这个样子了,就不用做这个了。
1 2 3 4 5 6 7 8 9 10 11 12 13 14 15 16 17 su cd /optmkdir -p /mnt/cdrom/chmod +777 /optrm -rf /opt/yumrepomkdir -pv /opt/yumreposudo mount -t iso9660 /opt/CentOS-7.5-x86_64-DVD-1804.iso /mnt/cdrom/ sudo cp -a /mnt/cdrom/Packages /opt/yumrepo/ sudo cp -a /mnt/cdrom/repodata /opt/yumrepo/ su chmod +644 /opt/yumrepochmod +644 /opt/yumrepo/Packageschmod +644 /opt/yumrepo/repodatasu dayi
/opt/yumrepo里要这个样子:
然后重新发文件:
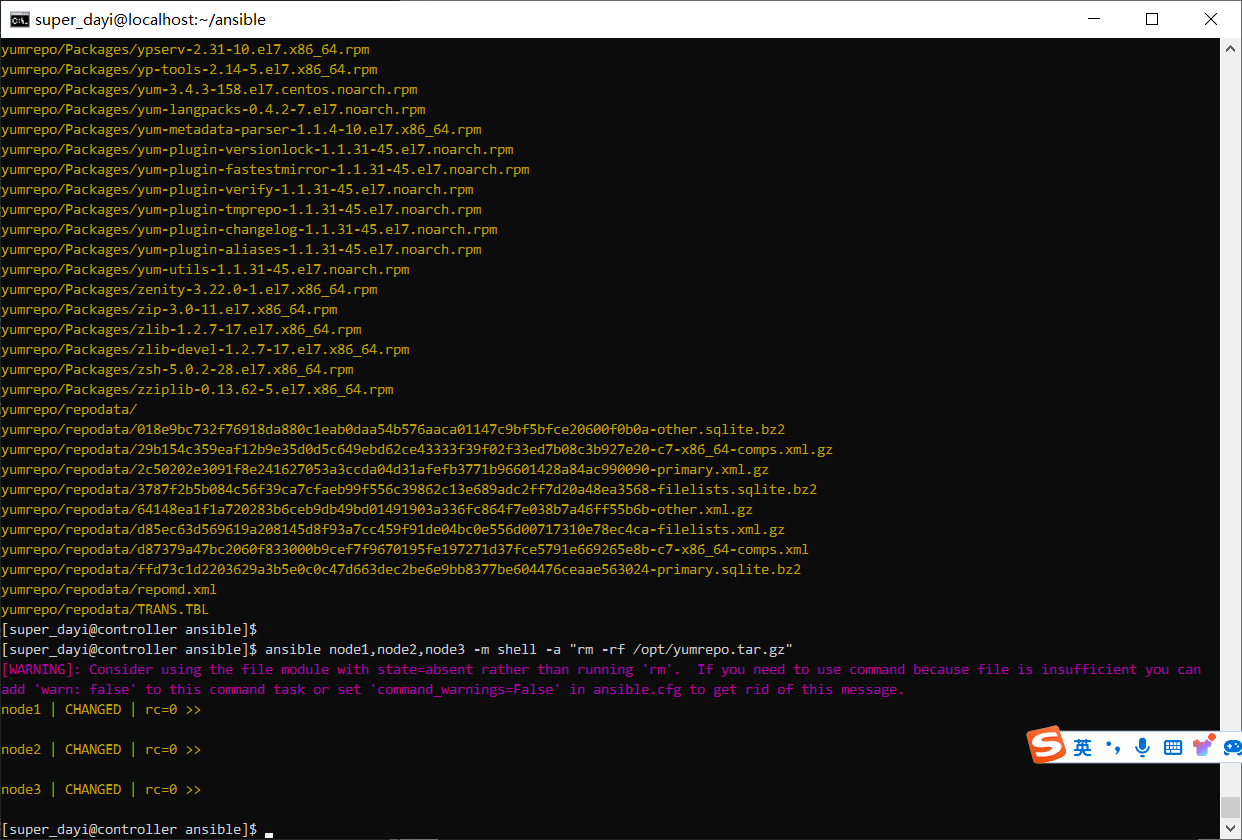
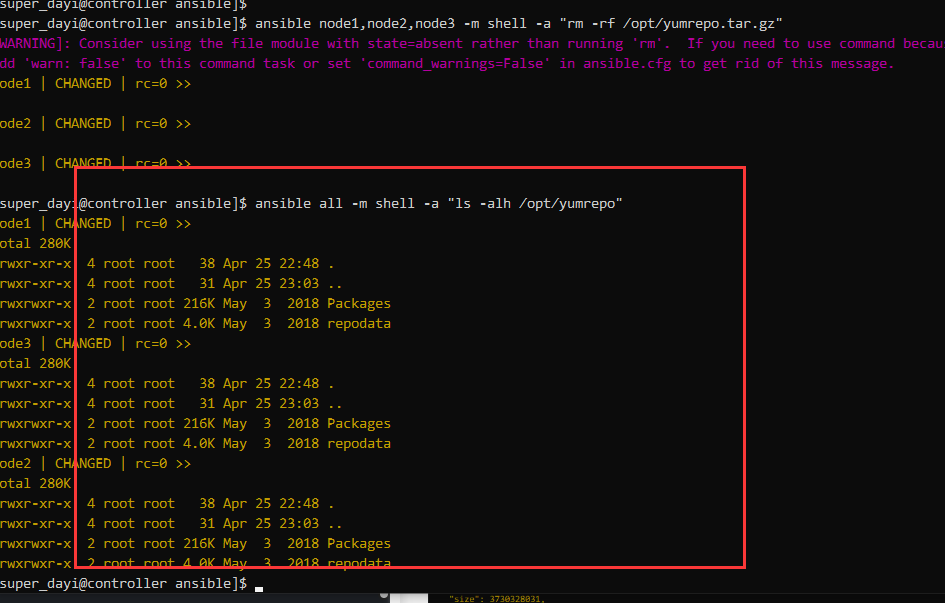
1 2 3 4 5 su dayi cd ~/ansibleansible node1,node2,node3 -m shell -a "rm -rf /opt/yumrepo" ansible-playbook copy_yum.yaml -vv ansible all -m shell -a "ls -alh /opt/yumrepo"
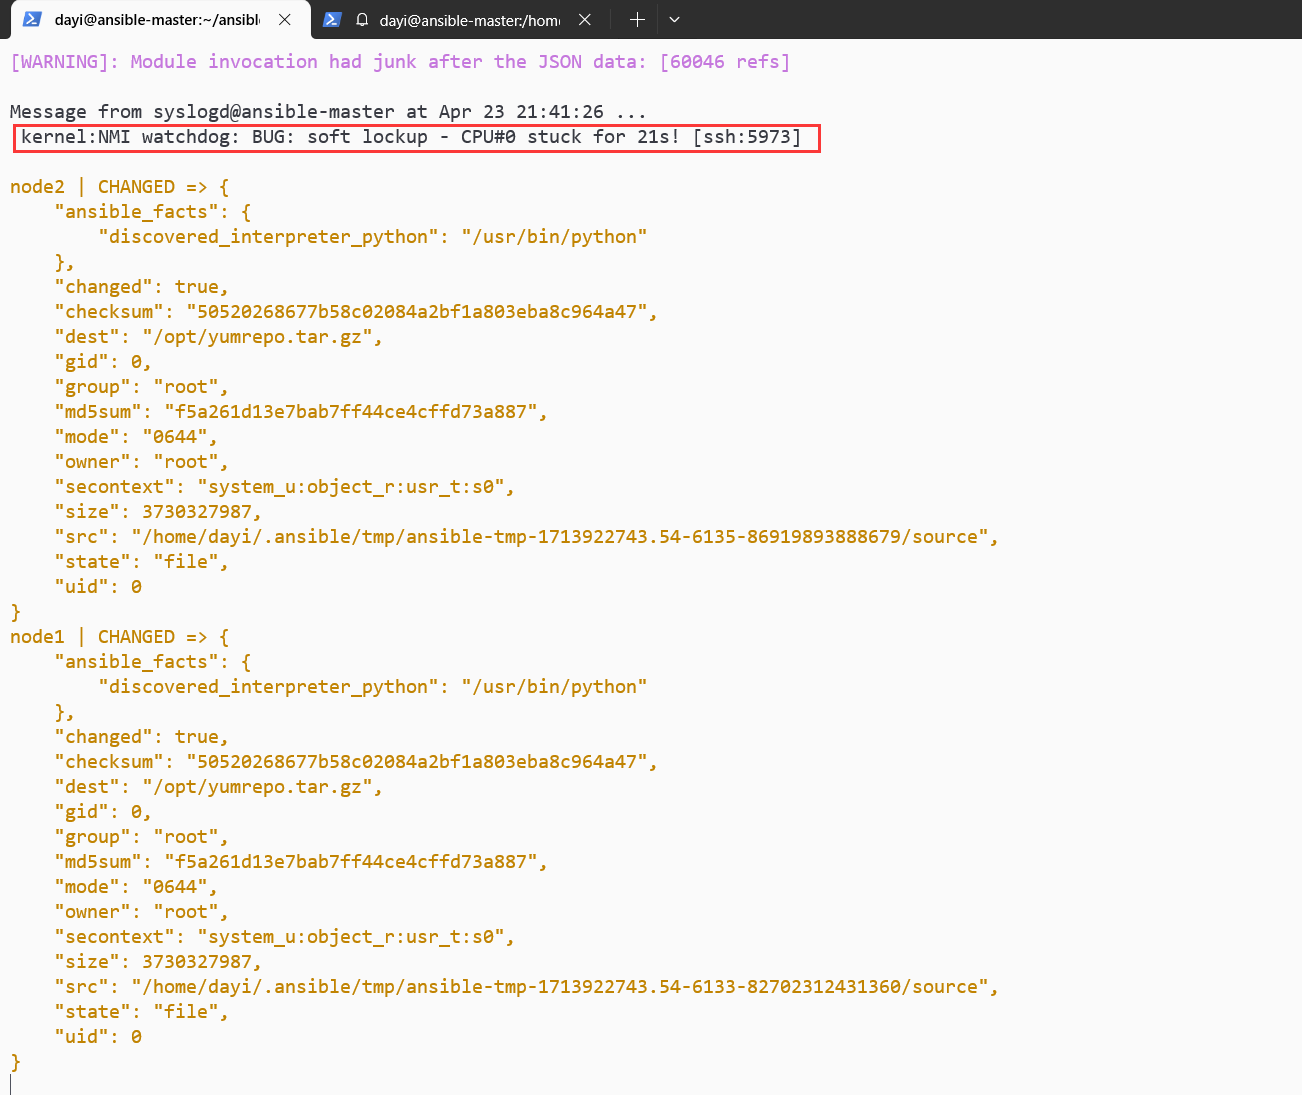
我这里差不多要发 50 分钟多没发完一个(
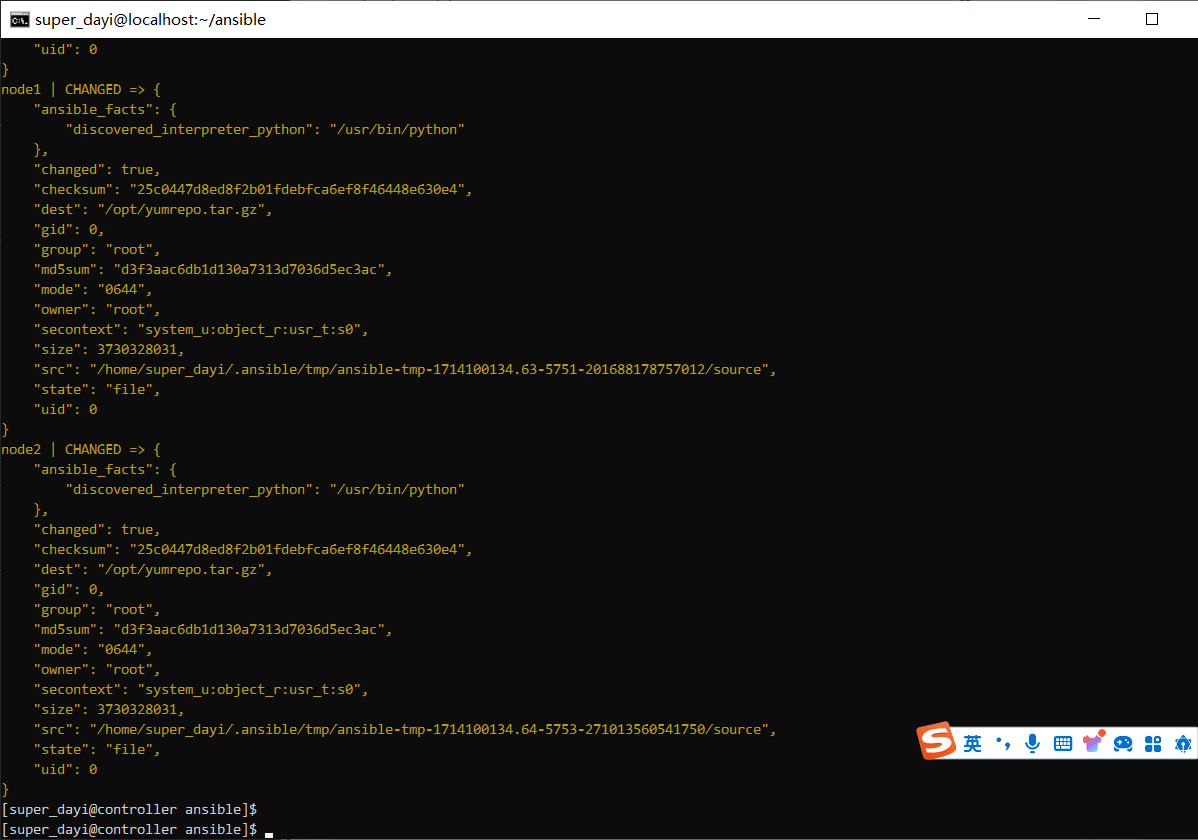
加速文件分发 1 2 3 4 5 6 7 8 9 10 11 su cd /opttar zcvf yumrepo.tar.gz yumrepo chmod +644 /opt/yumrepo.tar.gzsu dayi cd ~/ansibleansible node1,node2,node3 -m copy -a "src=/opt/yumrepo.tar.gz dest=/opt/" -v ansible node1,node2,node3 -m shell -a "cd /opt && tar -zxvf yumrepo.tar.gz" rm -rf /opt/yumrepo.tar.gzansible node1,node2,node3 -m shell -a "rm -rf /opt/yumrepo.tar.gz"
CPU 都给我卡死了。
不容易:
【可选】删除从节点全部 yum 仓库
这个我没做
你可以玩玩这个 PLAYBOOK(建议先打个快照)
1 2 3 4 5 6 7 8 9 10 11 12 13 14 15 16 17 18 19 20 21 22 23 24 25 26 27 --- - hosts: - node1 - node2 - node3 become: yes tasks: - name: Remove yum repo directories file: path: "{{ item }}" state: absent loop: - /etc/yum.repos.d - /opt/yumrepo - /var/cache/yum - /var/lib/rpm - name: Clean yum cache command : yum clean all args: warn: false - name: Remove rpm database command : rm -f /var/lib/rpm/__db* args: warn: false
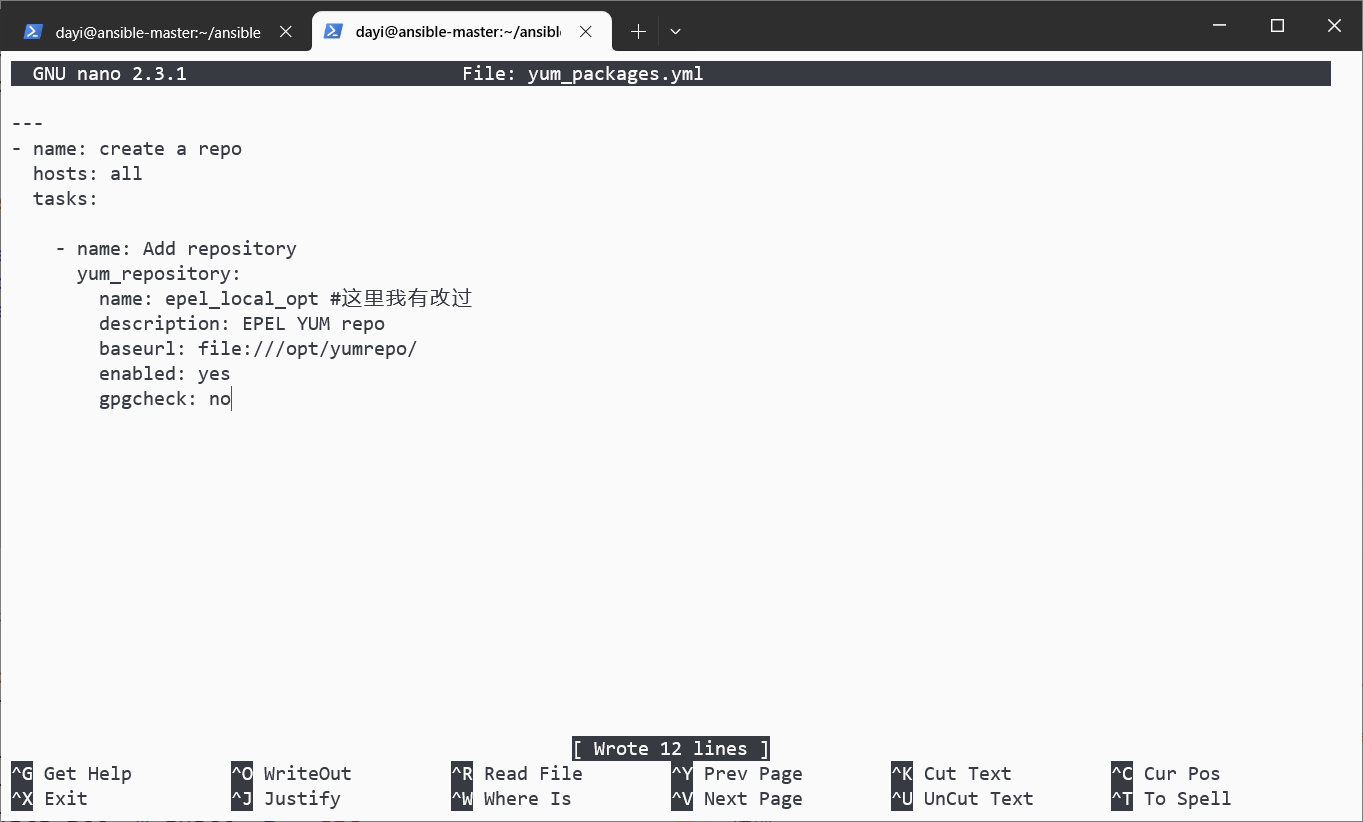
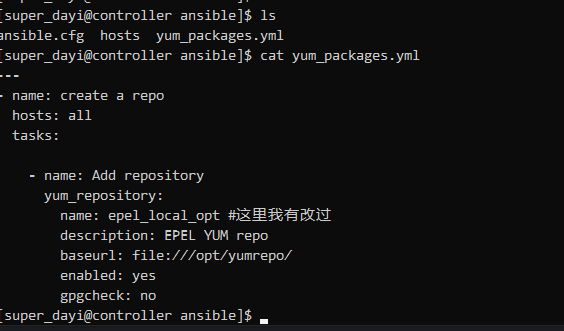
配置本地 YUM 仓库 playbook 1 2 3 su dayi cd ~/ansible/nano yum_packages.yml
内容
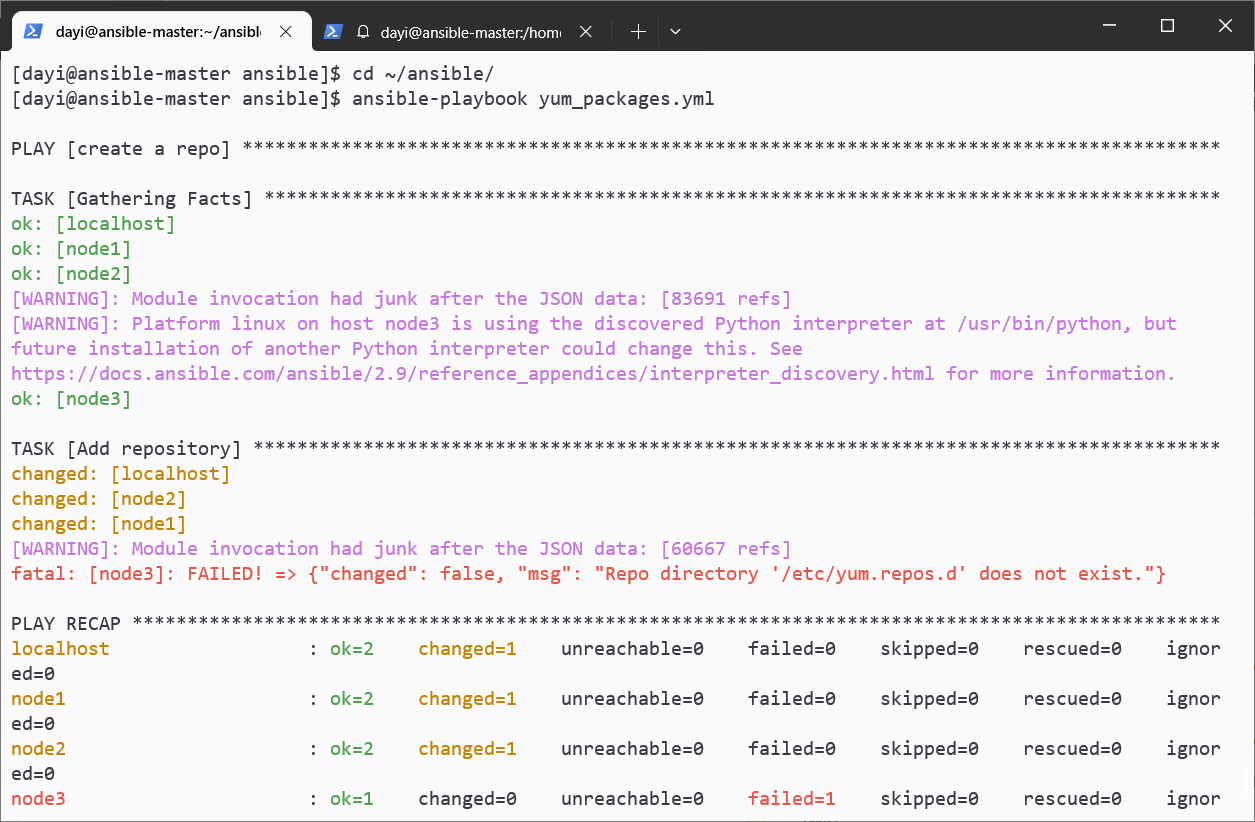
1 2 3 4 5 6 7 8 9 10 11 12 --- - name: create a repo hosts: all tasks: - name: Add repository yum_repository: name: epel_local_opt description: EPEL YUM repo baseurl: file:///opt/yumrepo/ enabled: yes gpgcheck: no
继续执行:
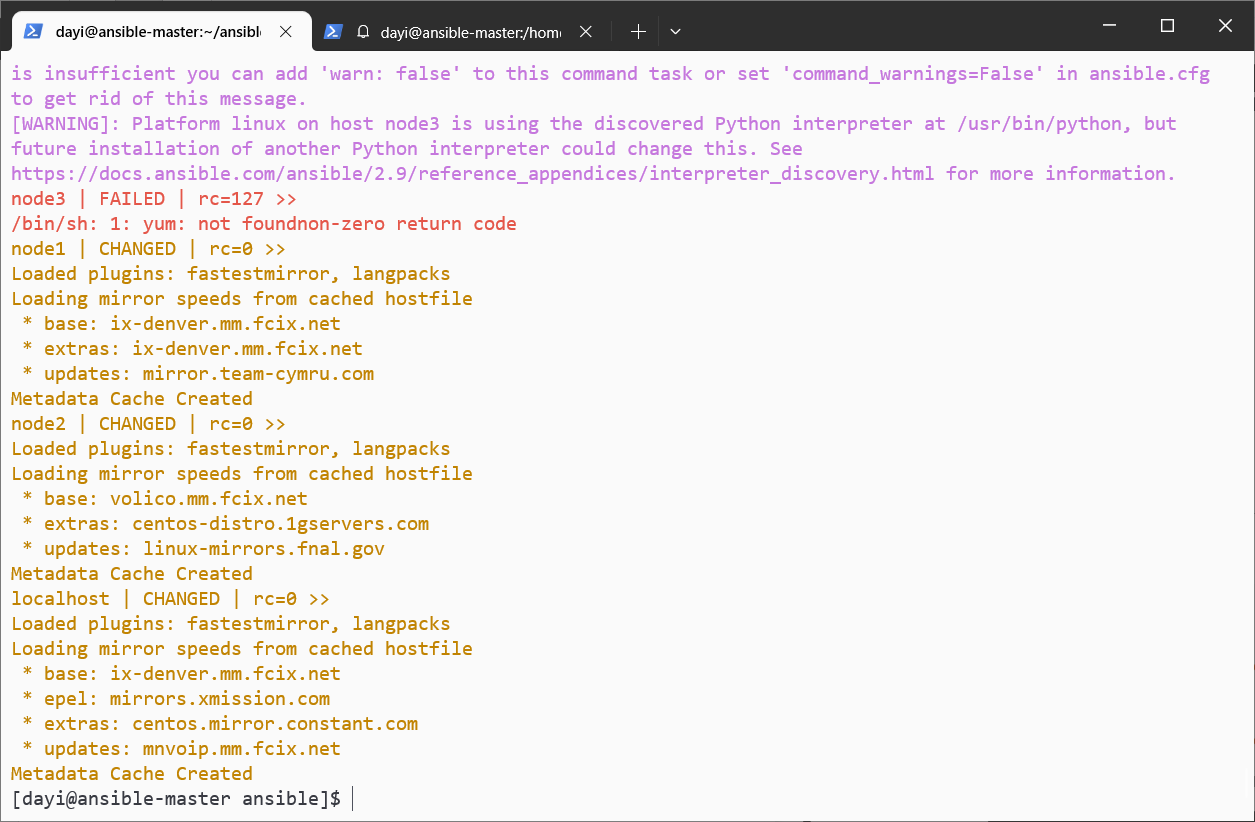
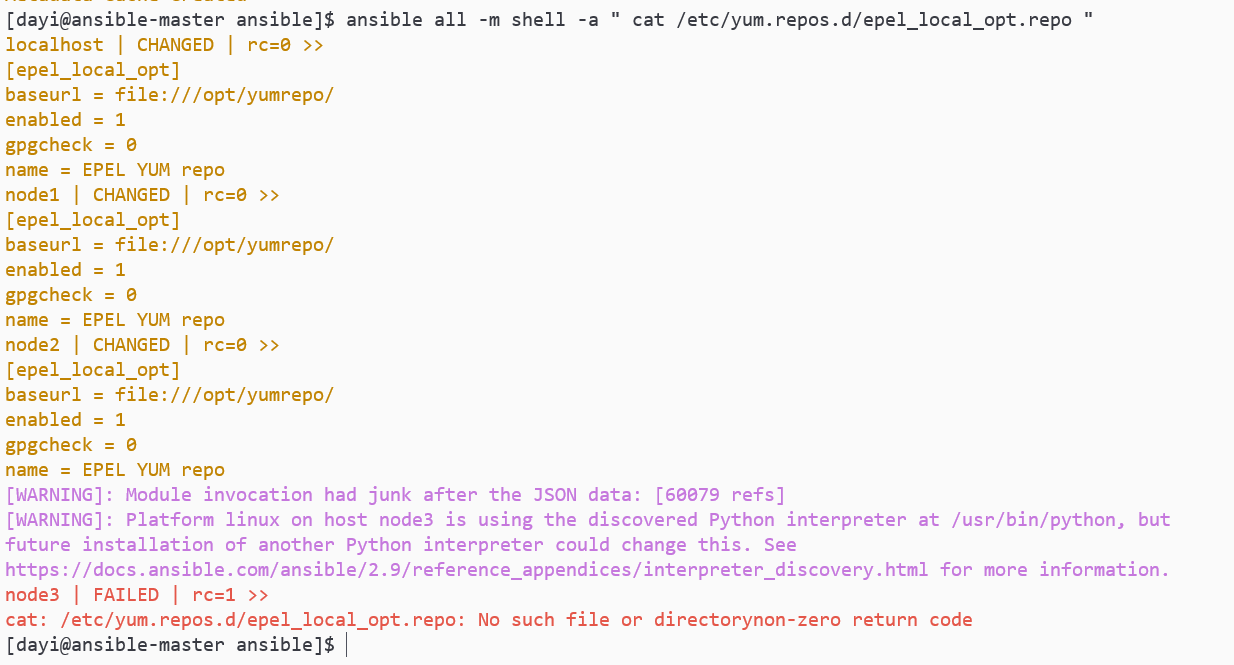
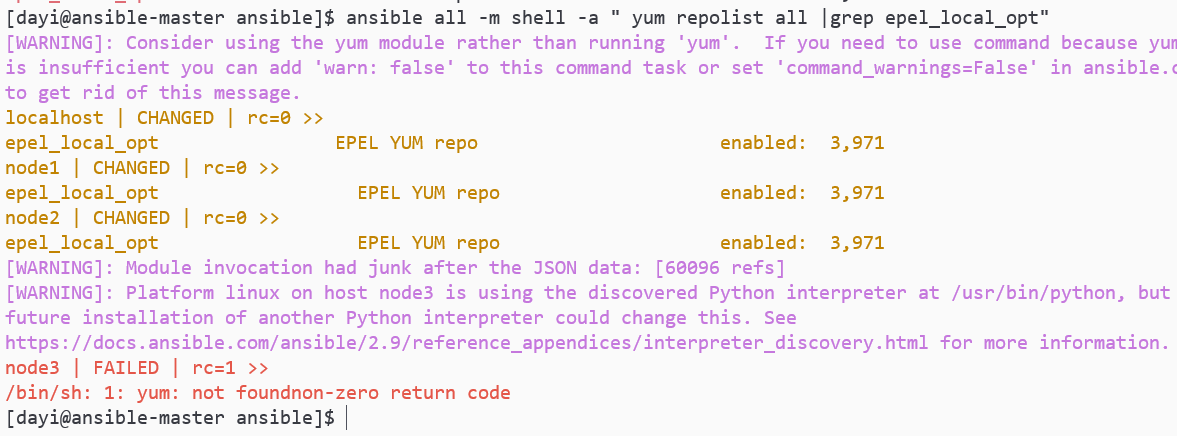
1 2 3 4 5 6 ansible-playbook yum_packages.yml ansible all -m shell -a " yum makecache " ansible all -m shell -a " ls /etc/yum.repos.d/ " ansible all -m shell -a " cat /etc/yum.repos.d/epel_local_opt.repo " ansible all -m shell -a " yum repolist all |grep epel_local_opt" ansible all -m shell -a " yum info vsftpd --disablerepo=* --enablerepo=epel_local_opt"
继续
1 2 3 su dayi cd ~/ansiblevim yum_install_vsftpd.yml
文件内容:
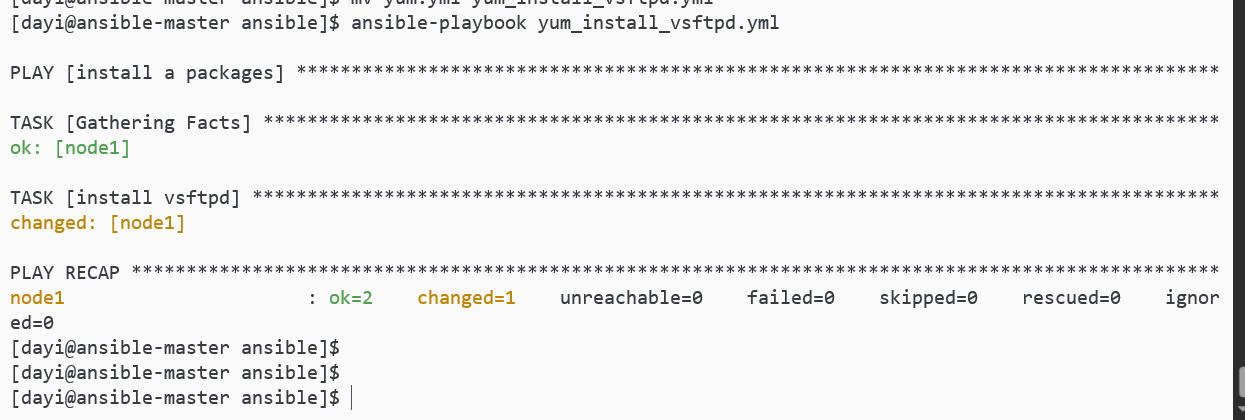
1 2 3 4 5 6 7 8 --- - name: install a packages hosts: node1 tasks: - name: install vsftpd yum: name: vsftpd state: present
1 ansible-playbook yum_install_vsftpd.yml
启动 vsftpd 1 2 3 4 5 su dayi cd ~/ansibleansible node1 -m shell -a " systemctl status vsftpd " vim start_vsftpd_service.yml
文件内容:
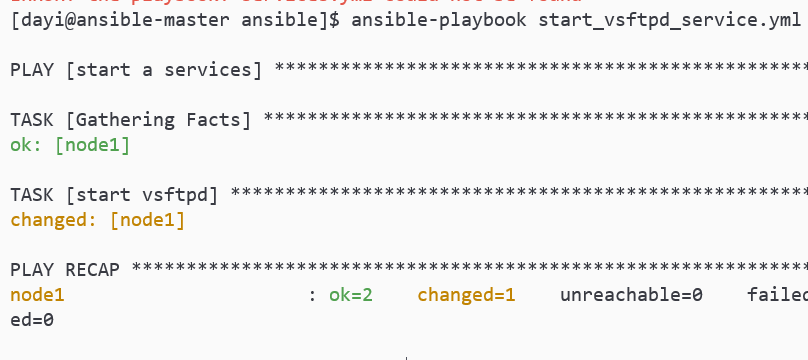
1 2 3 4 5 6 7 8 9 --- - name: start a services hosts: node1 tasks: - name: start vsftpd service: name: vsftpd state: started enabled: yes
继续
1 ansible-playbook start_vsftpd_service.yml
检查
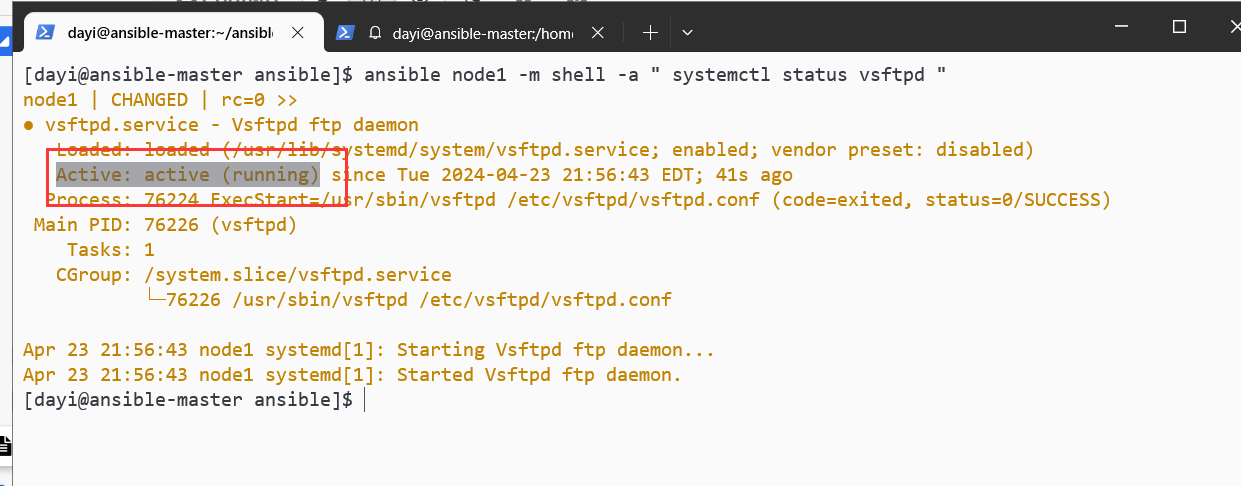
1 ansible node1 -m shell -a " systemctl status vsftpd "
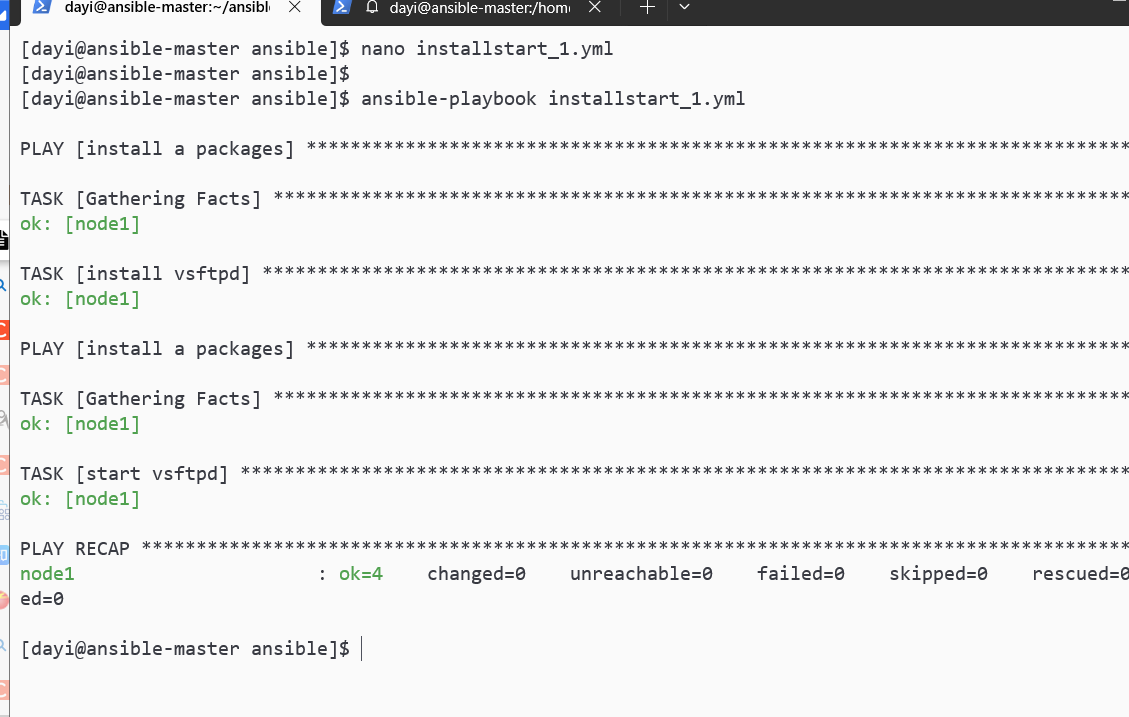
两个 play;1 个 play,多个 tasks nano installstart_1.yml
1 2 3 4 5 6 7 8 9 10 11 12 13 14 15 16 17 18 19 --- - name: install a packages hosts: node1 tasks: - name: install vsftpd yum: name: vsftpd state: present - name: install a packages hosts: node1 tasks: - name: start vsftpd service: name: vsftpd state: started enabled: yes
1 ansible-playbook installstart_1.yml
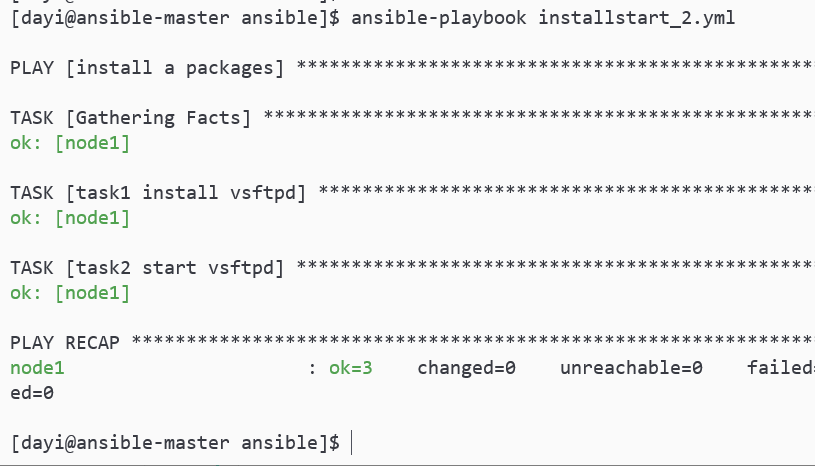
nano installstart_2.yml
1 2 3 4 5 6 7 8 9 10 11 12 13 14 15 --- - name: install a packages hosts: node1 tasks: - name: task1 install vsftpd yum: name: vsftpd state: present - name: task2 start vsftpd service: name: vsftpd state: started enabled: yes
1 ansible-playbook installstart_2.yml
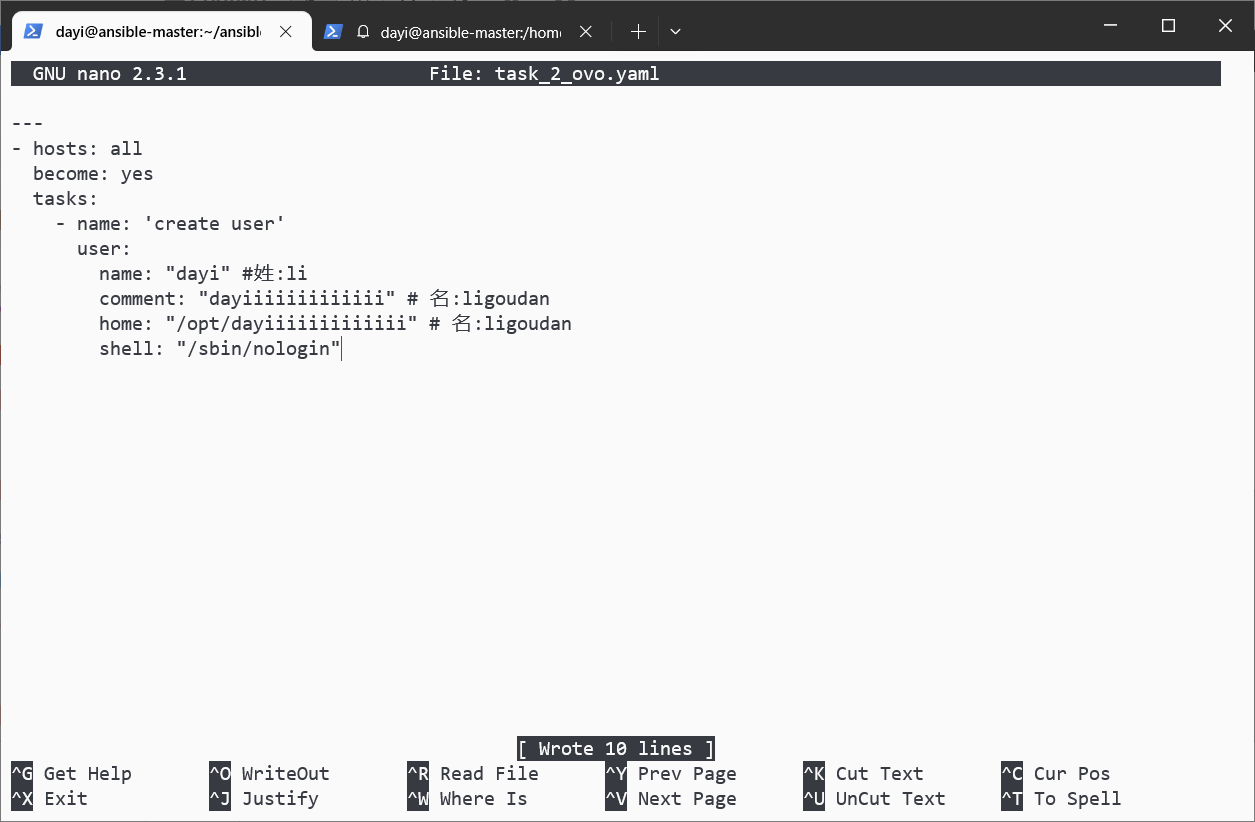
【课上作业 2】 1 2 3 4 使用user模块创建用户:用户名为你个人的姓 指定家目录为/opt/你的名字 shell登录环境为/sbin/nologin 描述为你的名字的全称
1 2 3 su dayi cd ~/ansiblenano task_2_ovo.yaml
nano task_2_ovo.yaml
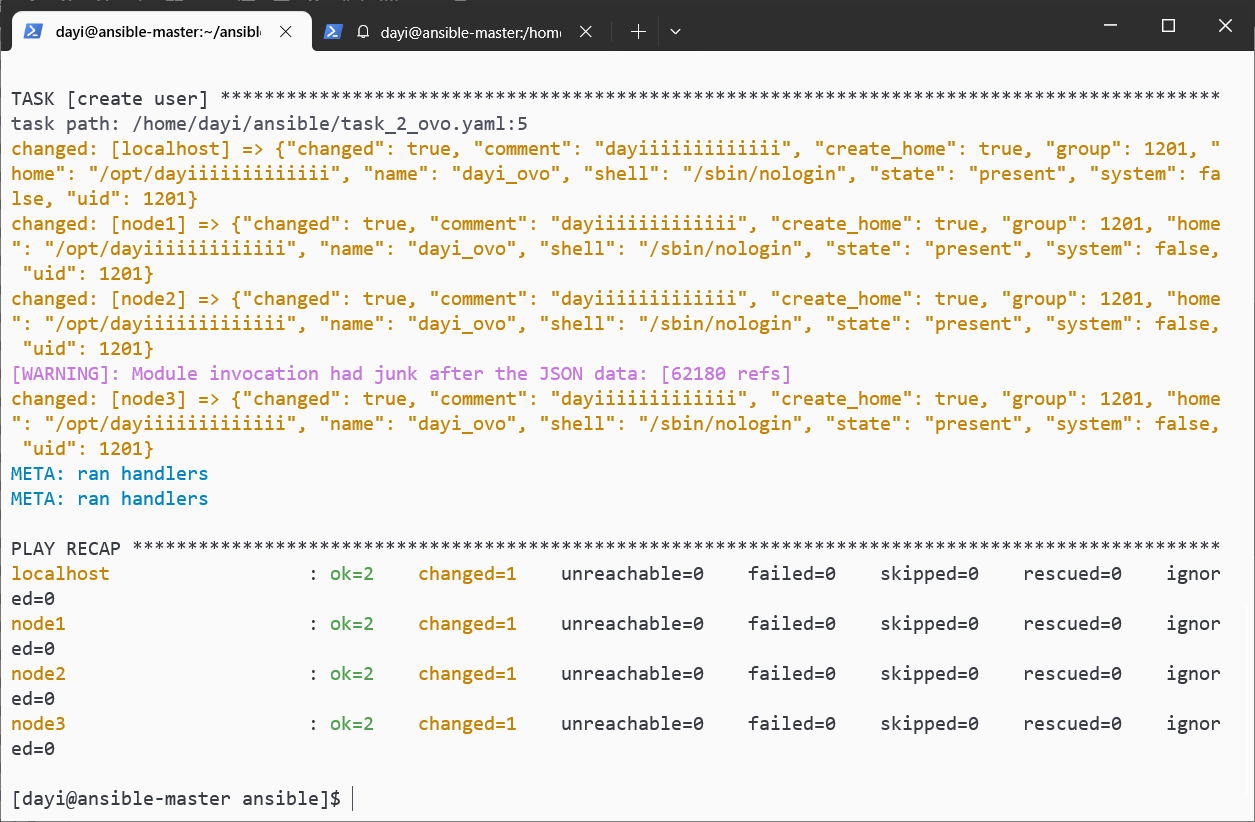
1 2 3 4 5 6 7 8 9 10 --- - hosts: all become: yes tasks: - name: 'create user' user: name: "dayi_ovo" comment: "dayiiiiiiiiiiiii" home: "/opt/dayiiiiiiiiiiiii" shell: "/sbin/nologin"
继续执行
1 2 ansible-playbook task_2_ovo.yaml -vv ansible all -m shell -a "cat /etc/passwd|grep dayi_ovo"
ovo 查看:
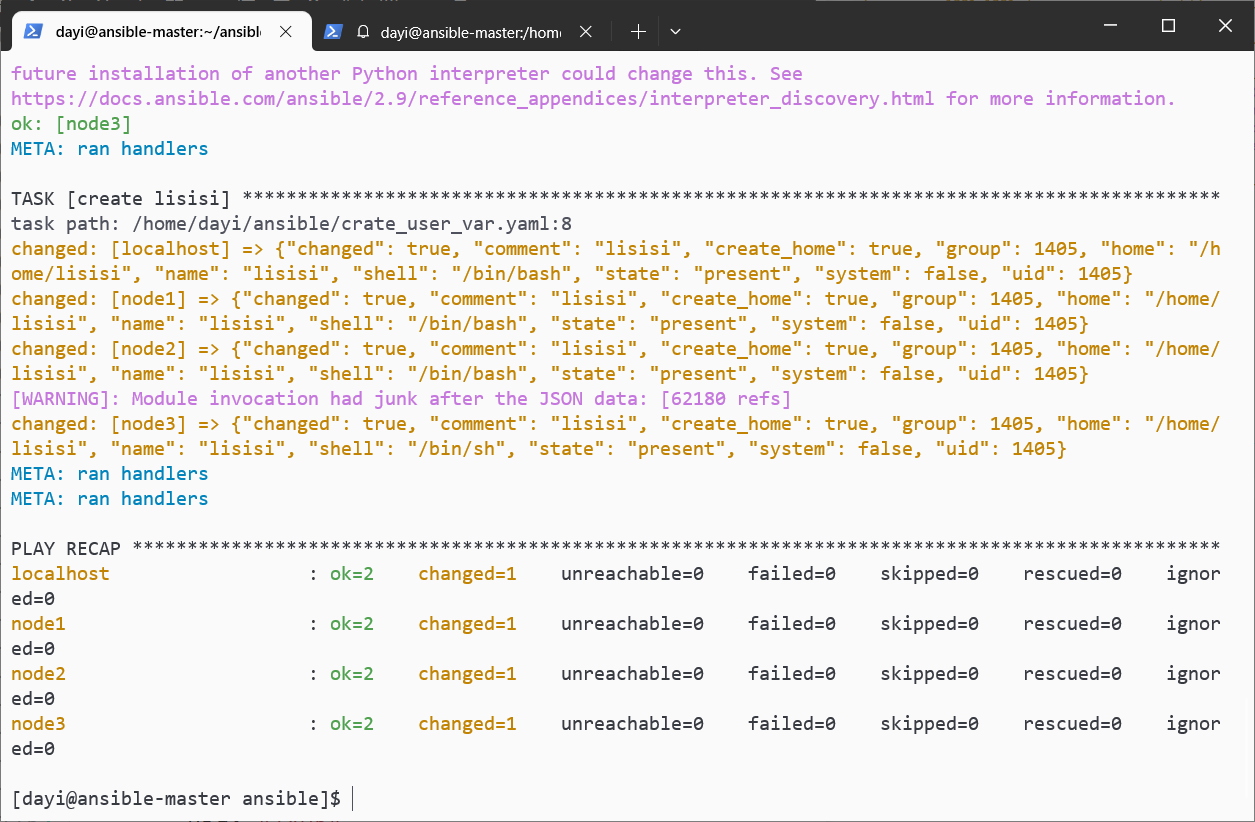
变量 字母、数字、下划线
1 2 3 4 5 su dayi cd ~/ansiblenano crate_user_var.yaml ansible-playbook crate_user_var.yaml -vv ansible all -m shell -a "cat /etc/passwd|grep lisisi"
1 2 3 4 5 6 7 8 9 10 11 --- - name: create a user use vars vars: username: lisisi hosts: all tasks: - name: create {{ username }} user: name: "{{ username }}" comment: "{{ username }}" uid: "1405"
周三下午 要求 如何利用 ansible 为多台 linux 服务器同时配置网站服务:
先分个组 1 2 3 4 5 vim ~/ansible/inventory [prod] node2 node3
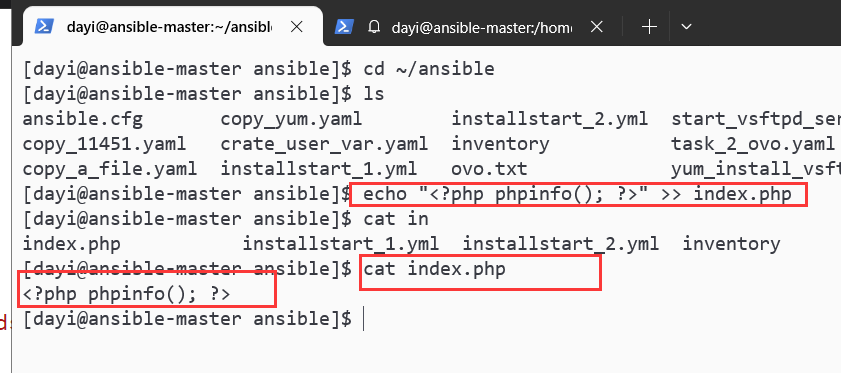
写 index.php 文件到 1 2 3 su dayi cd ~/ansibleecho "<?php phpinfo(); ?>" >> index.php
lamp.yaml 1 2 3 su dayi cd ~/ansible/nano lamp.yaml
lamp.yaml
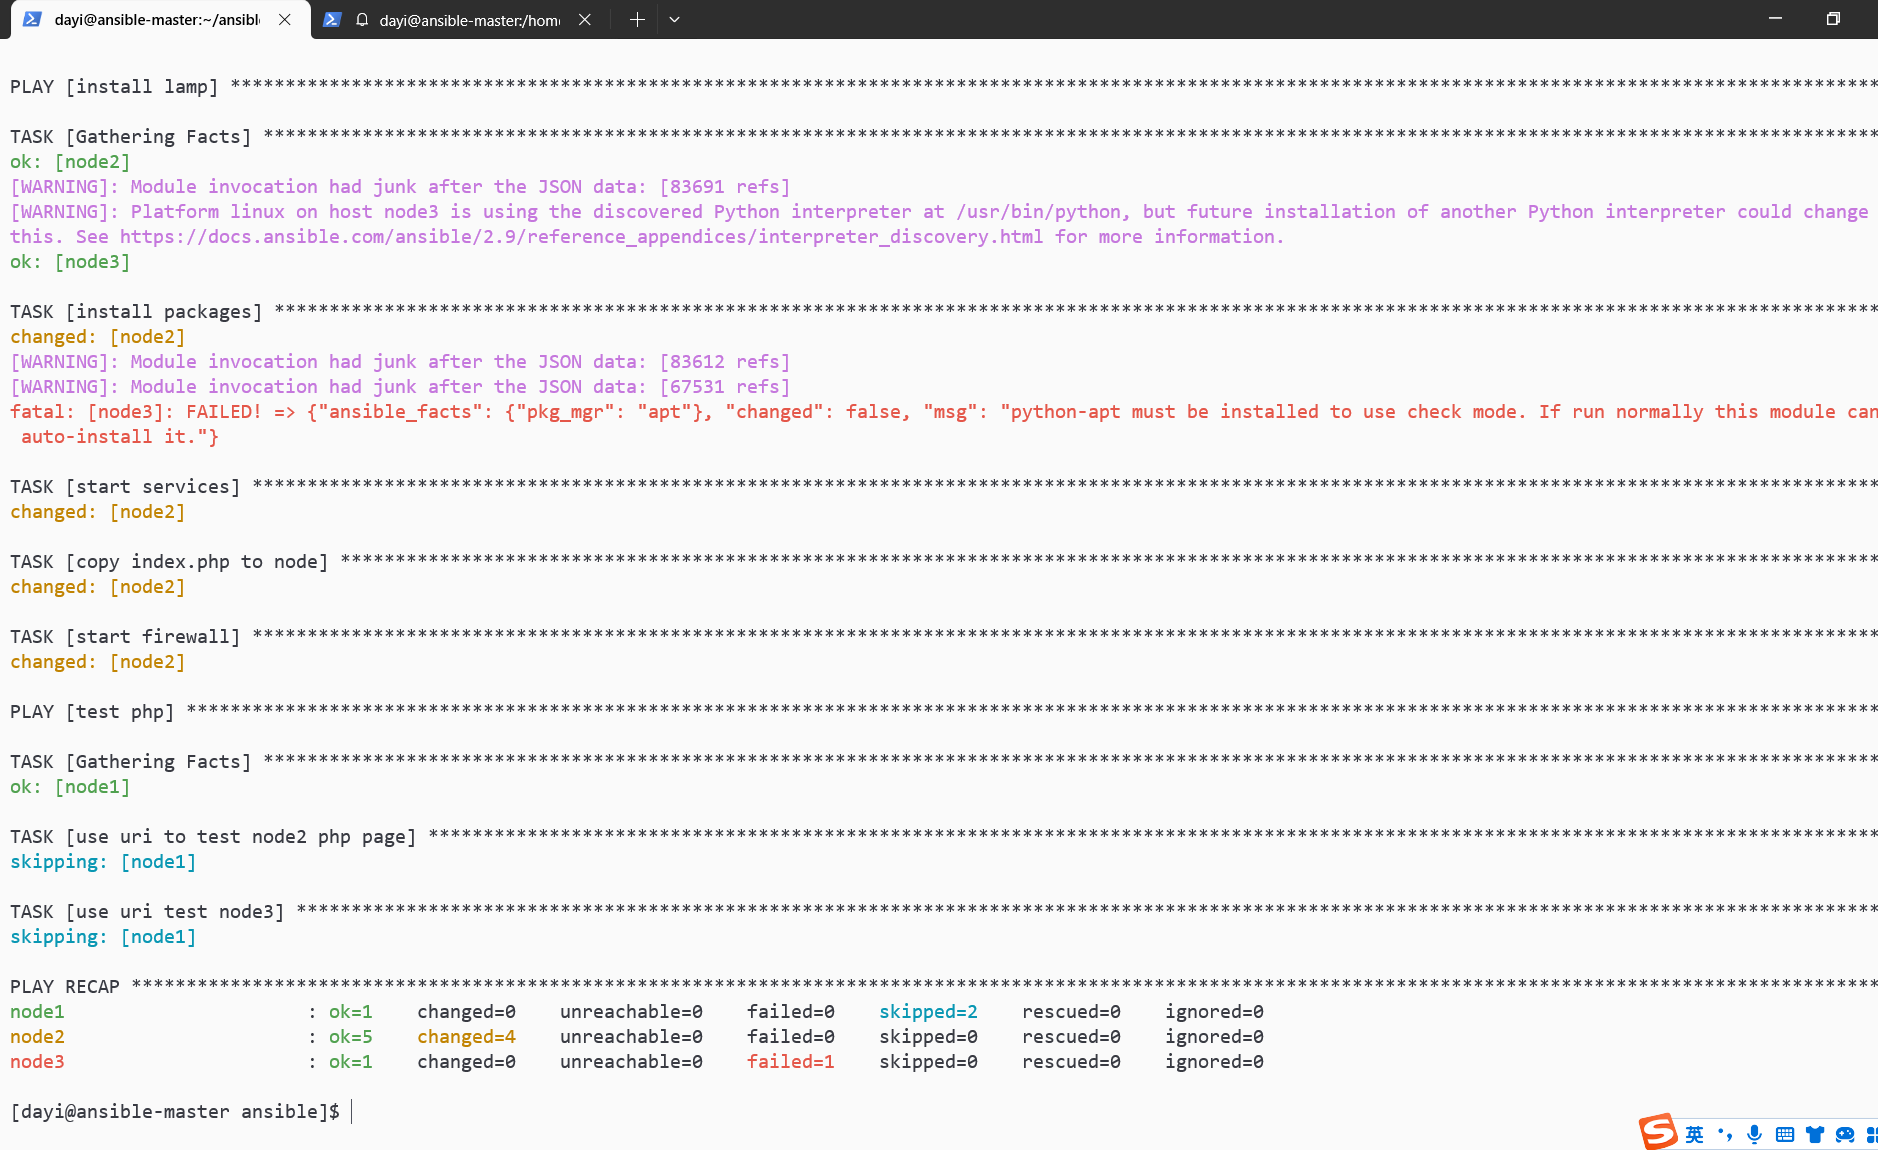
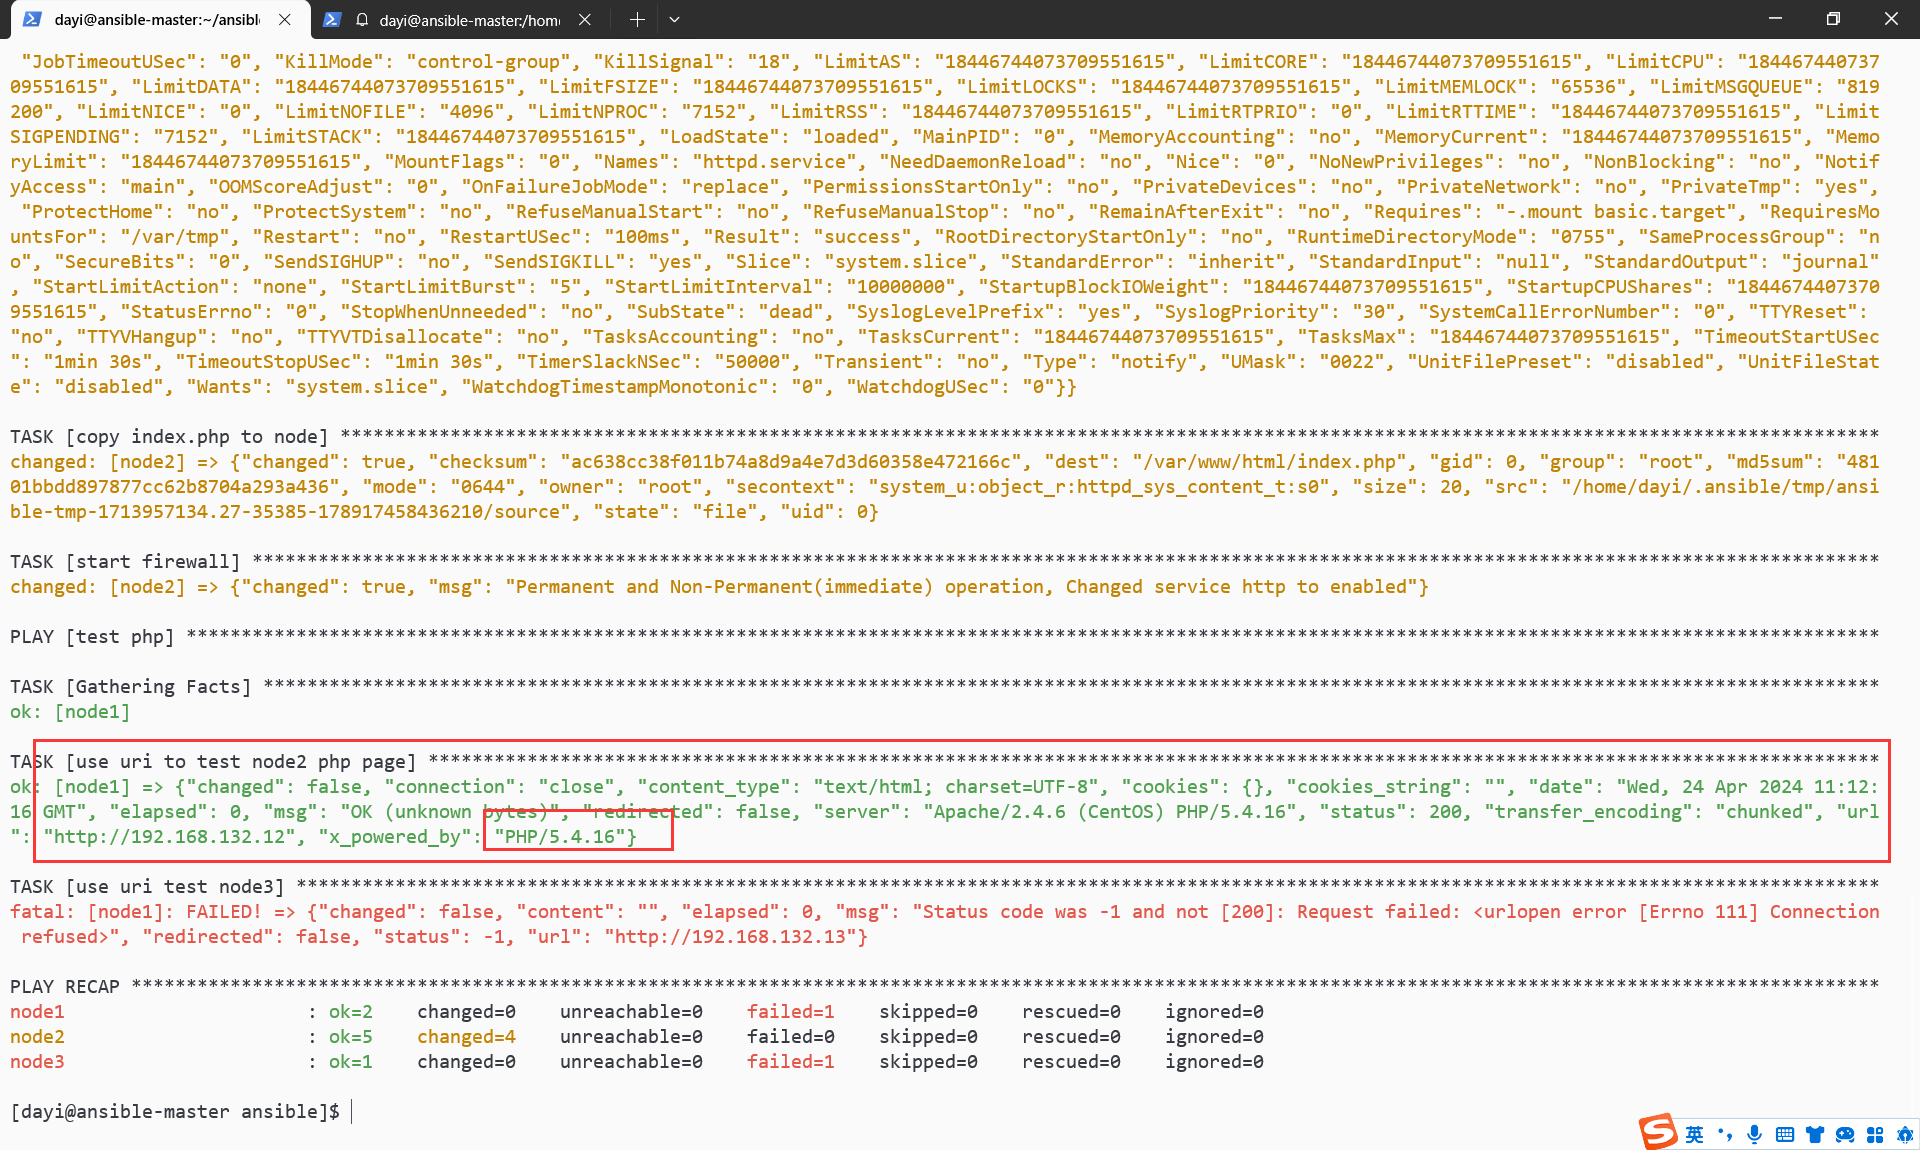
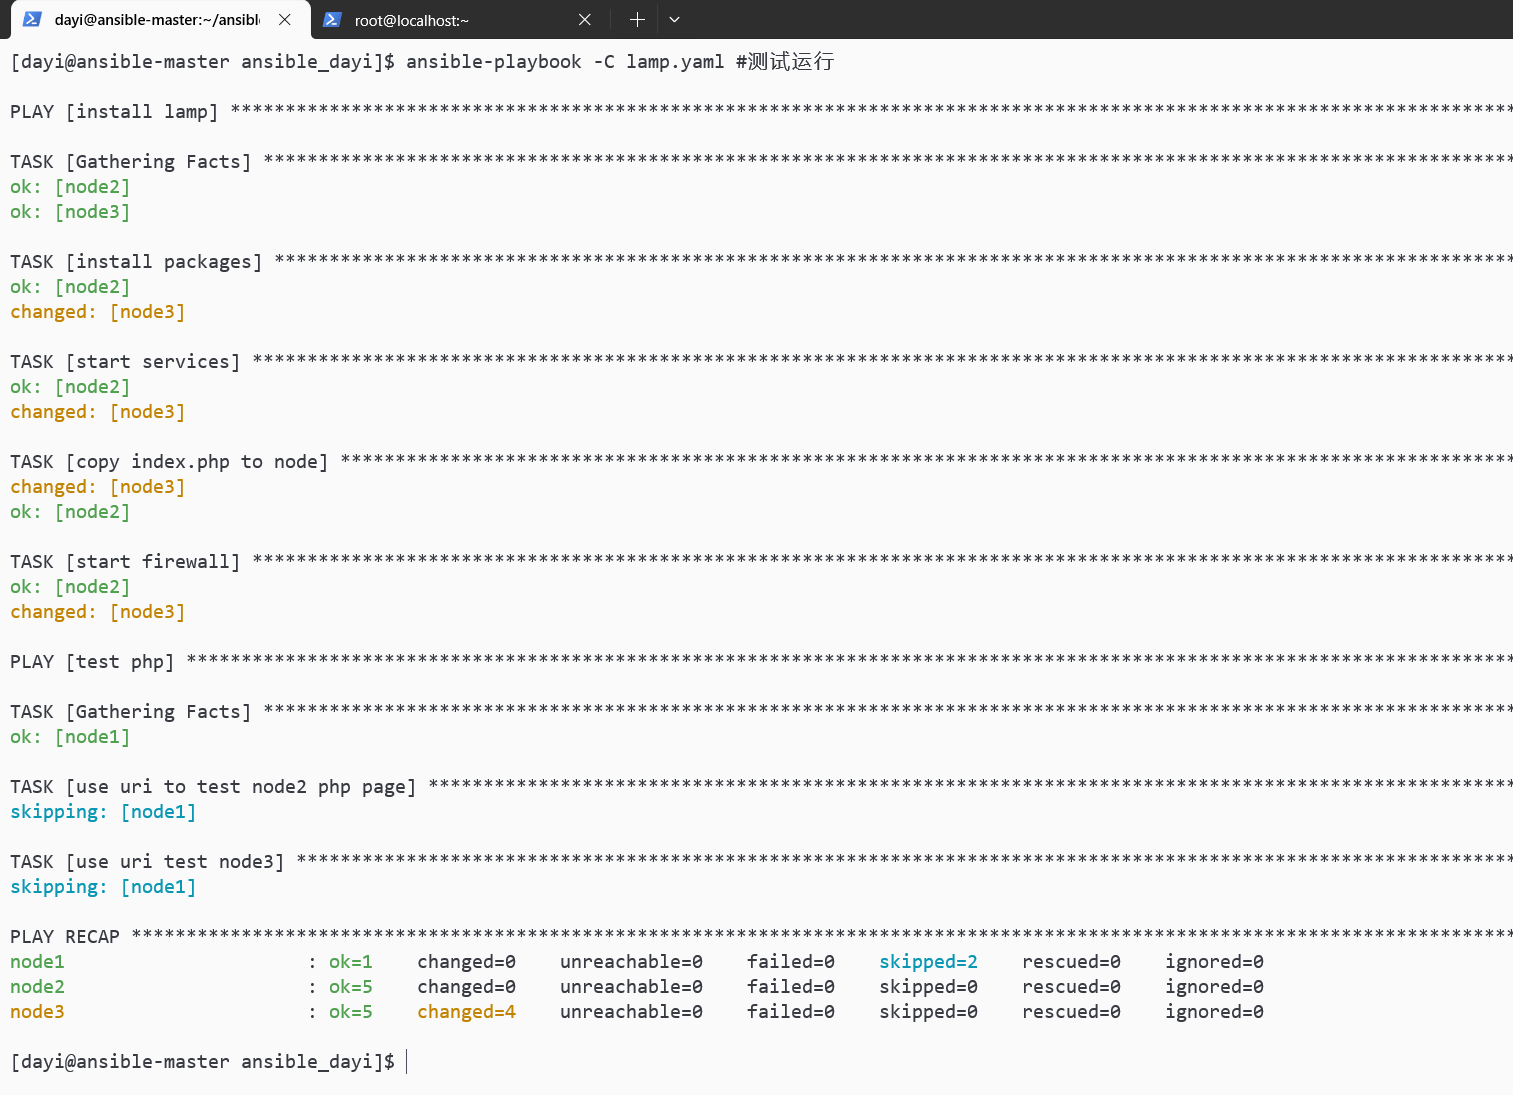
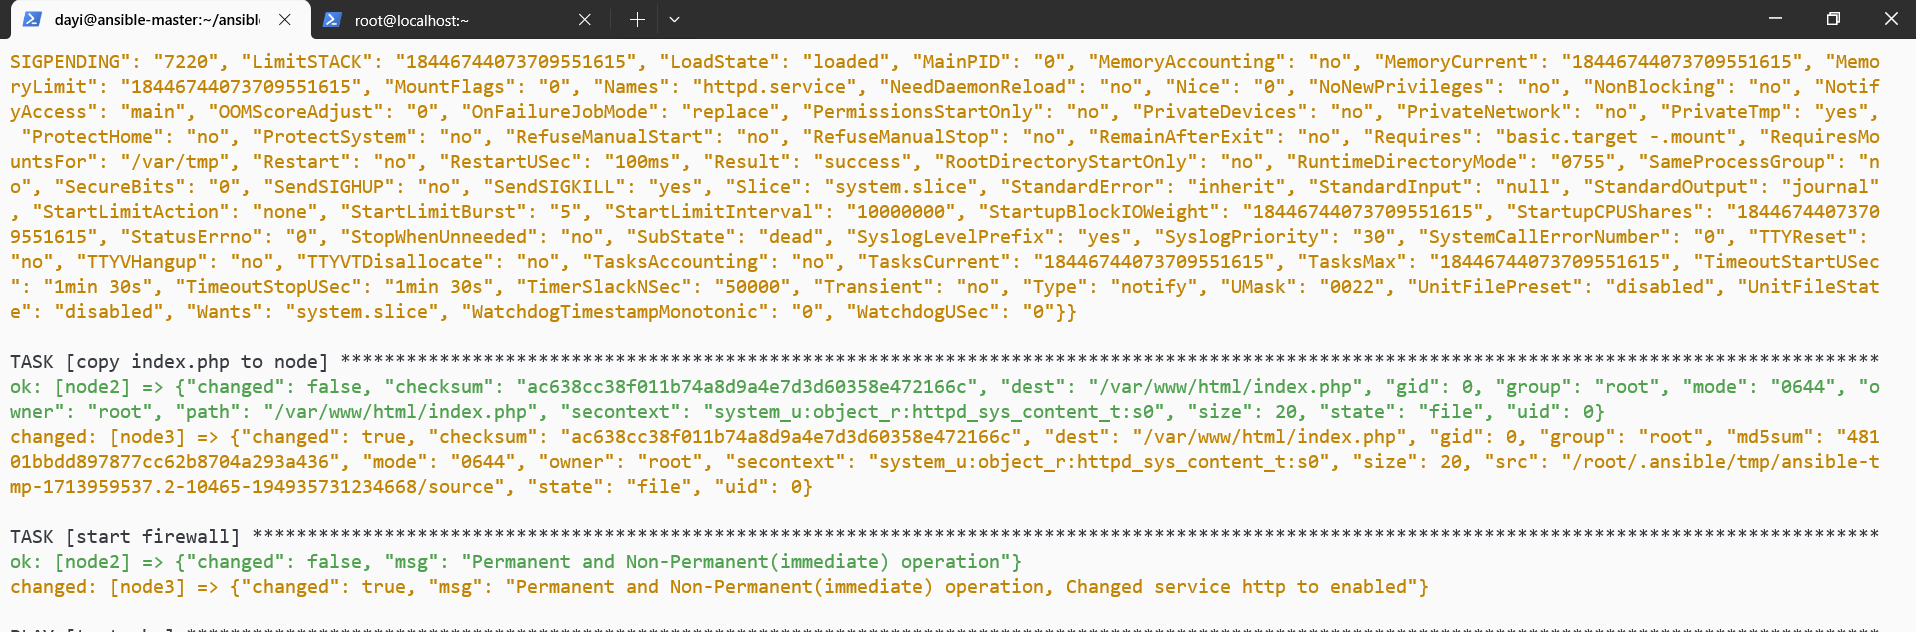
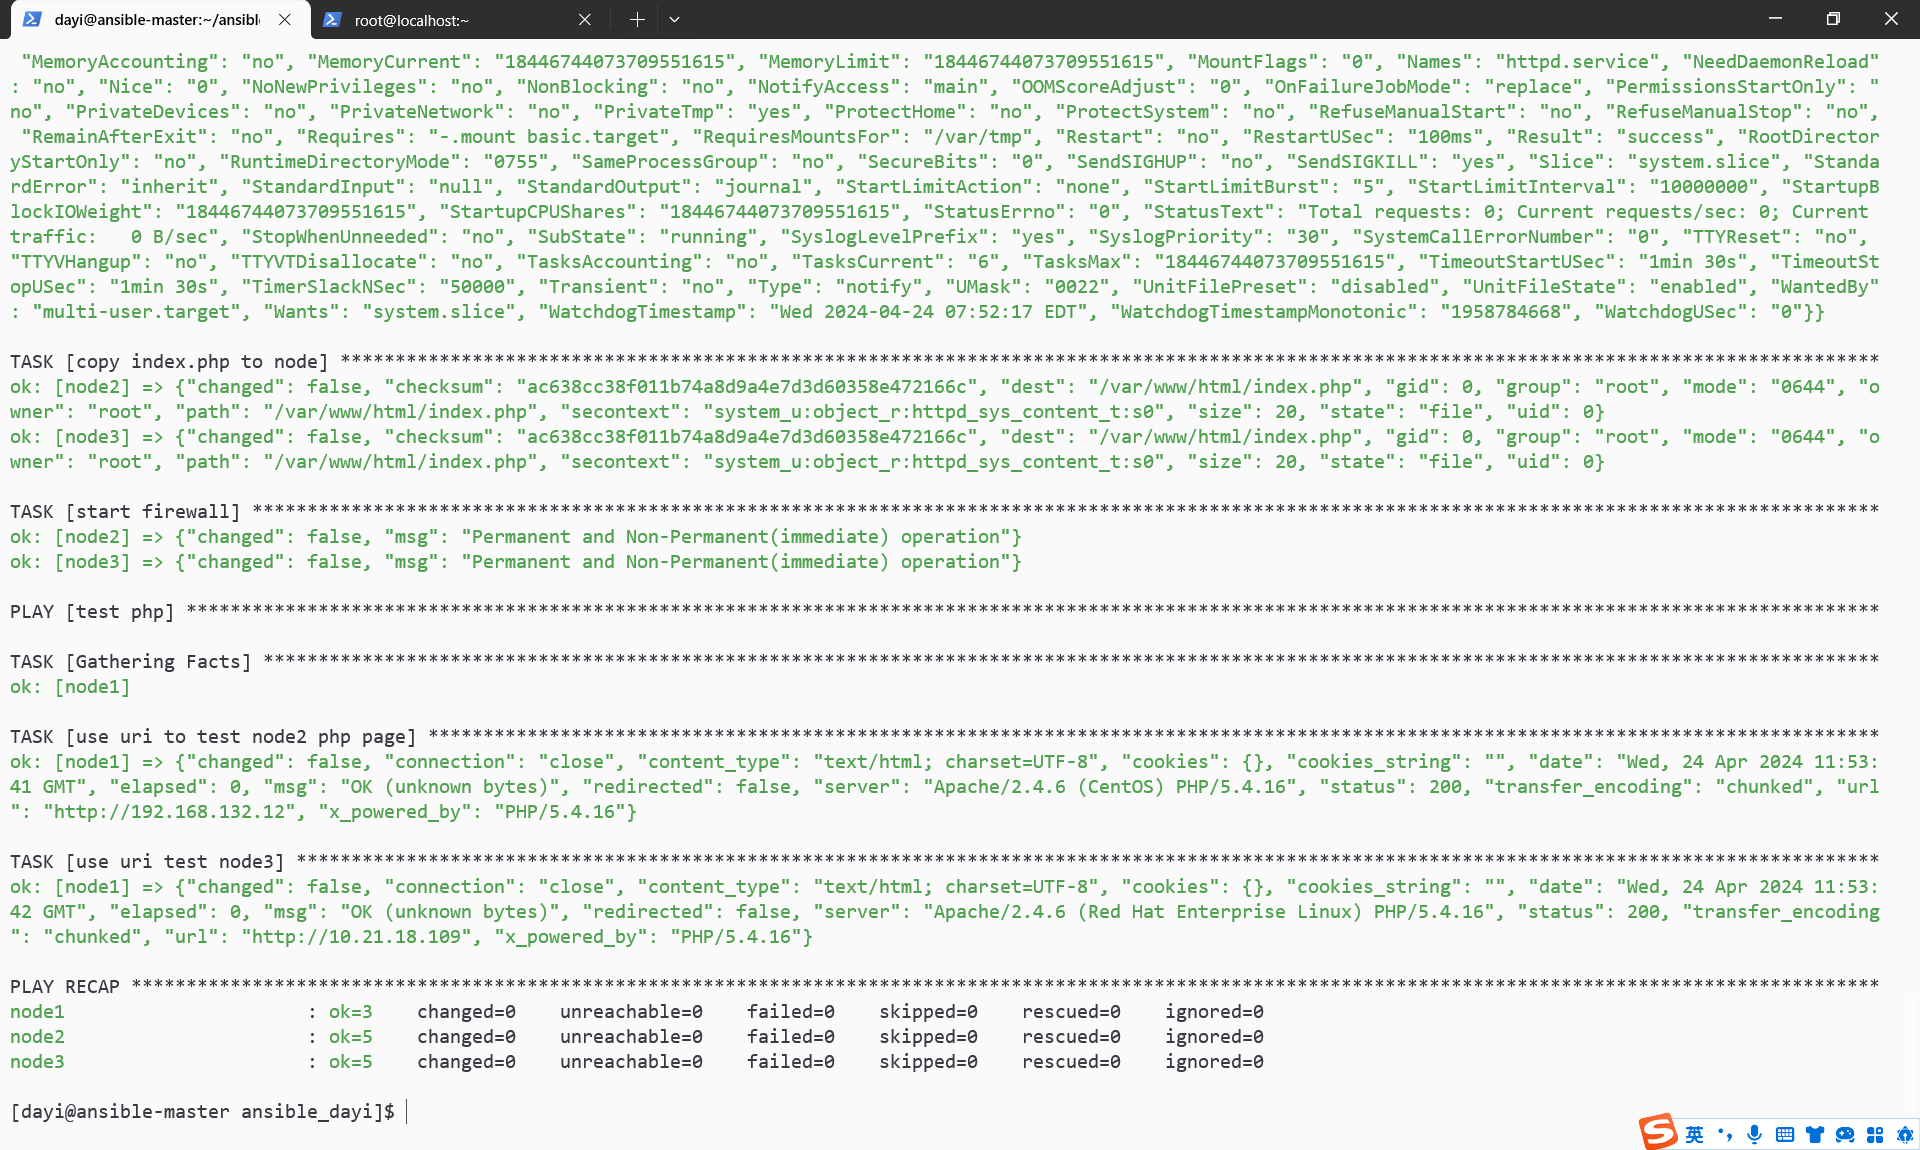
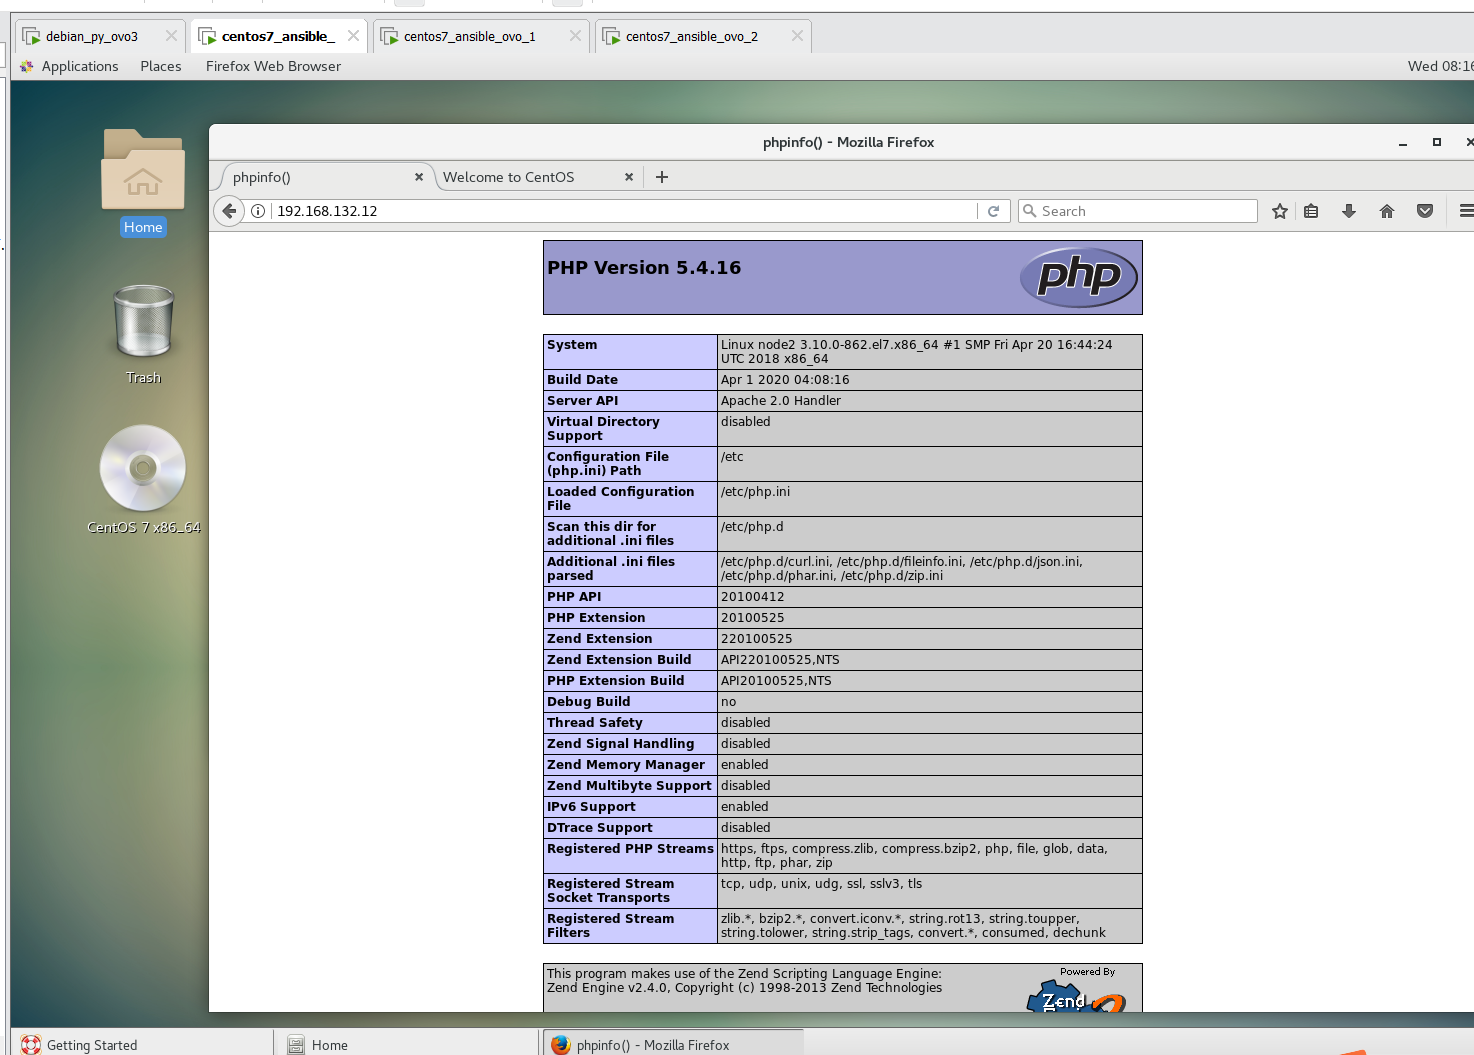
1 2 3 4 5 6 7 8 9 10 11 12 13 14 15 16 17 18 19 20 21 22 23 24 25 26 27 28 29 30 31 32 33 34 35 36 37 38 39 40 41 42 43 44 45 46 --- - name: install lamp hosts: prod tasks: - name: install packages yum: name: "{{ packages}} " vars: packages: - httpd - php - mariadb - mariadb-server state: latest - name: start services service: name: httpd enabled: yes state: started - name: copy index.php to node copy: src: ~/ansible/index.php dest: /var/www/html/index.php mode: '0644' - name: start firewall firewalld: service: http permanent: yes state: enabled immediate: yes - name: test php hosts: node1 tasks: - name: use uri to test node2 php page uri: url: http://192.168.132.12 - name: use uri test node3 uri: url: http://192.168.132.13
ovo
1 2 ansible-playbook -C lamp.yaml ansible-playbook lamp.yaml -v
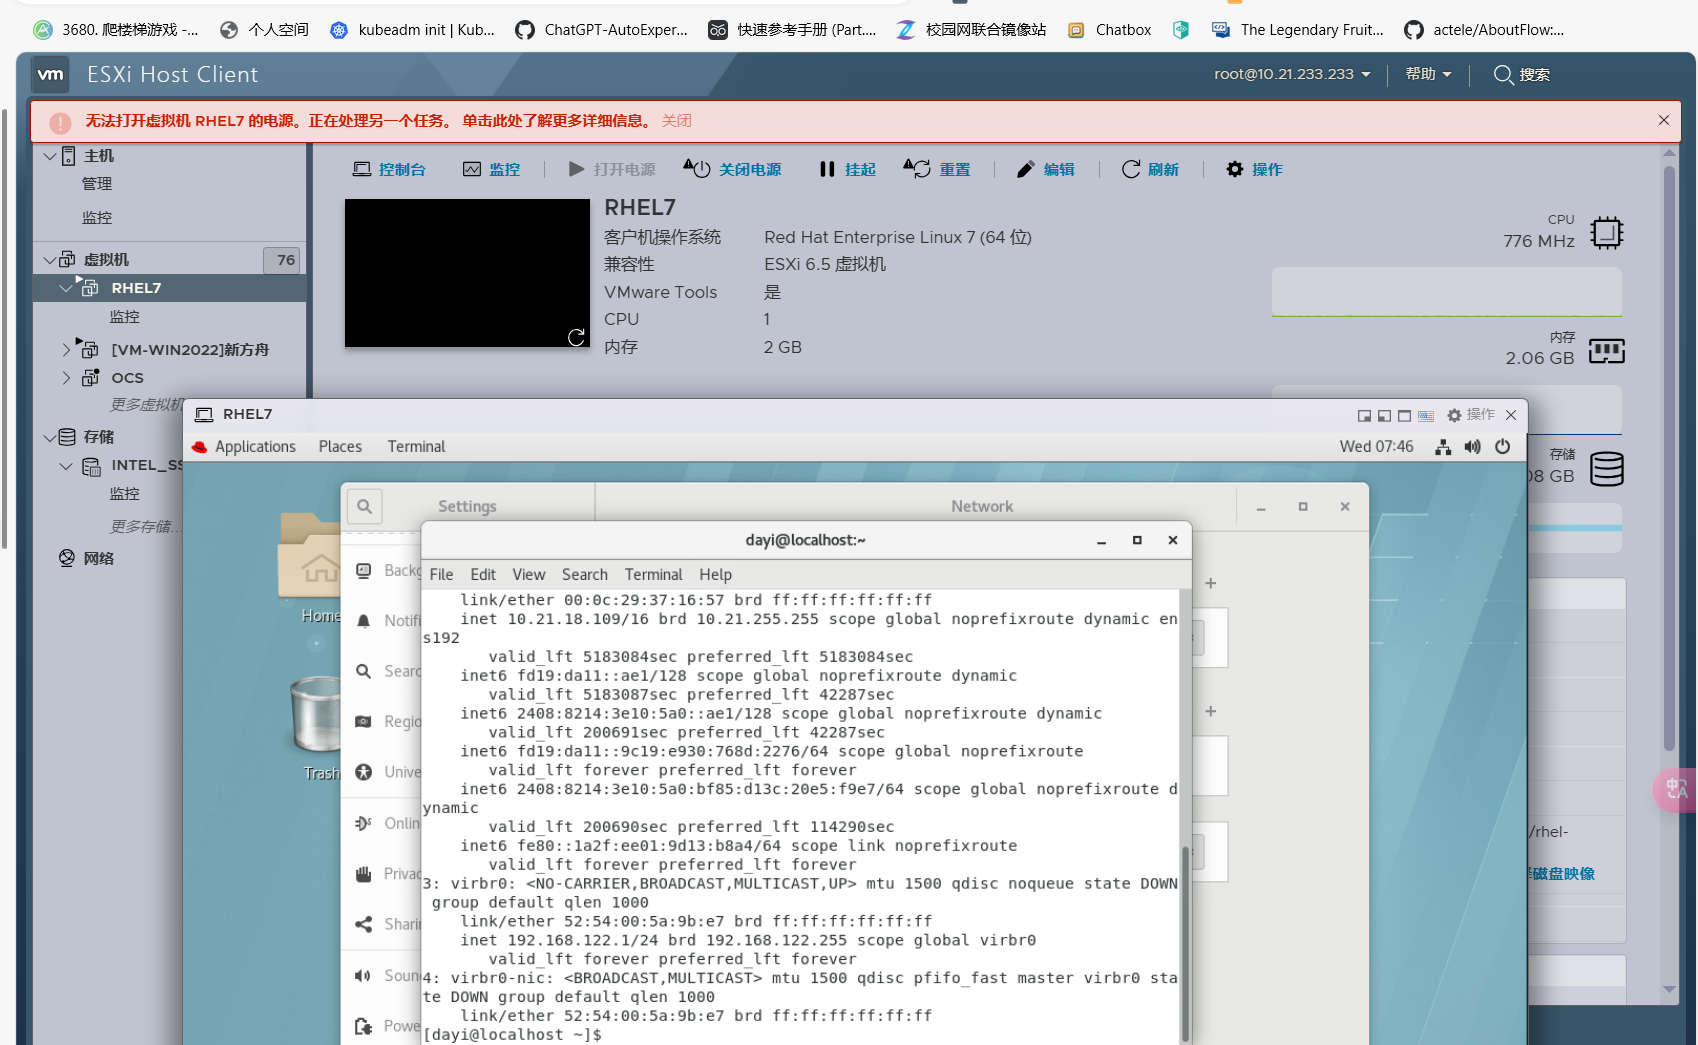
有 PHP 啦,我这里 node3 不能用是因为是因为这个系统不是 centos。
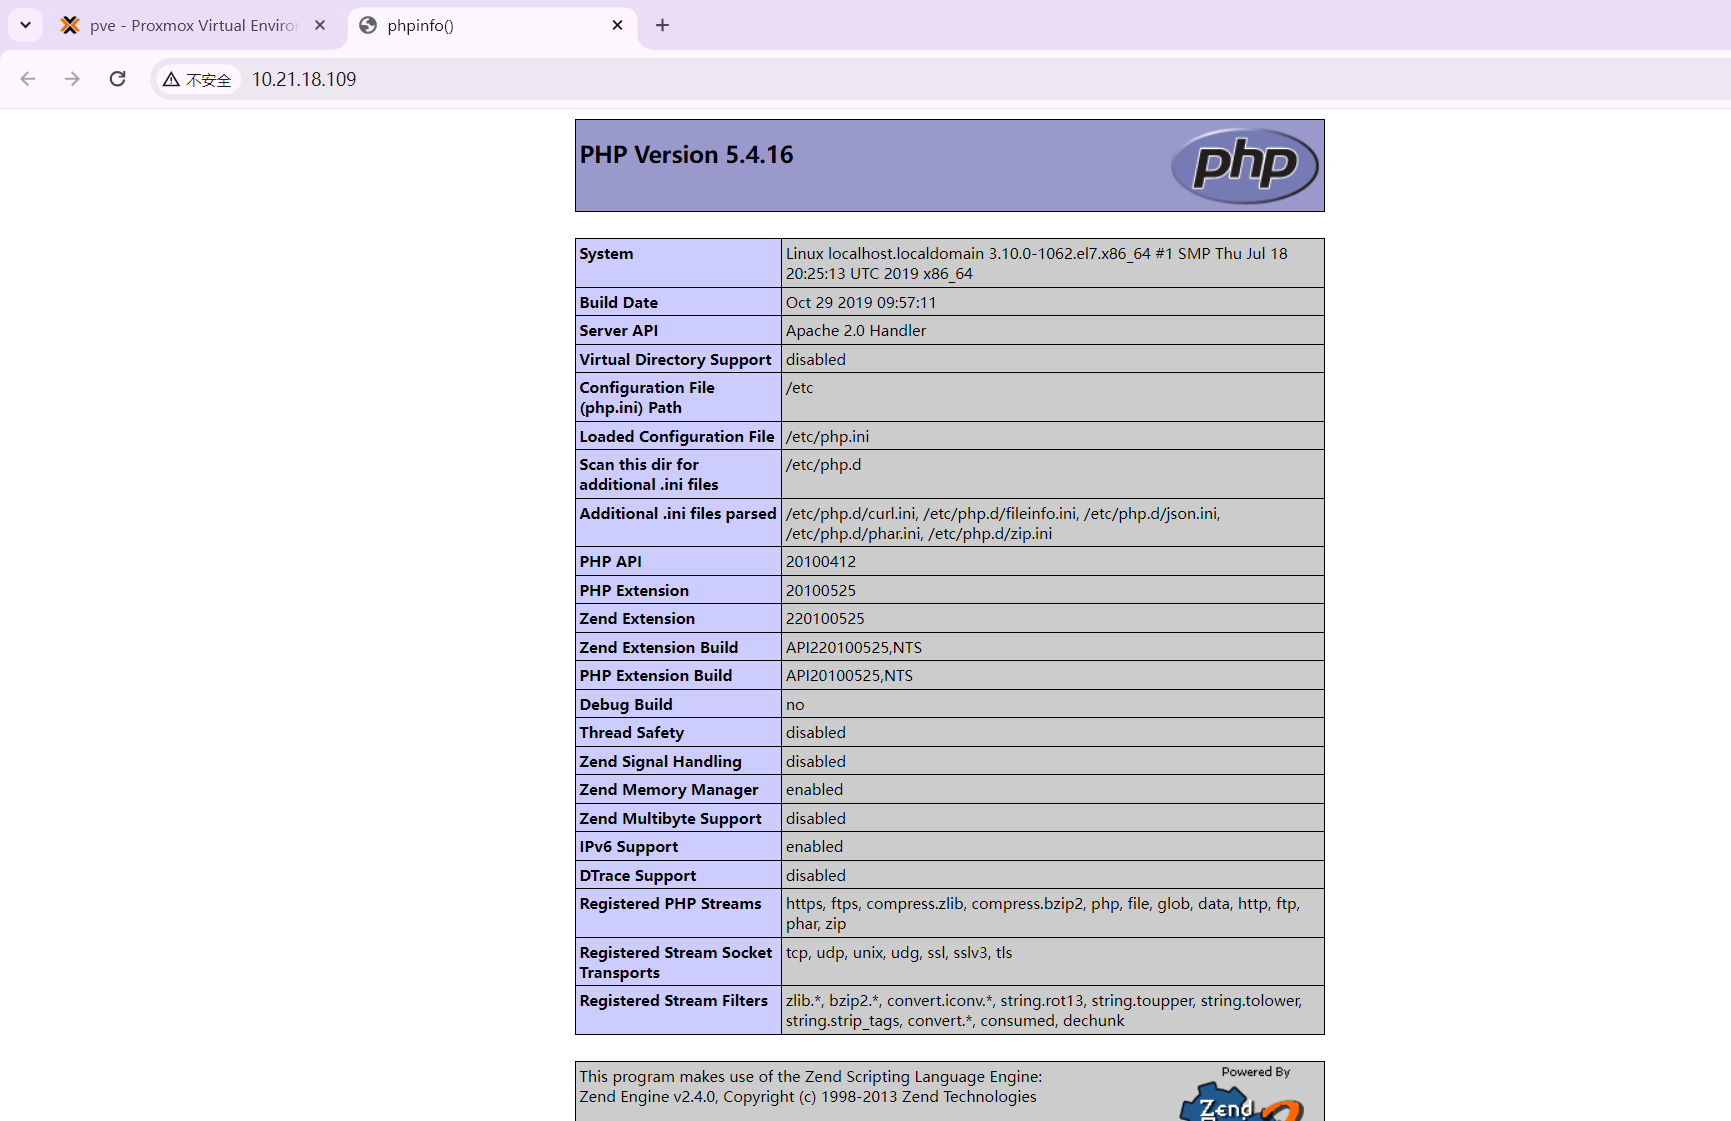
换一个 RHEL7 来看下正常界面 debian 图一乐,整个 RHEL7
1 2 ansible-playbook -C lamp.yaml ansible-playbook lamp.yaml -v
网页也可以打开:
周四 第一节 1 2 3 4 5 使用user模块,使用loop参数,利用循环结构创建多个用户 如tom jerry david caobo 第一种方式,通过多个play或者task挨个创建 (以下是通过多个tasks创建)
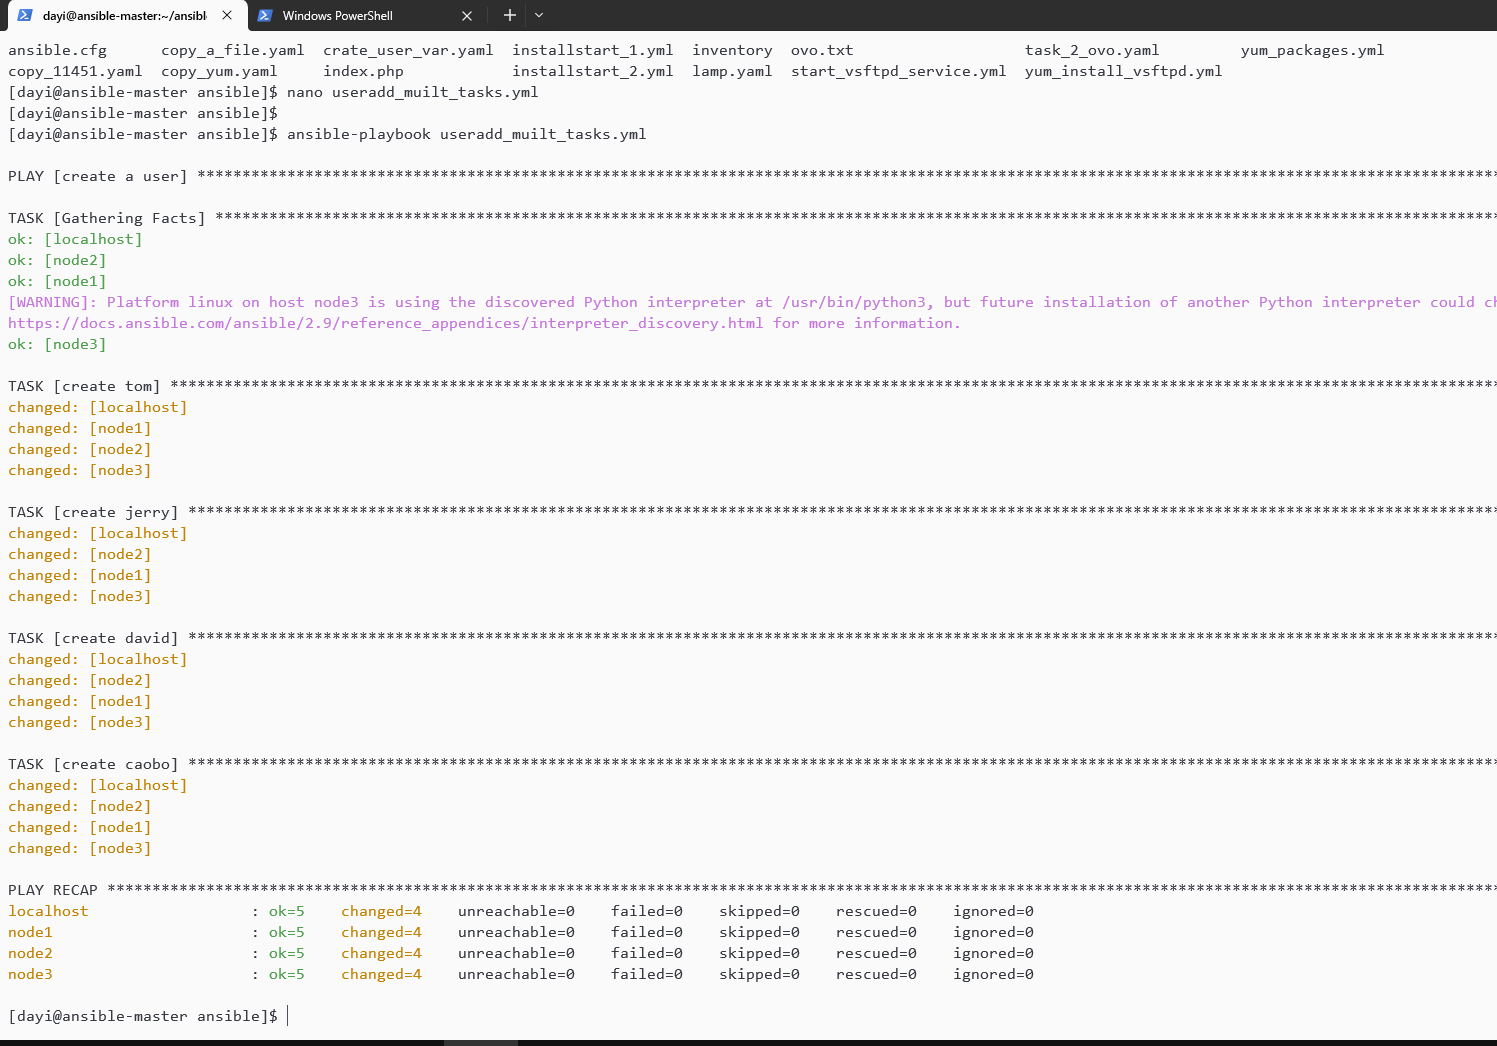
多个 TASK 1 2 3 4 su dayi cd ~/ansiblenano useradd_muilt_tasks.yml ansible-playbook useradd_muilt_tasks.yml
like:
1 2 3 4 5 6 7 8 9 10 11 12 13 14 15 16 17 18 19 20 --- - name: create a user hosts: all tasks: - name: create tom user: name: tom state: present - name: create jerry user: name: jerry state: present - name: create david user: name: david state: present - name: create caobo user: name: caobo state: present
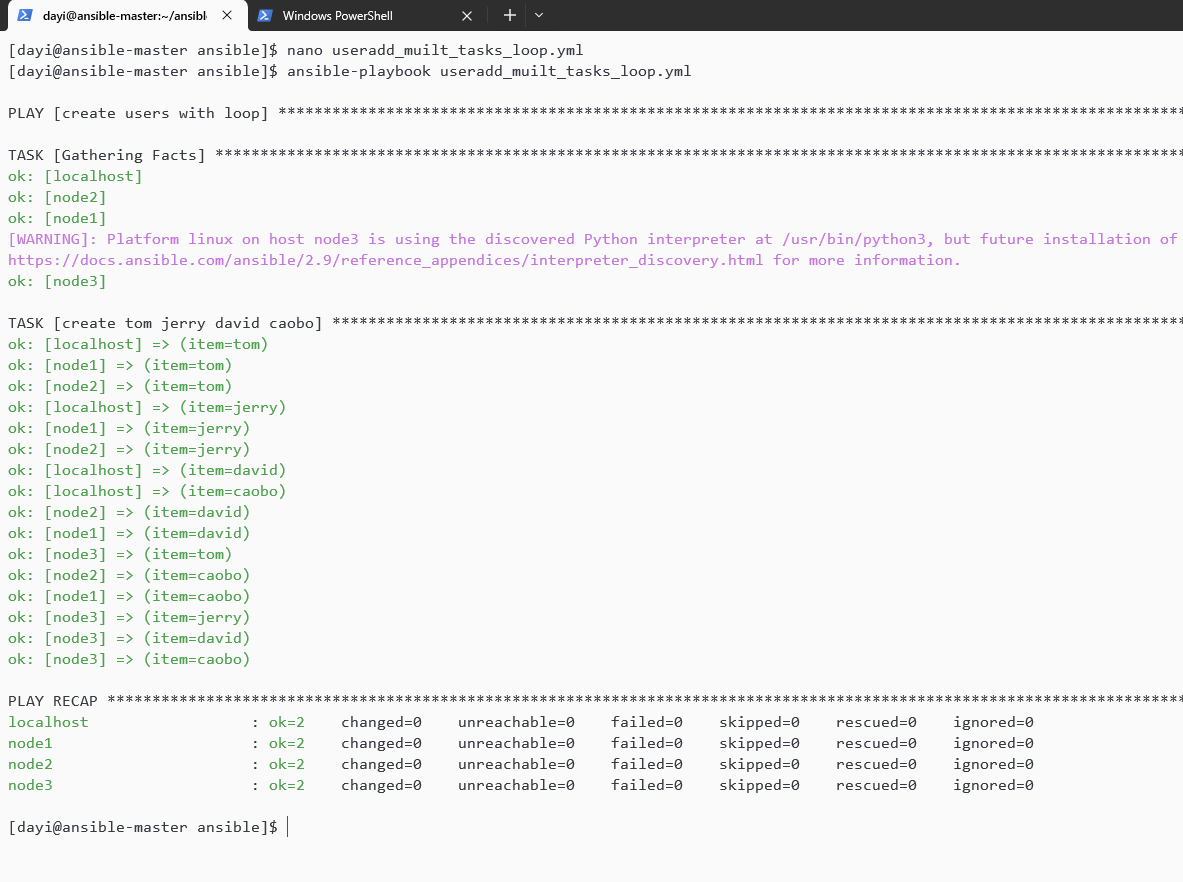
loop 创建 1 2 3 4 su dayi cd ~/ansiblenano useradd_muilt_tasks_loop.yml ansible-playbook useradd_muilt_tasks_loop.yml
yaml:
1 2 3 4 5 6 7 8 9 10 11 12 13 14 15 16 --- - name: create users with loop hosts: all tasks: - name: create tom jerry david caobo user: name: "{{item}} " state: present loop: - tom - jerry - david - caobo
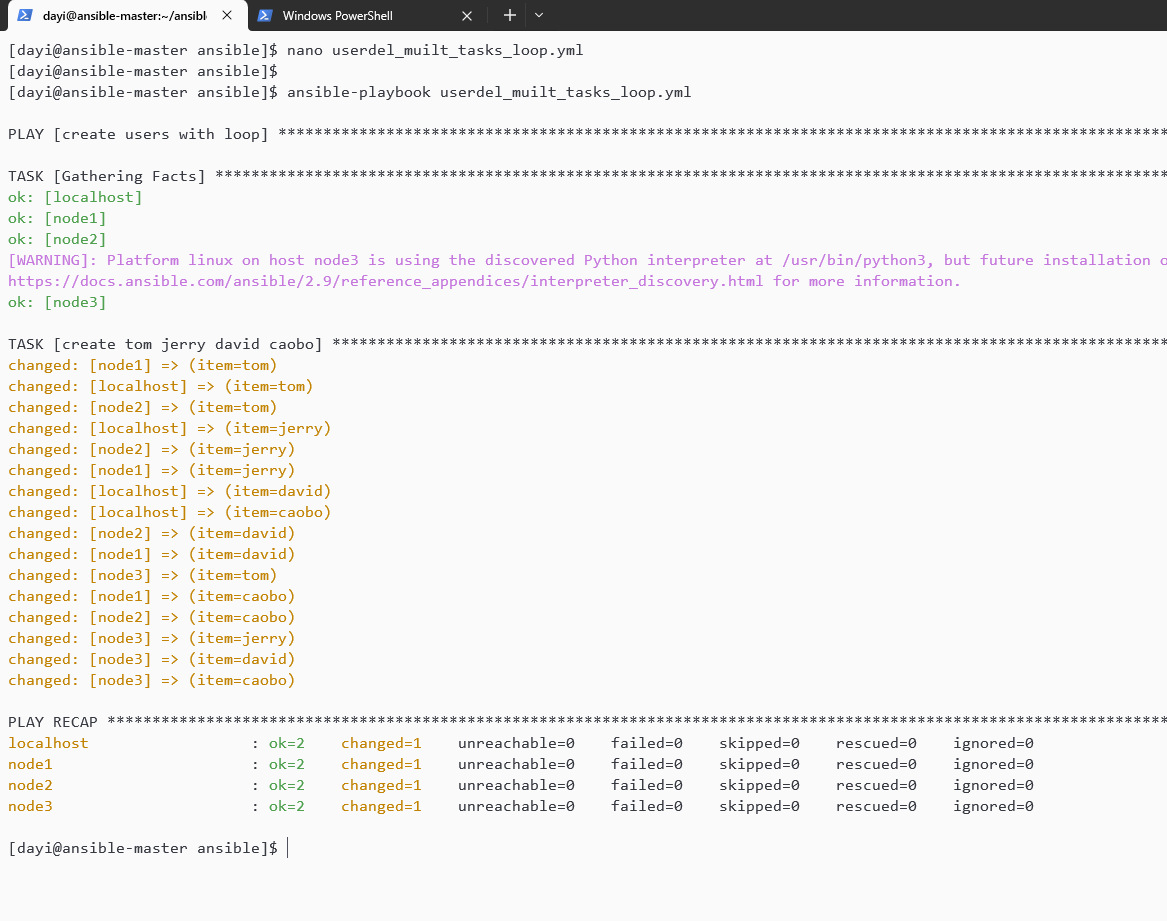
loop 删除 1 2 3 4 su dayi cd ~/ansiblenano userdel_muilt_tasks_loop.yml ansible-playbook userdel_muilt_tasks_loop.yml
yaml:
1 2 3 4 5 6 7 8 9 10 11 12 13 14 15 16 --- - name: create users with loop hosts: all tasks: - name: create tom jerry david caobo user: name: "{{item}} " state: absent remove: yes loop: - tom - jerry - david - caobo
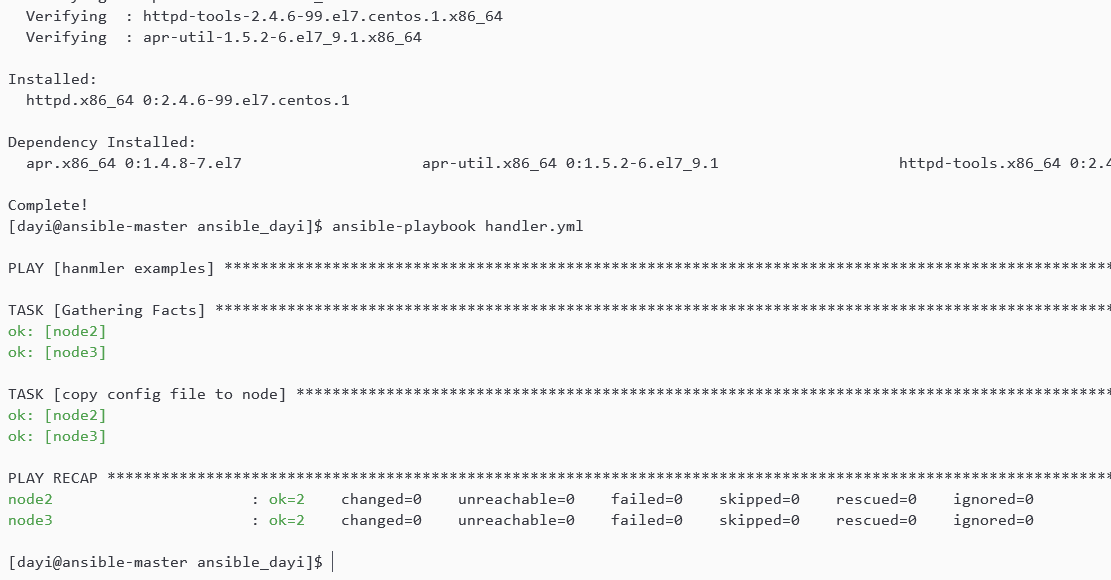
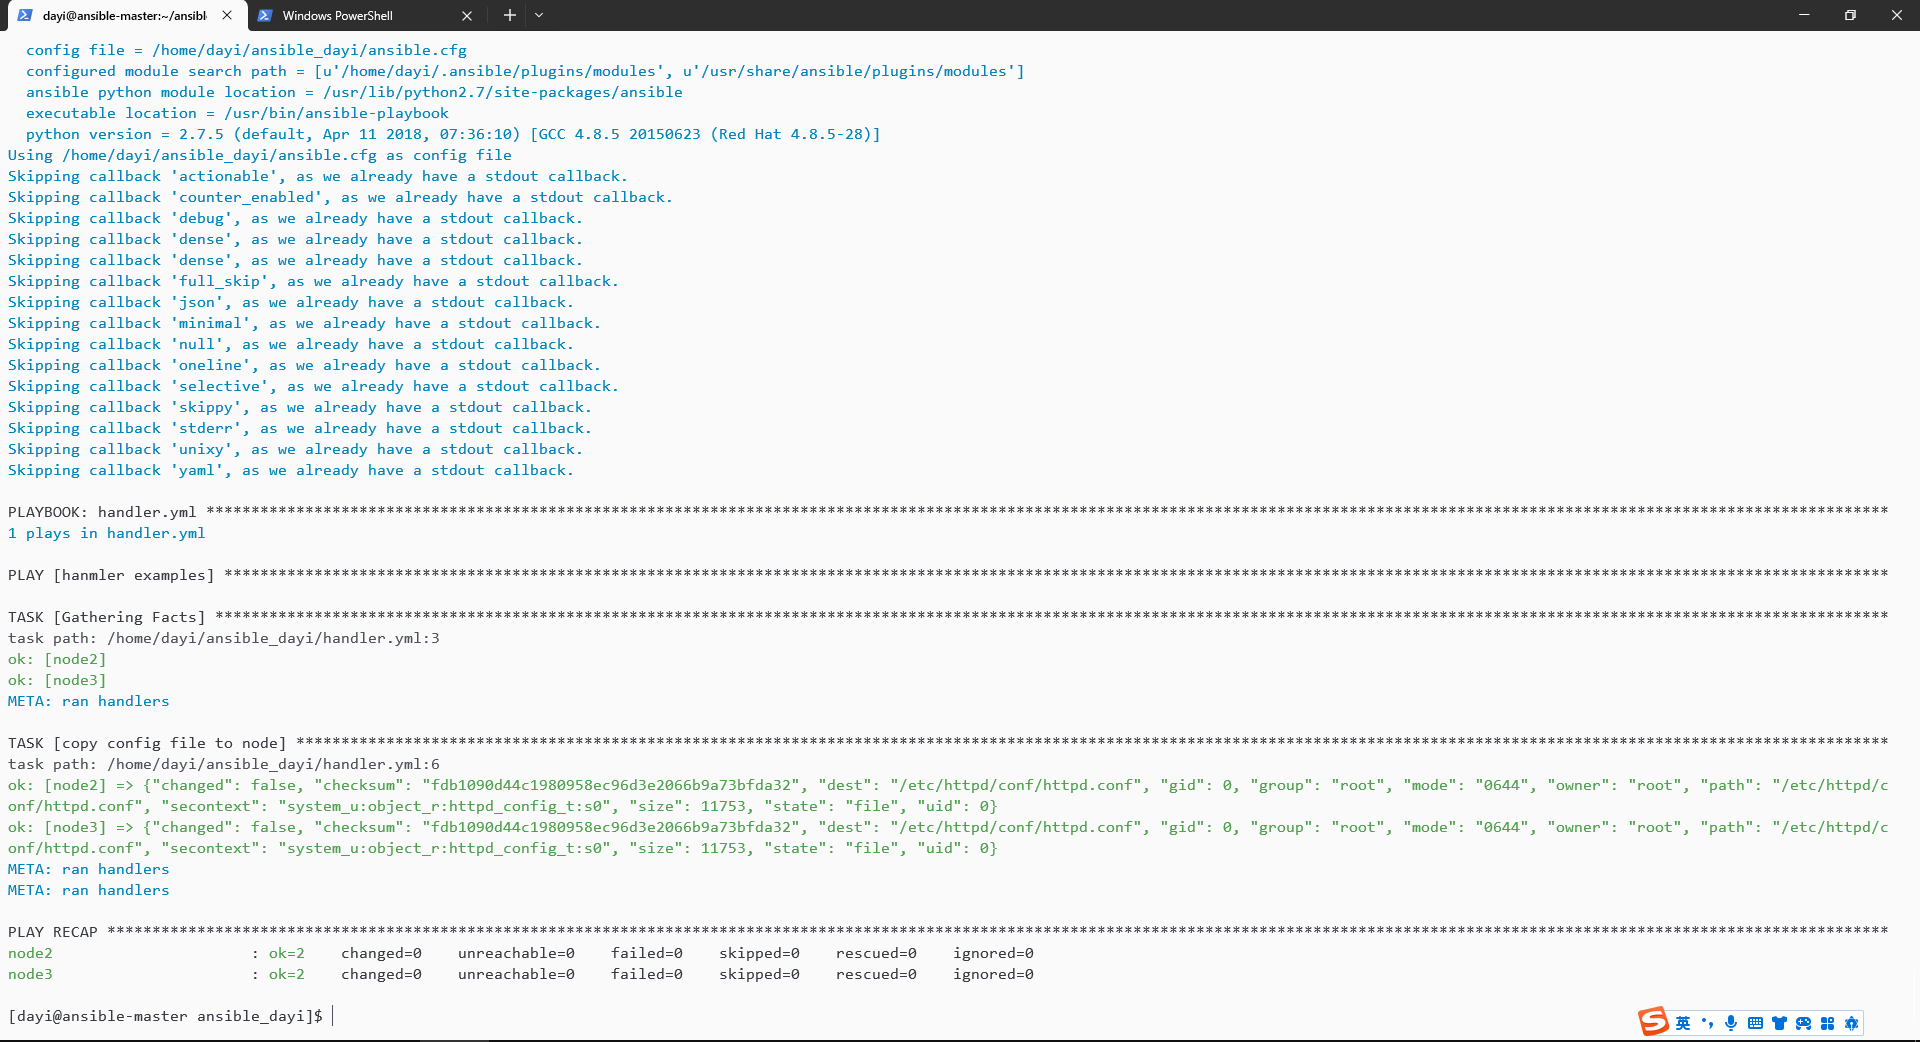
handler.yml 1 2 3 4 5 6 su dayi cd ~/ansiblenano handler.yml sudo yum install httpd ansible-playbook handler.yml -vv
1 2 3 4 5 6 7 8 9 10 11 12 13 14 15 16 17 --- - name: hanmler examples hosts: prod tasks: - name: copy config file to node copy: src: /etc/httpd/conf/httpd.conf dest: /etc/httpd/conf/httpd.conf notify: restart apache service handlers: - name: restart apache service service: name: httpd state: restarted
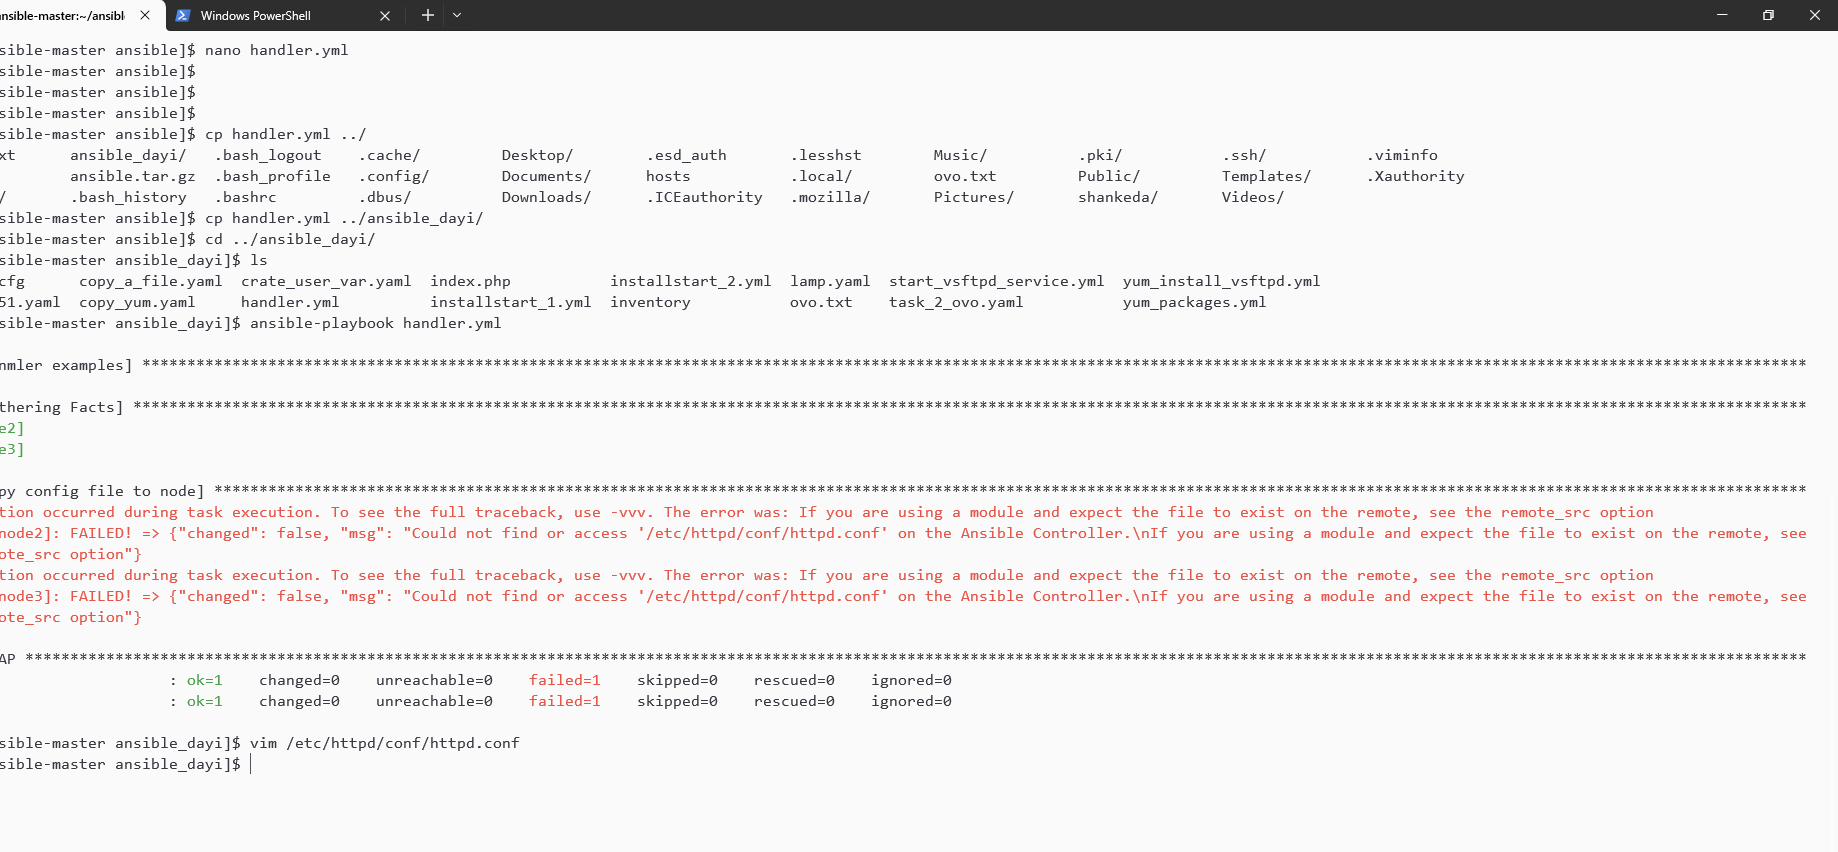
没装 httpd 的话会没配置文件:
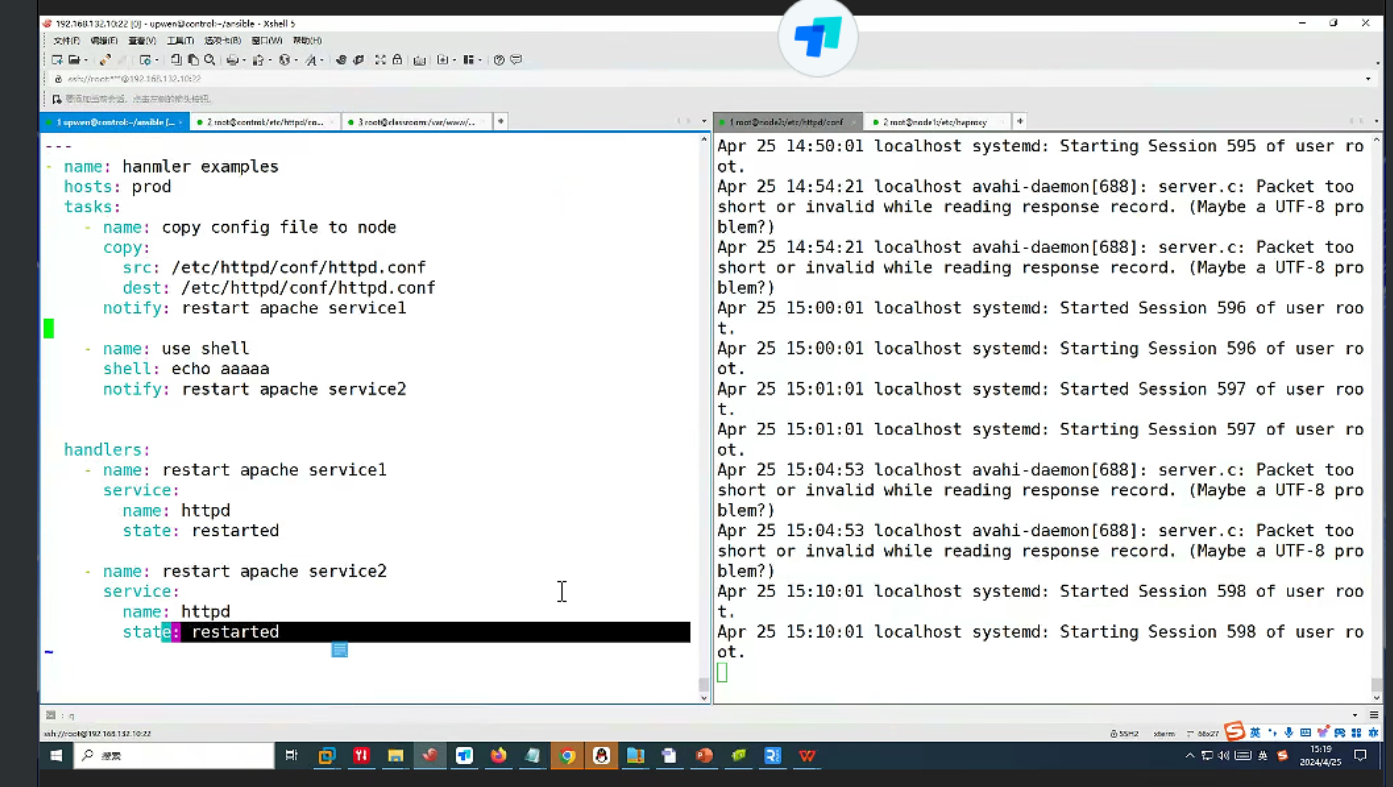
周四下午 多个 notify 和多个 handlers 如何运行?
1 2 3 4 su dayi cd ~/ansiblevim exampleshandler.yml ansible-playbook exampleshandler.yml -vv
exampleshandler.yml
1 2 3 4 5 6 7 8 9 10 11 12 13 14 15 16 17 18 19 20 21 22 23 24 --- - name: hanmler examples hosts: prod tasks: - name: copy config file to node shell: echo bbbb notify: restart apache service1 - name: use shell shell: echo aaaaa notify: restart apache service2 handlers: - name: restart apache service1 service: name: httpd state: restarted - name: restart apache service2 service: name: httpd state: restarted
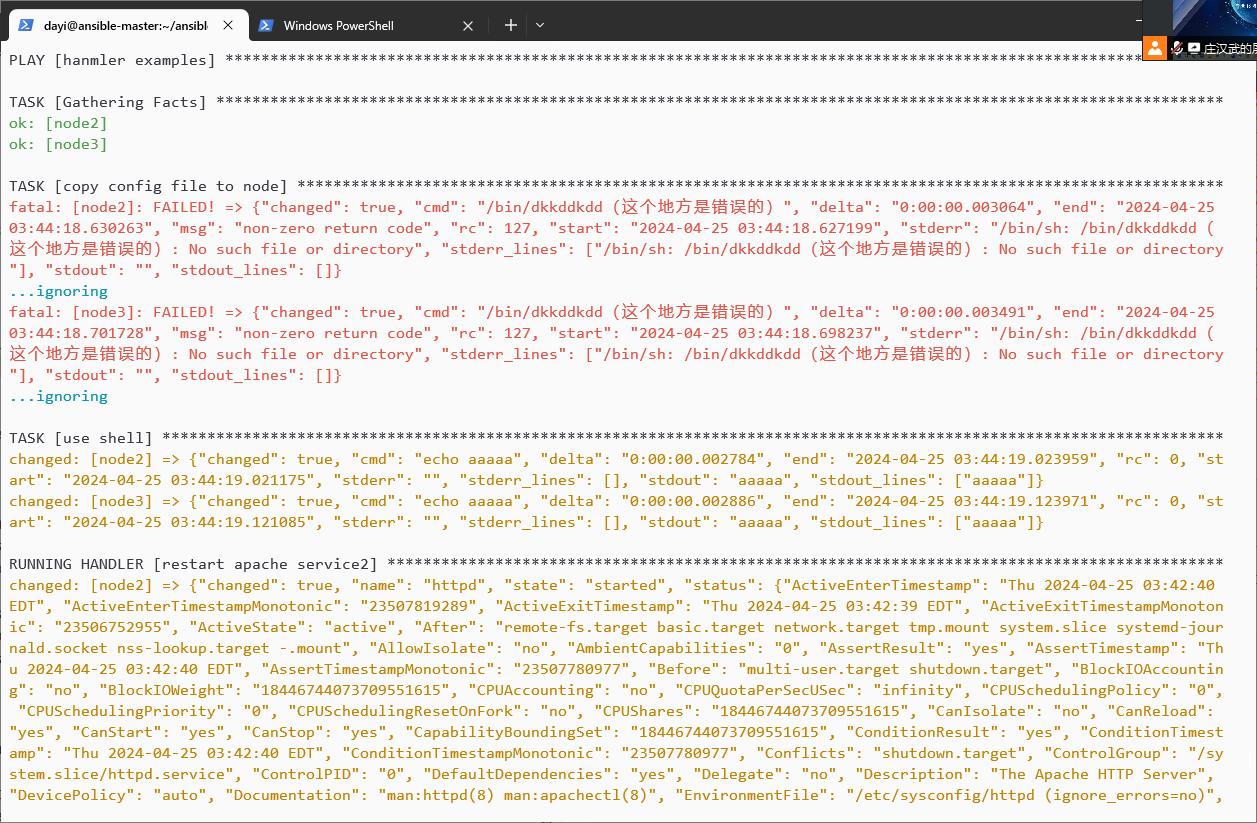
#执行顺序还是按照你的 playbook 的顺序去执行,从上往下 #如果其中某一个 task 出现错误。我们使用 ignore_errors 去忽略该错误
1 2 3 4 5 6 7 8 9 10 11 12 13 14 15 16 17 18 19 20 21 22 23 24 25 26 27 vim exampleshandler2.yml ansible-playbook exampleshandler2.yml -v --- - name: hanmler examples hosts: prod tasks: - name: copy config file to node shell: /bin/dkkddkdd(这个地方是错误的) notify: restart apache service1 ignore_errors: true - name: use shell shell: echo aaaaa notify: restart apache service2 handlers: - name: restart apache service1 service: name: httpd state: restarted - name: restart apache service2 service: name: httpd state: restarted
导入 EPEL-GPG key 1 2 cd /etc/pki/rpm-gpgwget https://archive.fedoraproject.org/pub/epel/RPM-GPG-KEY-EPEL-7
周五实训报告 实训要求 1、搭建 ansible 的实验环境;搭建四台 centos7.5 版本的虚拟机,其中一台的 hostname 为 controller,另外三台分别为 node1-node3;
其实上文已经做啦,说实在,我不是很想重新做一遍)
我拿新机子重新来一遍。有一些细节可能就不截图了,因为上文已经有啦。
1、搭建 ansible 的实验环境;搭建四台 centos7.5 版本的虚拟机,其中一台的 hostname 为 controller,另外三台分别为 node1-node3 具体的安装可以看周一的章节的内容,这里细节就不再弄一次了。
注意磁盘大小:150GB!
改 IP 地址可以看第一天的末尾(应该是【修改 IP 地址】)
安装 4 个虚拟机 都是用 Centos 7.5 的那个镜像。
用英文(不建议用中文语言系统)
虚拟网络编辑器的 NAT 记得修改!不修改虚拟机没法联网。(这个在哪?开始里直接搜)
IP 可以直接在安装的时候就修改。记得打开自动连接。(General 里有个 Auto 连接)
安装选 SERVER WITH GUI,方便你后面改 IP
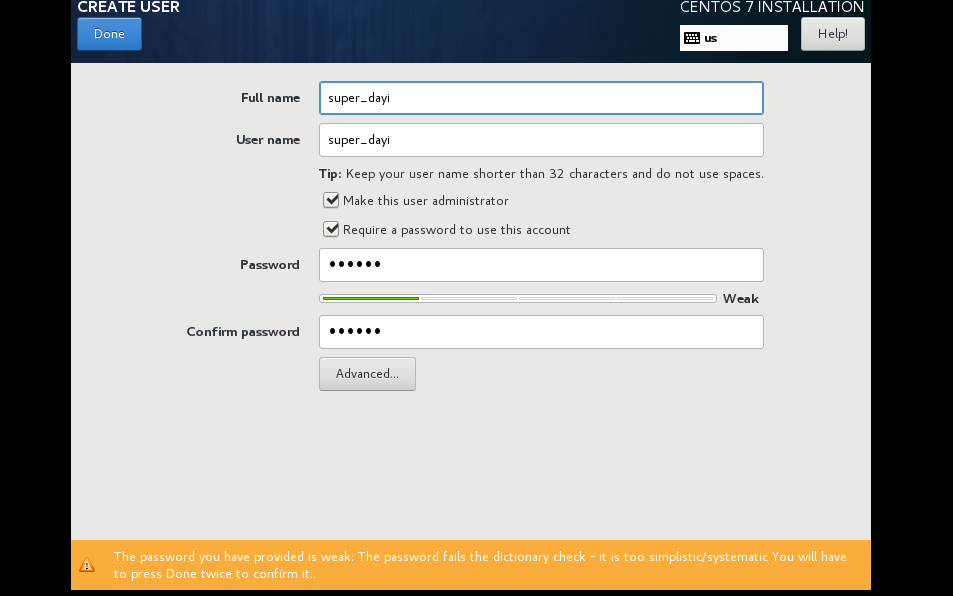
用户名用自己的姓名全拼,这里我用super_dayi,为了区分前后文内容。
克隆机子或者干脆直接再装 3 个
安装好之后分配 IP 地址
具体怎么改可以参考前文的【修改 IP 地址】https://cmd.dayi.ink/sUPF6_zfR-imTz3D2O7PeQ#%E4%BF%AE%E6%94%B9IP%E5%9C%B0%E5%9D%80
1 2 3 4 5 IP地址分配: controller 192.168.132.10 node1 192.168.132.11 node2 192.168.132.12 node3 192.168.132.13
改完把那个开关开一下再关一下。
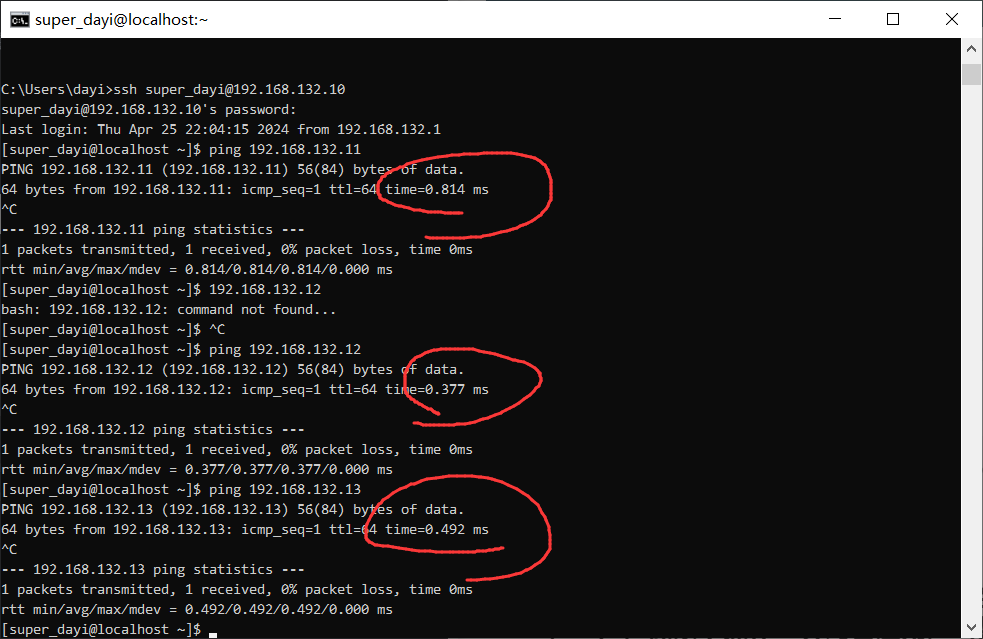
试试能不能 ping 通:
xshell 之类的工具连接到 ssh 上。
在 192.168.132.10 上 ping 其他几个机子
1 2 3 ping 192.168.132.11 ping 192.168.132.12 ping 192.168.132.13
我这里都通了
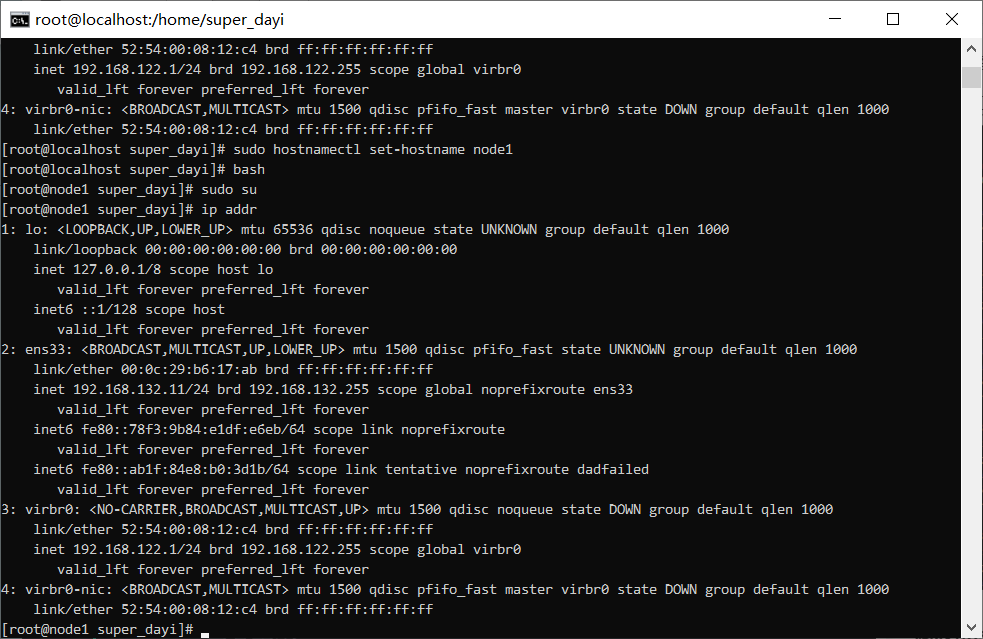
修改 hostname 这里你不同机子进终端自己修改一下就好。
1 2 3 4 5 6 su sudo hostnamectl set-hostname controller sudo hostnamectl set-hostname node1 sudo hostnamectl set-hostname node2 bash
2、完善 ansible 的环境。使用普通用户(你名字的全称,如 zhangsan),做以下操作:针对普通用户(如 zhangsan)做 sudo 的提权免密;针对普通用户做 ssh 的免密登录;完成 ansible 的 controller 的 yum 仓库的配置(yum -y install epel) 在周一到周四的基础上进行新建用户
我知道你想要
这里dayi是之前的用户 rabbit是要改的用户,如果你已经有了,可以建一个rabbit_作为新的用户名
1 2 3 4 5 6 7 8 9 10 11 12 13 14 15 16 17 18 19 20 21 22 23 24 25 26 27 28 29 30 31 32 33 34 35 36 37 38 39 40 41 42 43 44 45 46 47 48 49 50 51 52 53 54 55 56 ssh root@192.168.132.10 useradd rabbit cp -ra /home/dayi/ansible /home/rabbit/ls /home/rabbit rm /home/dayi/.ssh/known_hosts [root@ansible-master rabbit] ansible passwd rabbit sudo su sudo echo 'rabbit ALL=(ALL) NOPASSWD: ALL' >>/etc/sudoers su dayi cd ~/ansibleansible node1,node2,node3 -m user -a "name=rabbit comment=ovo shell=/bin/bash" ansible node1,node2,node3 -m shell -a "echo 'rabbit ALL=(ALL) NOPASSWD: ALL' >>/etc/sudoers" sudo adduser rabbit sudo su sudo echo "rabbit ALL=(ALL) NOPASSWD: ALL" >>/etc/sudoers sudo passwd rabbit su rabbit sudo su su rabbit cd ~/ansiblessh-keygen -t rsa ssh-copy-id rabbit@192.168.132.11 ssh-copy-id rabbit@192.168.132.12 ssh-copy-id rabbit@192.168.132.13 sudo chown -R rabbit /home/rabbit/ansible sudo chmod +w ansible.cfg ansible all -m ping
这样就可以啦:
重新做:设置免密登录 四个机子都要做
设置提权可以看周一的。
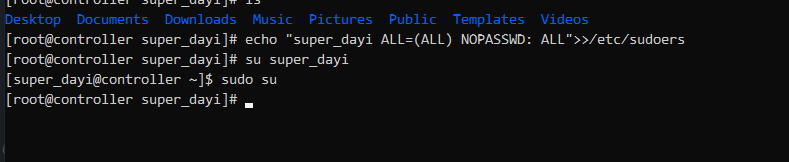
1 2 3 4 5 su echo "super_dayi ALL=(ALL) NOPASSWD: ALL" >>/etc/sudoerssu super_dayi sudo su
这样不提示需要输入密码就可以啦。
几个节点都试一下:
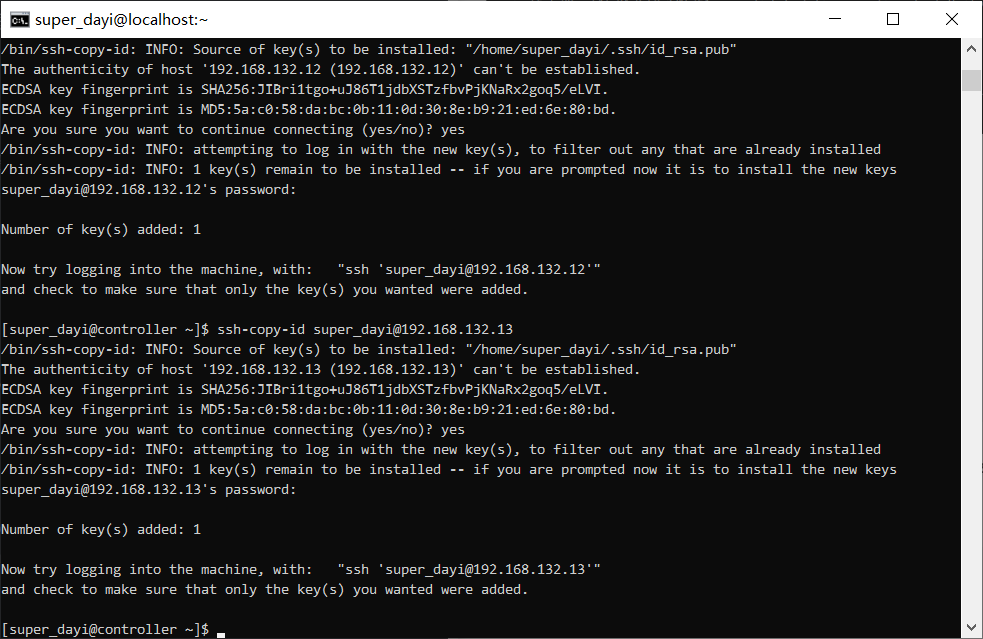
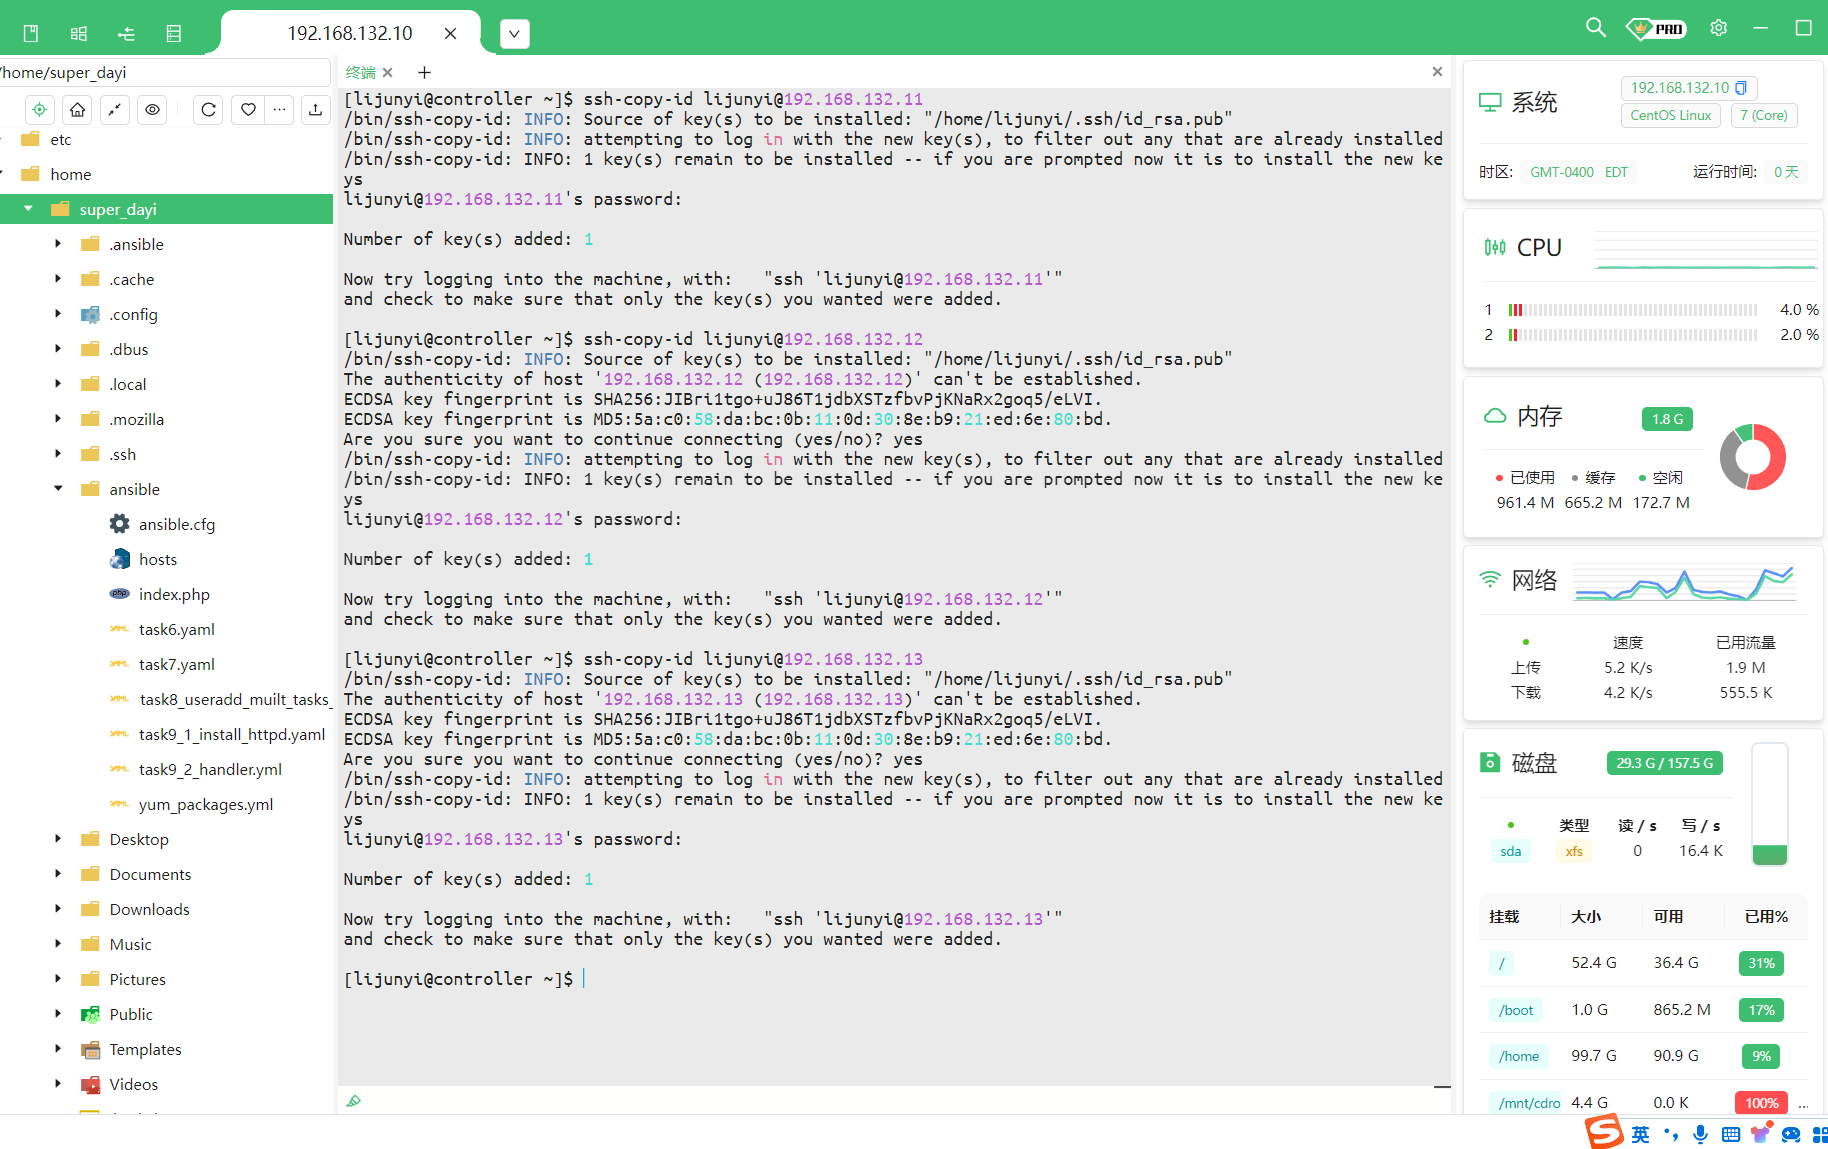
针对普通用户做 ssh 的免密登录 在 controller 上发送 rsa 公钥
1 2 3 4 5 su super_dayi ssh-keygen -t rsa ssh-copy-id super_dayi@192.168.132.11 ssh-copy-id super_dayi@192.168.132.12 ssh-copy-id super_dayi@192.168.132.13
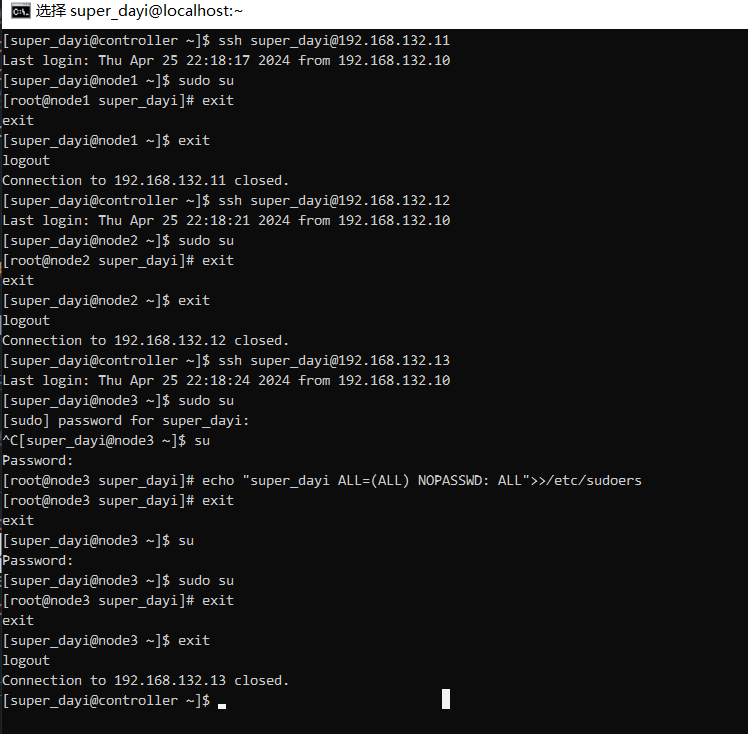
你看这个,咱忘了一个 PVP,确实得测试一下啦。
测试一下:
1 2 3 4 5 6 7 8 9 10 11 12 13 14 15 16 17 18 19 20 21 22 23 24 25 26 27 28 29 30 31 32 33 34 35 36 37 38 [super_dayi@controller ~]$ ssh super_dayi@192.168.132.11 Last login: Thu Apr 25 22:18:17 2024 from 192.168.132.10 [super_dayi@node1 ~]$ sudo su [root@node1 super_dayi] exit [super_dayi@node1 ~]$ exit logout Connection to 192.168.132.11 closed. [super_dayi@controller ~]$ ssh super_dayi@192.168.132.12 Last login: Thu Apr 25 22:18:21 2024 from 192.168.132.10 [super_dayi@node2 ~]$ sudo su [root@node2 super_dayi] exit [super_dayi@node2 ~]$ exit logout Connection to 192.168.132.12 closed. [super_dayi@controller ~]$ [super_dayi@controller ~]$ ssh super_dayi@192.168.132.13 Last login: Thu Apr 25 22:18:24 2024 from 192.168.132.10 [super_dayi@node3 ~]$ sudo su [sudo] password for super_dayi: ^C[super_dayi@node3 ~]$ su Password: [root@node3 super_dayi] [root@node3 super_dayi] exit [super_dayi@node3 ~]$ su Password: [super_dayi@node3 ~]$ sudo su [root@node3 super_dayi] exit [super_dayi@node3 ~]$ exit logout Connection to 192.168.132.13 closed. [super_dayi@controller ~]$
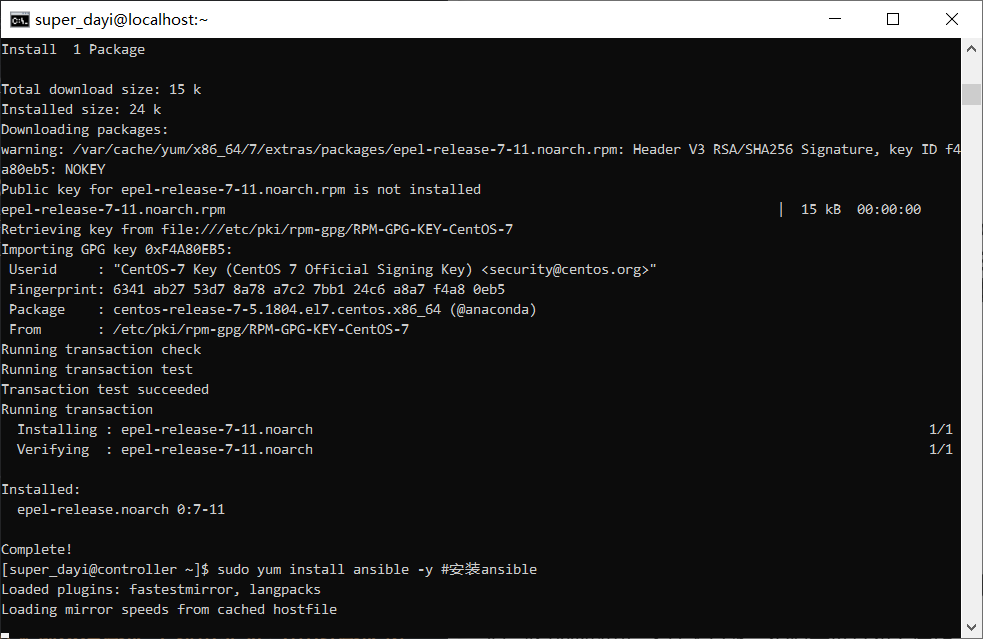
完成 ansible 的 controller 的 yum 仓库的配置(yum -y install epel) 在 controller 上
1 2 3 ping 223.5.5.5 sudo yum install epel-release -y sudo yum install ansible -y
3、配置 ansible.cfg 文件以及主机清单文件 hosts,其中,node1 和 node2 为 test 组中主机,node3 为 prod 组中主机。通过 ansible 的临时命令去查看主机连通性,是否可以实现基本的联通 只需要
这里的清单文件用hosts文件名
1 2 3 4 mkdir -pv ~/ansiblecd ~/ansiblecp -a /etc/ansible/ansible.cfg ~/ansiblevim ~/ansible/ansible.cfg
修改:
位置 1:
位置 2:(但这里是可选)
位置 3:
继续:
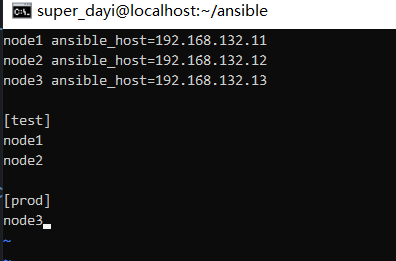
内容:
1 2 3 4 5 6 7 8 9 10 node1 ansible_host=192.168.132.11 node2 ansible_host=192.168.132.12 node3 ansible_host=192.168.132.13 [test] node1 node2 [prod] node3
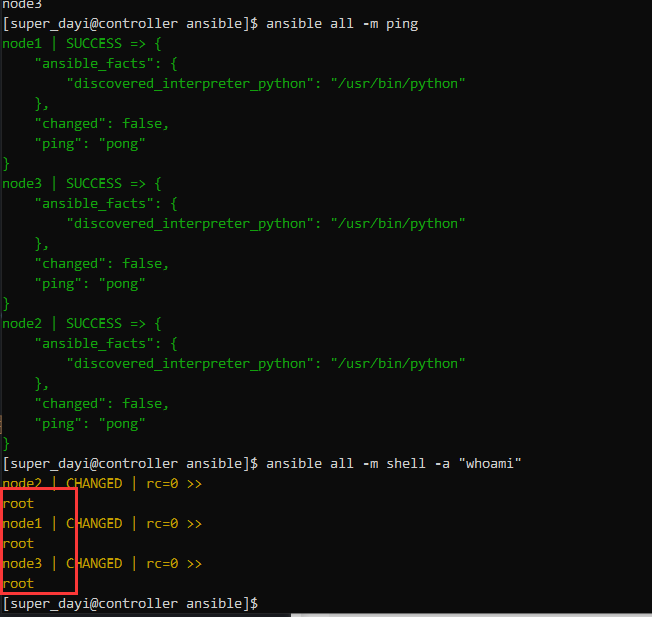
ansible 的临时命令去查看主机连通性 1 2 ansible all -m ping ansible all -m shell -a "whoami"
4、配置 node1-node3 的本地 yum 仓库(利用光盘当中的仓库内容)
该过程很慢
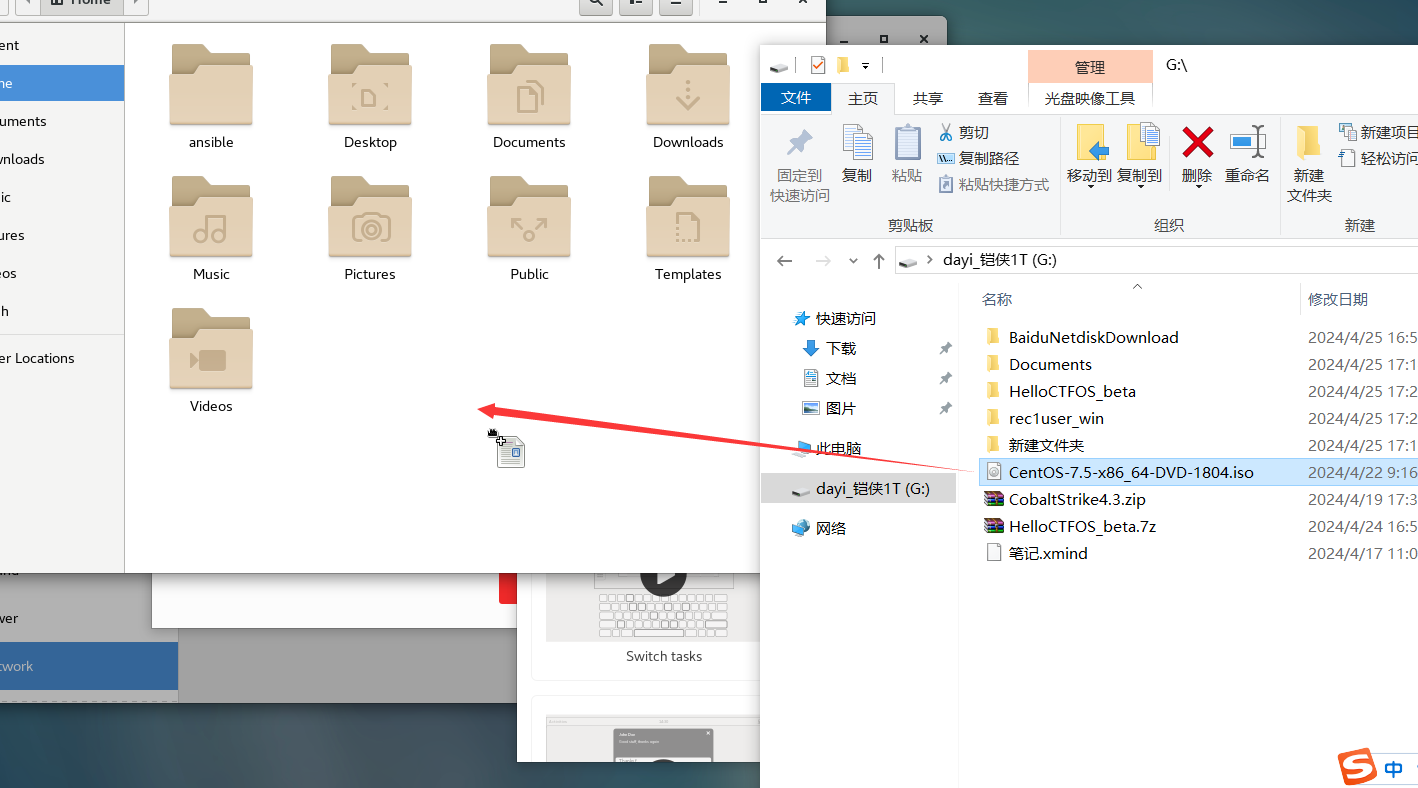
把CentOS-7.5-x86_64-DVD-1804.iso 放到你的用户文件夹目录,然后再进行如下操作:
注意!这里推荐用 xshell 之类的工具,防止复制不完:避免出现这种 ISO 就 7M 的情况
这个方法请多次检查镜像是否正确:
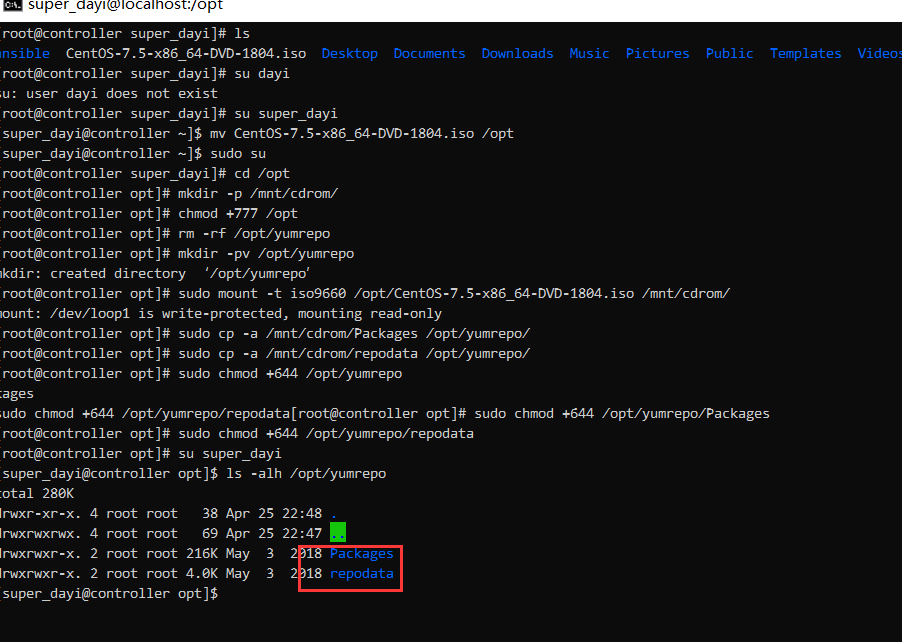
挂载镜像、复制仓库:
1 2 3 4 5 6 7 8 9 10 11 12 13 14 15 16 17 18 sudo su chmod +777 /optsudo super_dayi cd ~mv CentOS-7.5-x86_64-DVD-1804.iso /opt sudo su cd /optmkdir -p /mnt/cdrom/chmod +777 /optrm -rf /opt/yumrepomkdir -pv /opt/yumreposudo mount -t iso9660 /opt/CentOS-7.5-x86_64-DVD-1804.iso /mnt/cdrom/ sudo cp -a /mnt/cdrom/Packages /opt/yumrepo/
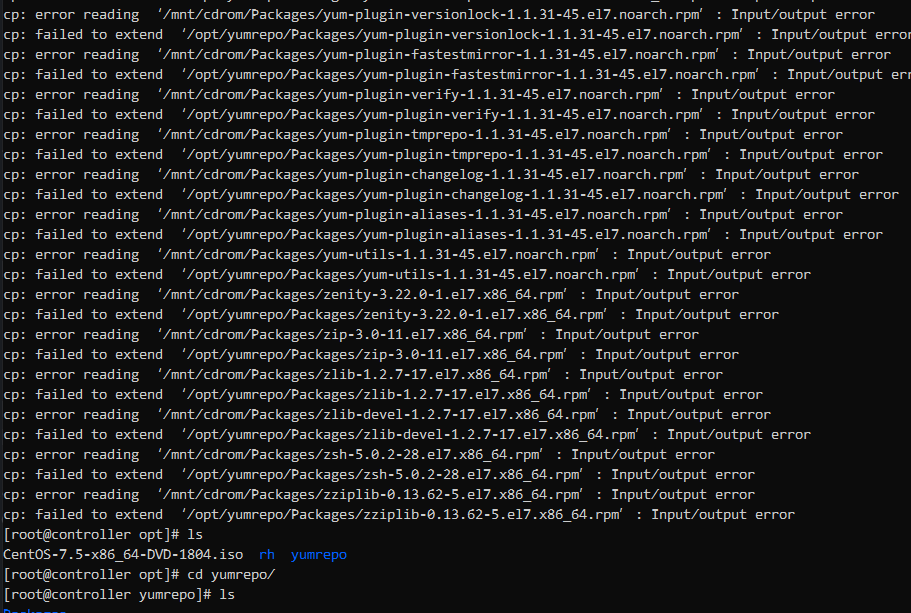
如果遇到这种 IO 错误是镜像文件没复制好,重新来一遍就行。
继续:
1 2 3 4 5 6 7 8 9 sudo cp -a /mnt/cdrom/Packages /opt/yumrepo/ sudo cp -a /mnt/cdrom/repodata /opt/yumrepo/ sudo chmod +644 /opt/yumrepo sudo chmod +644 /opt/yumrepo/Packages sudo chmod +644 /opt/yumrepo/repodata su super_dayi ls -alh /opt/yumrepo
分发文件:
1 2 3 4 5 6 7 8 9 10 11 12 13 14 15 16 17 18 19 cd ~/ansibleansible node1,node2,node3 -m shell -a "rm -rf /opt/yumrepo" ansible-playbook copy_yum.yaml -vv ansible all -m shell -a "ls -alh /opt/yumrepo" sudo su cd /opttar zcvf yumrepo.tar.gz yumrepo chmod +644 /opt/yumrepo.tar.gzsu super_dayi cd ~/ansibleansible node1,node2,node3 -m copy -a "src=/opt/yumrepo.tar.gz dest=/opt/" -v ansible node1,node2,node3 -m shell -a "cd /opt && tar -zxvf yumrepo.tar.gz" rm -rf /opt/yumrepo.tar.gzansible node1,node2,node3 -m shell -a "rm -rf /opt/yumrepo.tar.gz" ansible all -m shell -a "ls -alh /opt/yumrepo"
图,缓慢的三步:
这样就对啦:
附文件 这些是上面步骤可能用到的文件
copy_yum.yaml 文件内容 nano copy_yum.yaml
1 2 3 4 5 6 7 8 --- - name: copy a file hosts: all tasks: - name: copy /opt/yumrepo/ to /opt/yumrepo/ copy: src: /opt/yumrepo/ dest: /opt/yumrepo/
快速分发的代码的 playbook:(相当于加速文件分发那几行 ) 1 2 3 4 5 6 sudo su cd /opttar zcvf yumrepo.tar.gz yumrepo chmod +644 /opt/yumrepo.tar.gzsu dayi cd ~/ansible
然后跑这个:
1 2 3 4 5 6 7 8 9 10 11 12 13 14 15 16 17 18 19 20 21 22 23 24 25 --- - name: Deploy yumrepo to nodes hosts: node1,node2,node3 become: true tasks: - name: Copy tar.gz to target nodes copy: src: /opt/yumrepo.tar.gz dest: /opt/yumrepo.tar.gz - name: Extract tar.gz on target nodes shell: tar -zxvf /opt/yumrepo.tar.gz -C /opt args: chdir: /opt - name: Remove tar.gz from target nodes file: path: /opt/yumrepo.tar.gz state: absent - name: Clean up local tar.gz file: path: /opt/yumrepo.tar.gz state: absent become_user: root
继续配置 对的,这就一半。
配置本地 YUM 仓库 playbook 1 2 3 su super_dayi cd ~/ansible/nano yum_packages.yml
内容
1 2 3 4 5 6 7 8 9 10 11 12 --- - name: create a repo hosts: all tasks: - name: Add repository yum_repository: name: epel_local_opt description: EPEL YUM repo baseurl: file:///opt/yumrepo/ enabled: yes gpgcheck: no
继续执行:
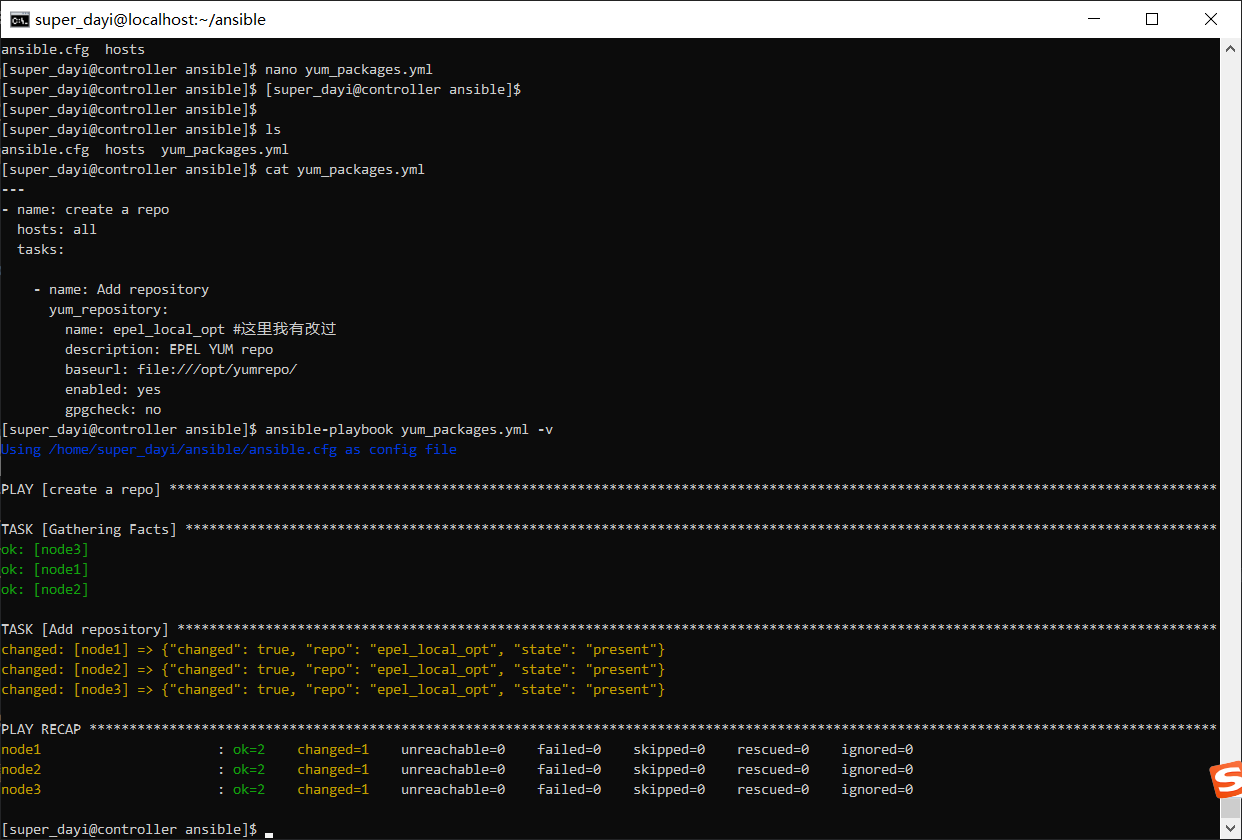
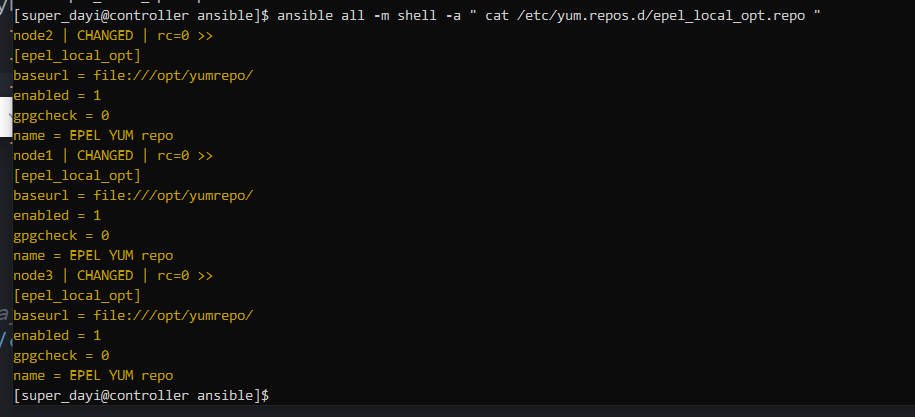
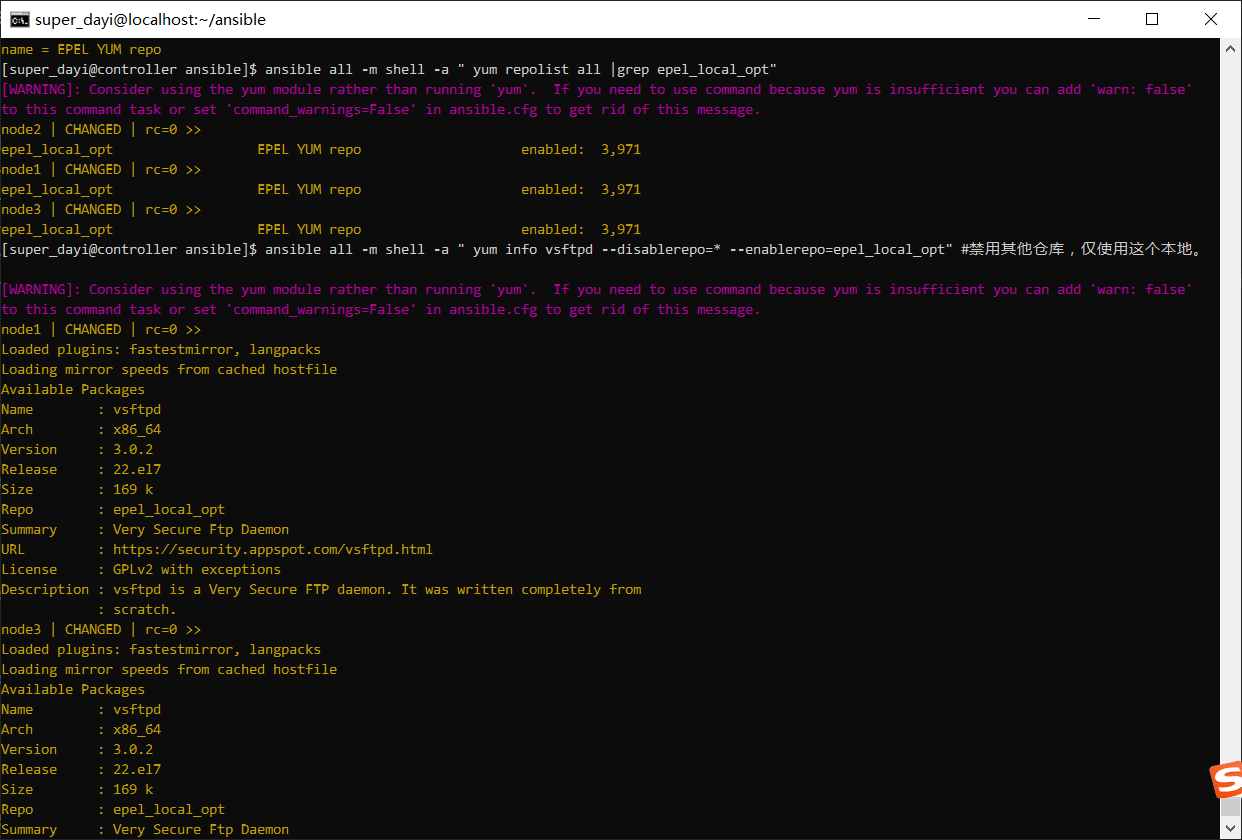
1 2 3 4 5 6 ansible-playbook yum_packages.yml -v ansible all -m shell -a " yum makecache " ansible all -m shell -a " ls /etc/yum.repos.d/ " ansible all -m shell -a " cat /etc/yum.repos.d/epel_local_opt.repo " ansible all -m shell -a " yum repolist all |grep epel_local_opt" ansible all -m shell -a " yum info vsftpd --disablerepo=* --enablerepo=epel_local_opt"
图 ansible-playbook yum_packages.yml -v
剩下的几步:
这样就可以啦
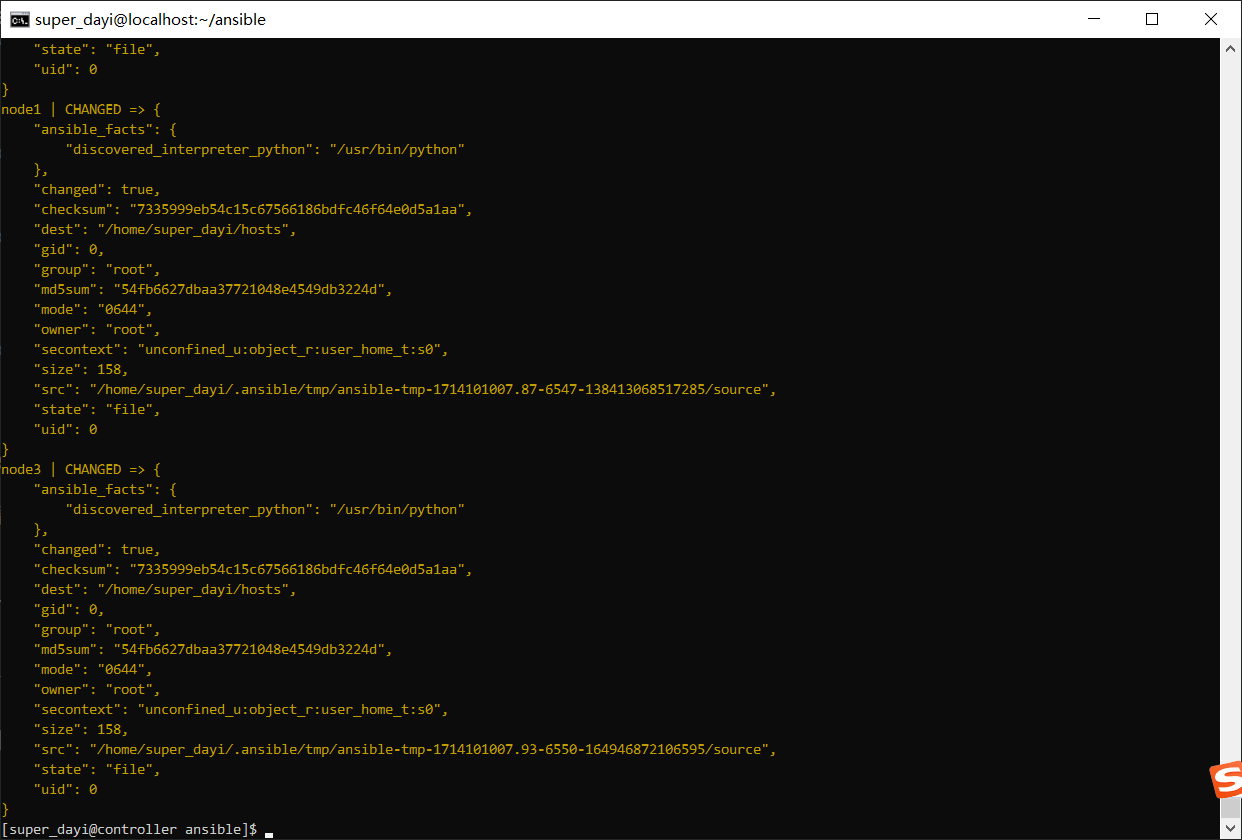
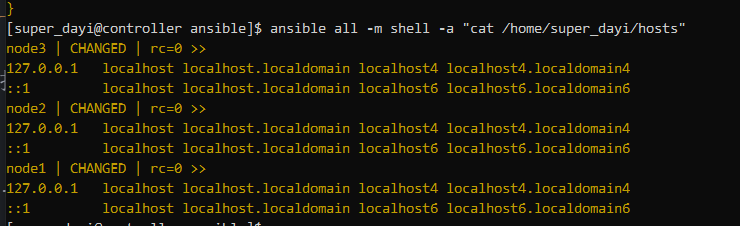
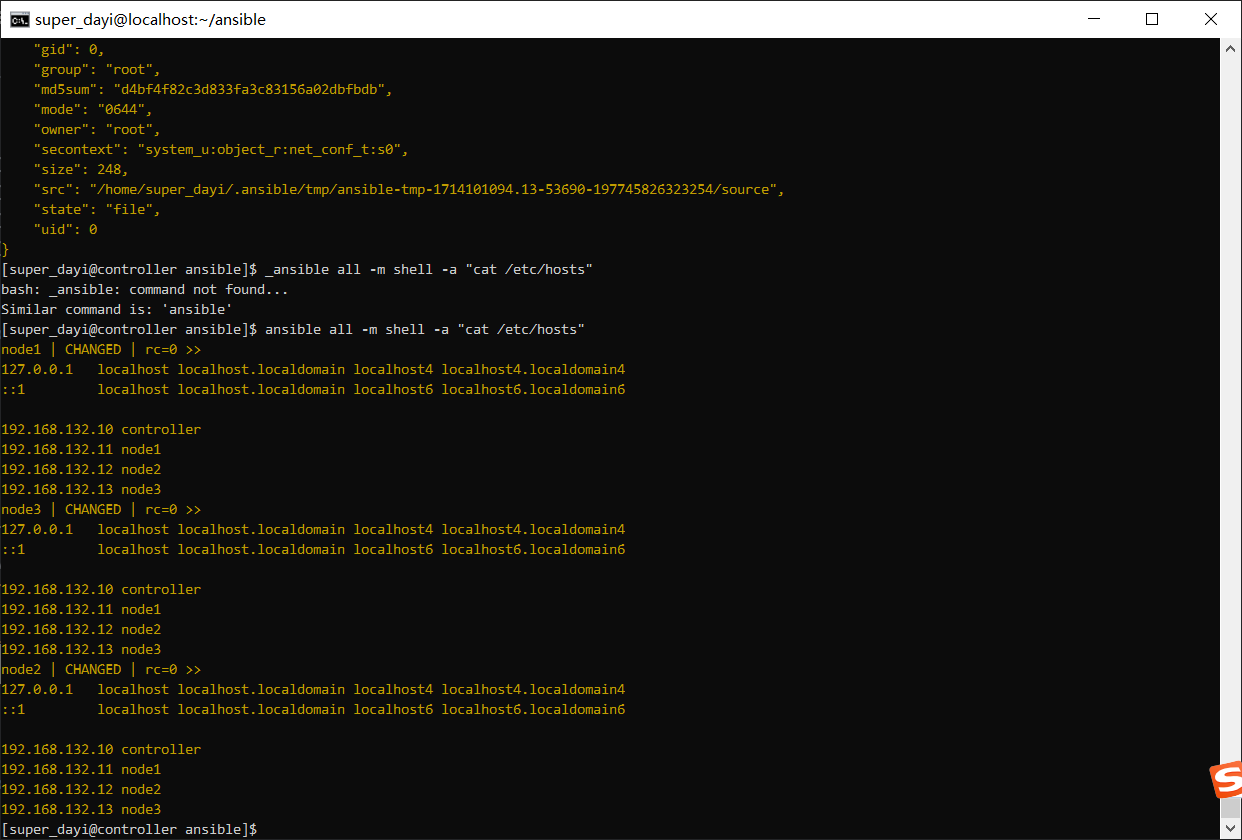
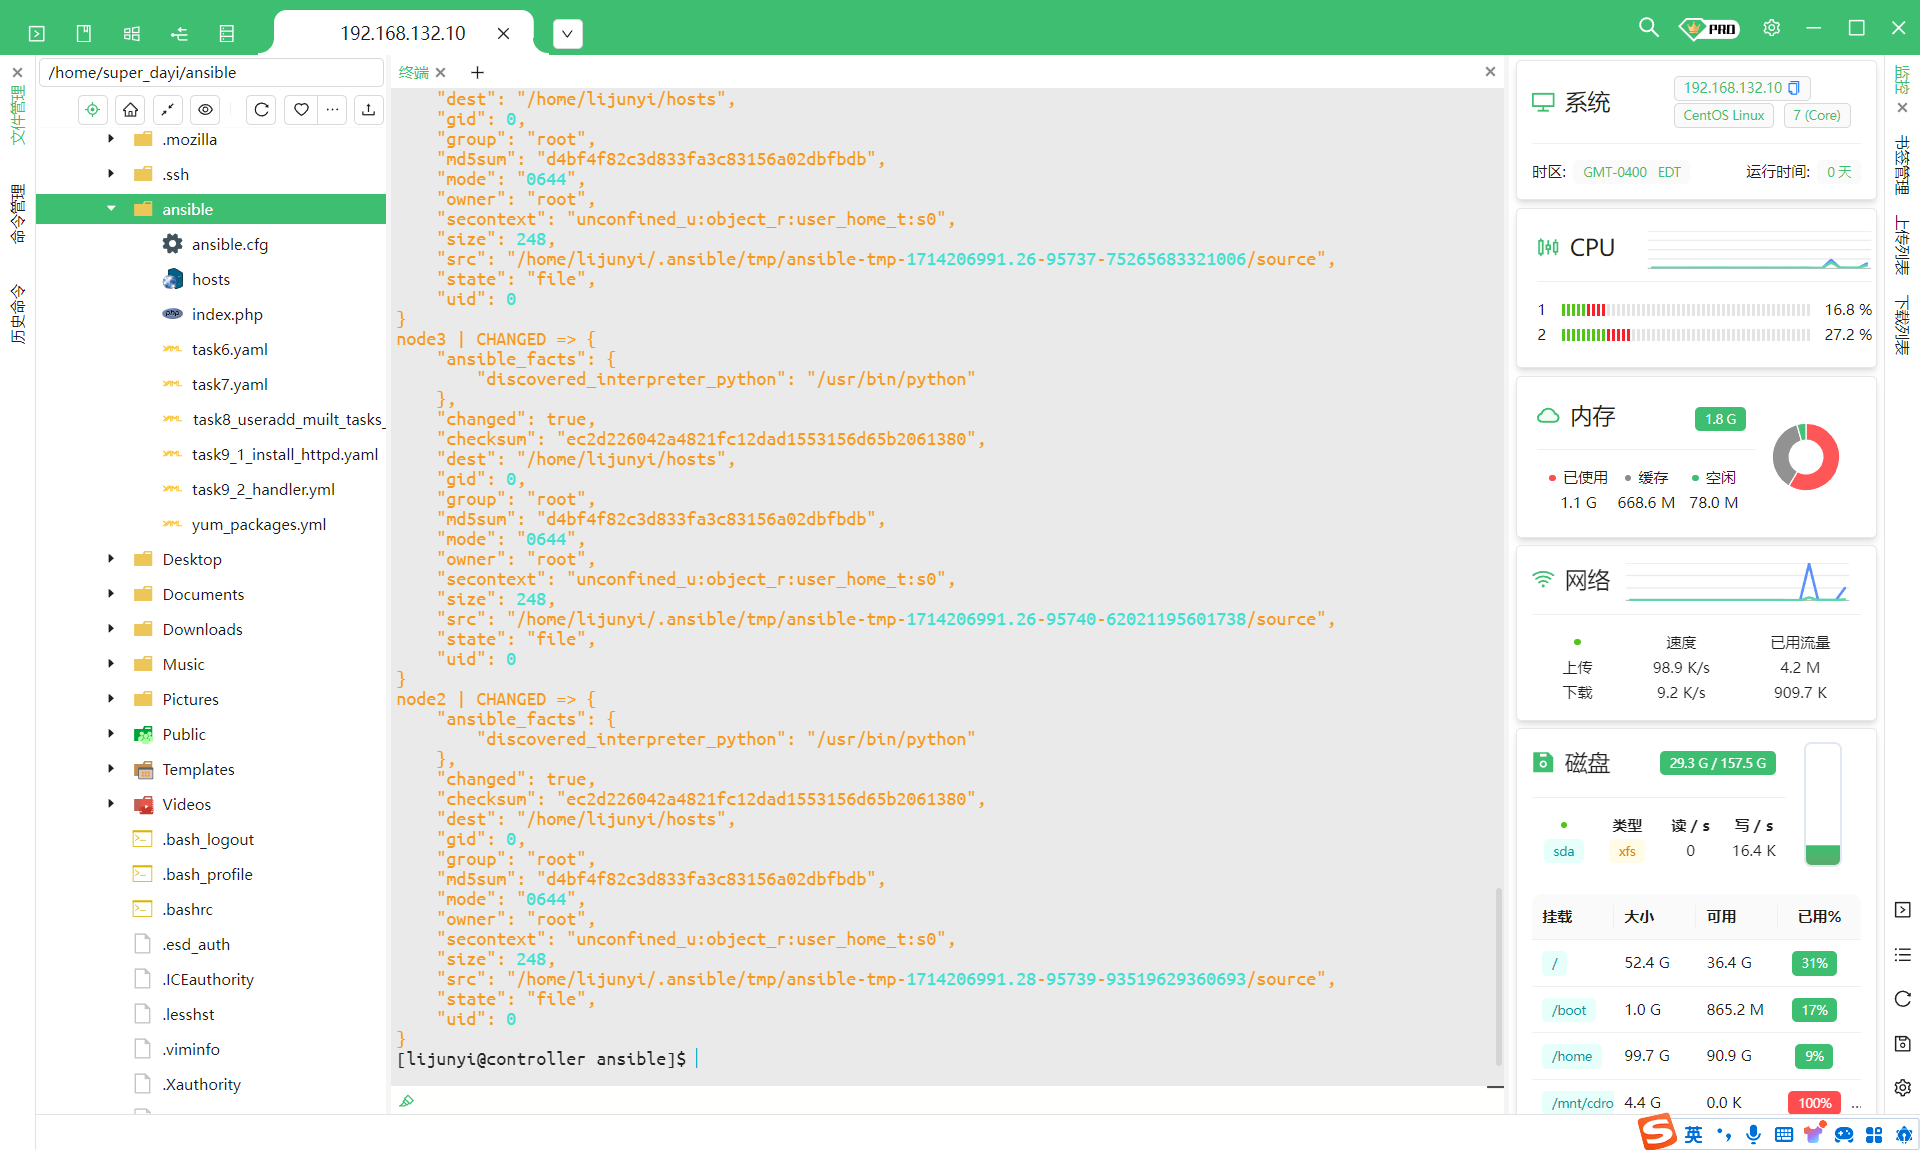
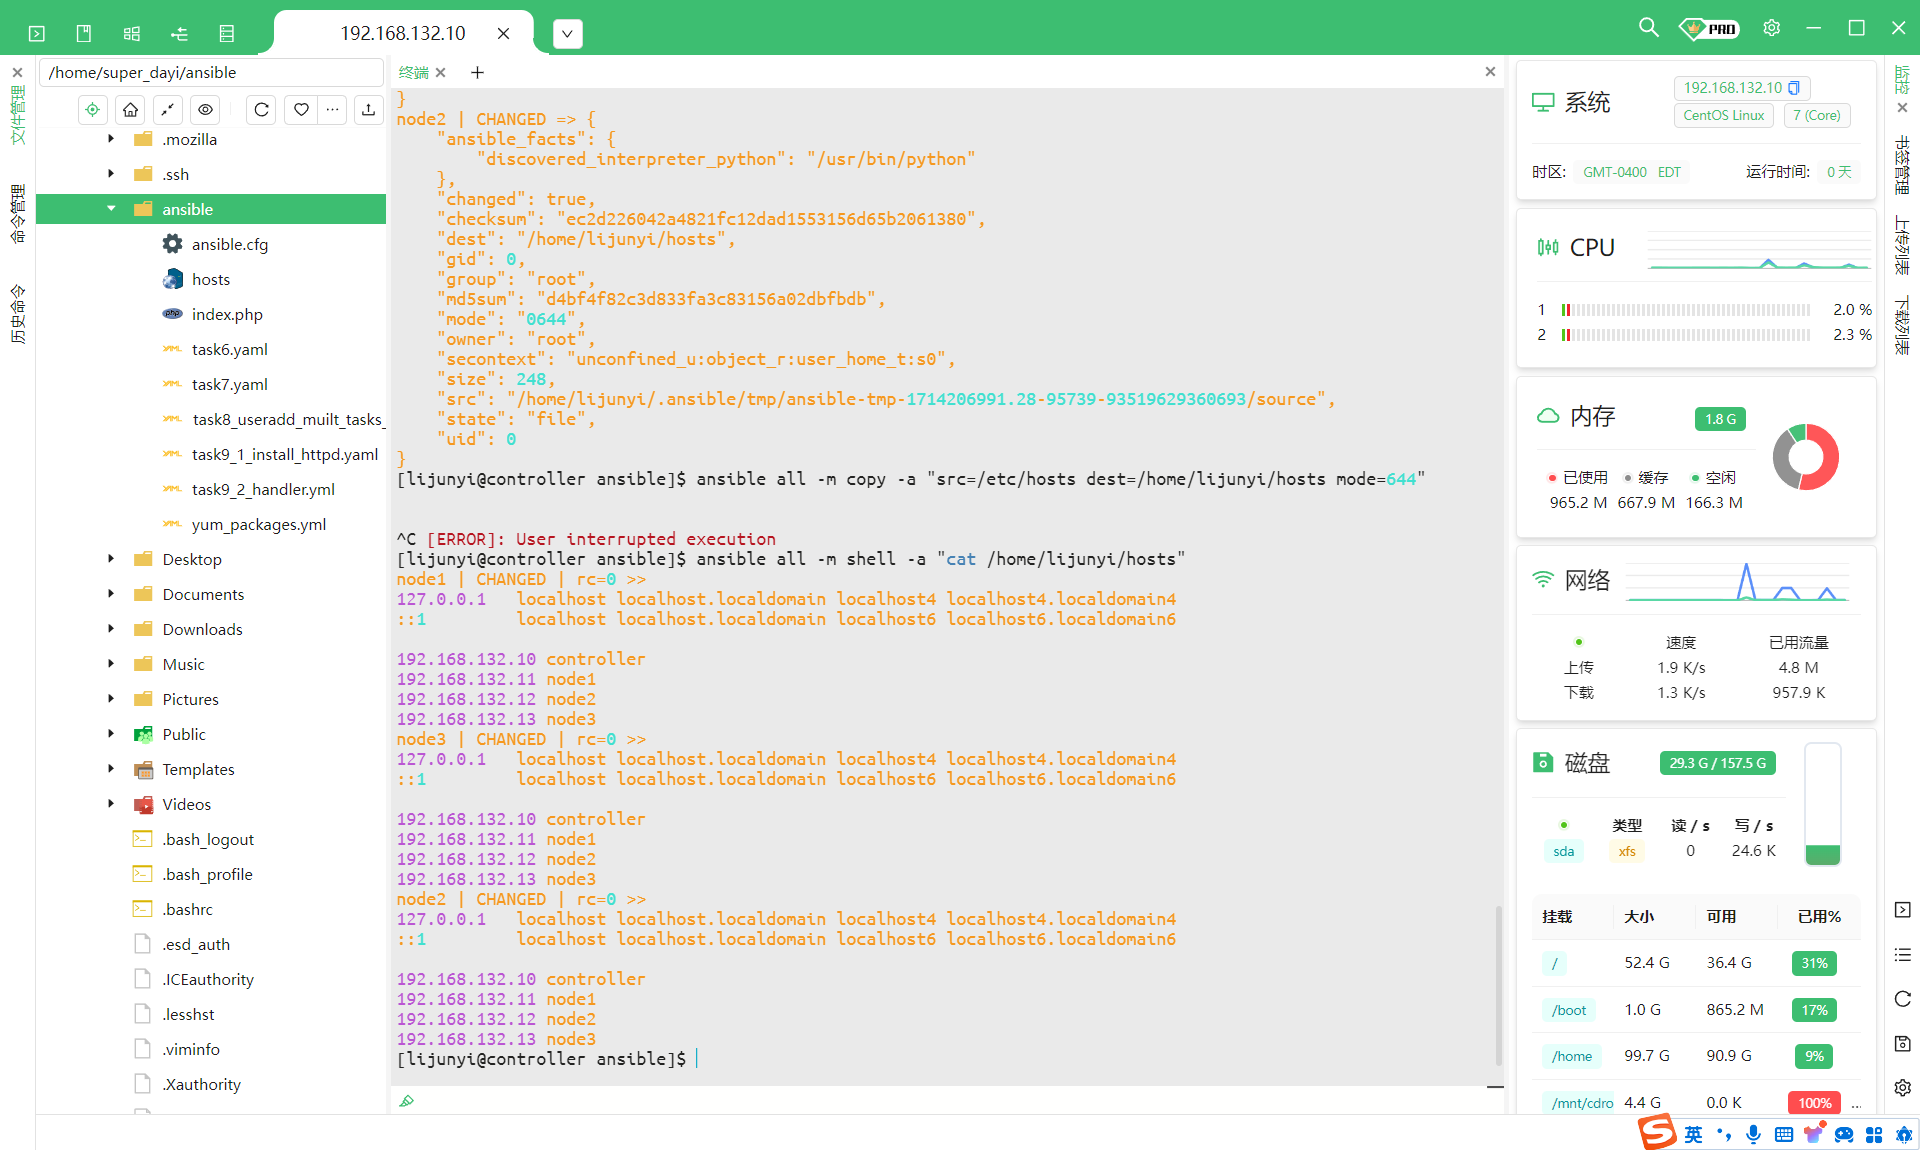
4、使用 ansible 的临时命令命令在 node1-node3 上 复制/etc/hosts 文件到用户家目录下 只做符合题目要求的 1 2 ansible all -m copy -a "src=/etc/hosts dest=/home/super_dayi/hosts mode=644" ansible all -m shell -a "cat /home/super_dayi/hosts"
推荐做一下:同步 hosts
这里推荐一起执行了
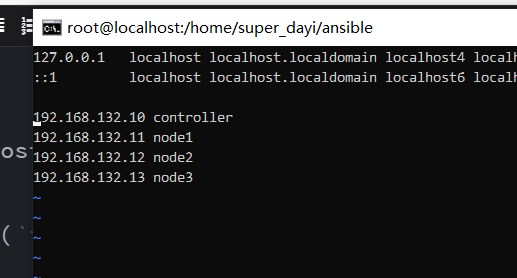
添加输入这个(i输入,:wq!保存)
1 2 3 4 192.168.132.10 controller 192.168.132.11 node1 192.168.132.12 node2 192.168.132.13 node3
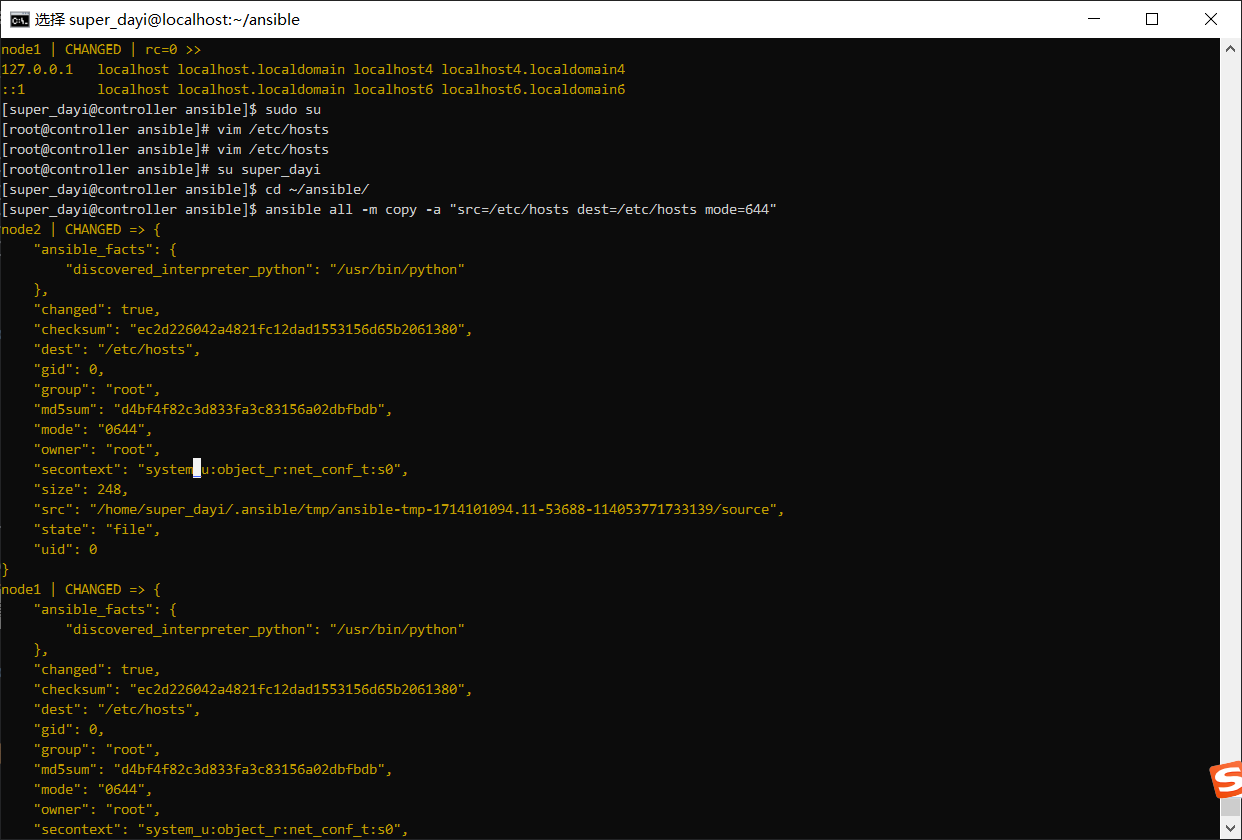
然后复制文件
1 2 3 4 5 su super_dayi cd ~/ansible/ansible all -m copy -a "src=/etc/hosts dest=/etc/hosts mode=644" ansible all -m shell -a "cat /etc/hosts"
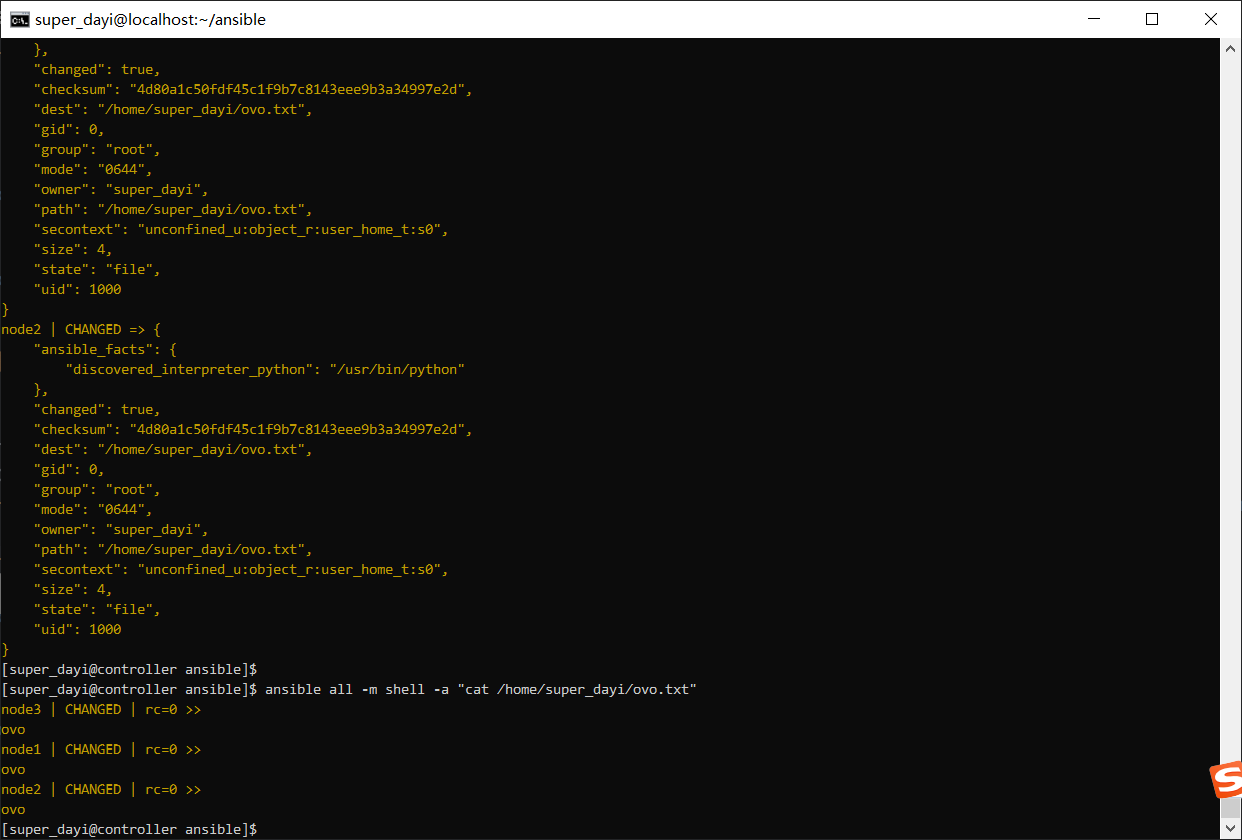
示例:复制一个普通文件 1 2 3 4 5 su super_dayi echo "ovo" >> ~/ovo.txtansible all -m copy -a "src=/home/super_dayi/ovo.txt dest=/home/super_dayi/ovo.txt owner=super_dayi mode=644" ansible all -m shell -a "cat /home/super_dayi/ovo.txt"
从机上有了:
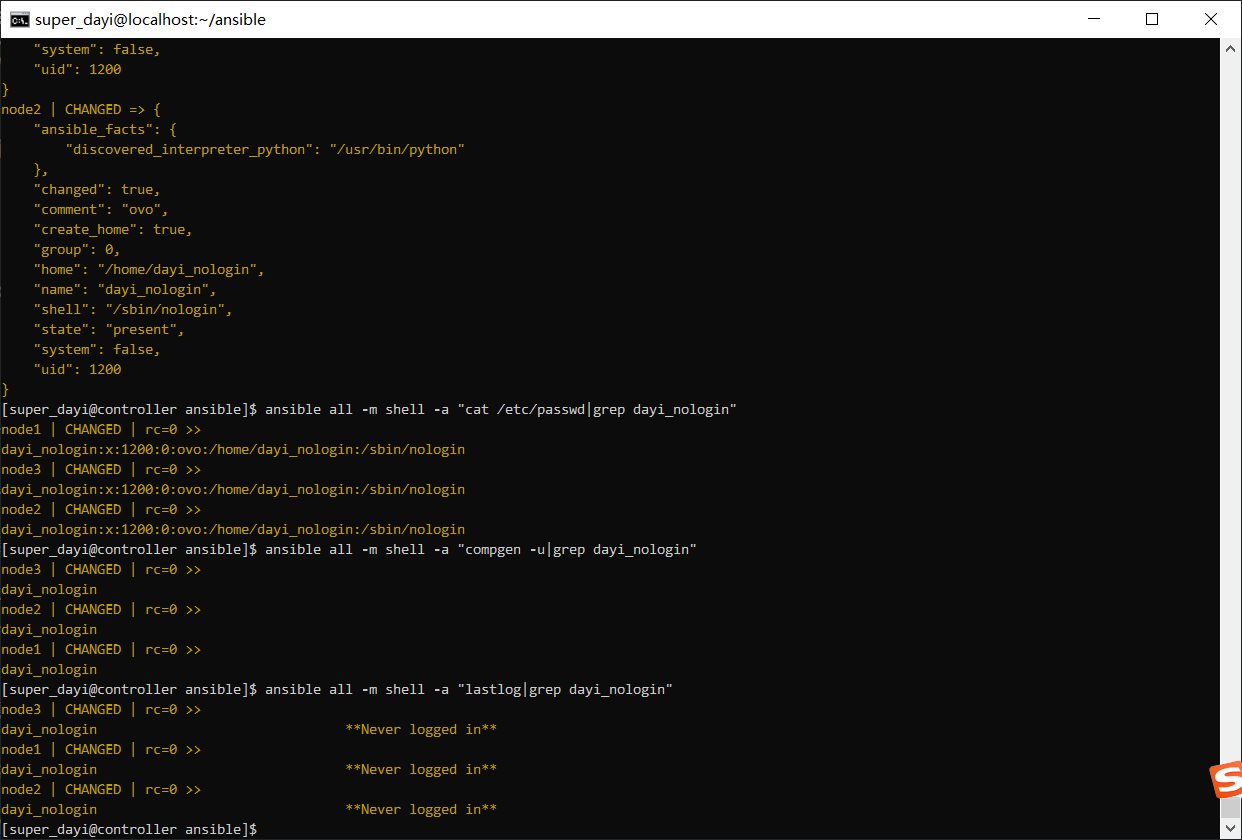
5、使用 ansible 的临时命令命令在 node1-node3 上创建用户 zhangsan 建用户 dayi_nologin 是另外的用户,不要跟现有的重复了
1 ansible all -m user -a "name=dayi_nologin comment=ovo uid=1200 group=root shell=/sbin/nologin"
查看当前用户们
1 2 3 4 5 ansible all -m shell -a "cat /etc/passwd|grep dayi_nologin" ansible all -m shell -a "compgen -u|grep dayi_nologin" ansible all -m shell -a "lastlog|grep dayi_nologin"
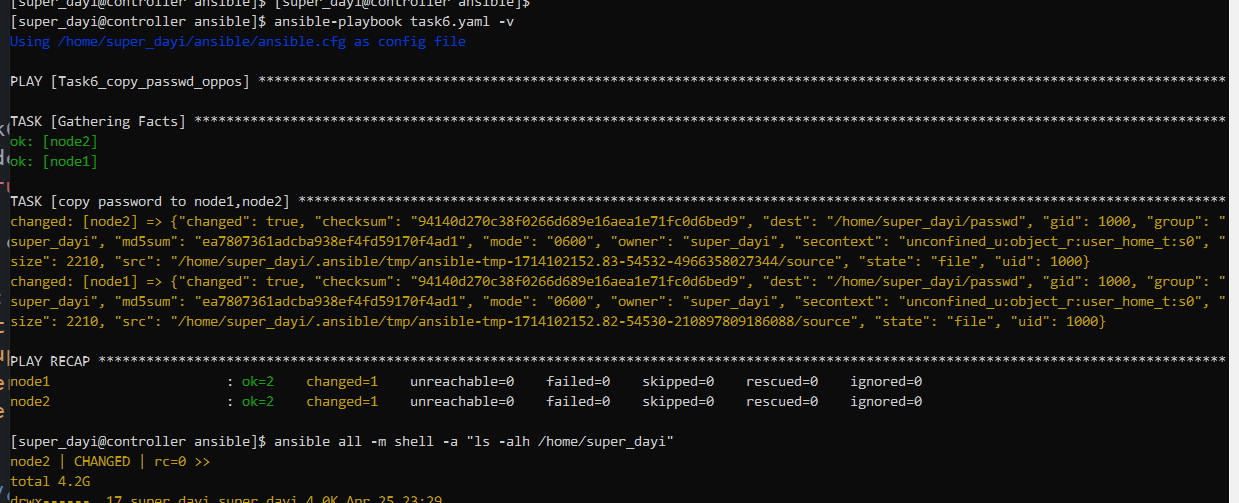
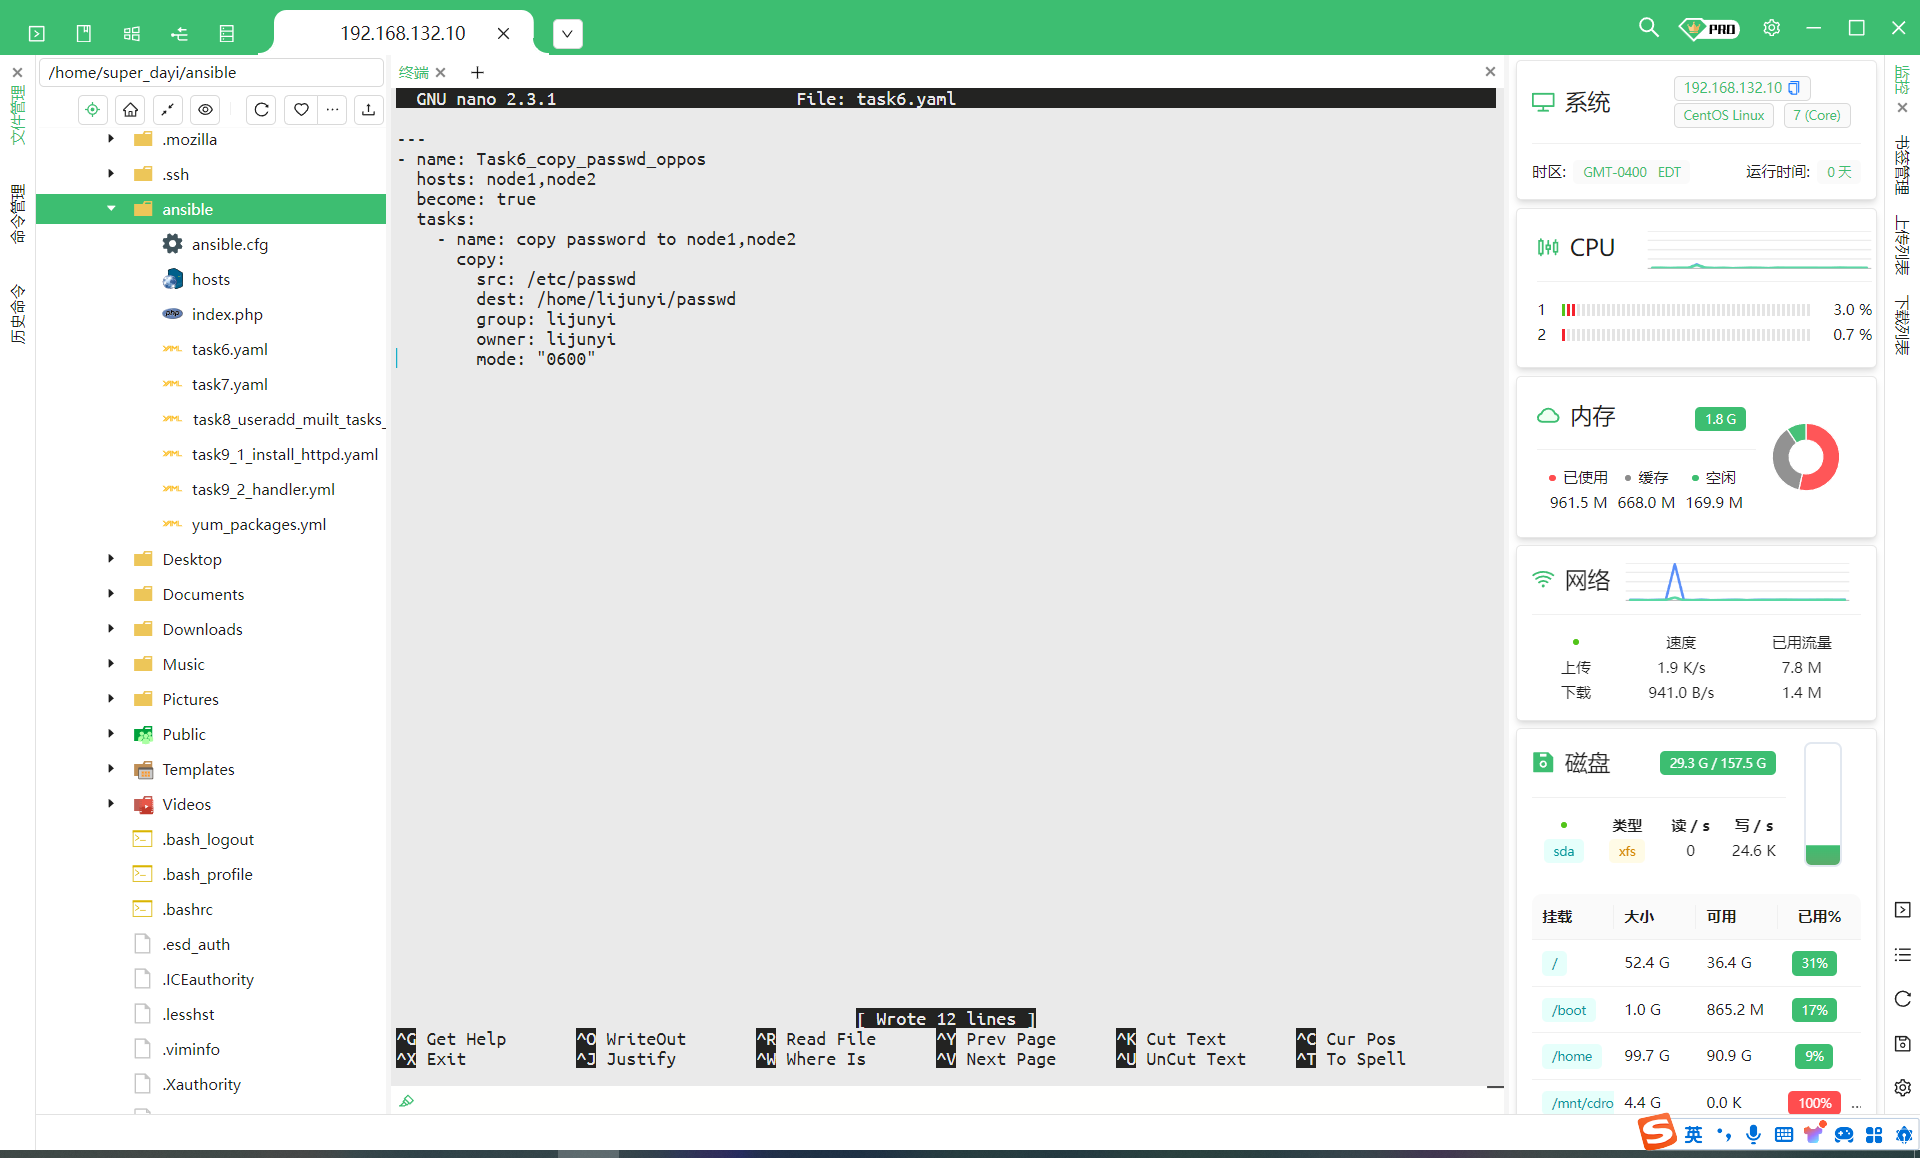
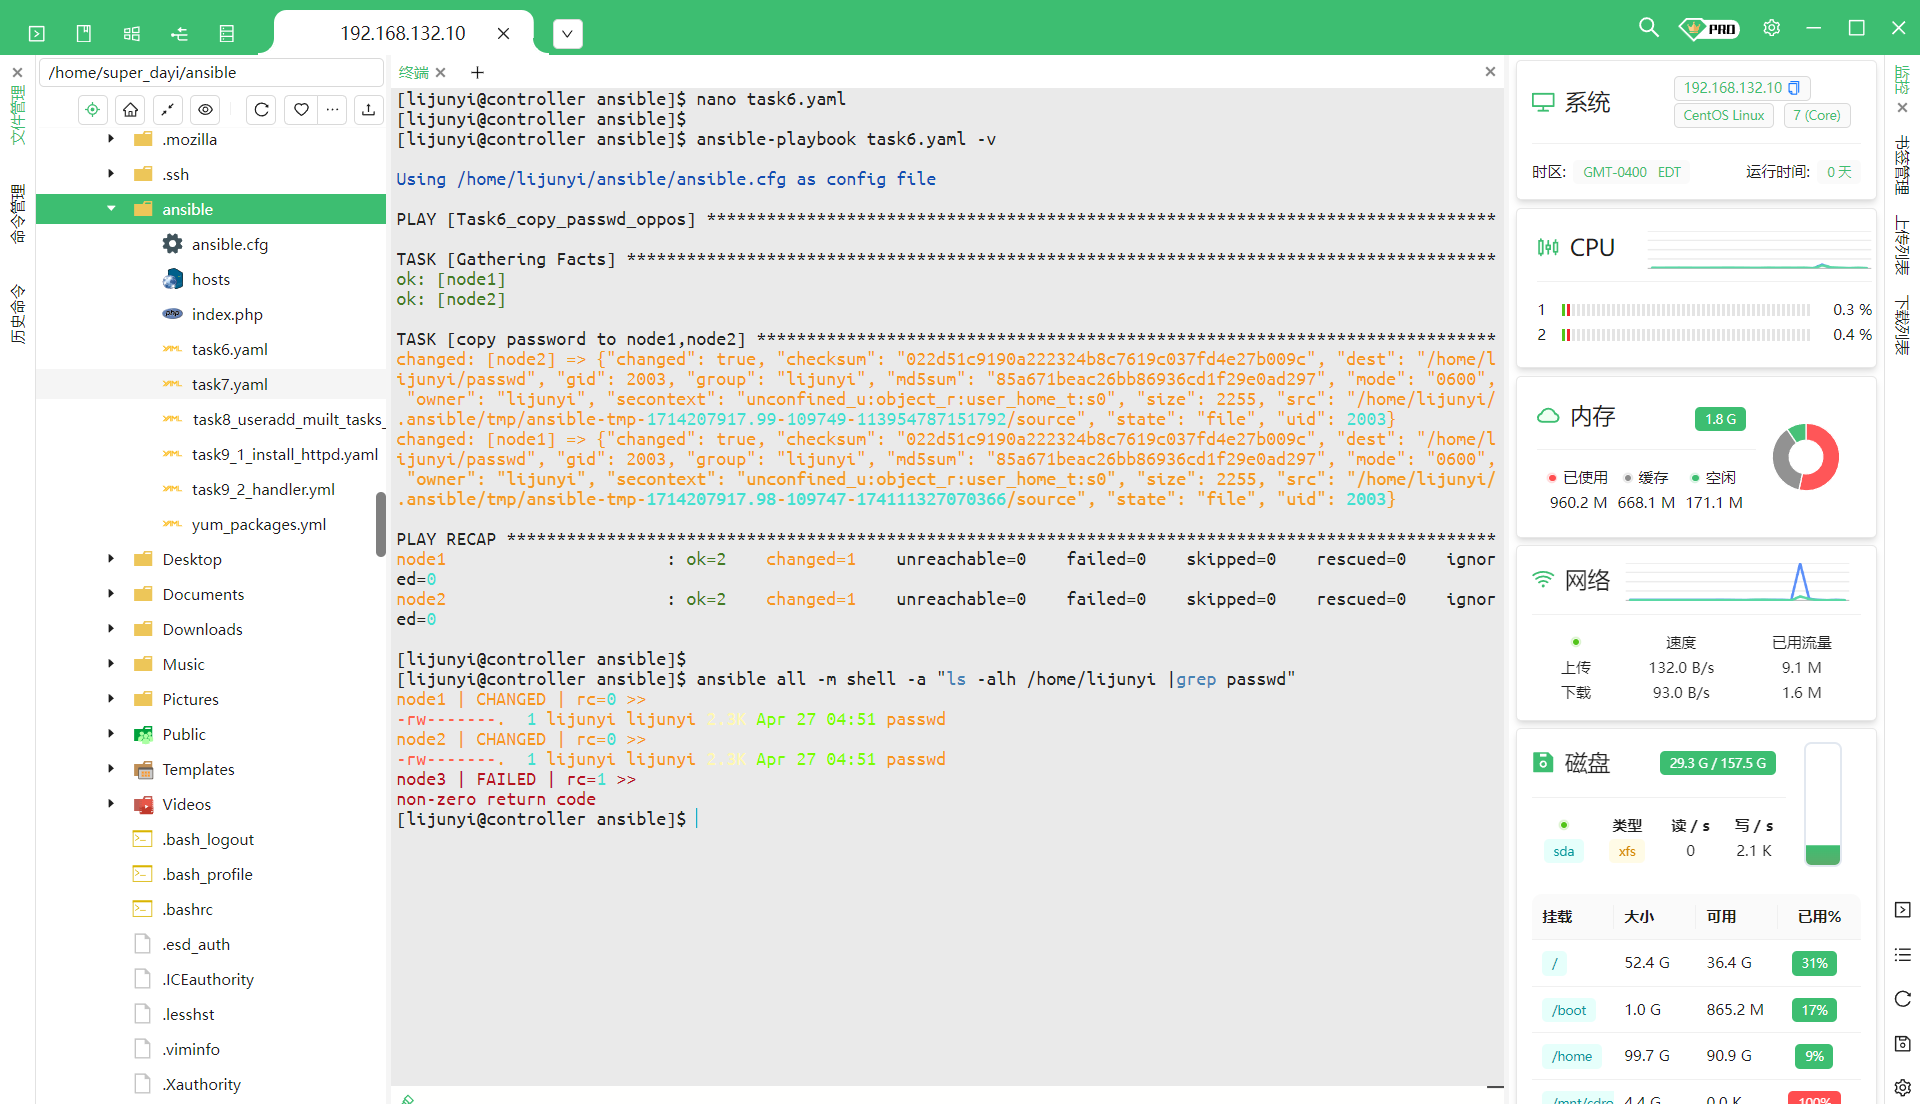
6、编写一个 playbook,hosts 为 node1 和 node2,复制/etc/passwd 文件,属主为 upwen,属组为 upwen,权限为 0600;并验证结果(ansible-playbook all -a ‘ ls -l /home/upwen/passwd ) 1 2 3 4 5 6 7 su super_dayi cd ~/ansiblenano task6.yaml ansible-playbook task6.yaml -v ansible all -m shell -a "ls -alh /home/super_dayi |grep passwd"
task6.yaml
1 2 3 4 5 6 7 8 9 10 11 12 --- - name: Task6_copy_passwd_oppos hosts: node1,node2 become: true tasks: - name: copy password to node1,node2 copy: src: /etc/passwd dest: /home/super_dayi/passwd group: super_dayi owner: super_dayi mode: "0600"
这样就可以啦
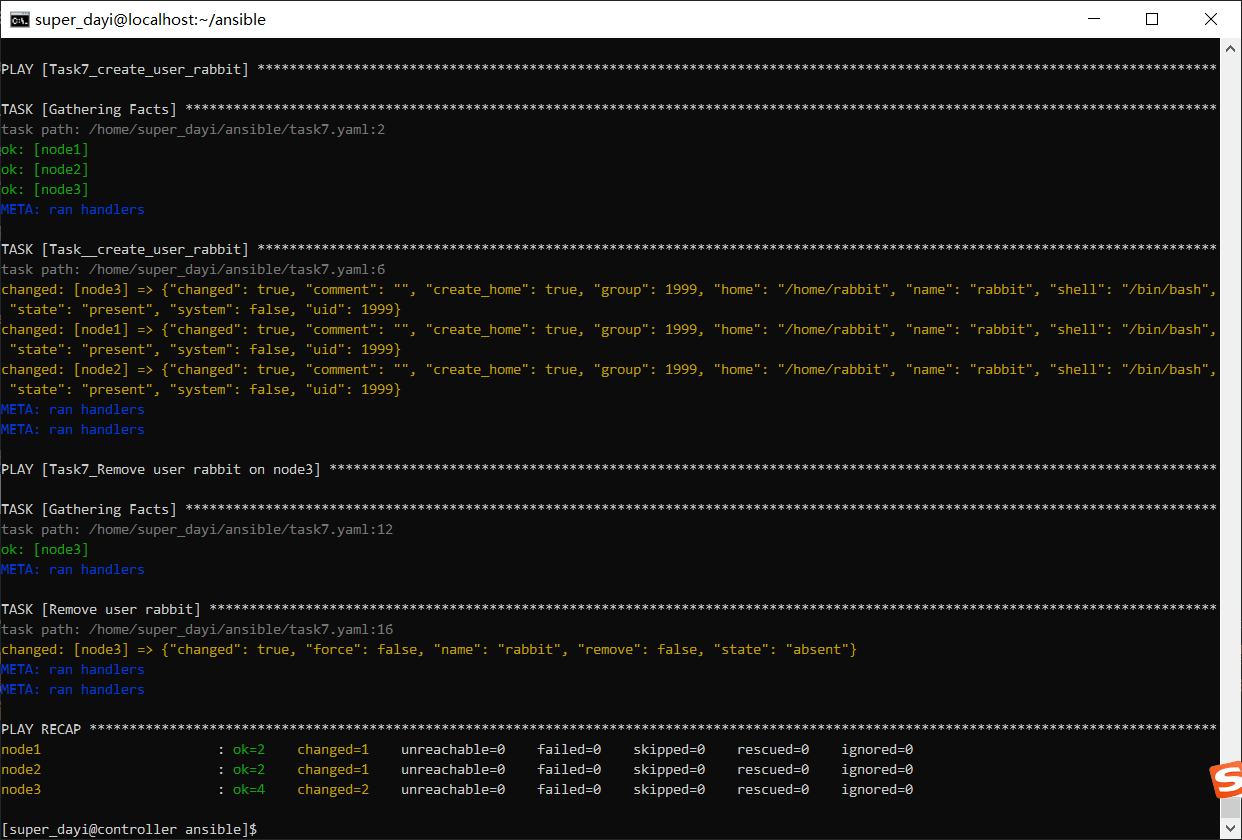
7、编写一个 playbook,在 node1-node3 上执行 play1,创建用户 lisi,并指定其 uid 为 1999;在 node3 上执行 play2,删除用户 lisi;(playbook 执行后的结果输出,以及通过临时命令查看/etc/passwd 文件当中的用户信息) 我这里用的 rabbit 用户
1 2 3 su super_dayi cd ~/ansiblenano task7.yaml
task7.yaml
1 2 3 4 5 6 7 8 9 10 11 12 13 14 15 16 17 18 19 --- - name: Task7_create_user_rabbit hosts: node1,node2,node3 become: true tasks: - name: Task__create_user_rabbit user: name: rabbit uid: 1999 state: present - name: Task7_Remove user rabbit on node3 hosts: node3 become: true tasks: - name: Remove user rabbit user: name: rabbit state: absent
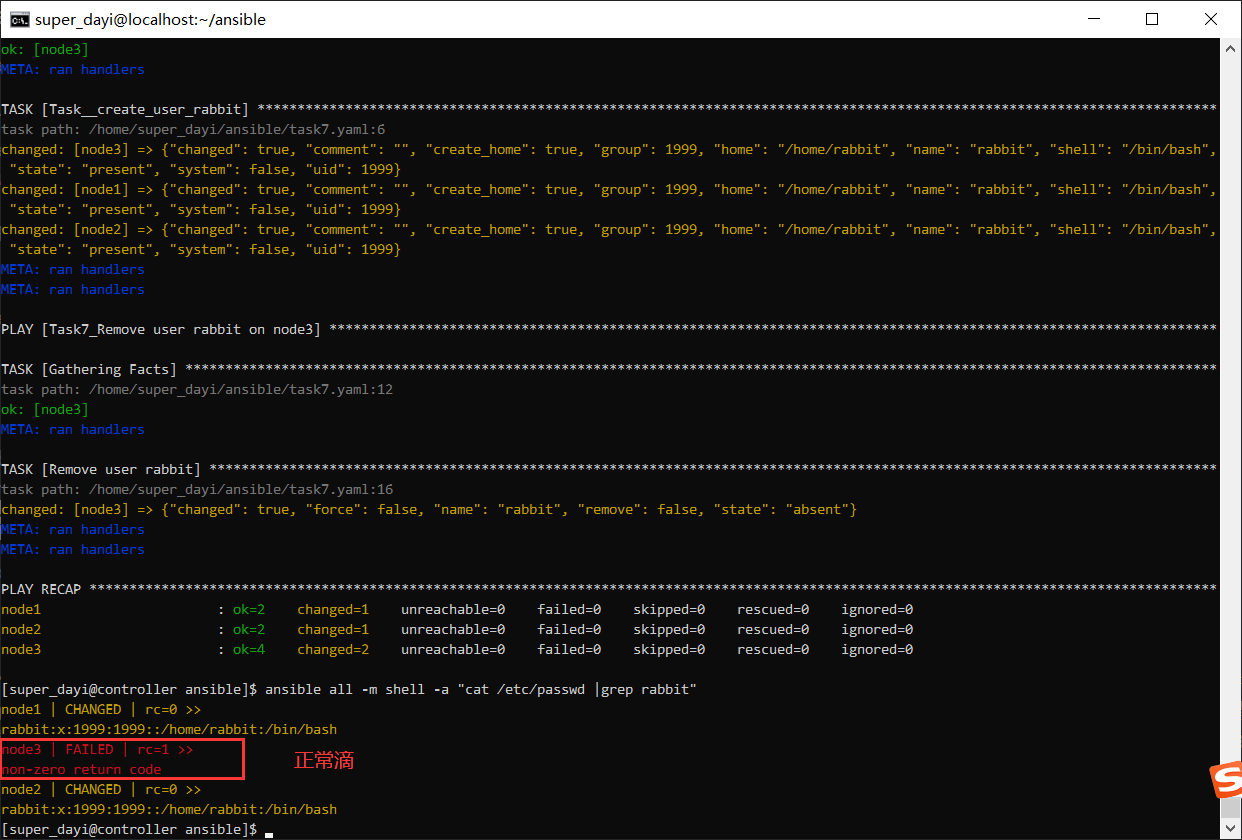
执行:
1 2 3 ansible-playbook task7.yaml -vv ansible all -m shell -a "cat /etc/passwd |grep rabbit"
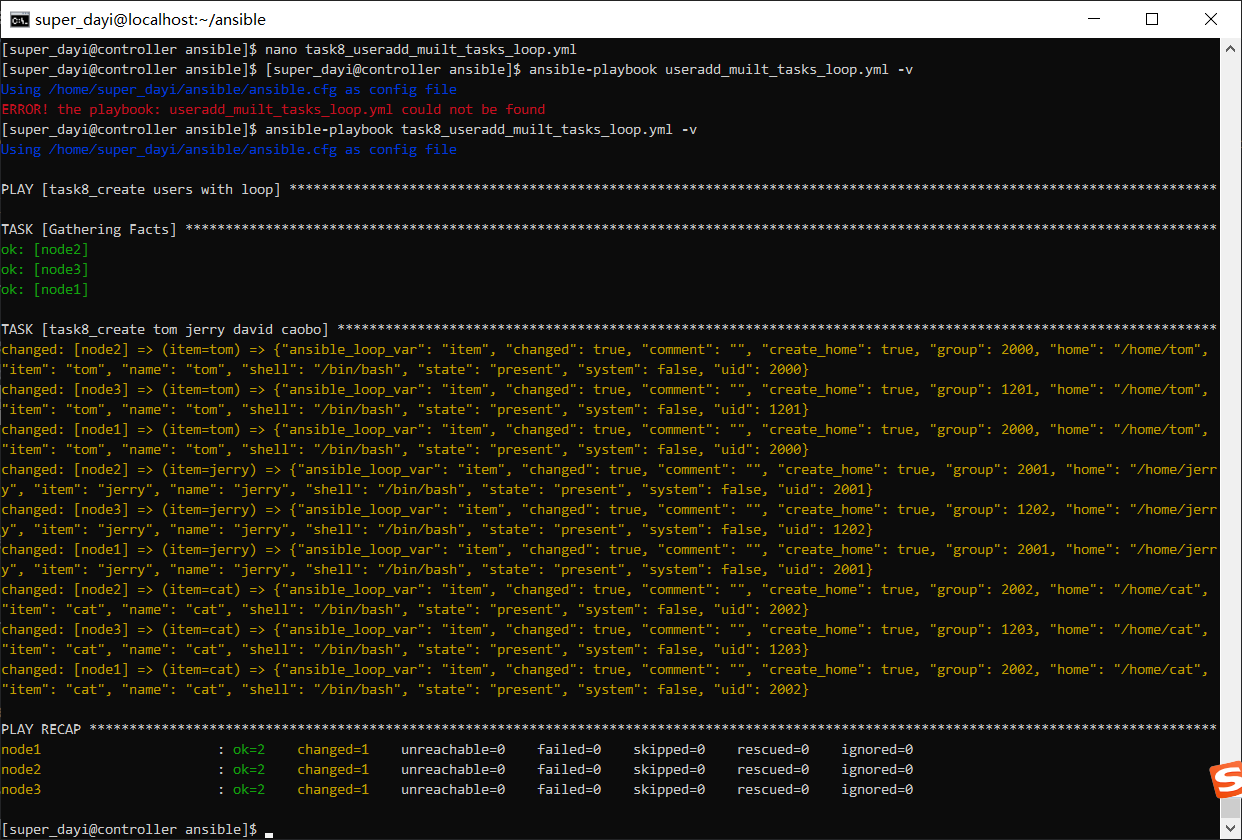
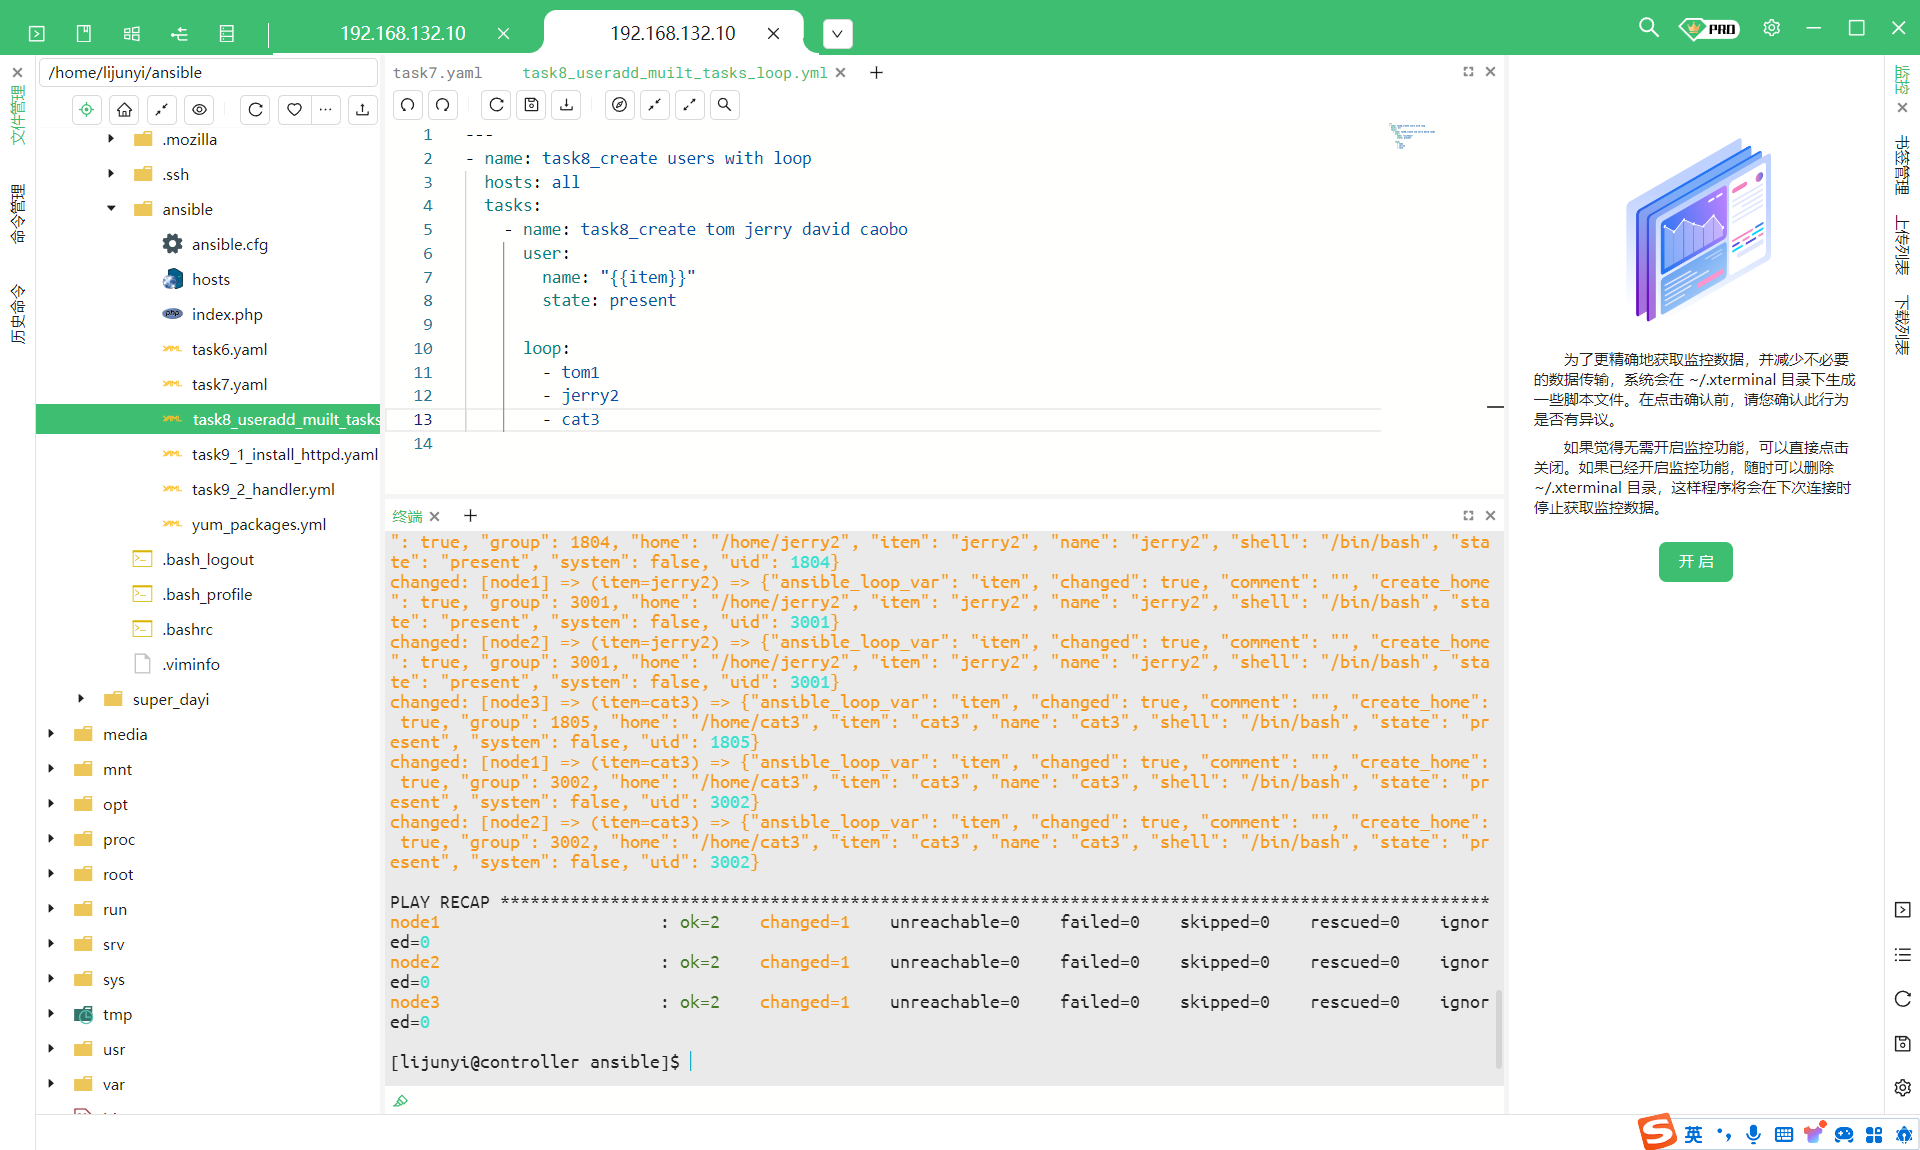
8、编写一个 playbook,利用 loop 循环结构,在 node1-node3 上分别创建三个用户,tom,jerry,cat;(执行完成之后查看并验证结果) loop 创建 1 2 3 4 su super_dayi cd ~/ansiblenano task8_useradd_muilt_tasks_loop.yml ansible-playbook task8_useradd_muilt_tasks_loop.yml -v
yaml:
1 2 3 4 5 6 7 8 9 10 11 12 13 --- - name: task8_create users with loop hosts: all tasks: - name: task8_create tom jerry david caobo user: name: "{{item}} " state: present loop: - tom - jerry - cat
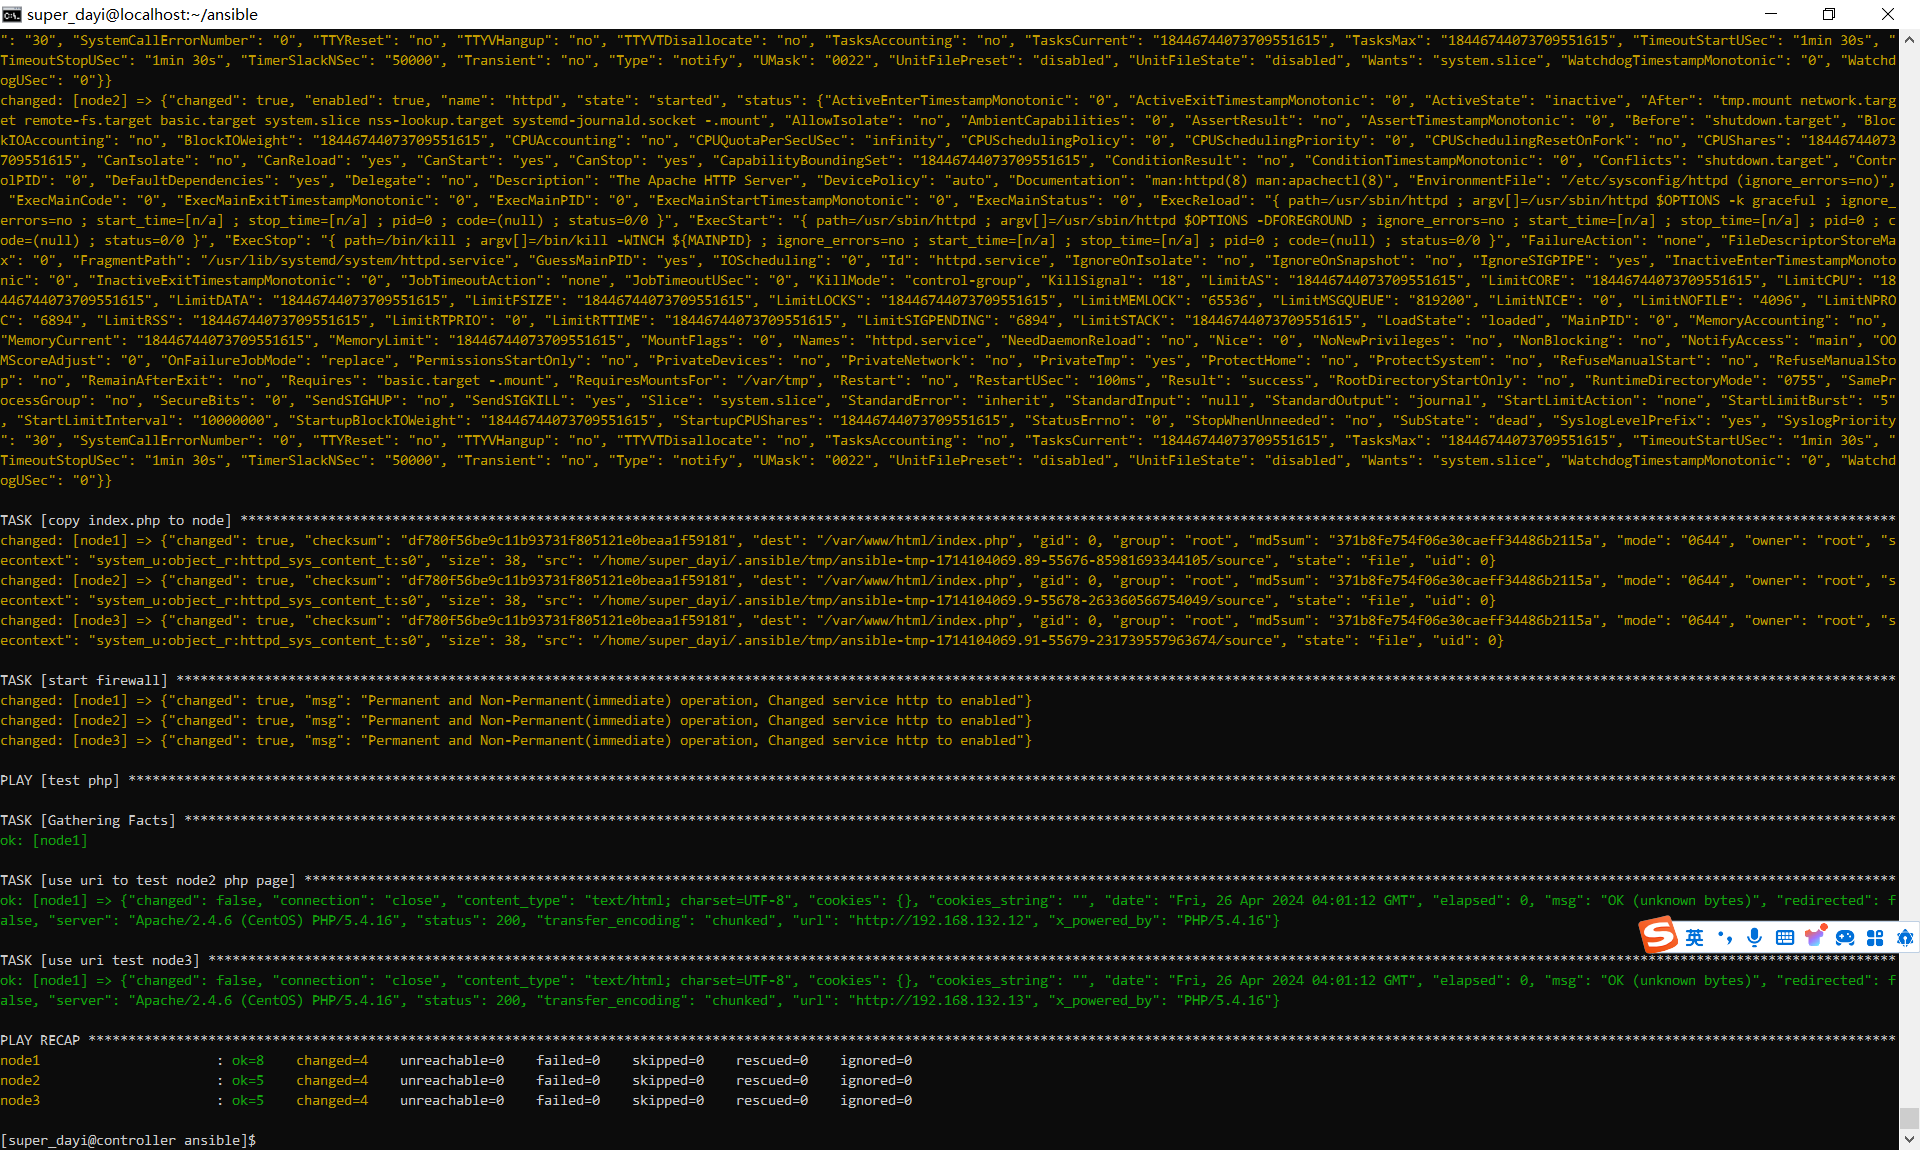
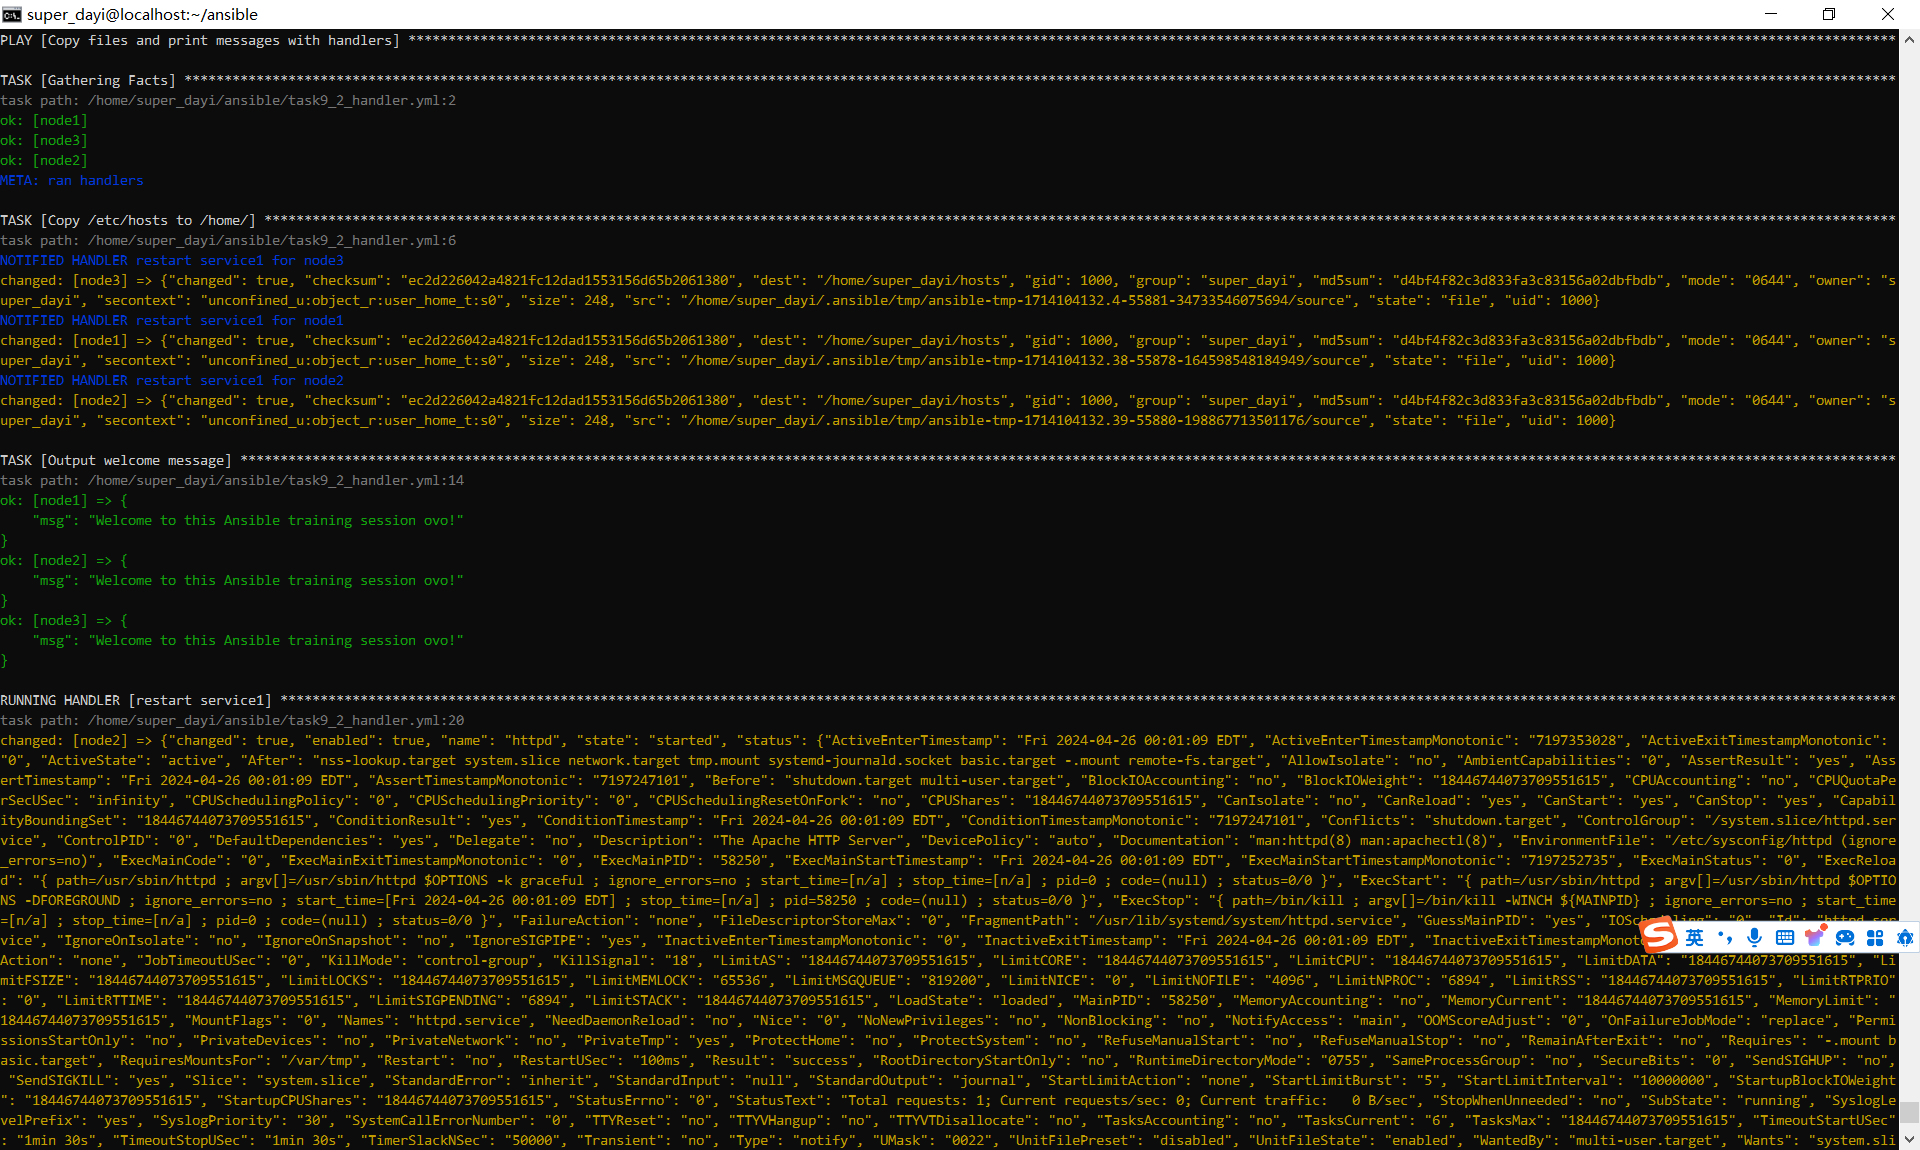
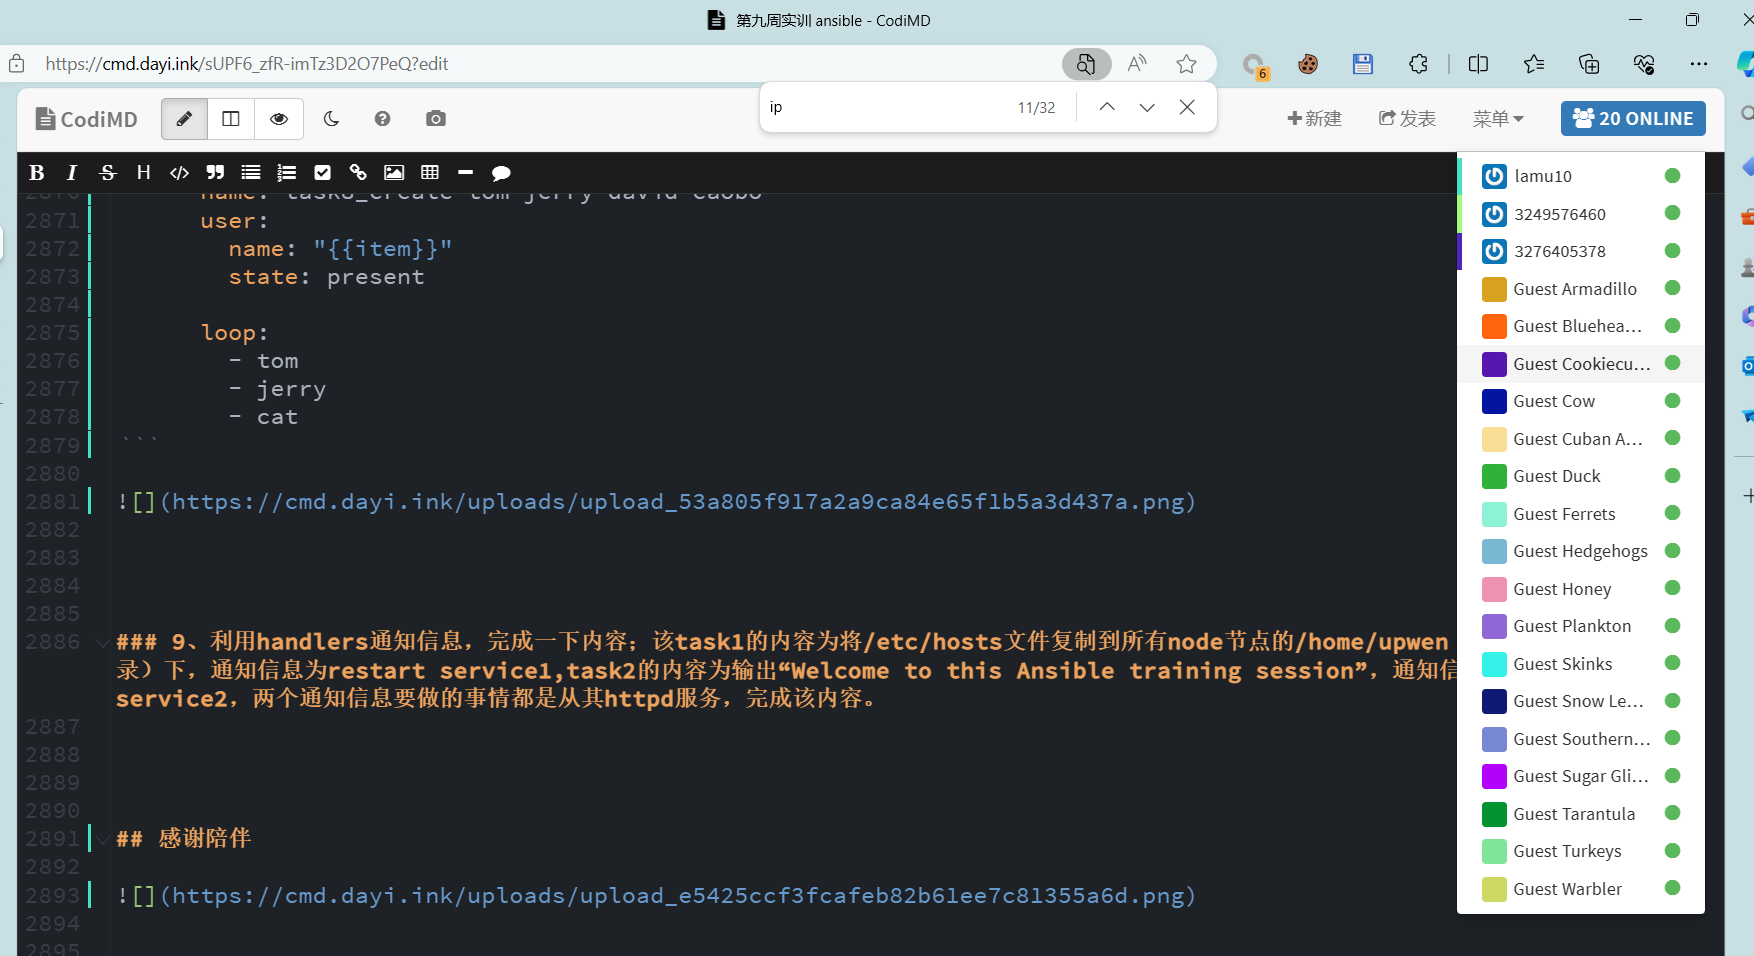
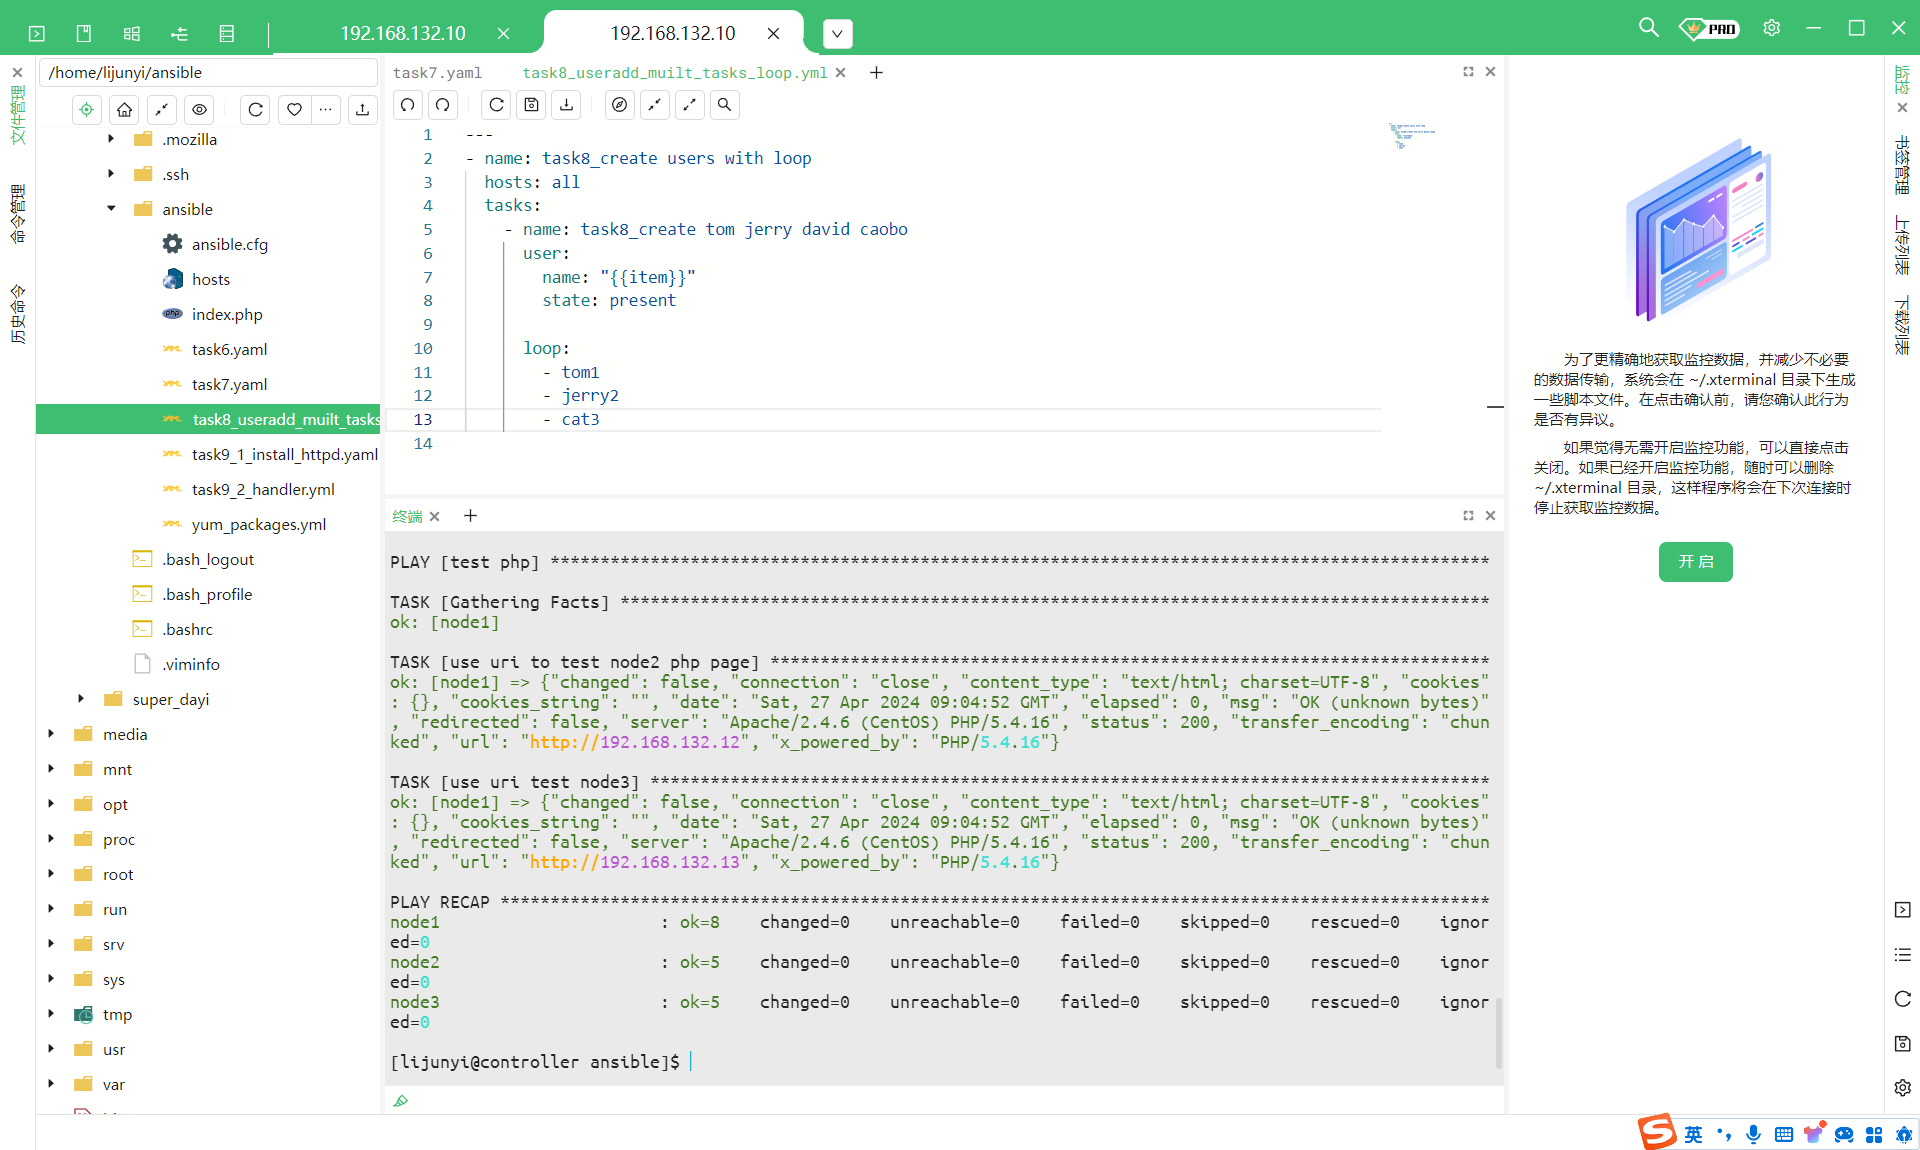
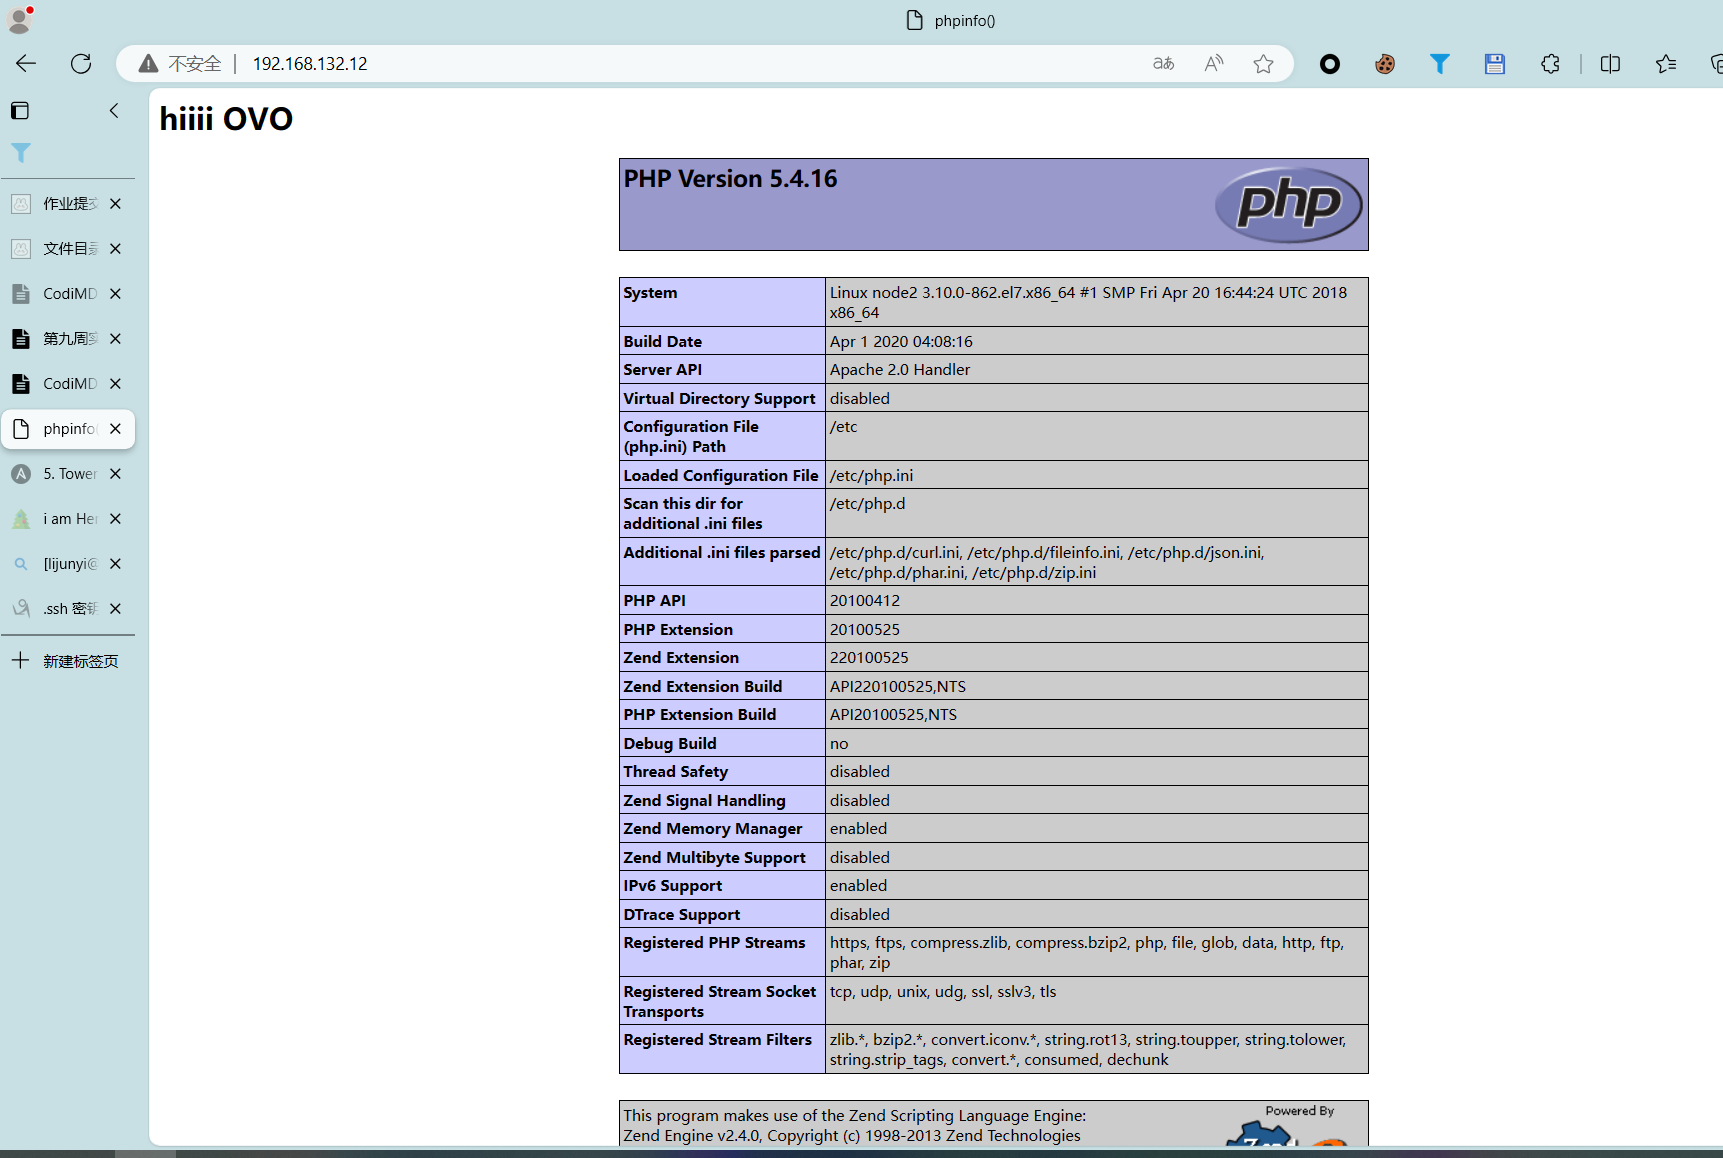
9、利用 handlers 通知信息,完成一下内容;该 task1 的内容为将/etc/hosts 文件复制到所有 node 节点的/home/upwen(你的普通用户的家目录)下,通知信息为 restart service1,task2 的内容为输出“Welcome to this Ansible training session”,通知信息为 restart service2,两个通知信息要做的事情都是从其 httpd 服务,完成该内容 安装 lamp 一起装了 1 2 3 4 5 su super_dayi cd ~/ansibleecho "<h1>hiiii OVO</h1><?php phpinfo(); ?>" >> index.phpnano task9_1_install_httpd.yaml ansible-playbook task9_1_install_httpd.yaml -v
task9_1_install_httpd.yaml
1 2 3 4 5 6 7 8 9 10 11 12 13 14 15 16 17 18 19 20 21 22 23 24 25 26 27 28 29 30 31 32 33 34 35 36 37 38 39 40 41 42 43 44 45 --- - name: install lamp hosts: node1,node2,node3 tasks: - name: install packages yum: name: "{{ packages}}" vars: packages: - httpd - php - mariadb - mariadb-server state: latest - name: start services service: name: httpd enabled: yes state: started - name: copy index.php to node copy: src: ~/ansible/index.php dest: /var/www/html/index.php mode: '0644' - name: start firewall firewalld: service: http permanent: yes state: enabled immediate: yes - name: test php hosts: node1 tasks: - name: use uri to test node2 php page uri: url: http://192.168.132.12 - name: use uri test node3 uri: url: http://192.168.132.13
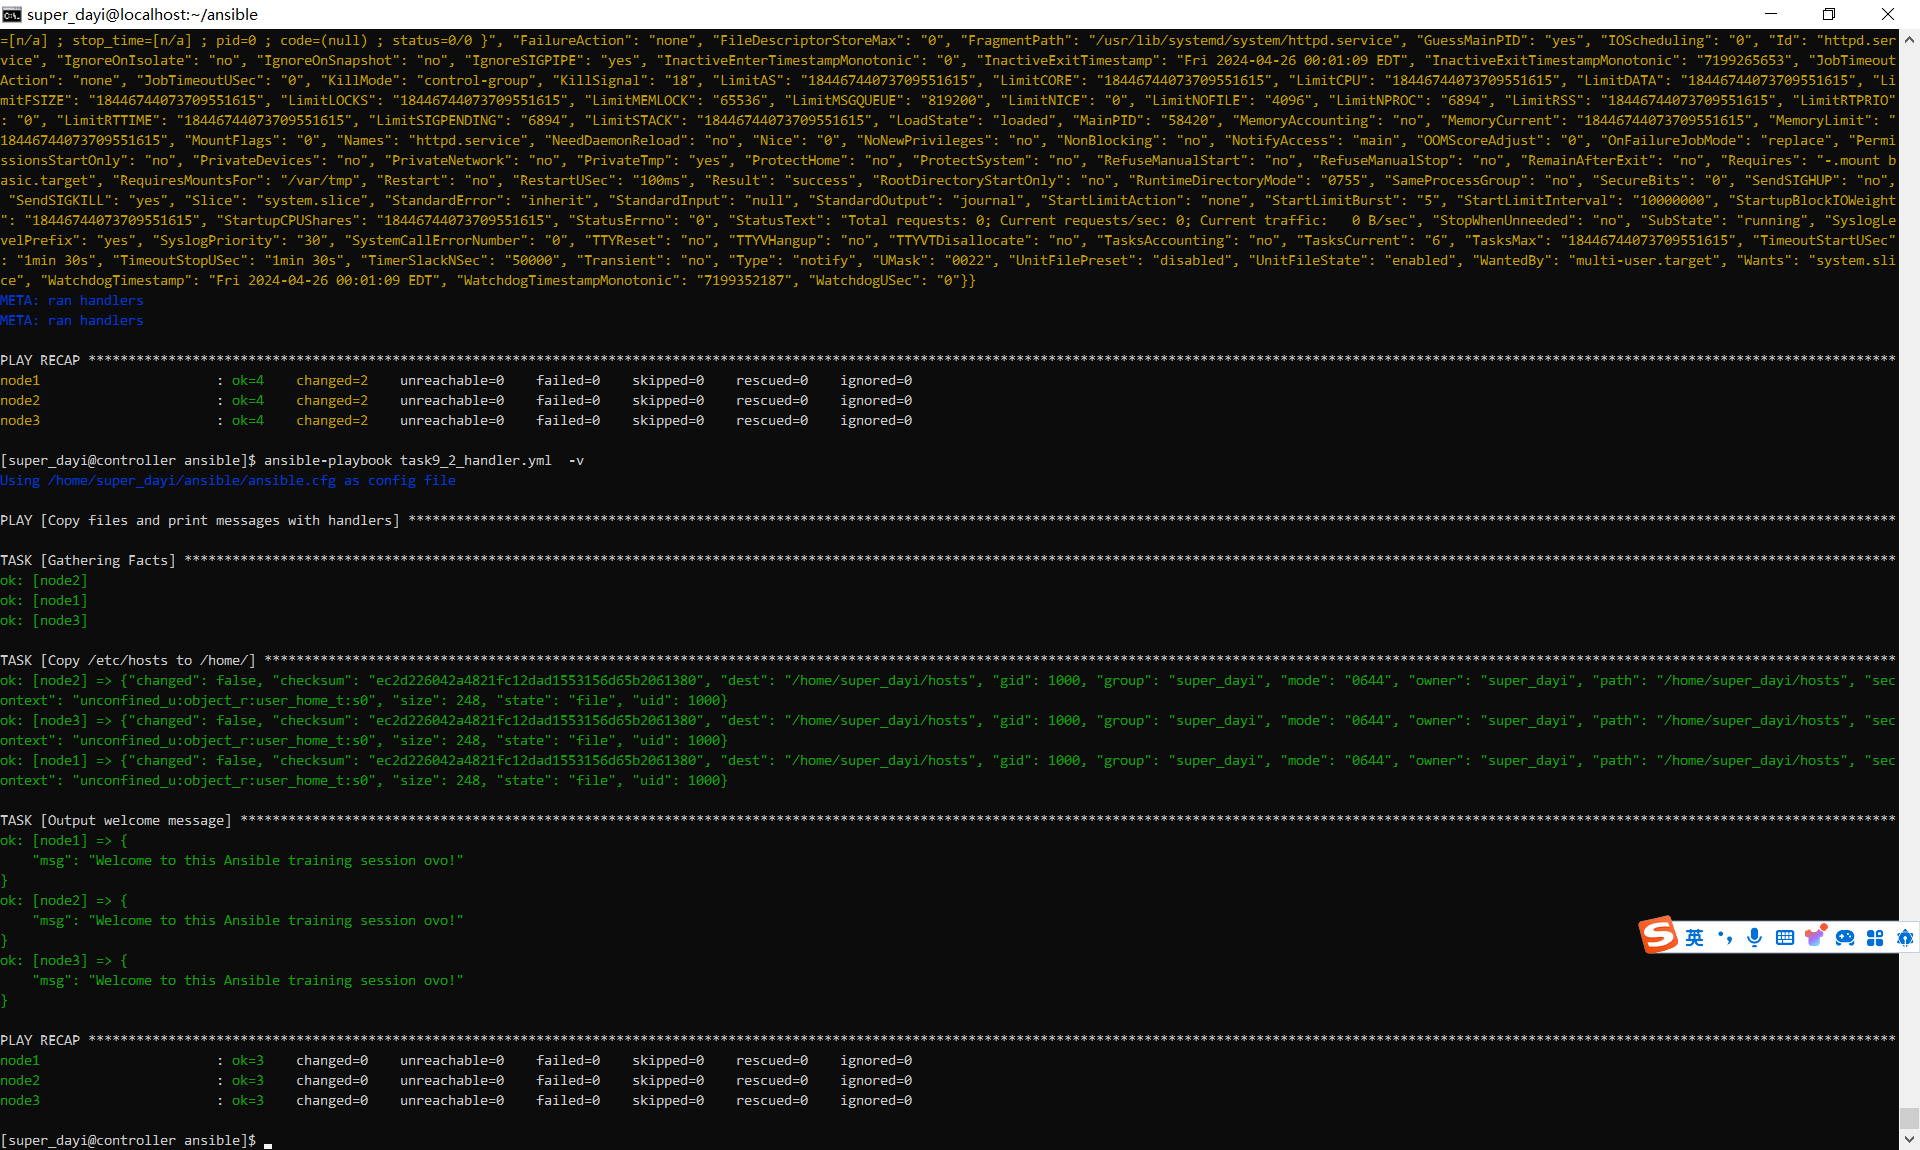
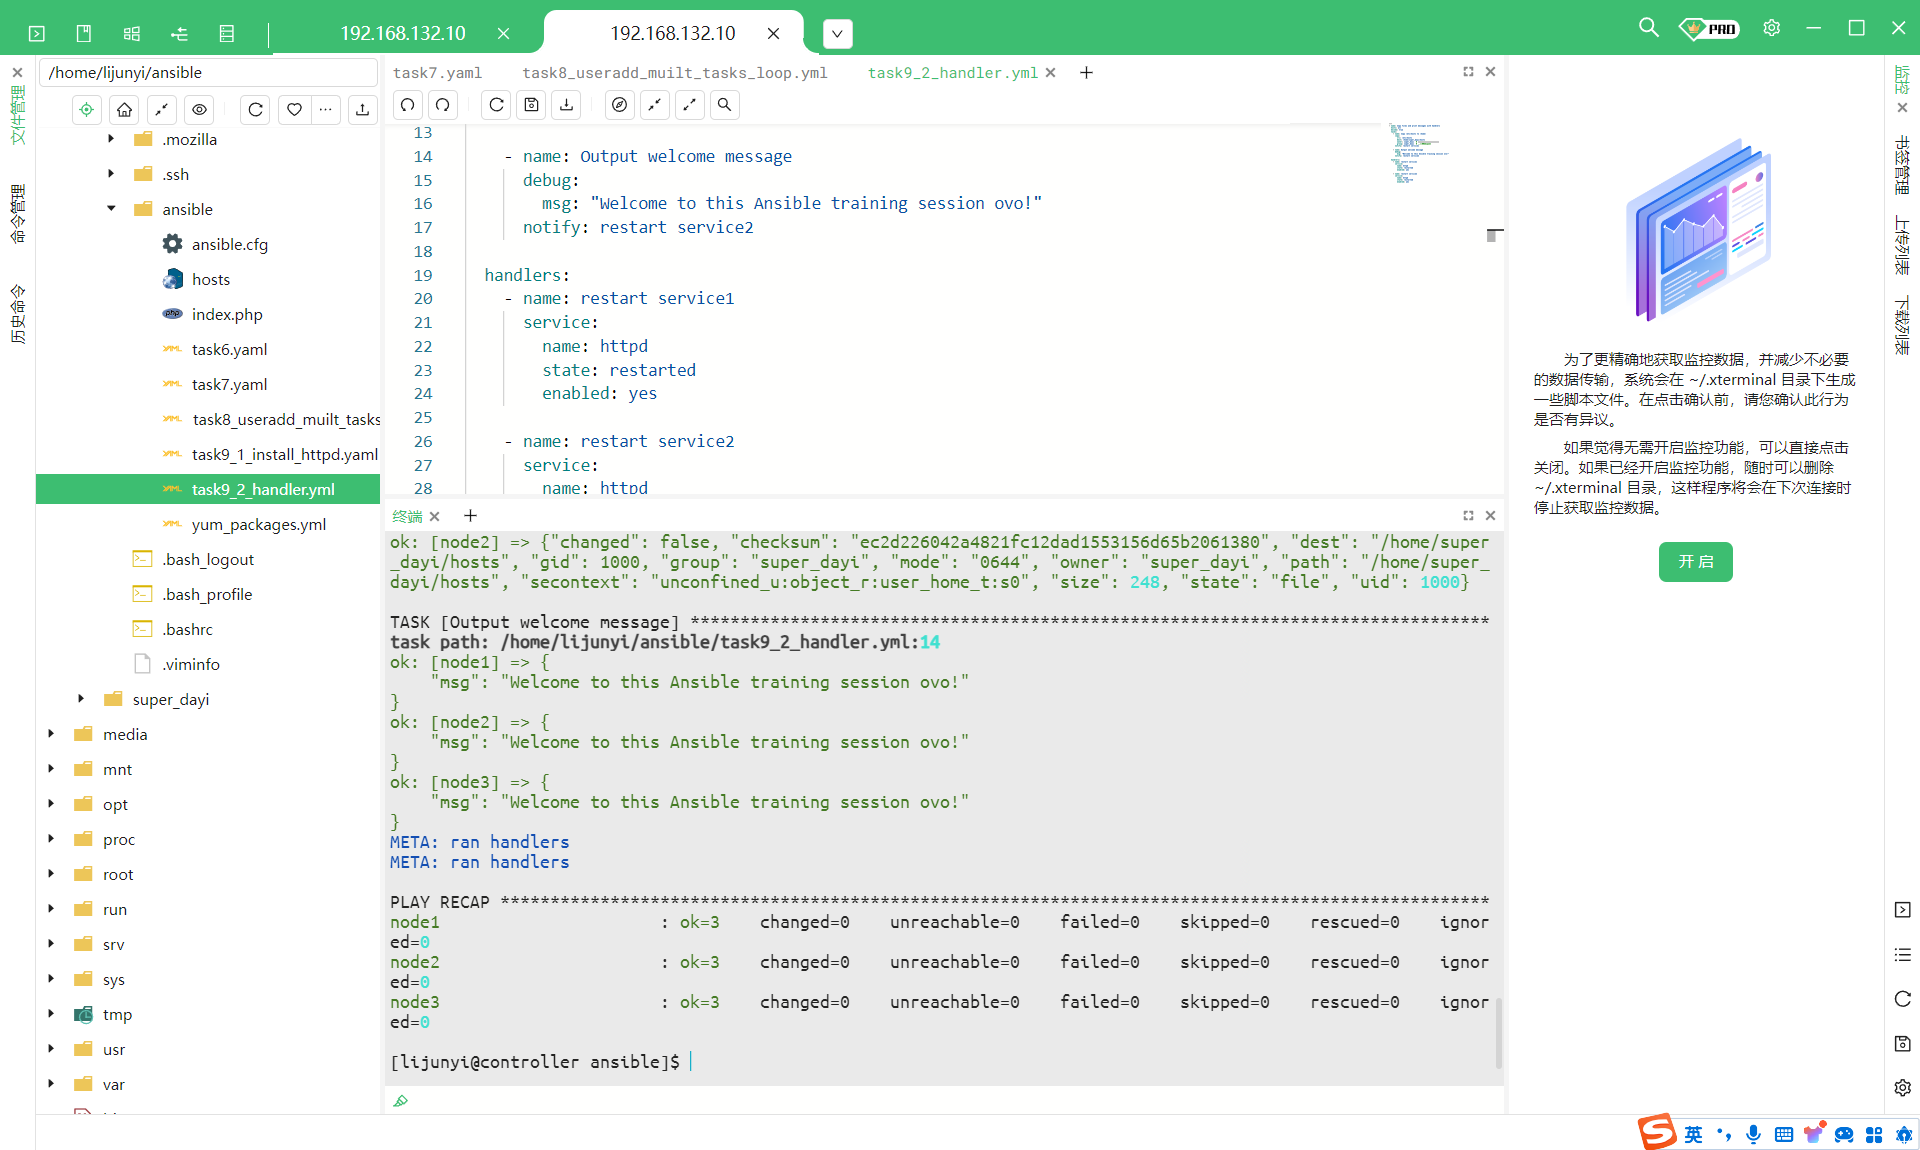
hander 通知信息哦 1 2 3 4 su super_dayi cd ~/ansiblenano task9_2_handler.yml ansible-playbook task9_2_handler.yml -vv
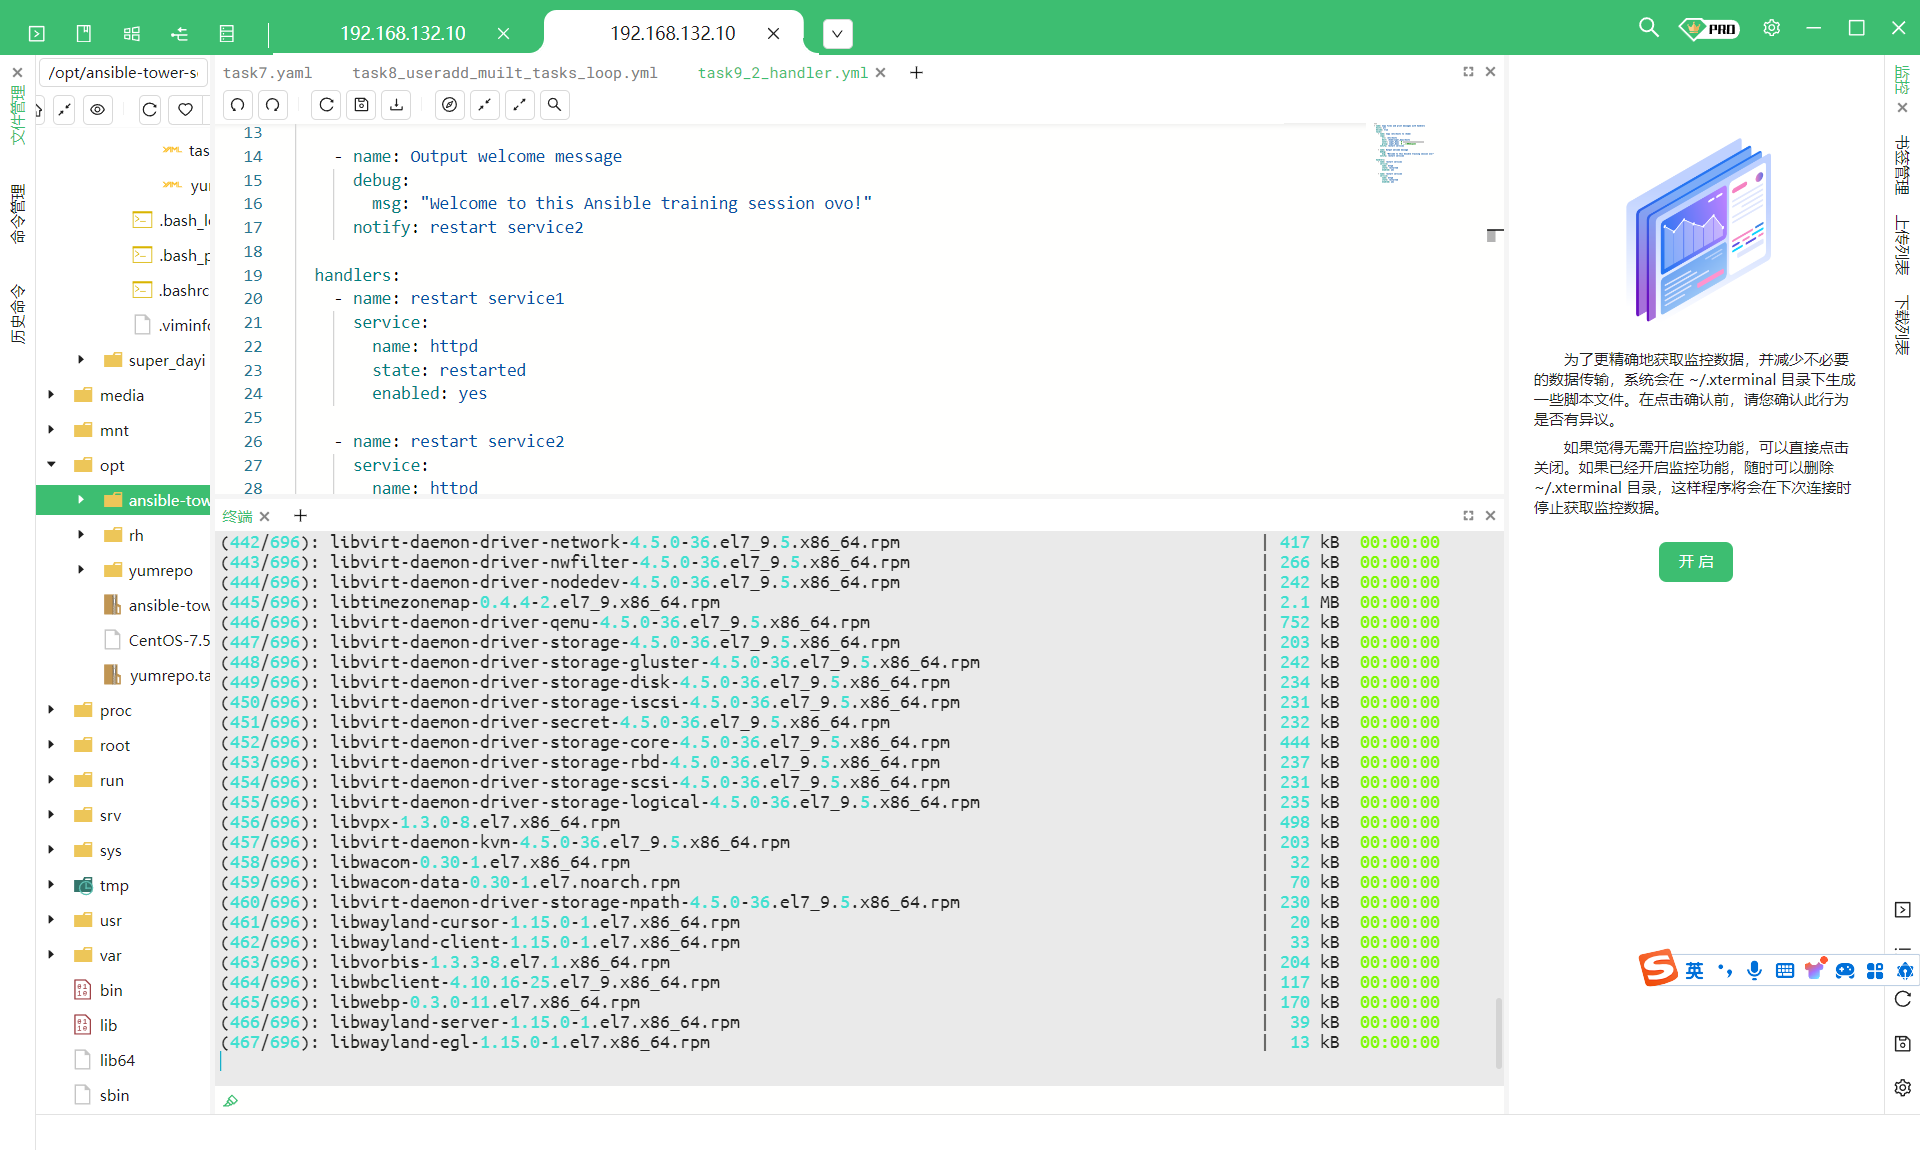
task9_2_handler.yml
1 2 3 4 5 6 7 8 9 10 11 12 13 14 15 16 17 18 19 20 21 22 23 24 25 26 27 28 29 30 --- - name: Copy files and print messages with handlers hosts: all become: true tasks: - name: Copy /etc/hosts to /home/ copy: src: /etc/hosts dest: /home/super_dayi/hosts owner: super_dayi group: super_dayi notify: restart service1 - name: Output welcome message debug: msg: "Welcome to this Ansible training session ovo!" notify: restart service2 handlers: - name: restart service1 service: name: httpd state: restarted enabled: yes - name: restart service2 service: name: httpd state: restarted enabled: yes
感谢陪伴 有什么问题说的及时跟咱说一下下 OVO
文件下载
1 2 3 链接:https://pan.baidu.com/s/18kMvAkprRthODsqcBL6MdQ?pwd =n18y 提取码:n18y --来自百度网盘超级会员V7的分享
下载 ansible 文件所注意的问题,输入
vim ~/ansible/ansible.cfg
把 dayi 改成自己的用户名
dayi 补的内容
因为内容比较重复,就写一点基本滴啦
前面的截图,以自己的姓名 开机,然后跑下面的这个命令:
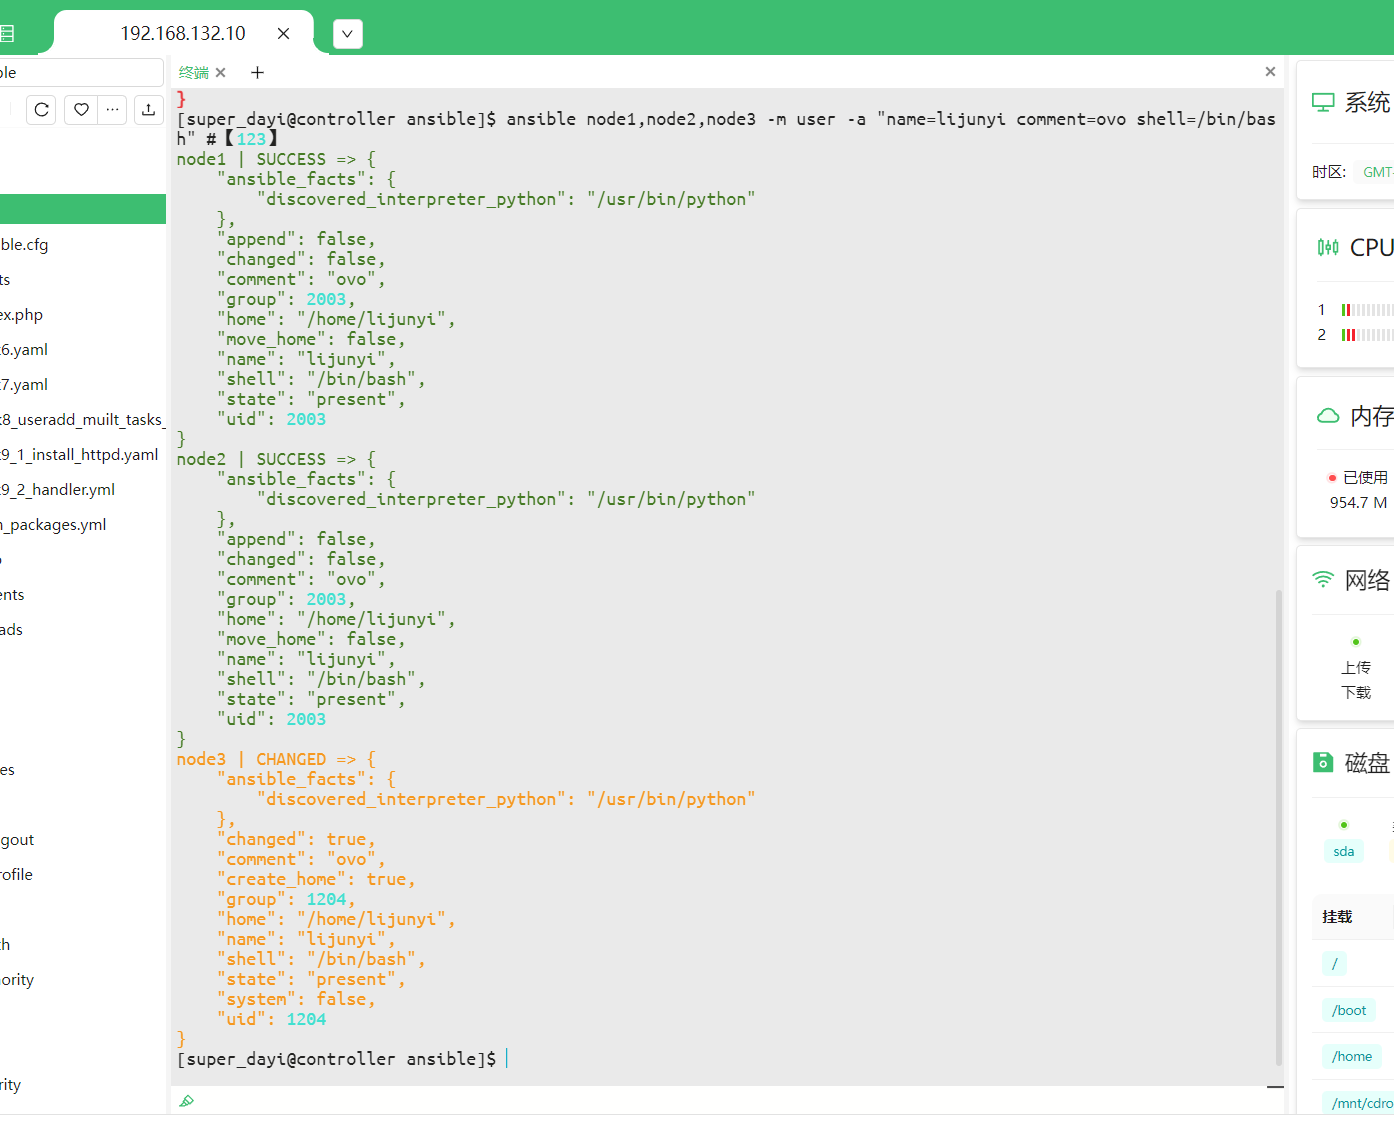
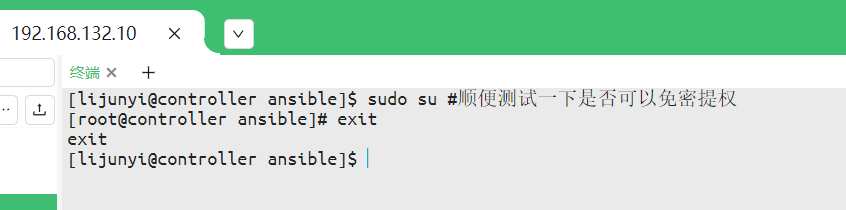
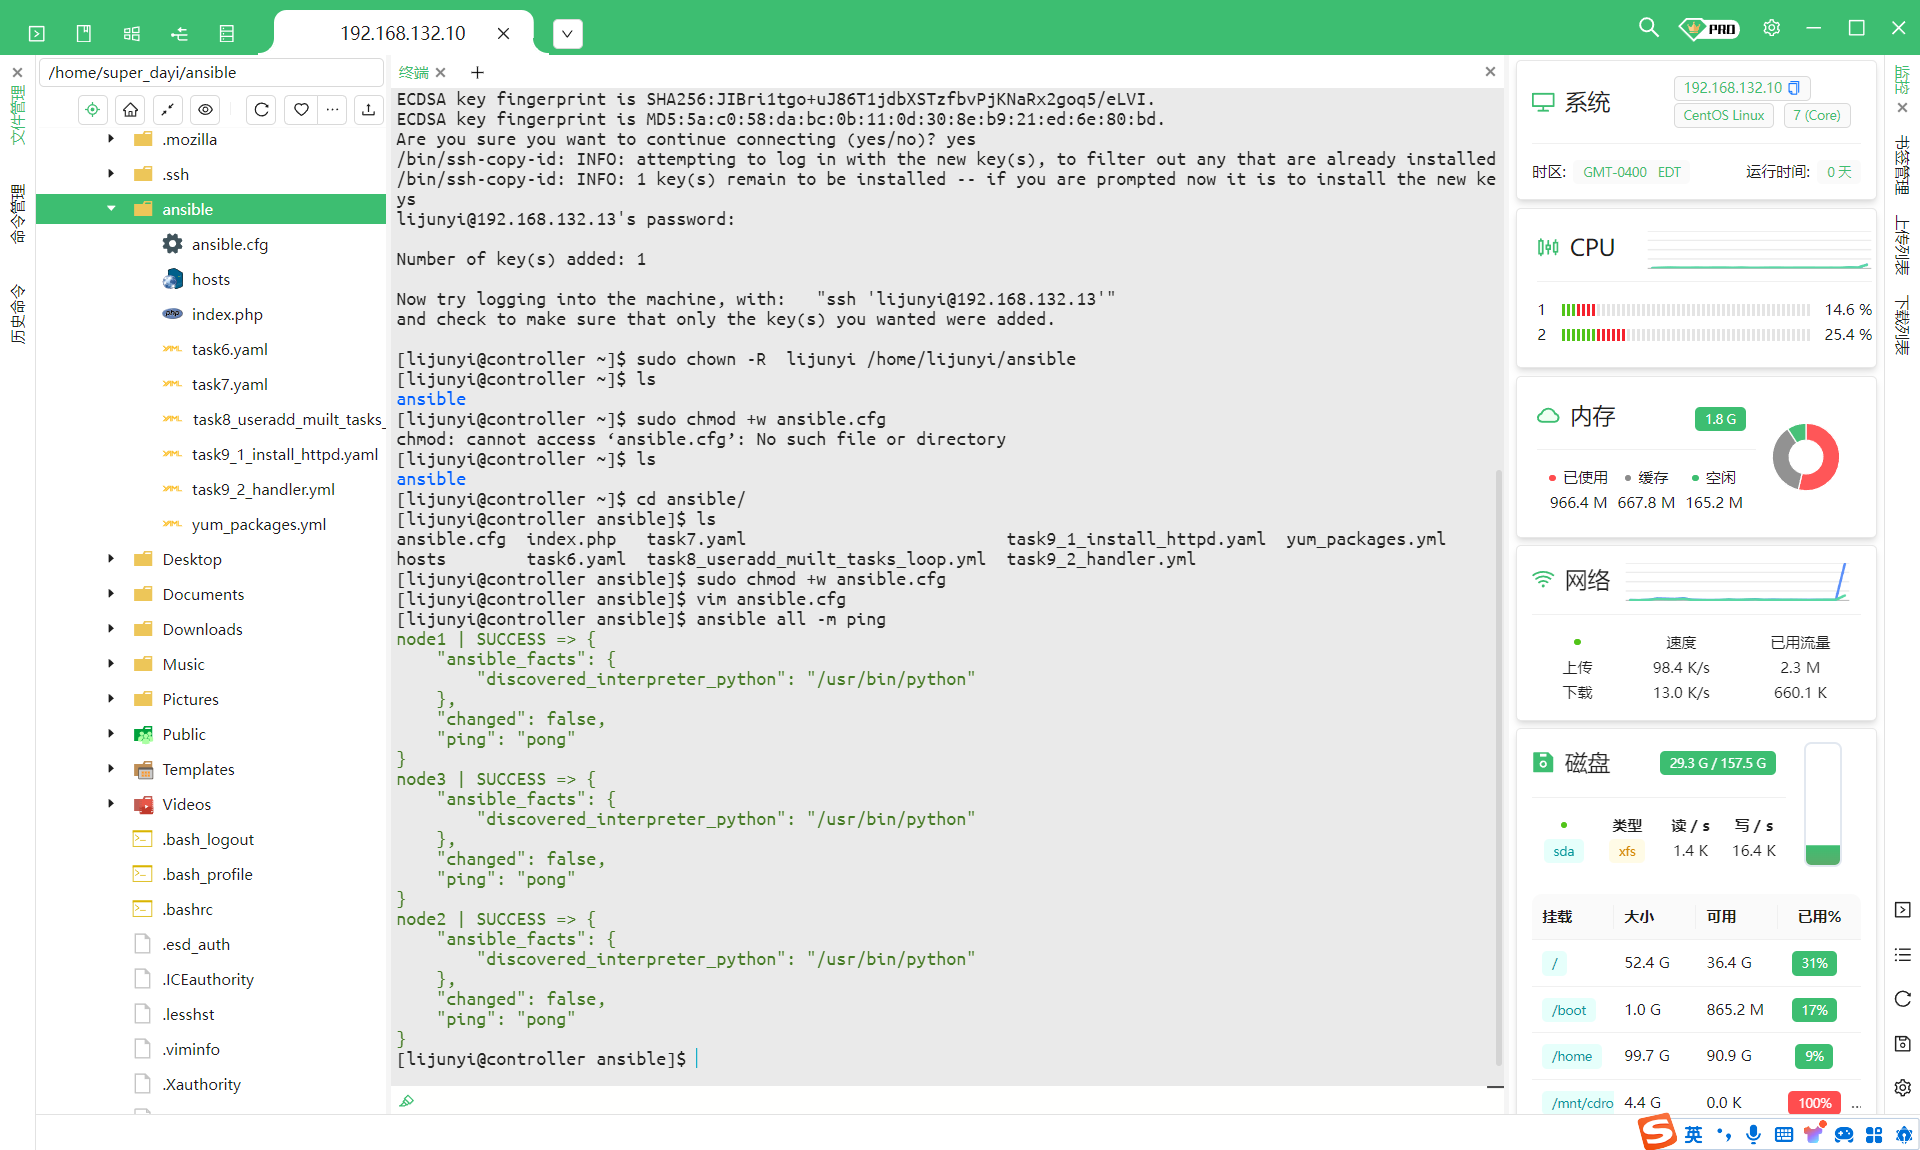
1 2 3 4 5 6 7 8 9 10 11 12 13 14 15 16 17 18 19 20 21 22 23 24 25 26 27 28 29 30 31 32 33 34 35 36 37 38 39 40 41 42 43 44 45 ssh root@192.168.132.10 useradd lijunyi cp -ra /home/super_dayi/ansible /home/lijunyi/ls /home/lijunyi [root@ansible-master lijunyi] ansible passwd lijunyi sudo su sudo echo 'lijunyi ALL=(ALL) NOPASSWD: ALL' >>/etc/sudoers su super_dayi cd ~/ansibleansible node1,node2,node3 -m user -a "name=lijunyi comment=ovo shell=/bin/bash" ansible node1,node2,node3 -m shell -a "echo 'lijunyi ALL=(ALL) NOPASSWD: ALL' >>/etc/sudoers" sudo passwd lijunyi su lijunyi sudo su su lijunyi cd ~/ansiblessh-keygen -t rsa ssh-copy-id lijunyi@192.168.132.11 ssh-copy-id lijunyi@192.168.132.12 ssh-copy-id lijunyi@192.168.132.13 sudo chown -R lijunyi /home/lijunyi/ansible sudo chmod +w ansible.cfg ansible all -m ping
截倆图:
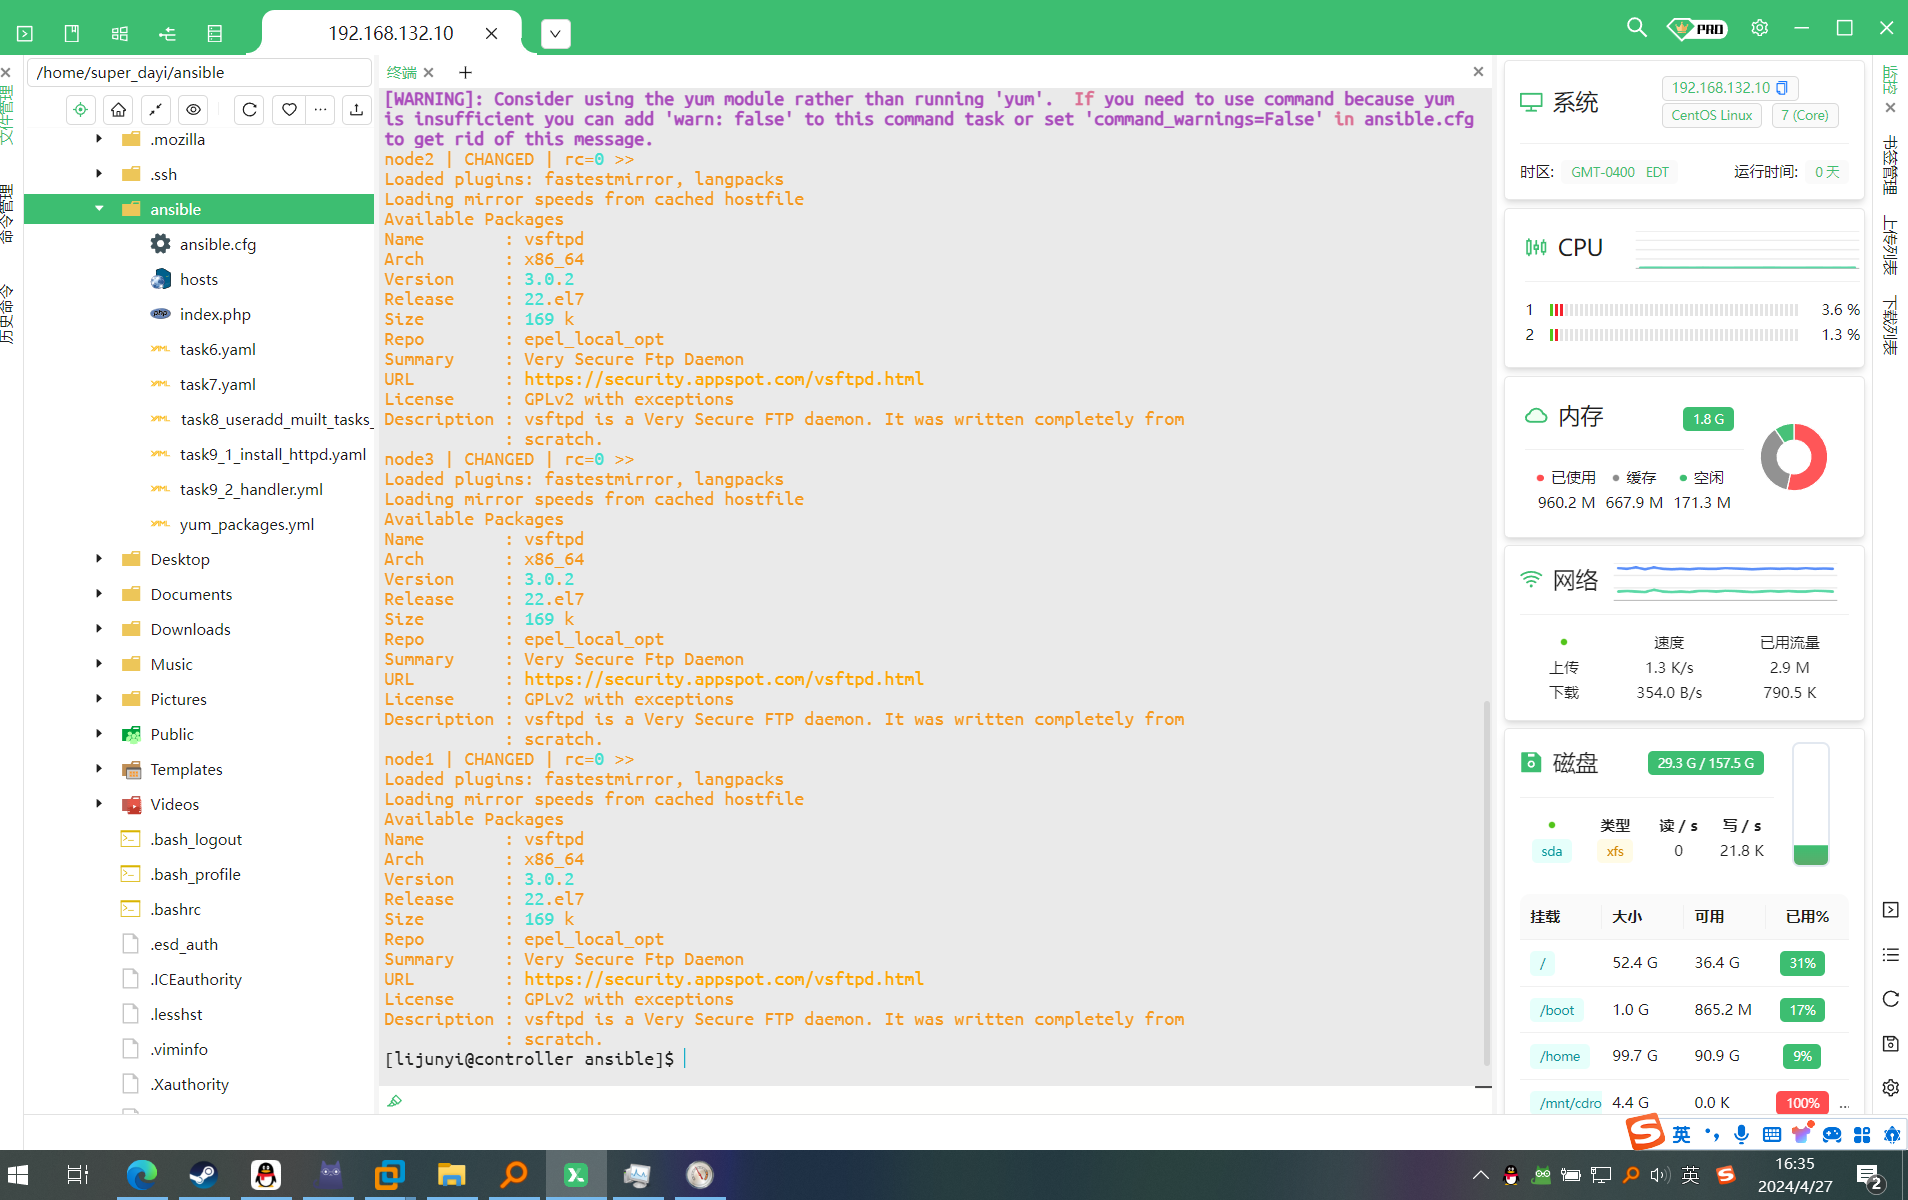
前面的截图,以自己的姓名 2 1 ansible all -m shell -a " yum info vsftpd --disablerepo=* --enablerepo=epel_local_opt"
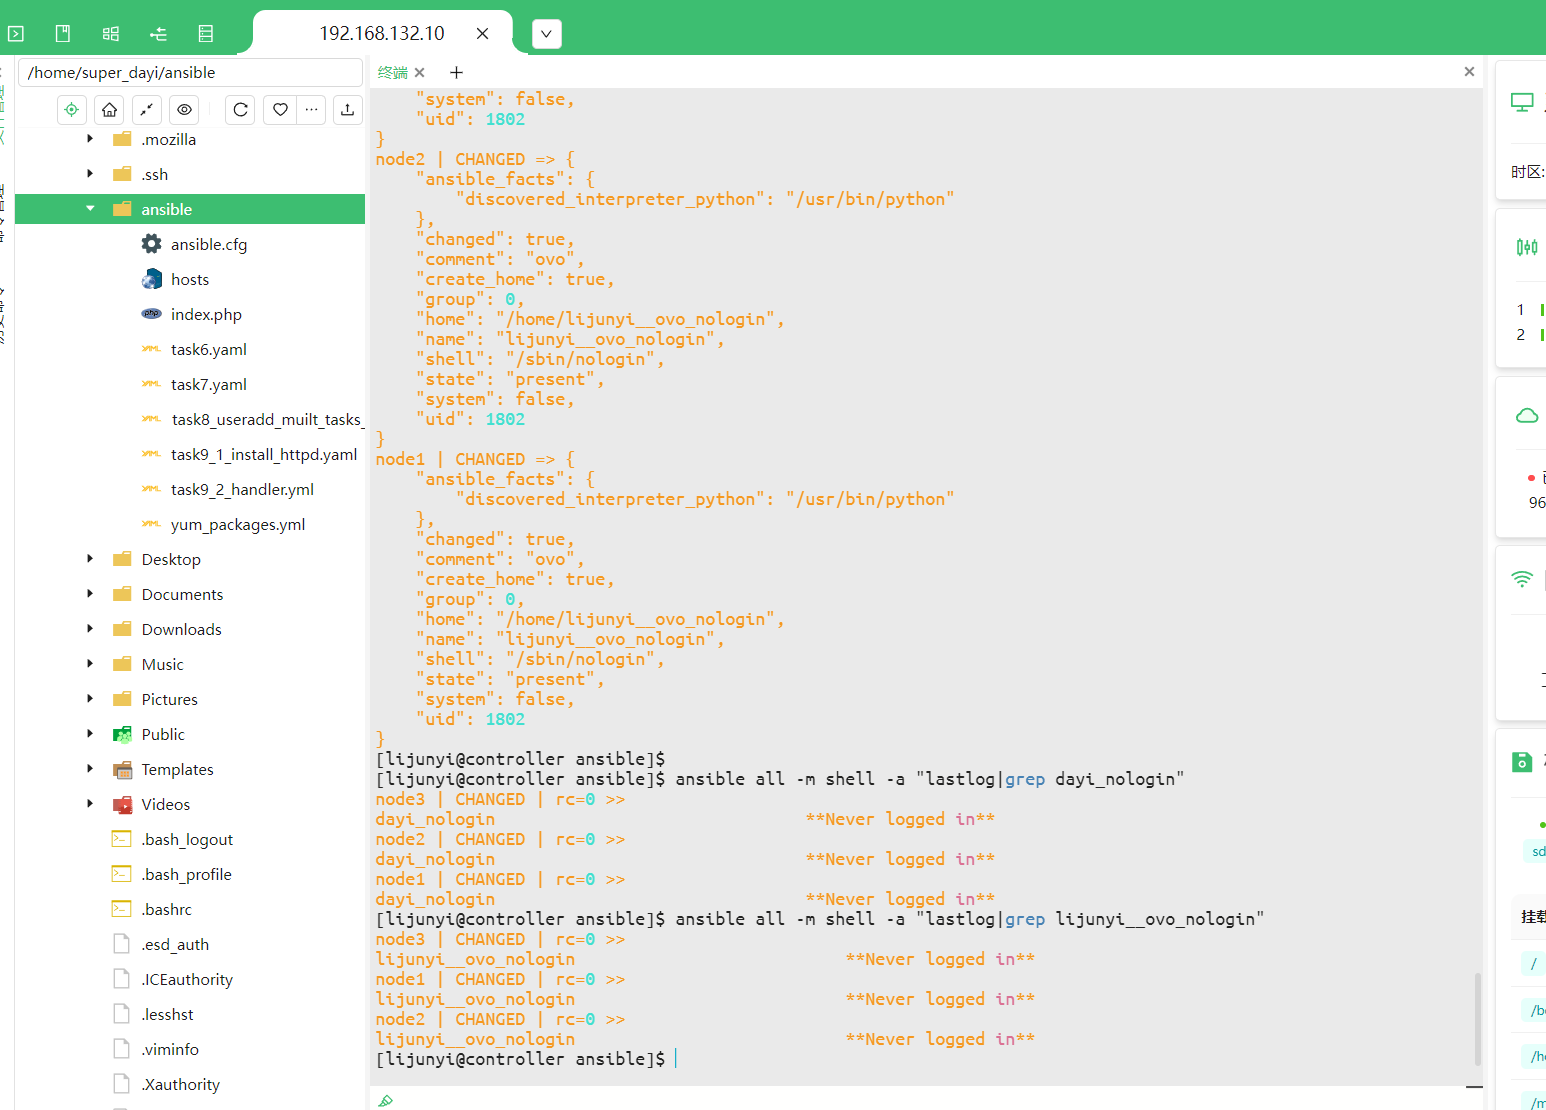
1 2 3 4 5 [lijunyi@controller ansible]$ ansible all -m shell -a "cat /home/lijunyi/hosts" [lijunyi@controller ansible]$ ansible all -m shell -a "cat /home/lijunyi/hosts" [lijunyi@controller ansible]$ ansible all -m user -a "name=lijunyi__ovo_nologin comment=ovo uid=1802 group=roo t shell=/sbin/nologin
前面的截图,以自己的姓名 3 1 2 3 4 5 6 7 8 9 10 11 12 13 14 15 [lijunyi@controller ansible]$ ansible all -m shell -a "lastlog|grep dayi_nologin" node3 | CHANGED | rc=0 >> dayi_nologin **Never logged in ** node2 | CHANGED | rc=0 >> dayi_nologin **Never logged in ** node1 | CHANGED | rc=0 >> dayi_nologin **Never logged in ** [lijunyi@controller ansible]$ ansible all -m shell -a "lastlog|grep lijunyi__ovo_nologin" node3 | CHANGED | rc=0 >> lijunyi__ovo_nologin **Never logged in ** node1 | CHANGED | rc=0 >> lijunyi__ovo_nologin **Never logged in ** node2 | CHANGED | rc=0 >> lijunyi__ovo_nologin **Never logged in ** [lijunyi@controller ansible]$
1 2 3 4 5 6 7 8 9 10 11 12 13 14 15 16 17 18 19 20 21 22 23 24 25 26 27 [lijunyi@controller ansible]$ ansible-playbook task6.yaml -v Using /home/lijunyi/ansible/ansible.cfg as config file PLAY [Task6_copy_passwd_oppos] ******************************************************************************* TASK [Gathering Facts] *************************************************************************************** ok: [node1] ok: [node2] TASK [copy password to node1,node2] ************************************************************************** changed: [node2] => {"changed" : true , "checksum" : "022d51c9190a222324b8c7619c037fd4e27b009c" , "dest" : "/home/lijunyi/passwd" , "gid" : 2003, "group" : "lijunyi" , "md5sum" : "85a671beac26bb86936cd1f29e0ad297" , "mode" : "0600" , "owner" : "lijunyi" , "secontext" : "unconfined_u:object_r:user_home_t:s0" , "size" : 2255, "src" : "/home/lijunyi/.ansible/tmp/ansible-tmp-1714207917.99-109749-113954787151792/source" , "state" : "file" , "uid" : 2003} changed: [node1] => {"changed" : true , "checksum" : "022d51c9190a222324b8c7619c037fd4e27b009c" , "dest" : "/home/lijunyi/passwd" , "gid" : 2003, "group" : "lijunyi" , "md5sum" : "85a671beac26bb86936cd1f29e0ad297" , "mode" : "0600" , "owner" : "lijunyi" , "secontext" : "unconfined_u:object_r:user_home_t:s0" , "size" : 2255, "src" : "/home/lijunyi/.ansible/tmp/ansible-tmp-1714207917.98-109747-174111327070366/source" , "state" : "file" , "uid" : 2003} PLAY RECAP *************************************************************************************************** node1 : ok=2 changed=1 unreachable=0 failed=0 skipped=0 rescued=0 ignored=0 node2 : ok=2 changed=1 unreachable=0 failed=0 skipped=0 rescued=0 ignored=0 [lijunyi@controller ansible]$ [lijunyi@controller ansible]$ ansible all -m shell -a "ls -alh /home/lijunyi |grep passwd" node1 | CHANGED | rc=0 >> -rw-------. 1 lijunyi lijunyi 2.3K Apr 27 04:51 passwd node2 | CHANGED | rc=0 >> -rw-------. 1 lijunyi lijunyi 2.3K Apr 27 04:51 passwd node3 | FAILED | rc=1 >> non-zero return code [lijunyi@controller ansible]$
前面的截图,以自己的姓名 4 1 2 3 4 5 6 7 8 9 nano task7.yaml ```` 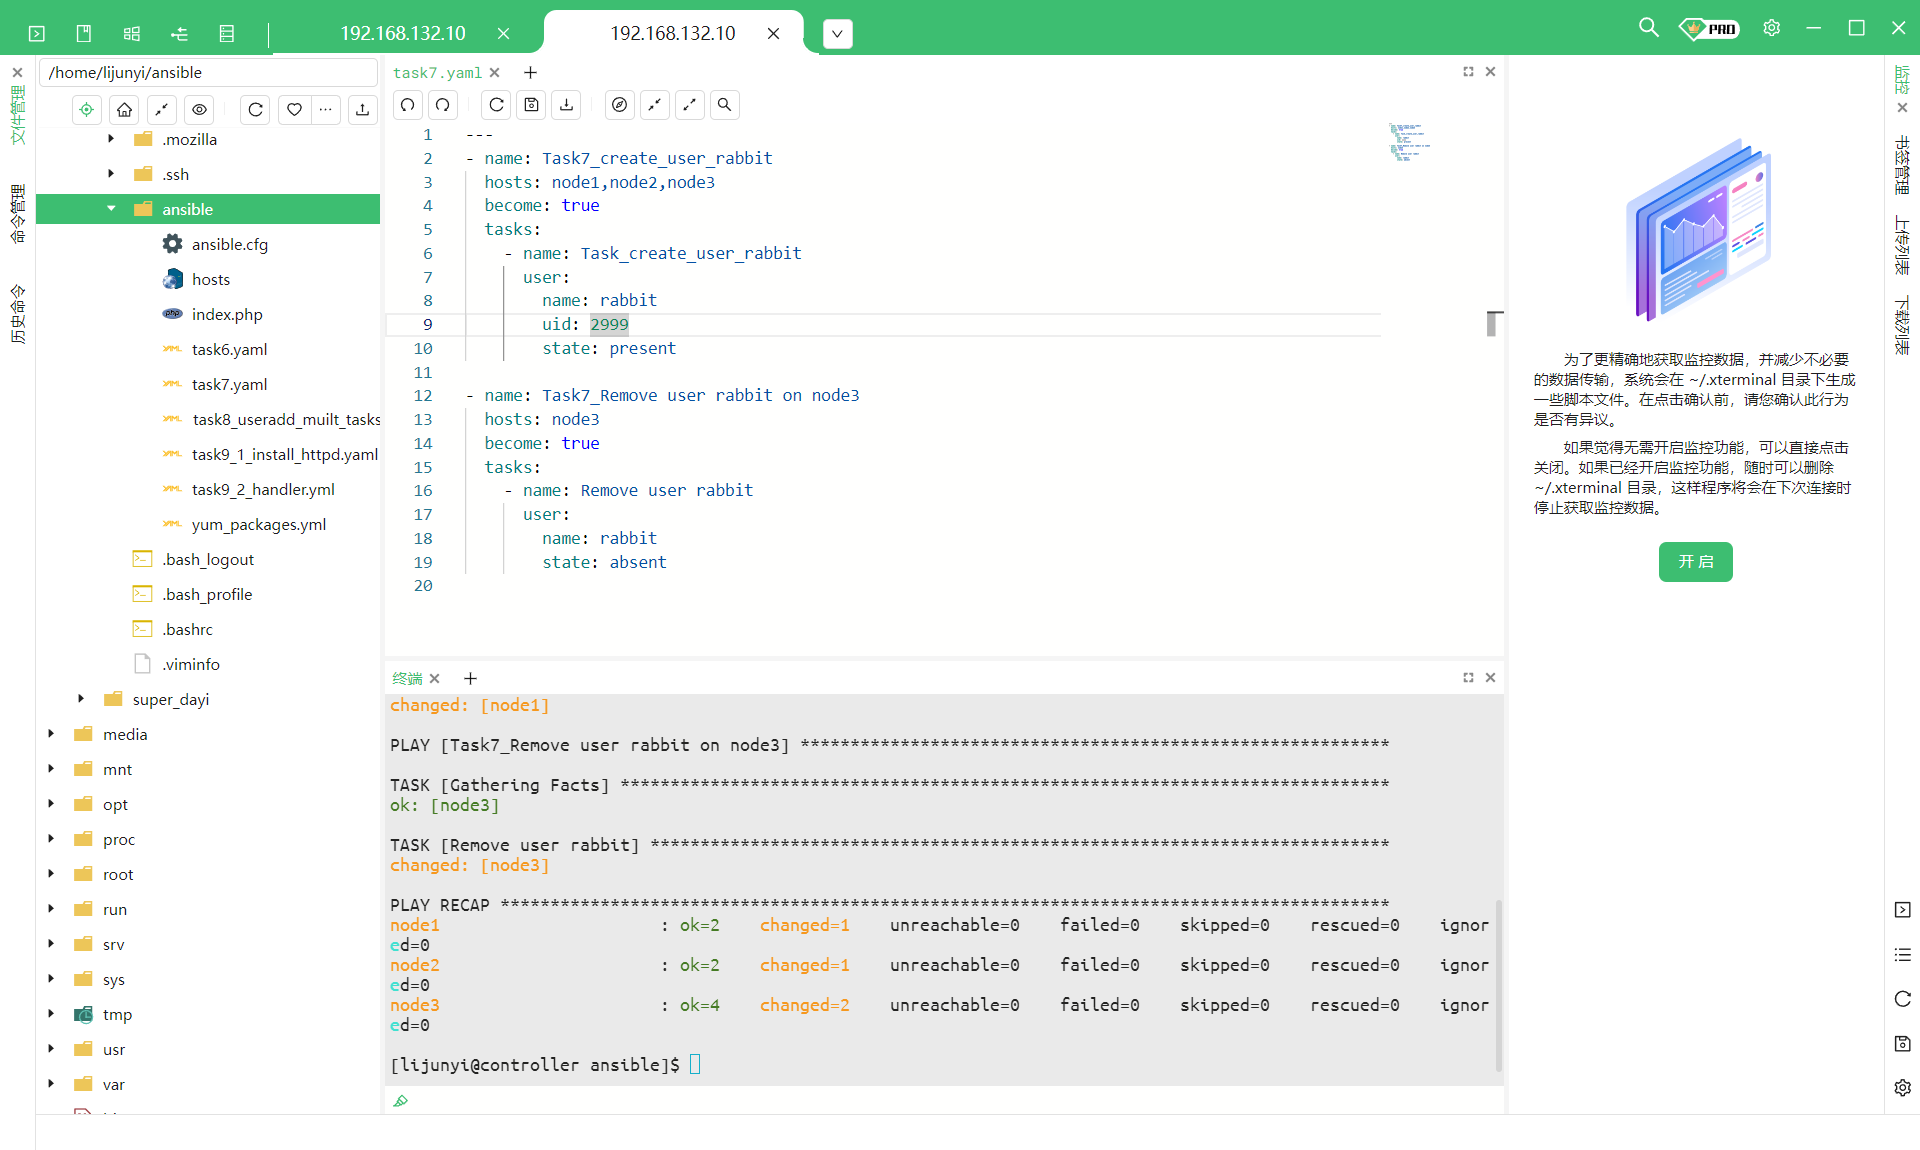 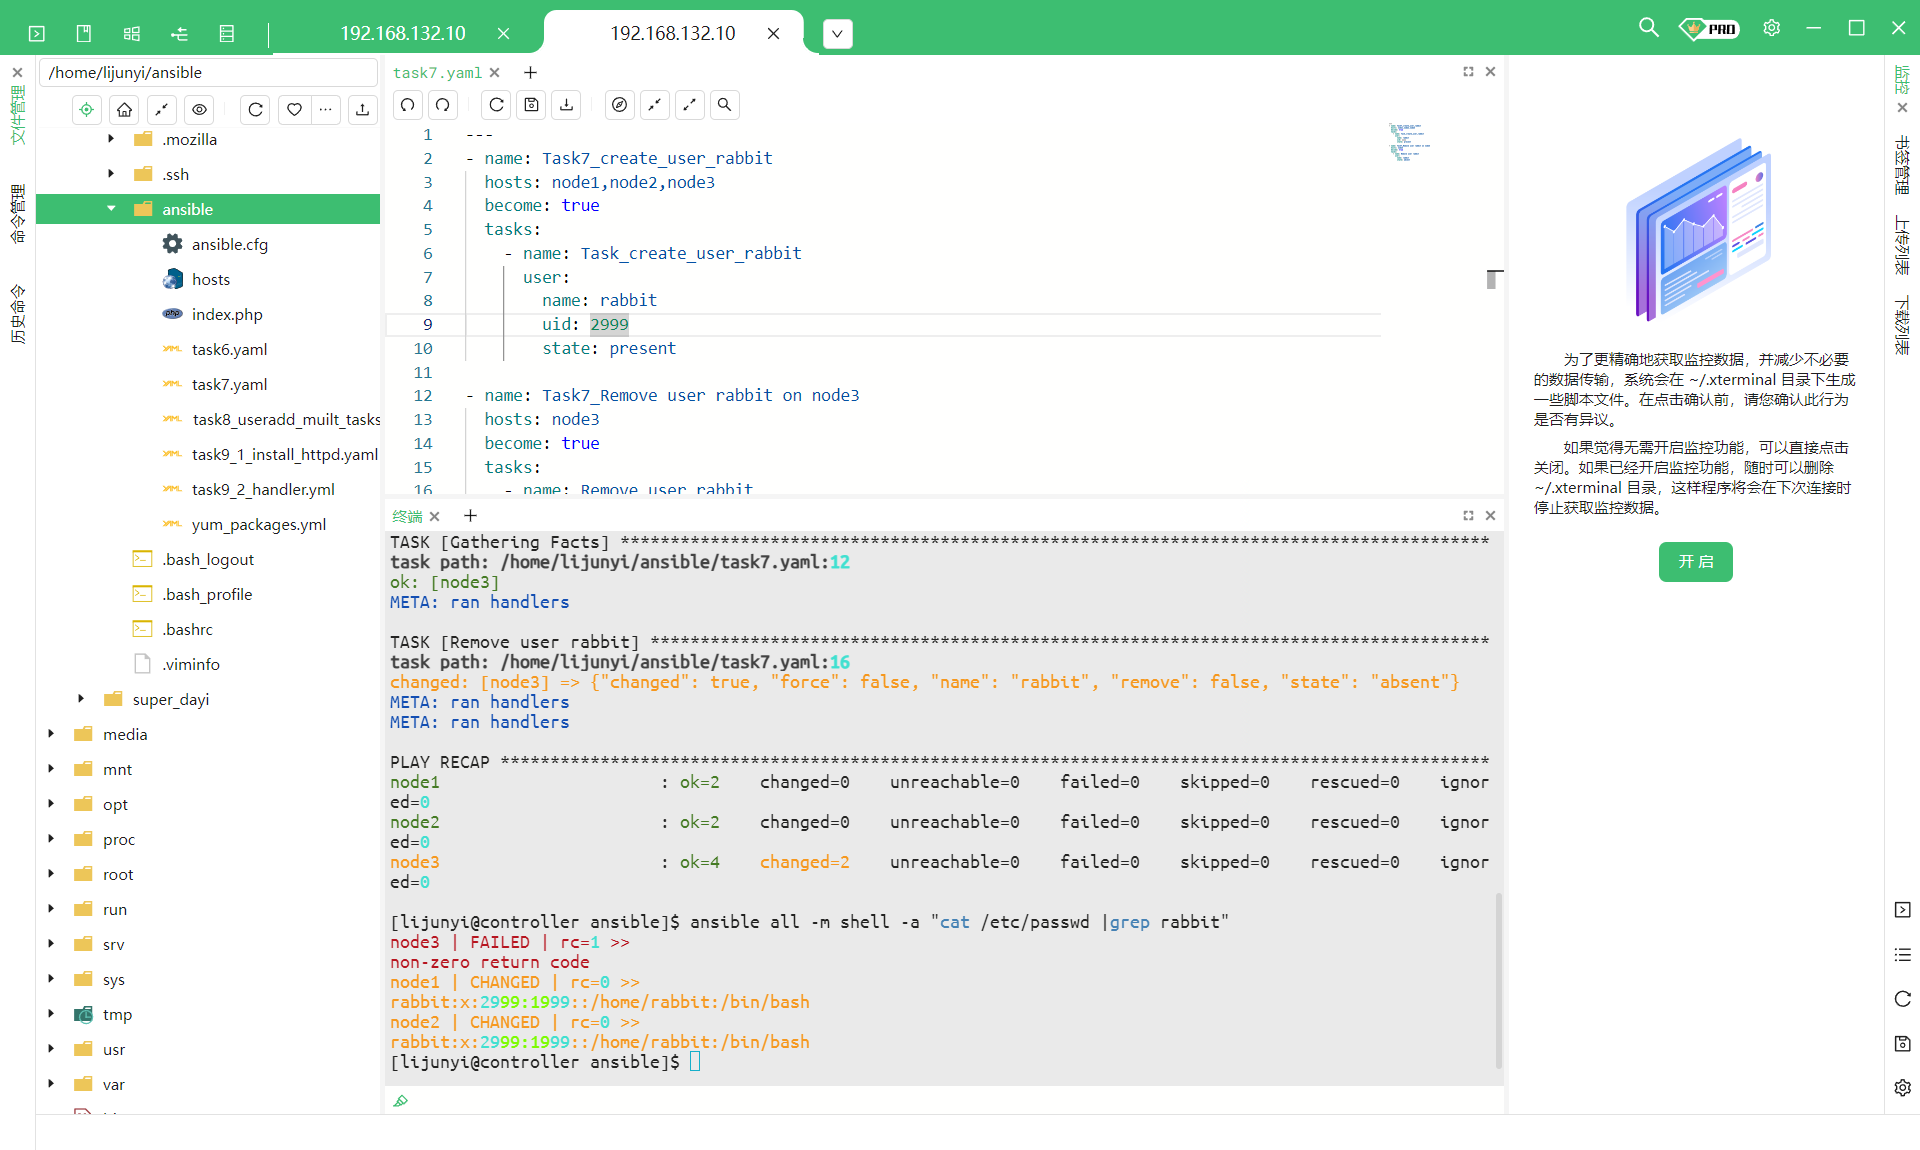 ```bash ansible-playbook task8_useradd_muilt_tasks_loop.yml -v
1 2 ansible-playbook task9_1_install_httpd.yaml -v ansible-playbook task9_2_handler.yml -vv
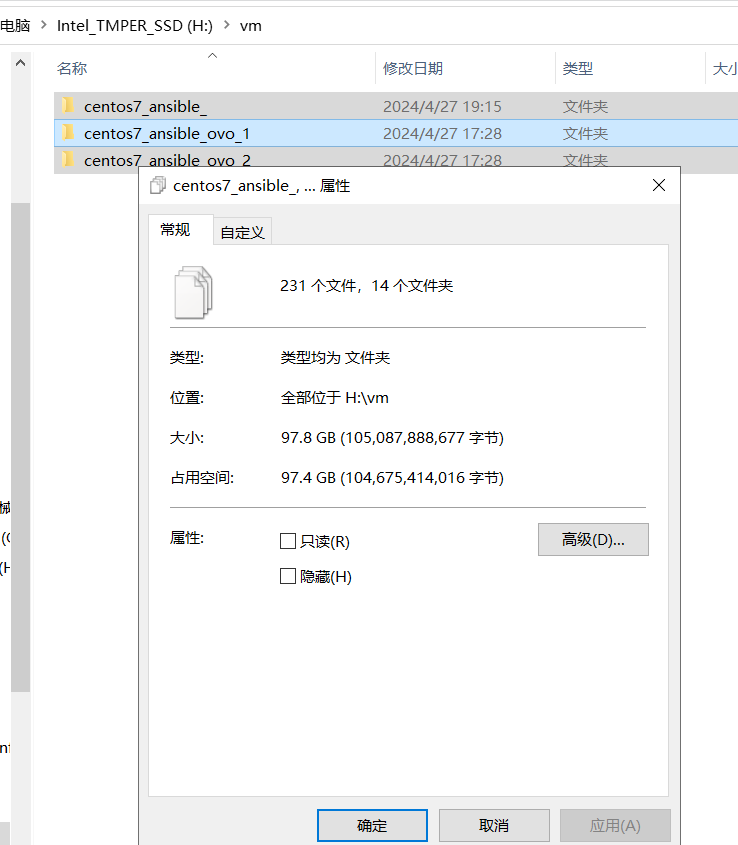
OVO 超级大的虚拟机
Ansible 图形化 Tower 安装 1 2 3 4 wget https://releases.ansible.com/ansible-tower/setup/ansible-tower-setup-latest.tar.gz --no-check-certificate tar xvzf ansible-tower-setup-latest.tar.gz yum upgrade
需要更新诶
更新一下下:
CTRL+C 了,本来想加点核心,然后 kernel panic 啦~
换个机子重新来 PVP:
更新:
1 2 3 [root@ansible-master dayi] CentOS Linux release 7.9.2009 (Core) [root@ansible-master dayi]
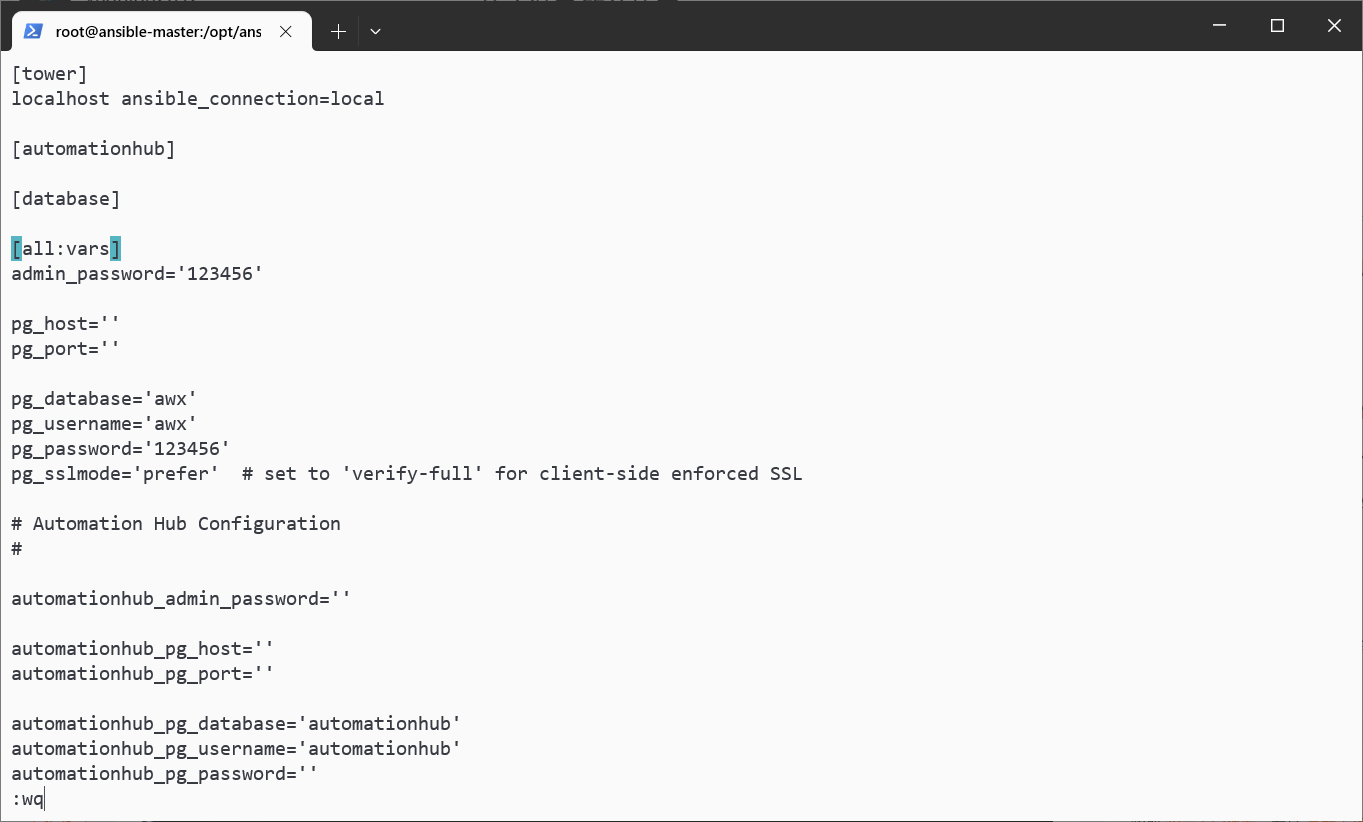
inventory 改个密码
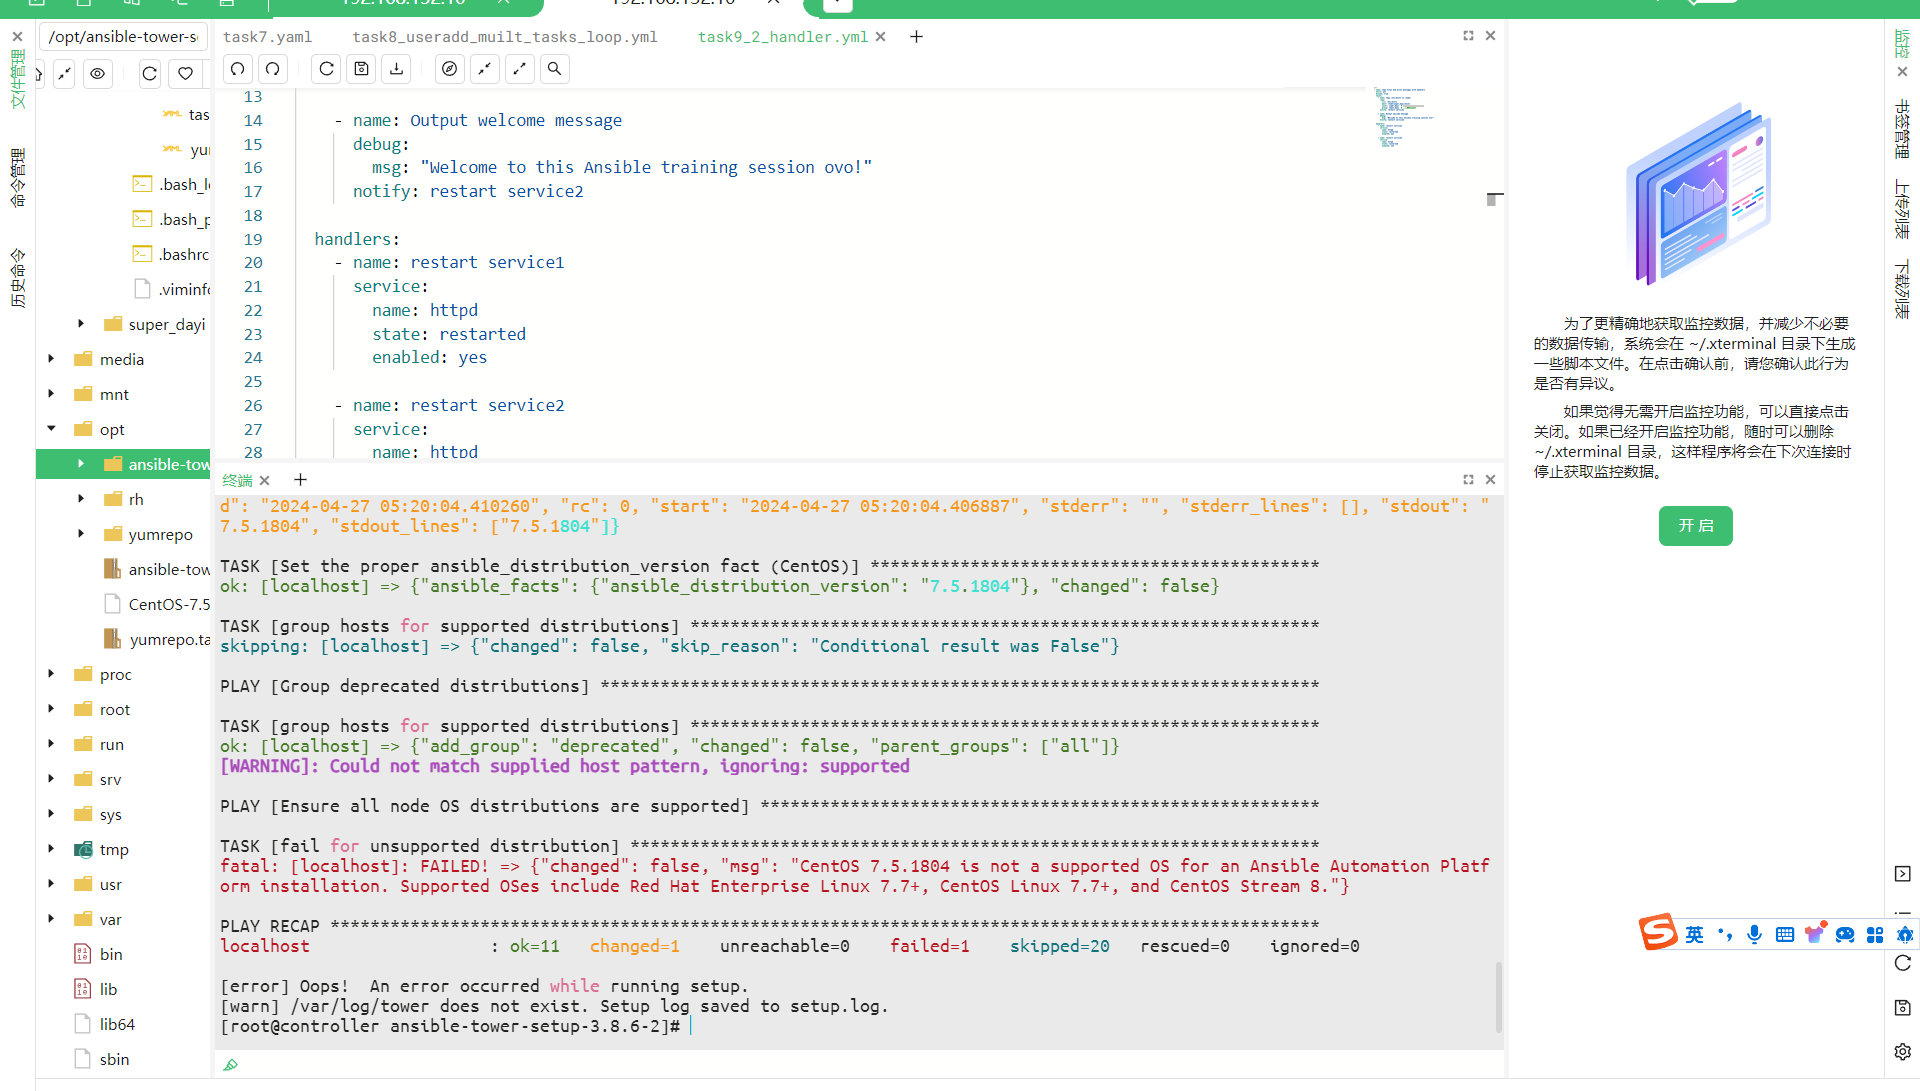
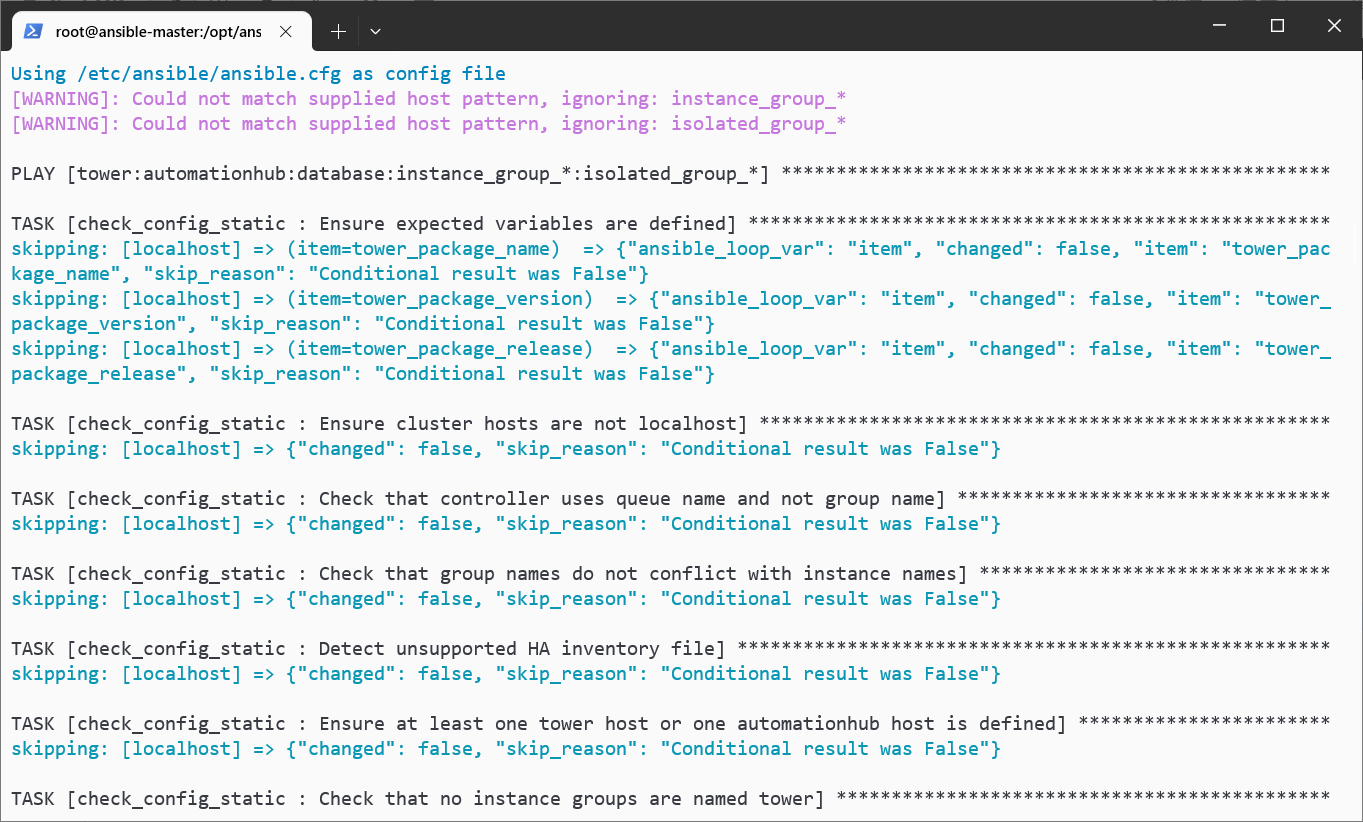
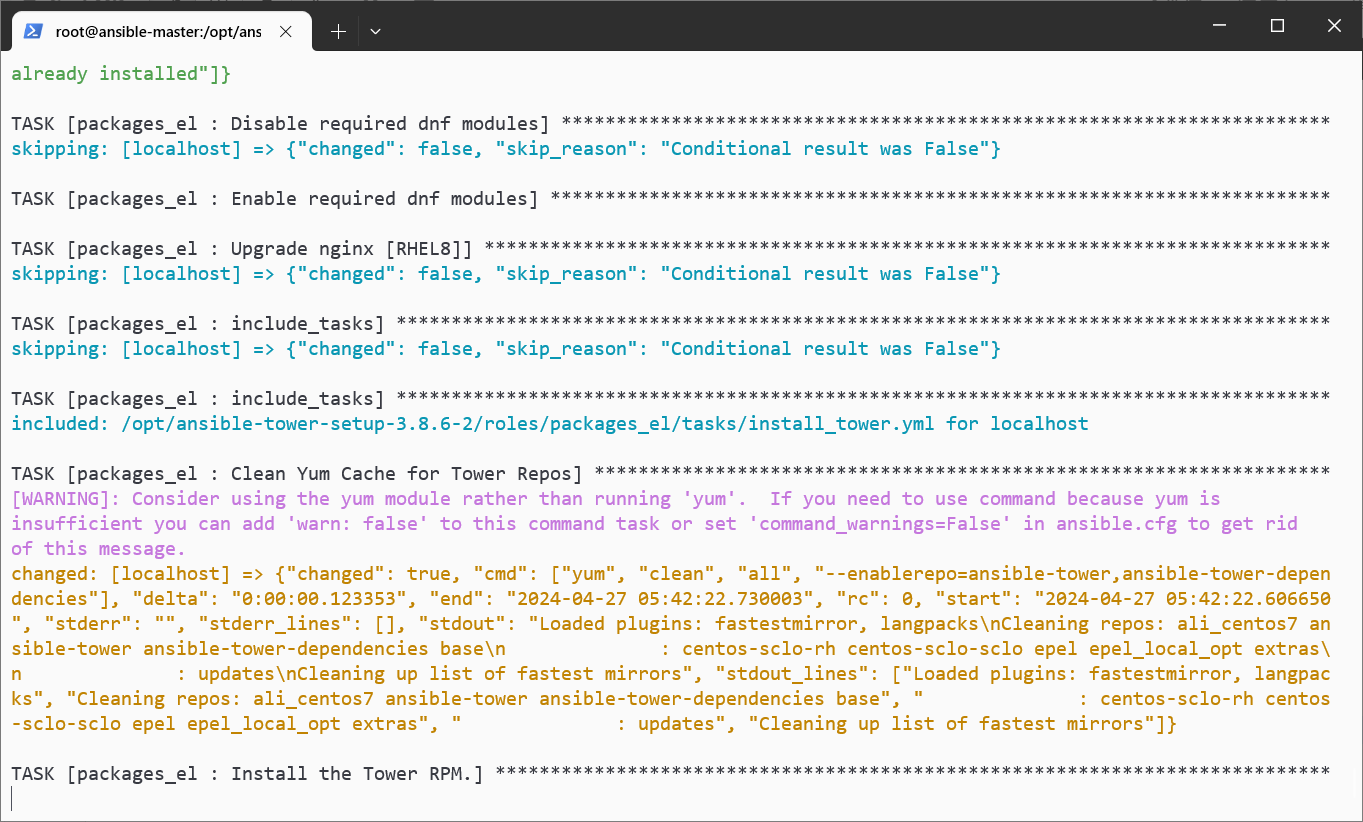
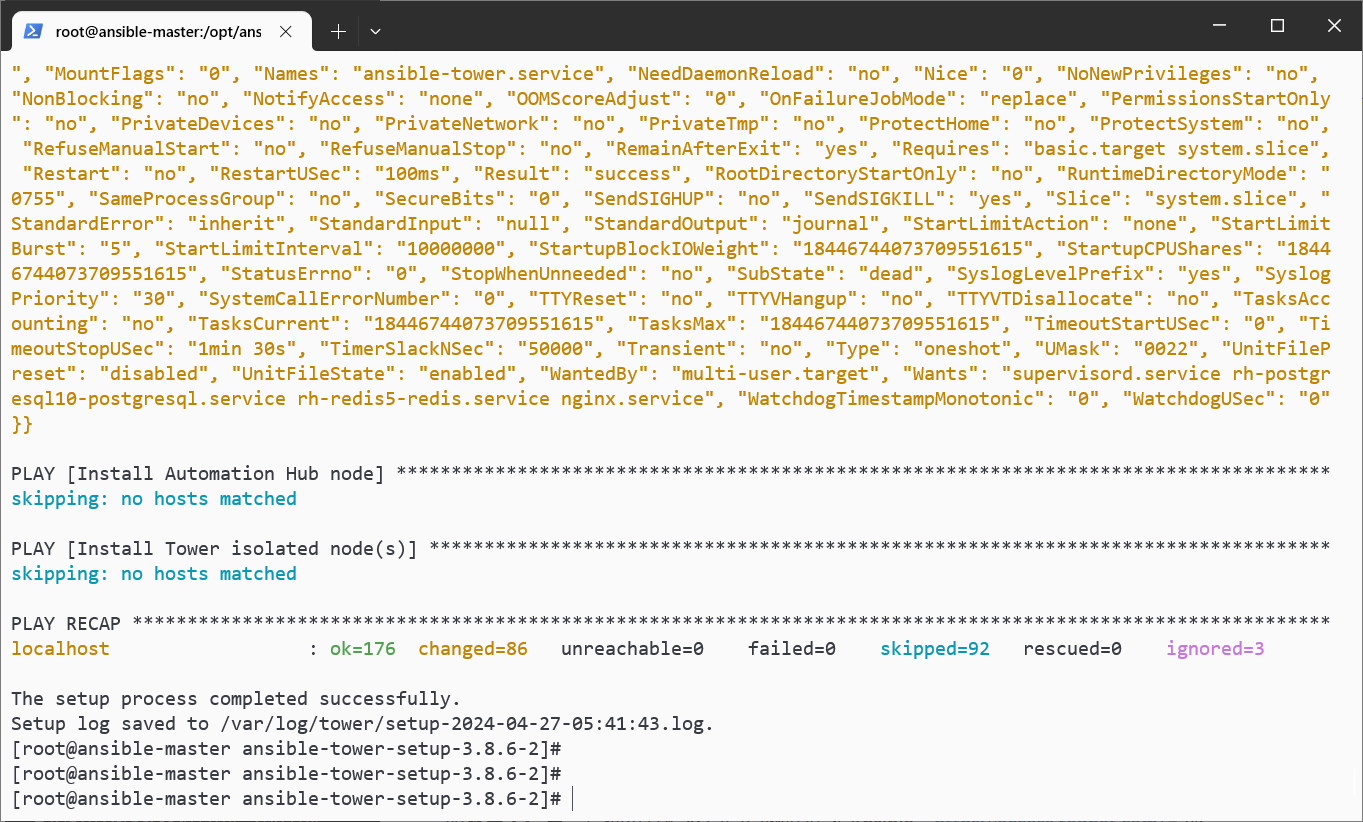
开始安装 1 2 [root@ansible-master ansible-tower-setup-3.8.6-2]
好大的 playbook
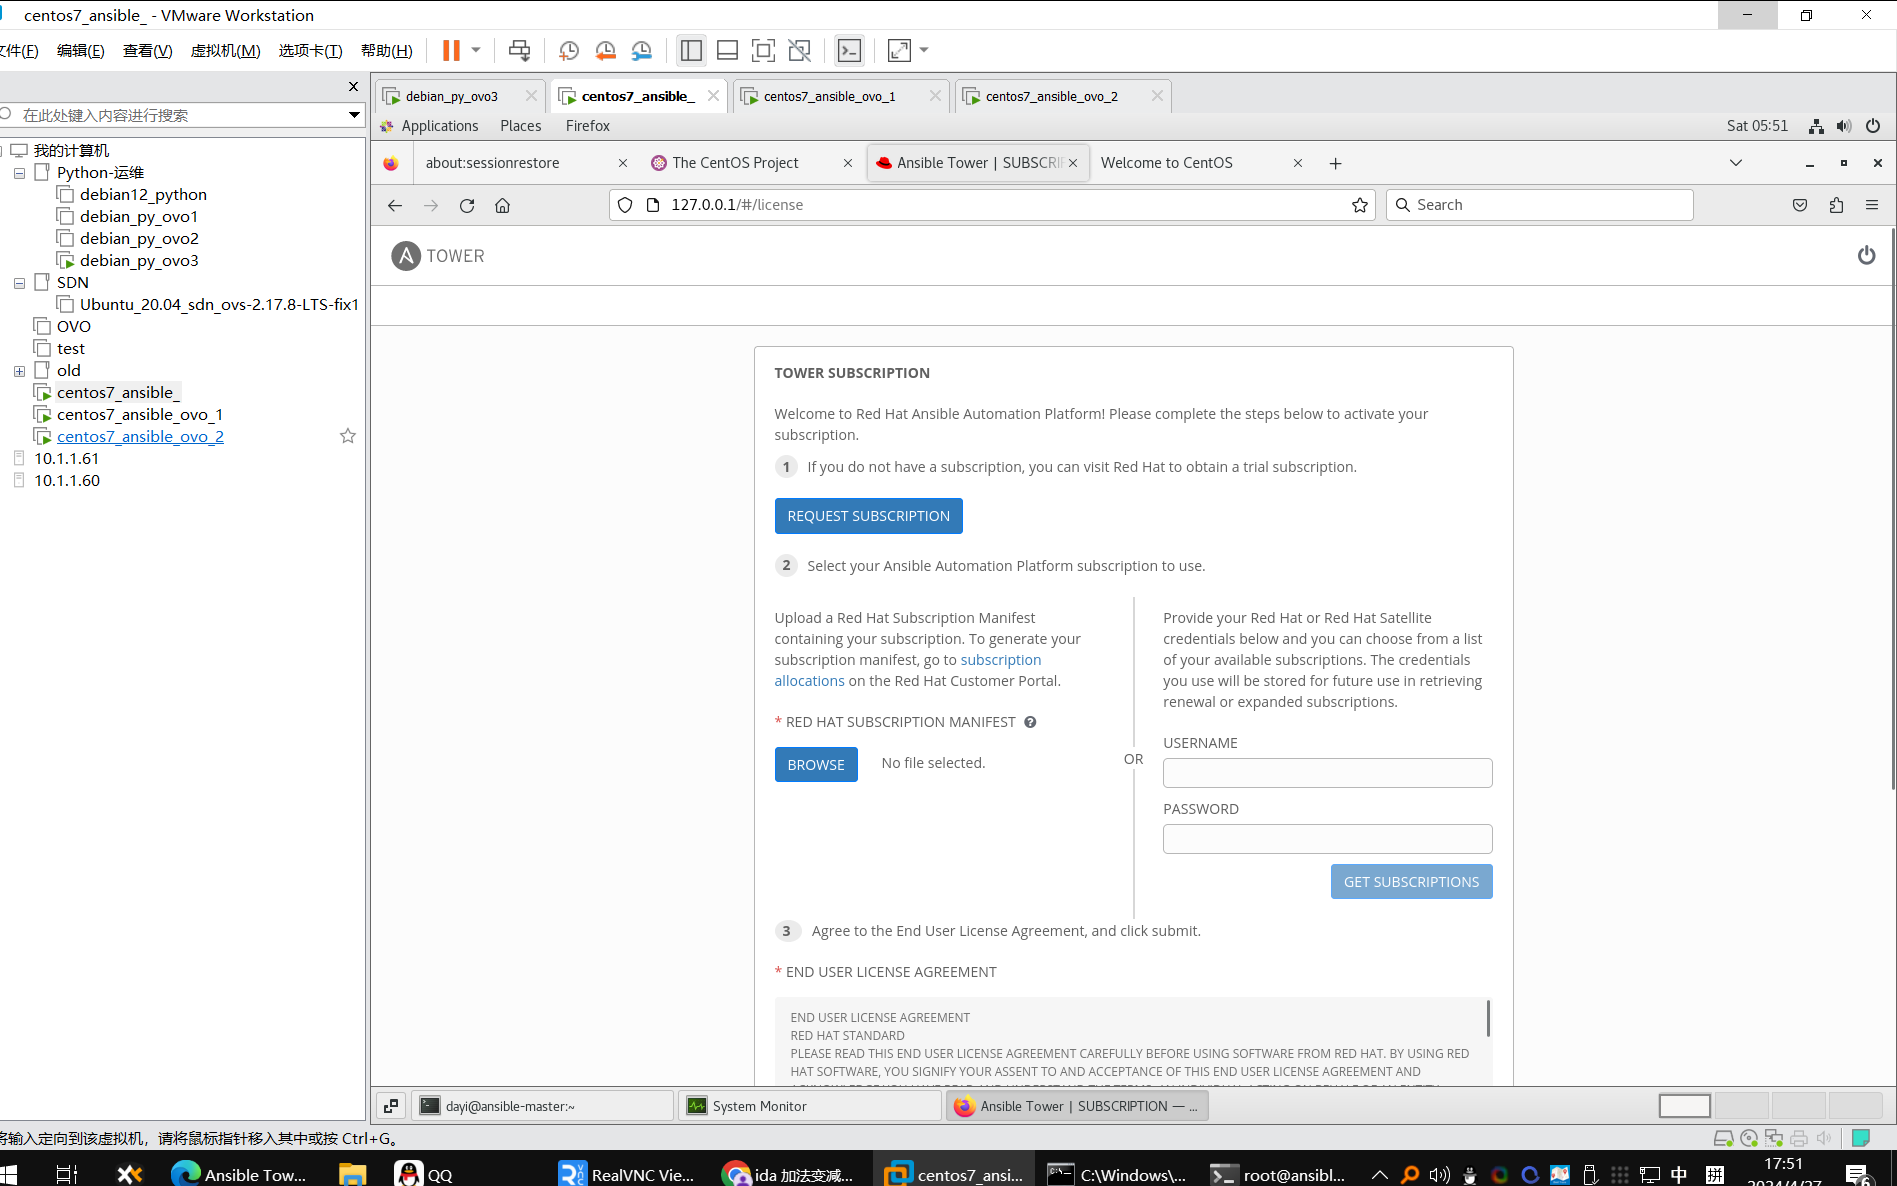
oppos 需要订阅
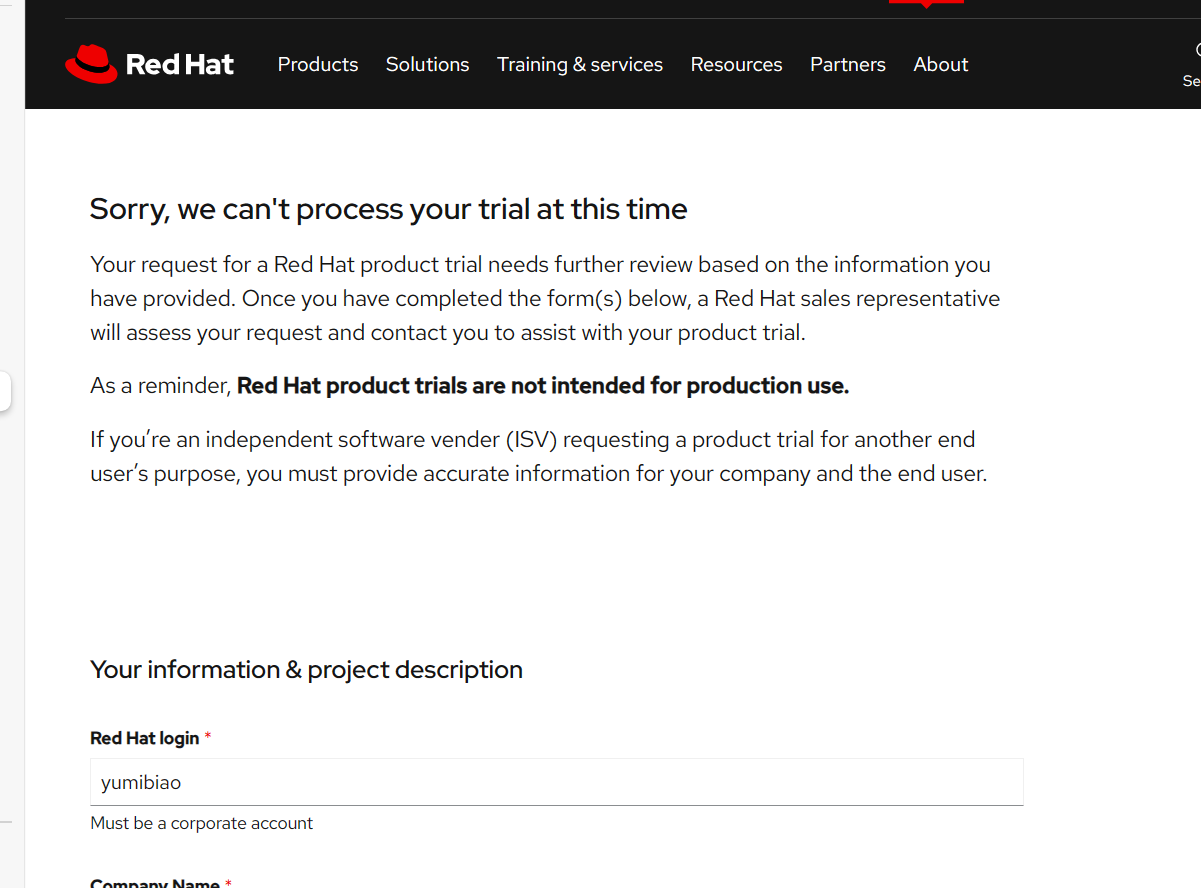
测试版免费, 但他又不让我用测试版本
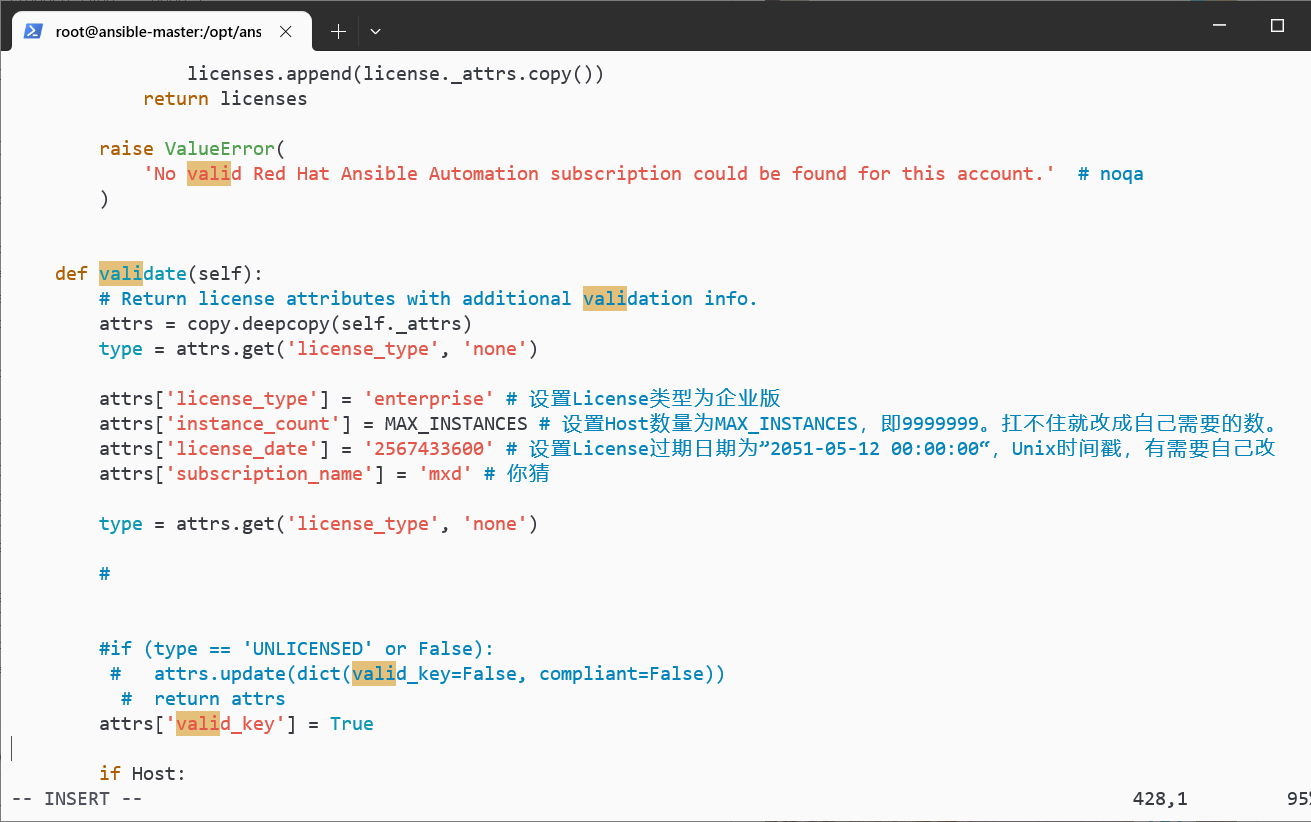
那就弄点小手段
参考 https://www.milkfish.site/2021/05/13/1038.loli
1 ansible-tower-service restart
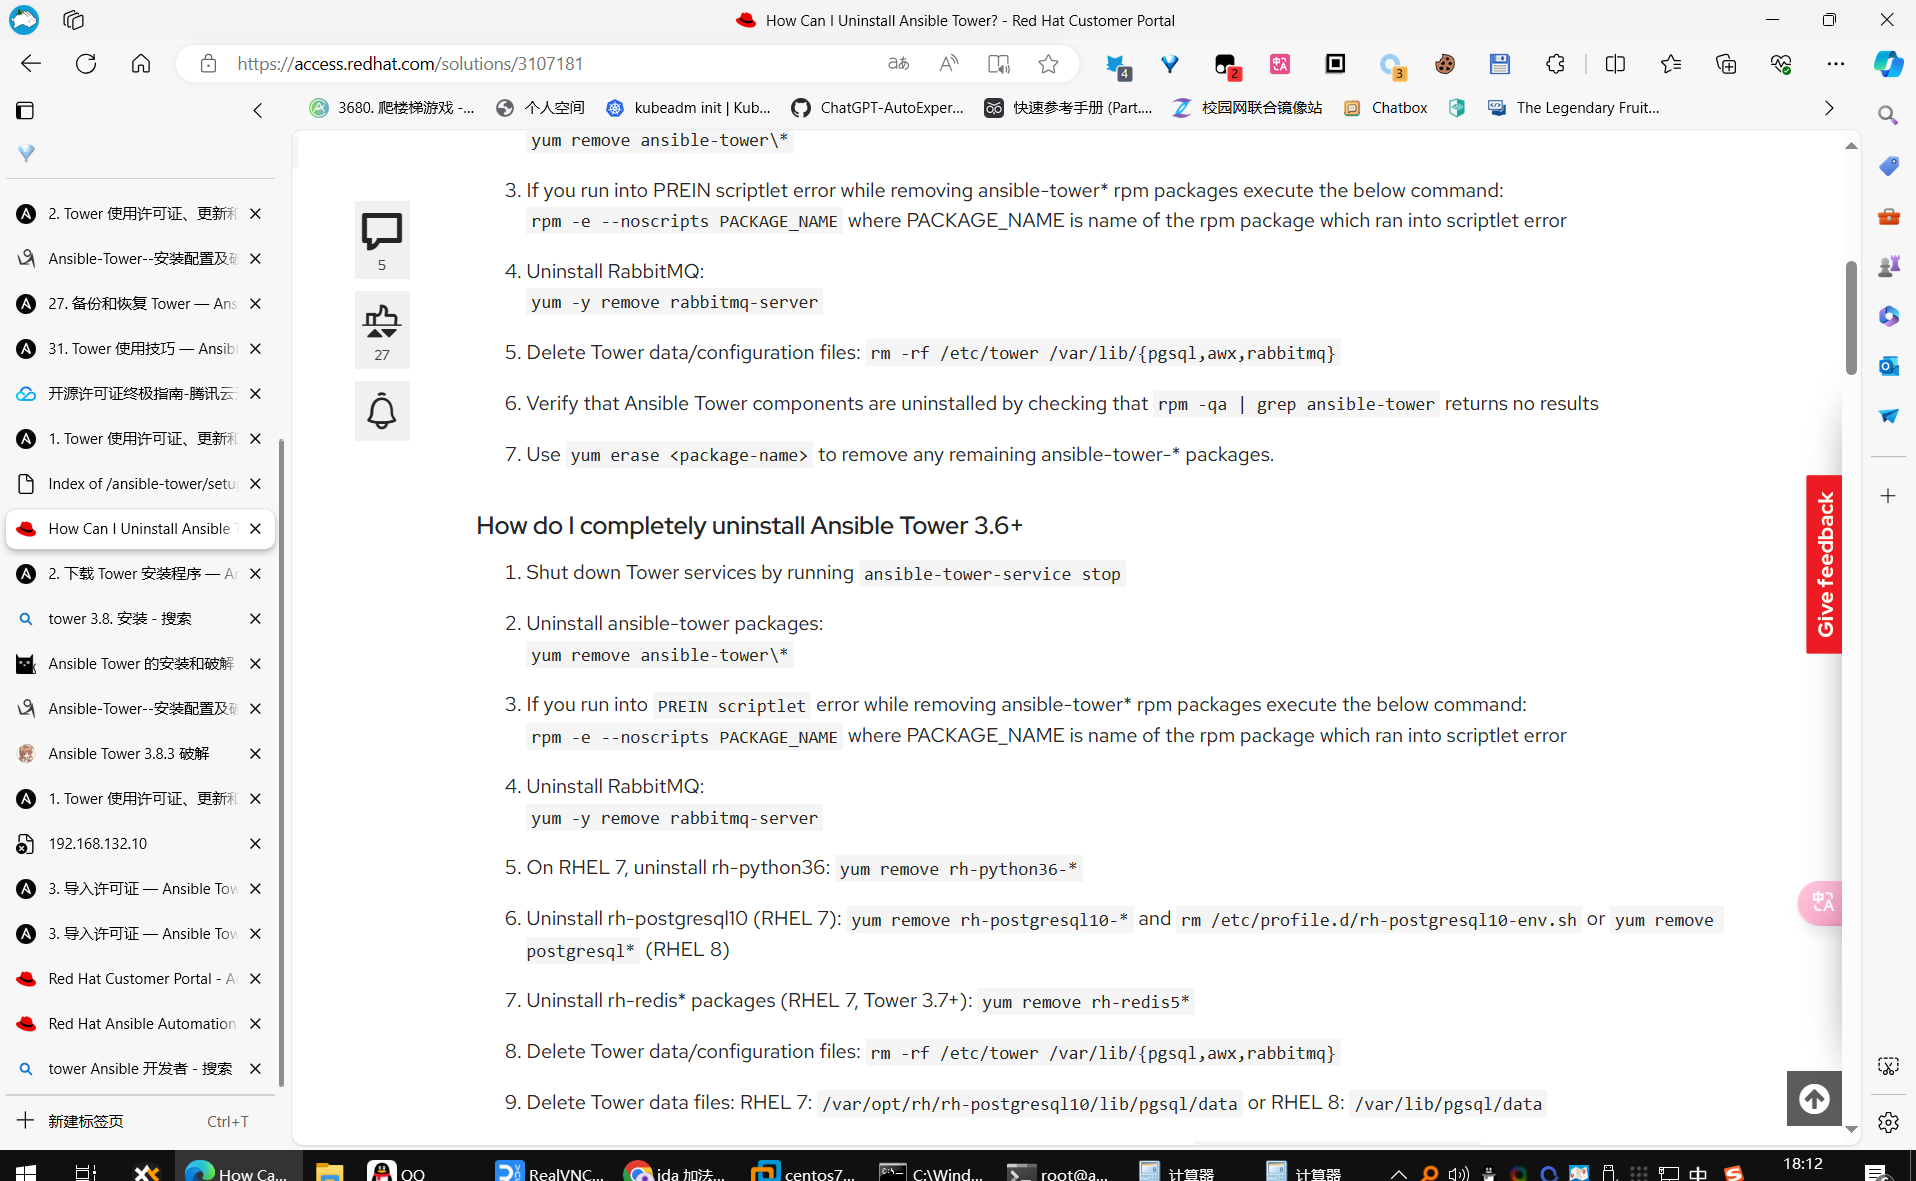
502 卸载重新装个 3.8.3 的
呜呜呜 https://www.annda.net/post/ansible-tower-3.8.x-install-and-crack
总算破完了
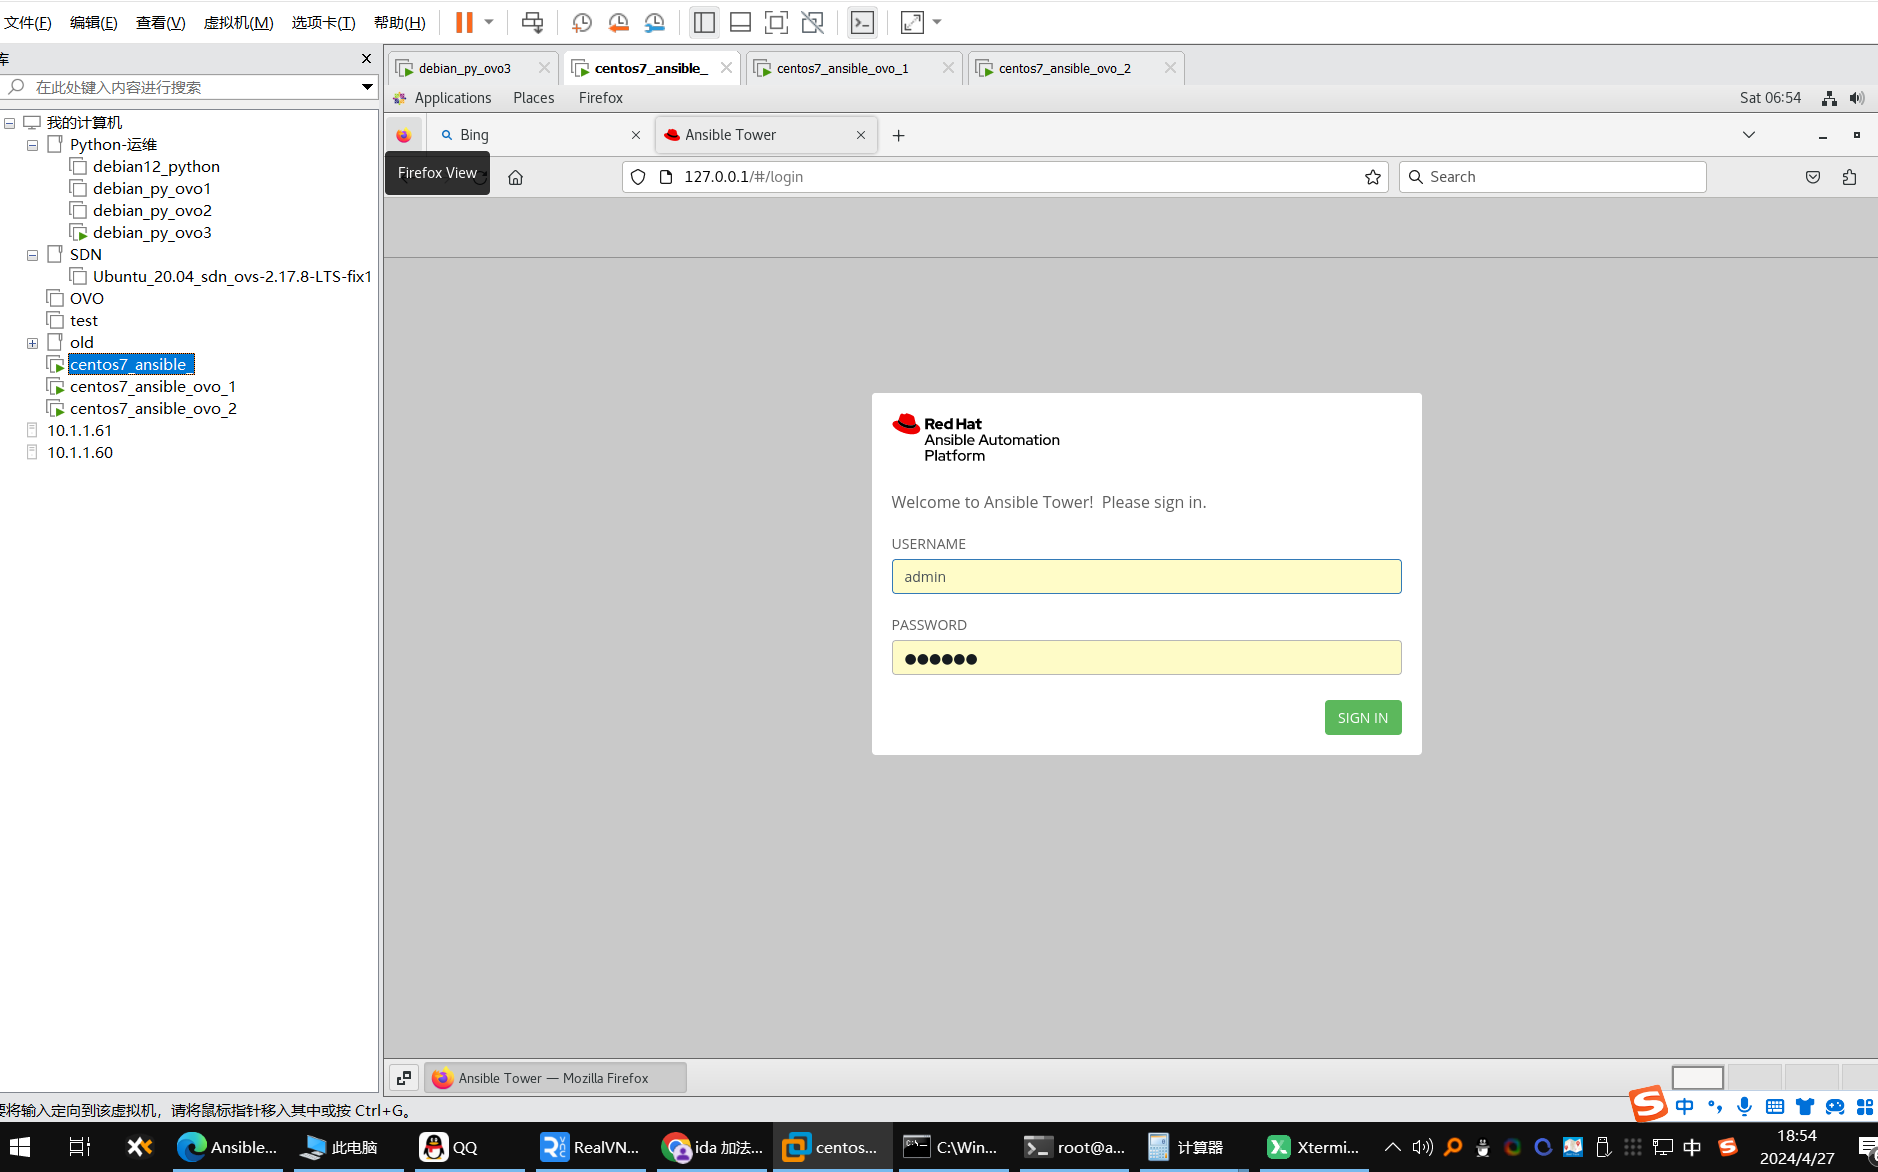
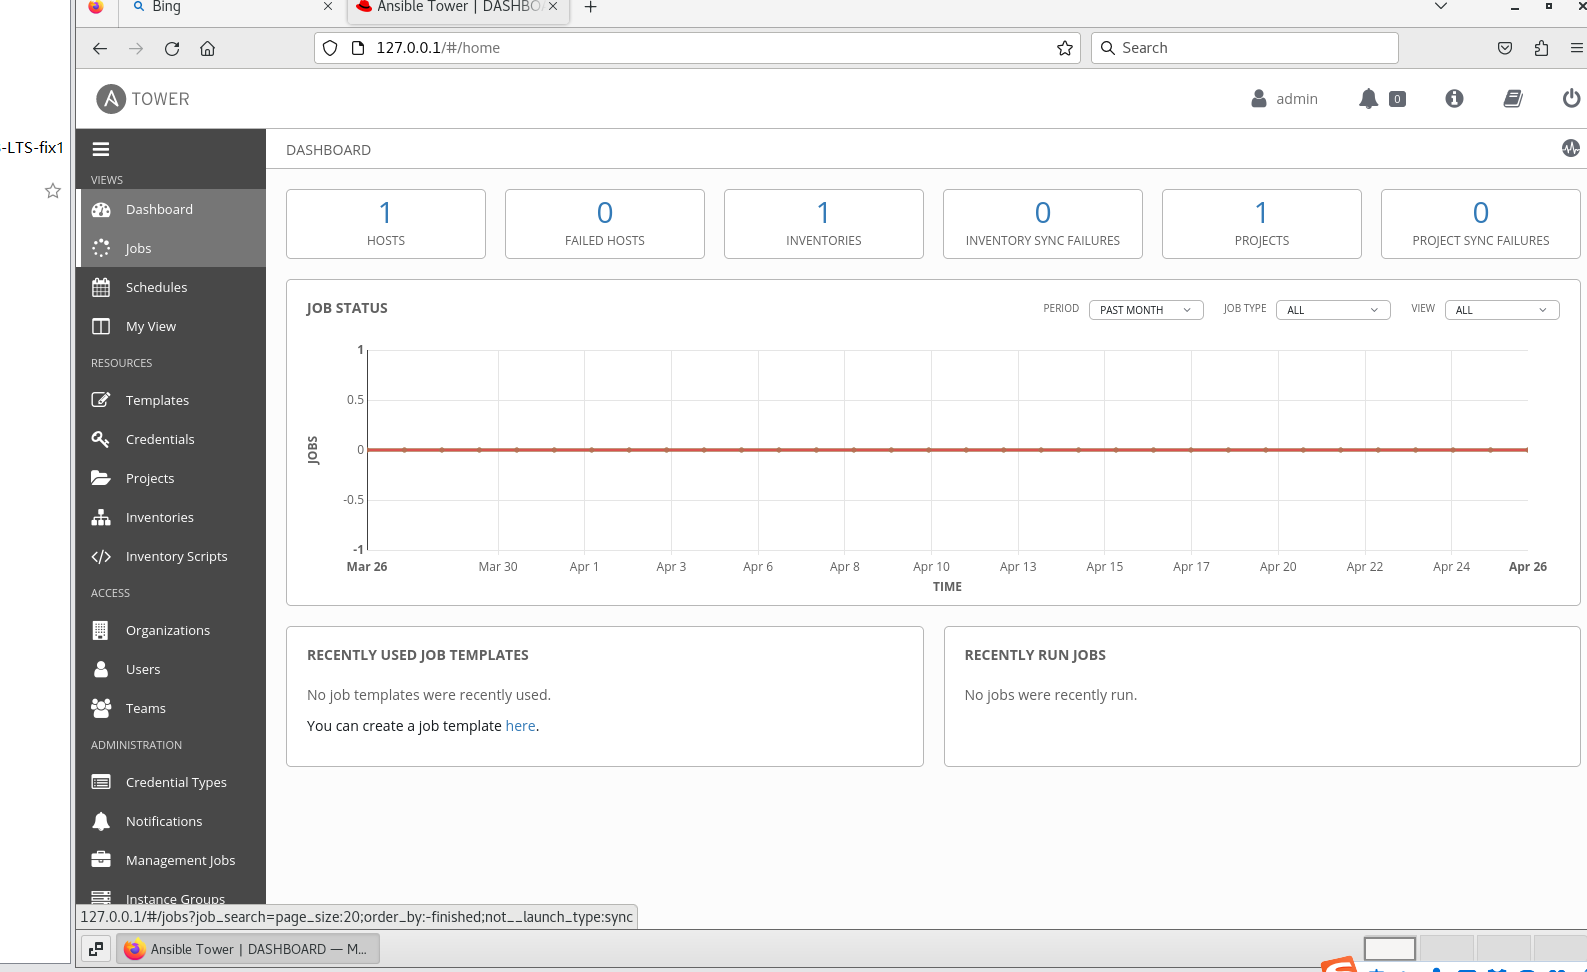
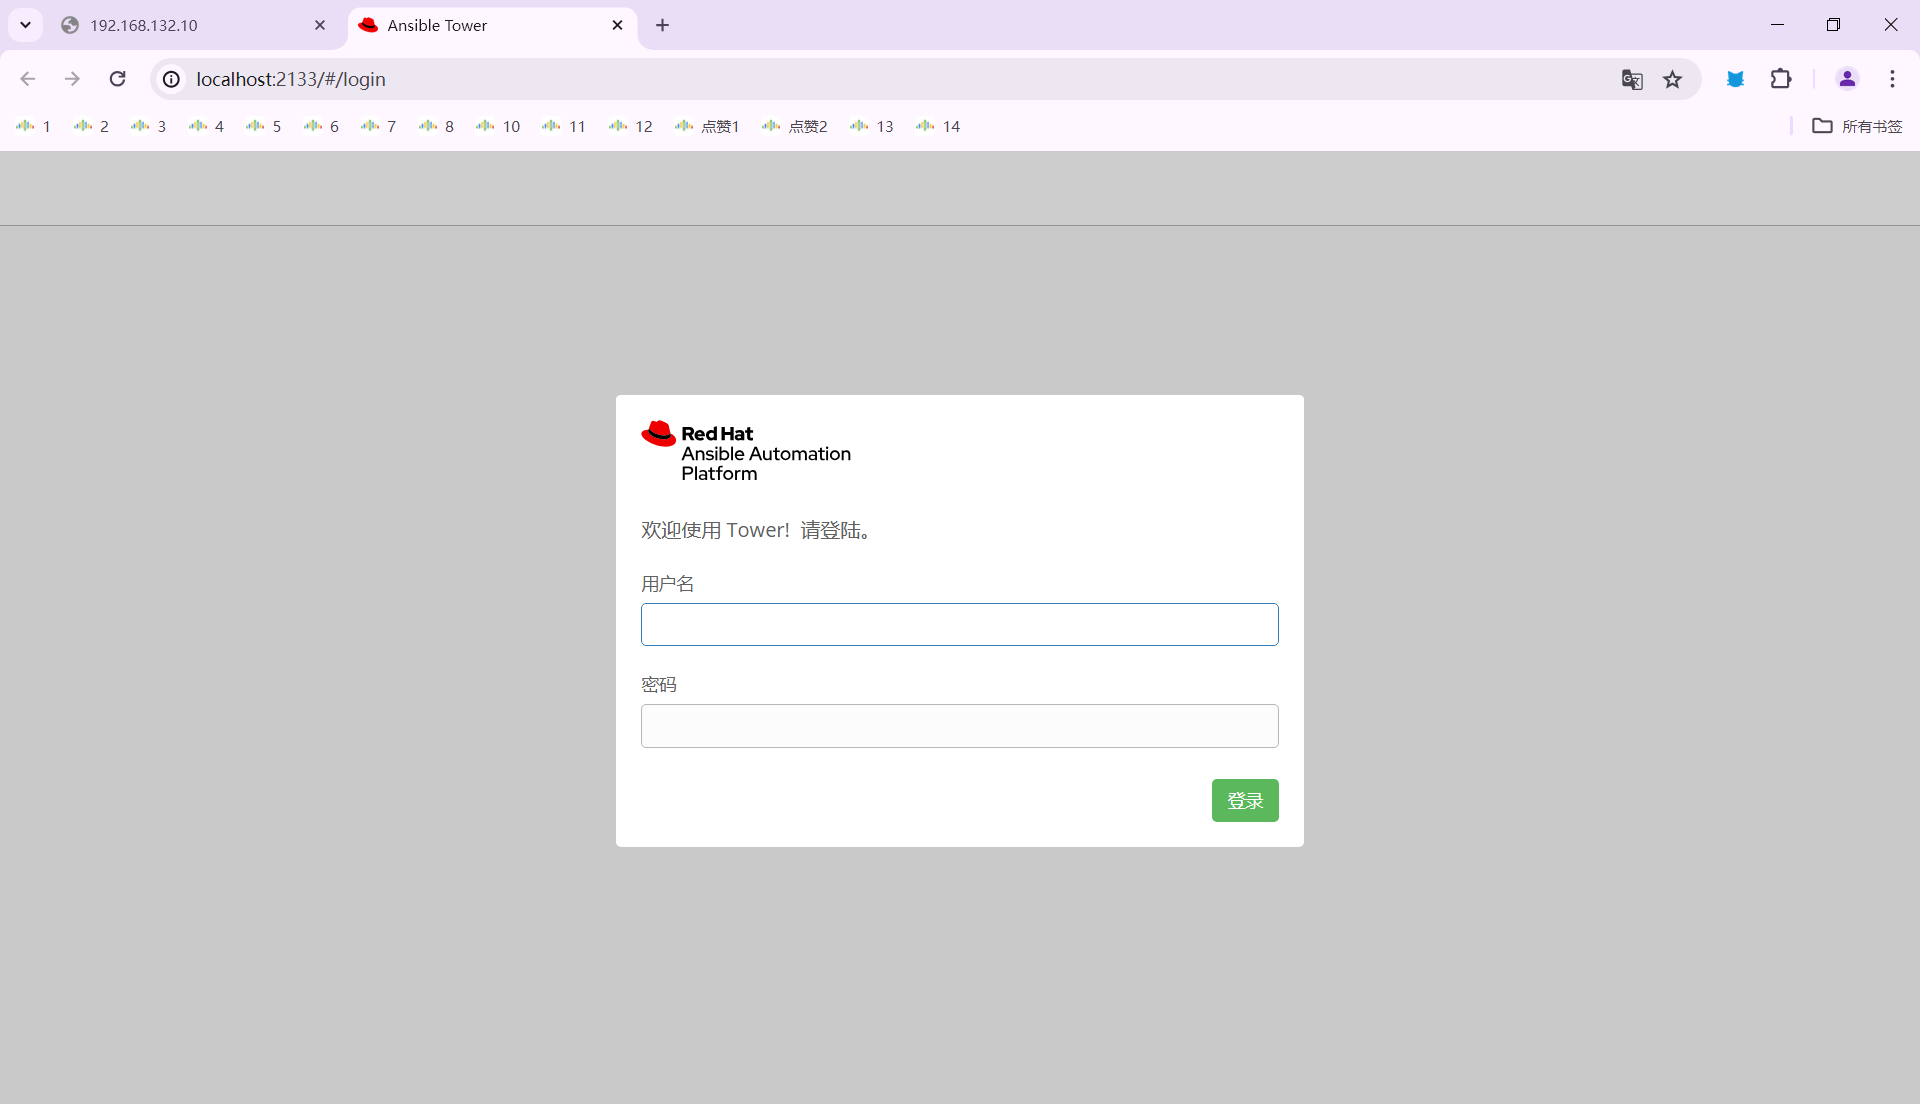
UI
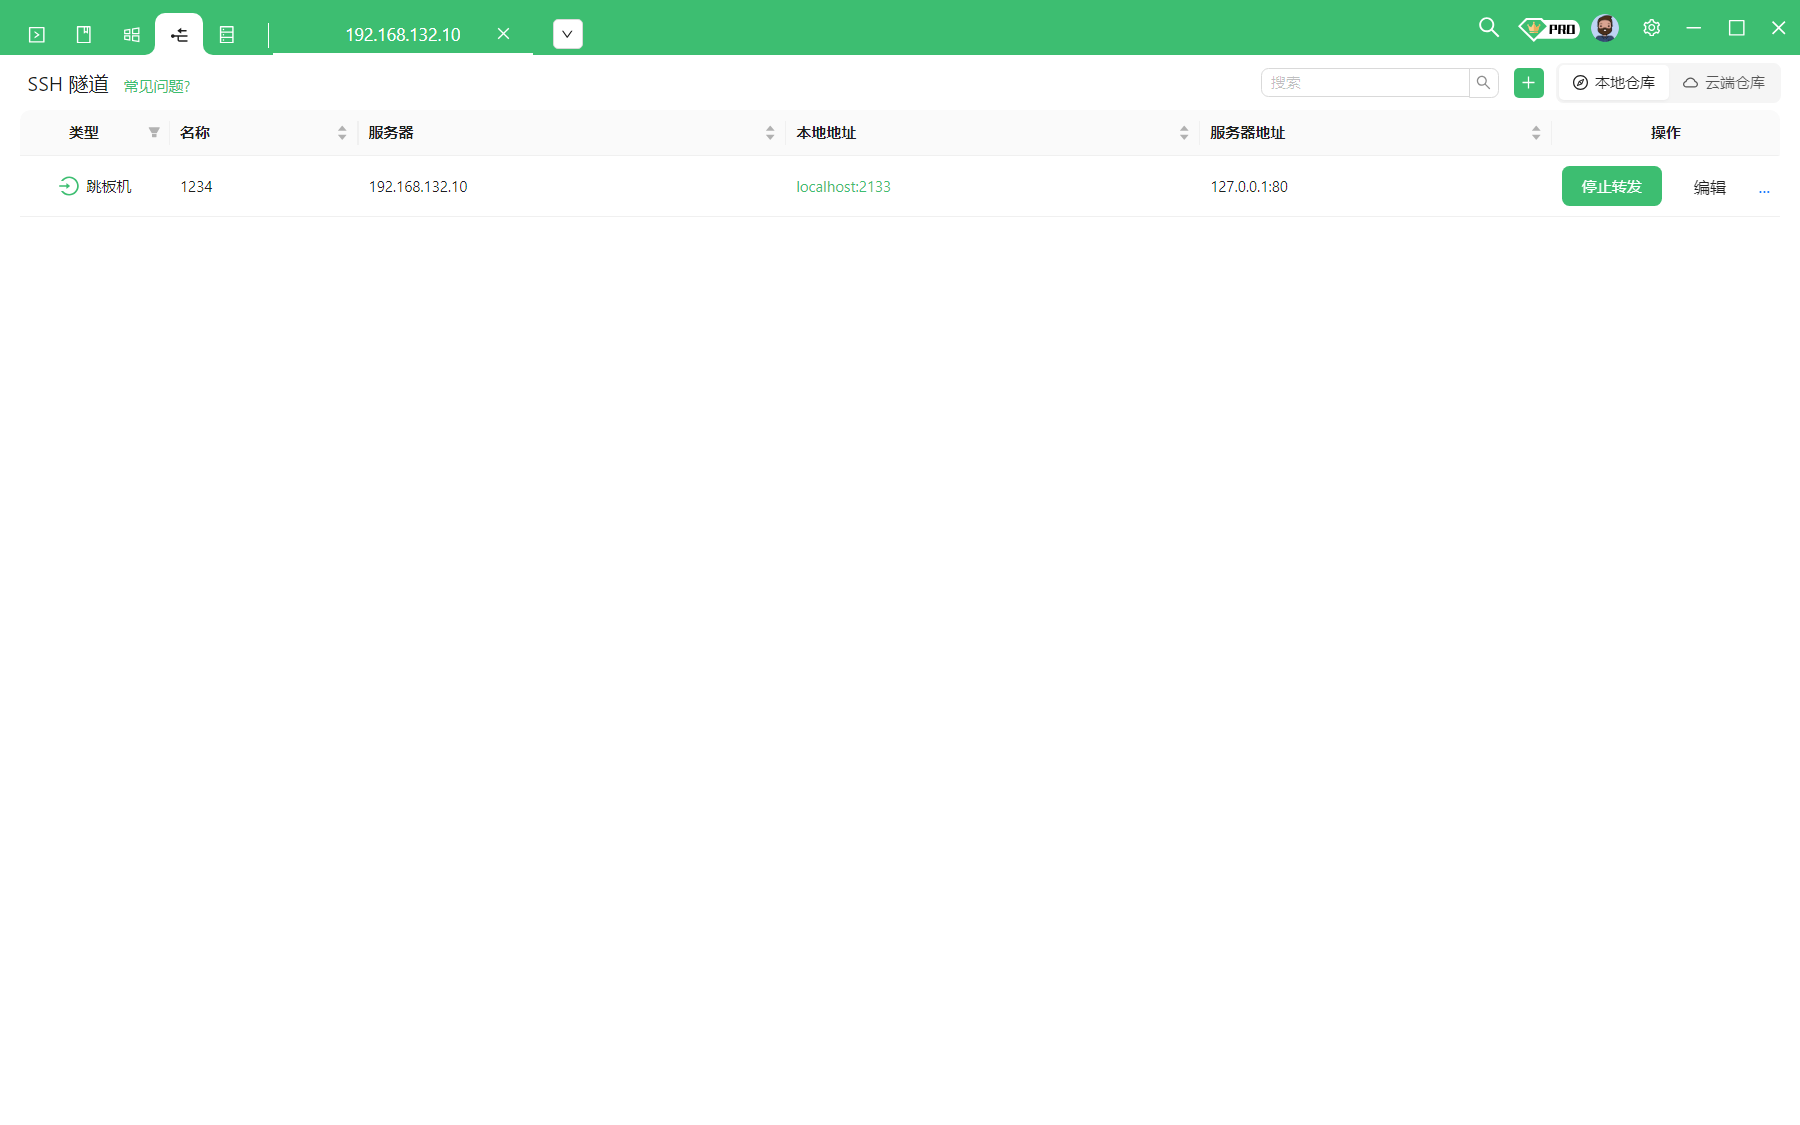
端口转发出来 SSH
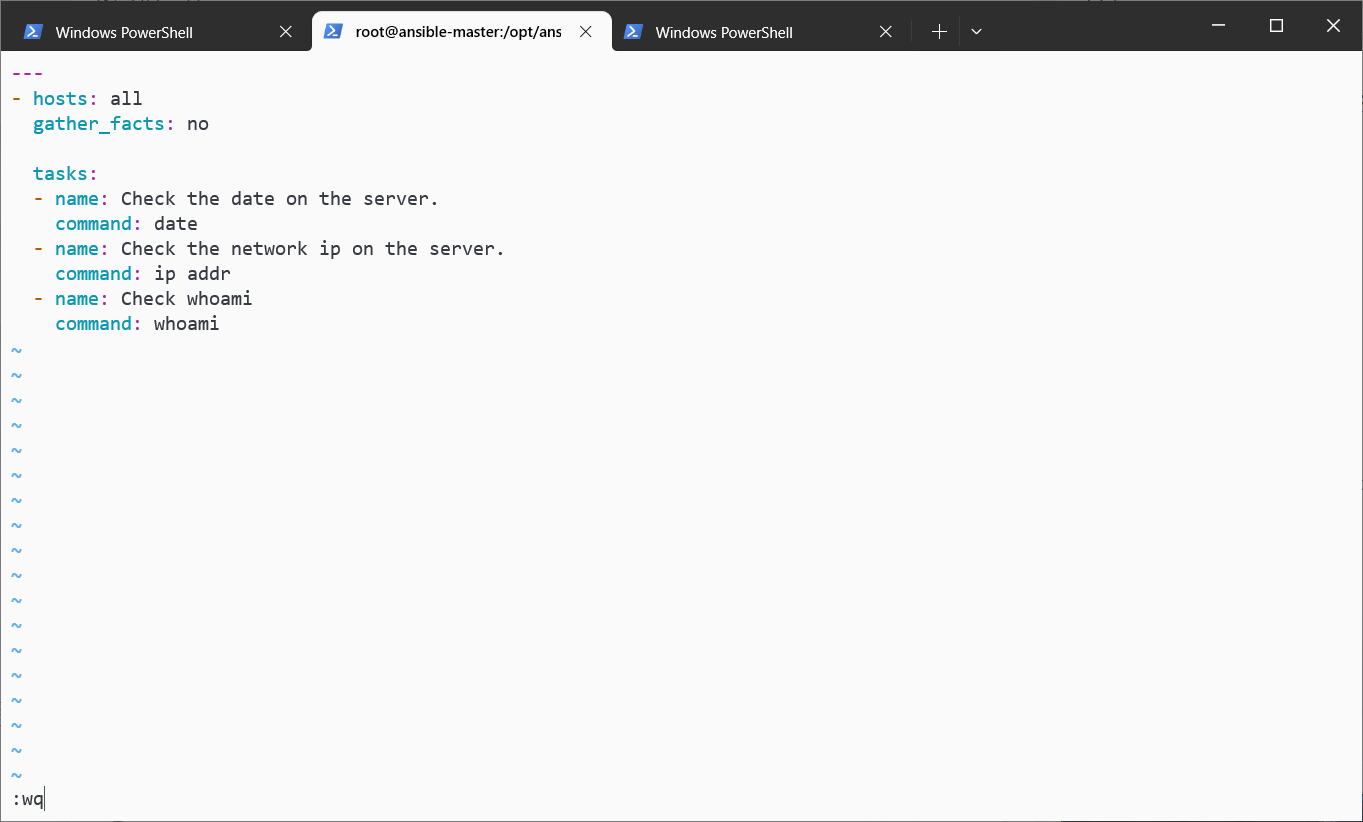
写一个 playbook 1 vim /var/lib/awx/projects/get_time.yaml
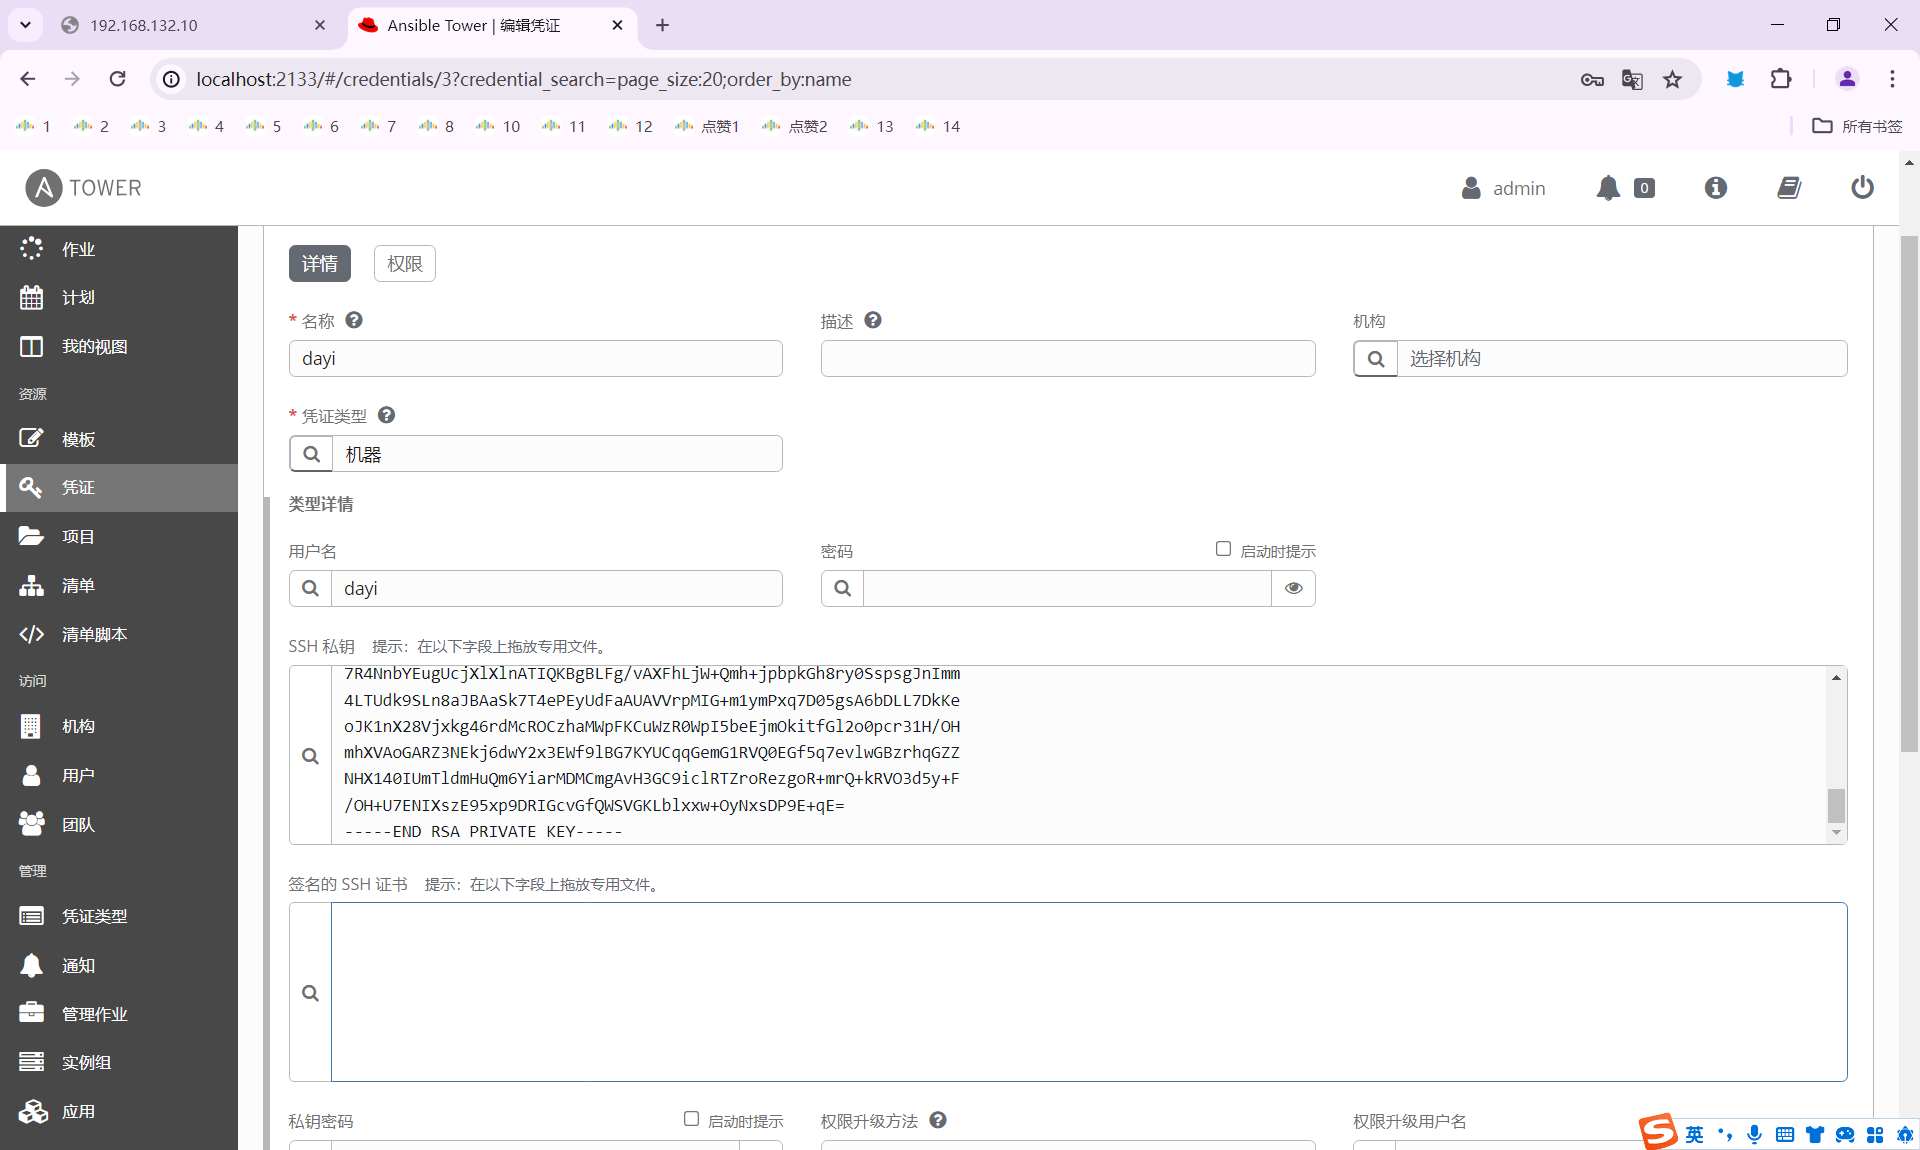
公钥
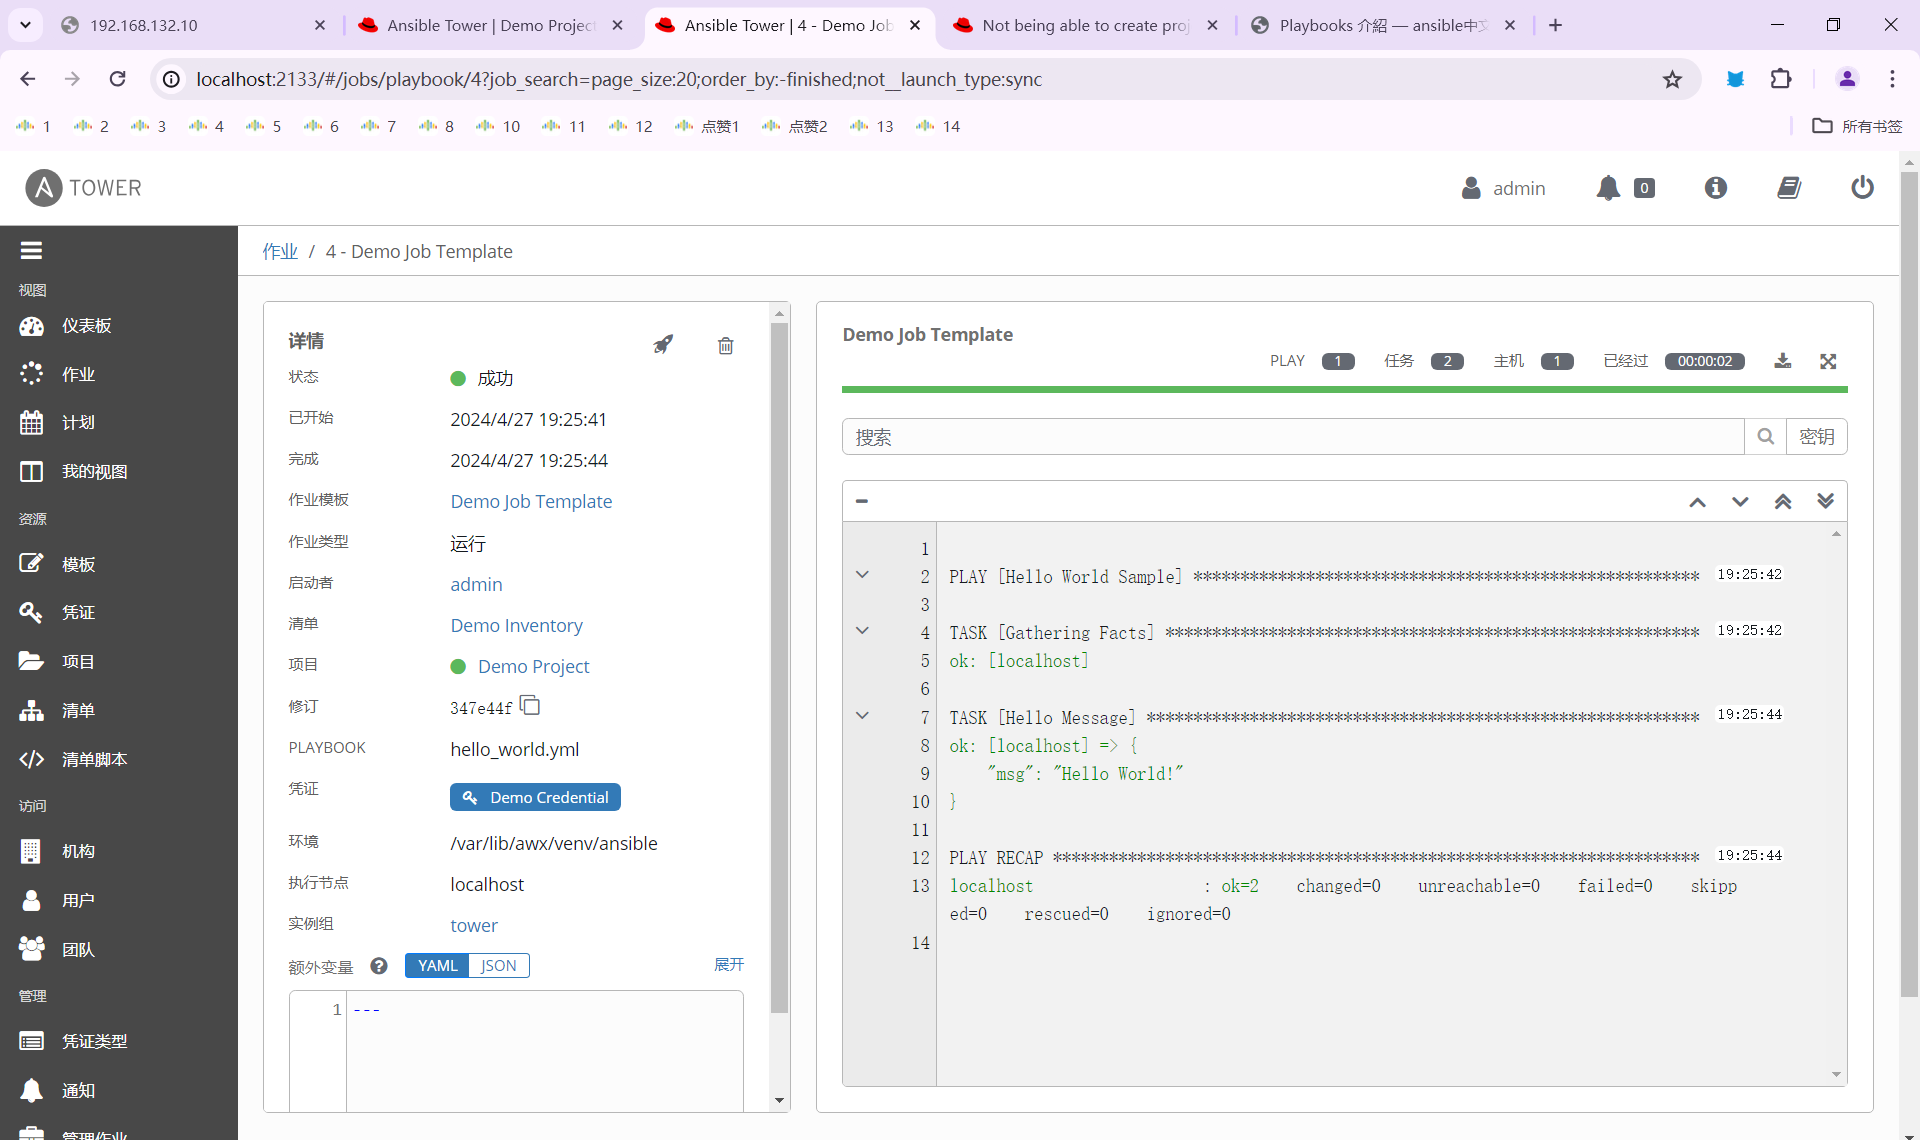
可以执行脚本啦
实训总结 本次 Ansible 实训为期一周,通过理论学习和动手实践,我对 Ansible 自动化运维工具有了全面的认识和掌握。以下是我的收获总结:
一、实训内容
搭建 Ansible 实验环境,创建多台 CentOS 虚拟机,配置 hostname
完善 Ansible 环境,配置 sudo 免密、SSH 免密登录,安装配置 yum 仓库
编写 Ansible 配置文件 ansible.cfg 和主机清单 hosts,测试节点连通性
为多个节点配置本地 yum 仓库,实现从光盘安装软件包
使用 Ansible 临时命令在被控节点上复制文件、创建用户等
编写多个 Ansible Playbook 实现复杂任务编排和自动化
使用 vars 变量、loop 循环、handler 通知等高级 Playbook 特性
实践 Ansible Tower 图形化管理平台的安装、破解和基本使用
二、实训体会 通过本次 Ansible 实训,我深刻体会到自动化运维工具给系统管理带来的高效和便利。传统的人工登录到每台服务器逐个操作的方式,已经无法满足当前动辄上百台服务器规模的运维需求。而 Ansible 不需要编译,不需要启动服务,只需要在控制节点上写好 yml 剧本,就可以快速地在成百上千台机器上执行任务,大大提高了运维效率。
Ansible 的另一个优势是它提供了丰富的模块,涵盖了运维过程中绝大部分操作。比如 yum、service、copy、user 等模块,让系统配置变得非常简单。而 register、when、loop 等语句则让剧本的逻辑控制更加灵活多变。总之 Ansible 简单易学但功能强大,是自动化运维领域的首选利器。
三、不足和改进 本次实训时间较短,对 Ansible 的学习还不够全面深入。比如 role、template 等特性还没来得及实践,对 Ansible Tower 的使用也比较浅显。未来我还需要在实际工作中多多使用 Ansible,并研读官方文档,不断积累经验,把 Ansible 的高级特性学以致用,写出更加健壮高效的 Playbook。
对于破解 Ansible Tower 一事,作为一名学生出于学习目的尚可接受,但工作中还是应该使用正版软件,维护知识产权,这也是一名工程师应有的职业操守。
四、总结 Ansible 实训让我明白,在云计算时代,自动化运维的重要性愈发凸显。Ansible、Puppet 等自动化运维工具的掌握和应用能力,已成为运维工程师的核心竞争力之一。感谢学校开设了 Ansible 实训课程,让我能与时俱进,掌握这一抢手技能。我将以此为契机,在今后的学习和工作中,继续深耕自动化运维领域,早日成长为一名优秀的运维工程师。
在线链接: 1.dayi的小键盘 https://type.dayiyi.top/index.php/archives/328/
2.cmd.dayi https://cmd.dayi.ink/sUPF6_zfR-imTz3D2O7PeQ
3.dayi的大键盘 https://blog.dayi.ink/?p=175
4.本文(doc文件,含本文新内容)专链接:
https://ovo.dayi.ink/2024/04/27/%E7%BD%91%E7%BB%9C%E7%AE%A1%E7%90%86%E4%B8%8E%E7%BB%B4%E6%8A%A4%E7%BB%BC%E5%90%88%E5%AE%9E%E8%AE%AD/
5.本文因文件过大无法正常上传到校友邦,原始文件下载:
1.链接1(腾讯云HK):https://pic.icee.top/blog/pic_bed/sharex/_pn-2024-04-27-23-25-22_Crocodile_Farflung_Lined.rar
2.链接2(cloudflare):https://p.dabbit.net/blog/pic_bed/sharex/_pn-2024-04-27-23-25-22_Crocodile_Farflung_Lined.rar
3.蓝奏云(推荐):https://wwl.lanzoum.com/b00rmzgt1c 密码:6w9w